
Video previews have become a standard feature on most media platforms and applications. YouTube provides a perfect example where a user is presented with a video preview when the mouse pointer hovers over the thumbnail.
A thumbnail is an image preview of the actual video, as shown in the image below:
This post discusses creating video thumbnail previews on hover using Cloudinary and NextJS. At the end of this tutorial, we’ll learn how to use Cloudinary’s video functionality in a website to create a preview on the hover feature and add videos to our pages.
We completed this project in a CodeSandbox, and you can fork it to run the code.
GitHub link here.
Before we start, make sure you have:
- A Cloudinary account. Create a free account here.
- Knowledge of React.js and NextjS.
- NodeJS version 12+.
To create a NextJS application, run the terminal command below:
npx creat-next-app thumbnail-preview && cd thumbnail-preview
To confirm that NextJS installed successfully, start a local development server in the project’s directory using the command:
npm run dev
The local development server for NextJS runs on port 3000, i.e., localhost:3000 on a web browser.
We’ll use Bootstrap CSS to style the app’s pages, as it provides ready-to-use CSS classes. To install Bootstrap, we’ll run the command:
npm install bootstrap
After installation, we’ll import Bootstrap into our project by adding the following line at the top of pages/_app.js.
import 'bootstrap/dist/css/bootstrap.css'
Code language: JavaScript (javascript)After signing in to Cloudinary, navigate to the Media Library to upload videos.
The quickest way to upload videos to Cloudinary is by dragging and dropping the file to the Media Library Dashboard. The other way is by using the upload button on the top right of the webpage.
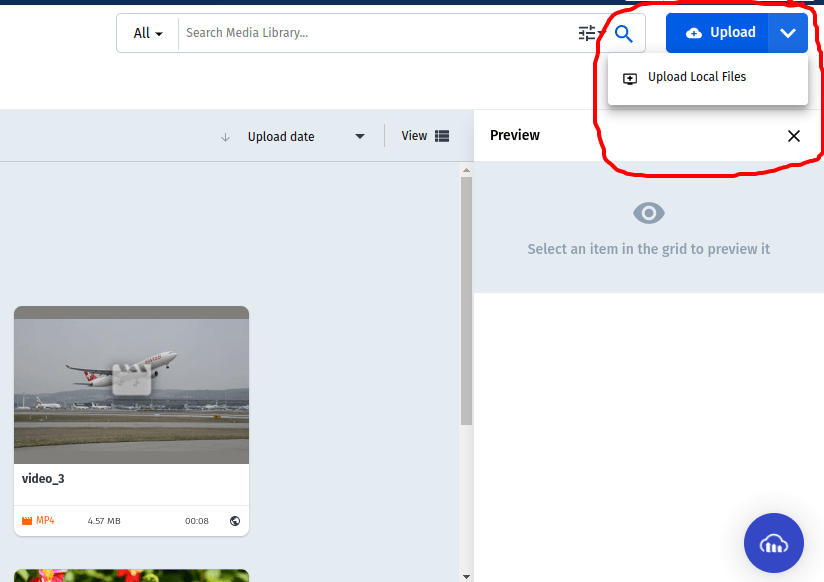
After the video is uploaded, use the link icon on the top right of the video card to copy its URL.
In the Home component of pages/index.js, we’ll create an array with the video URLs and their titles.
const Home = () => {
        const media_urls = [
        {
          id: 1,
          title: 'Video One',
          video_url:
            'https://res.cloudinary.com/chris101/video/upload/v1645684691/video_1.mp4',
        },
        {
          id: 2,
          title: 'Video Two',
          video_url:
            'https://res.cloudinary.com/chris101/video/upload/v1645684672/video_2.mp4',
        },
        {
          id: 3,
          title: 'Video Three',
          video_url:
            'https://res.cloudinary.com/chris101/video/upload/v1645684663/video_3.mp4',
        },
      ]
      return (
        <>
          <h1 className='text-center'>Cloudinary Video Show</h1>
          <div className='container'>
            <div className='row'>
              <div className='container'>
              </div>
            </div>
          </div>
        </>
      )
    }
    export default Home
Code language: JavaScript (javascript)
We’ll render each video using the native HTML video element.
<video width='320' height='240' controls>
  <source src={media.video_url} type='video/mp4' />
</video>
Code language: HTML, XML (xml)
In the Home component, we’ll loop through the array with video info and render each video.
    const Home = () => {
      const media_urls = [
        // media URLs here
      ]
      return (
        <>
          <h1 className='text-center'>Cloudinary Video Show</h1>
          <div className='container'>
            <div className='row'>
              <div className='container'>
                {media_urls.map((media) => (
                  <div key={media.id} className='col-lg-4 col-md-4'>
                    <h1>{media.title}</h1>
                    <video width='320' height='240' controls>
                      <source src={media.video_url} type='video/mp4' />
                    </video>
                  </div>
                ))}
              </div>
            </div>
          </div>
        </>
      )
    }
    export default Home
Code language: JavaScript (javascript)
The next step, we’ll create event handlers to trigger a preview on hover over the thumbnails. We’ll use the mouse events.
Next, we’ll use the onMouseEnter and onMouseLeave events. From the react documentation, the events are triggered when a pointer is over the targeted element(onMouseEnter) and immediately the pointer leaves the targeted element(onMouseLeave).
In our home page component, we’ll create two functions to handle the two events:
handleMouseEnter() and handleMouseLeave().
// handle mouse enter
const handleMouseEnter = (e) => {}
// handle mouse leave
const handleMouseLeave = (e) => {}
Code language: JavaScript (javascript)
To start the video preview on hover, we’ll modify the handleMouseEnter() to:
const handleMouseEnter = (e) => {
   const vid = e.target
   vid.muted = true
   vid.play()
}
Code language: JavaScript (javascript)
The above function grabs the <video></video>, and we’ll use one of the element’s built-in events. vid.muted is set to true, which means sound is disabled, and vid.play() starts playing the video.
To stop the video playback and return it to its original state, we modify the handleMouseLeave() function to:
  const handleMouseLeave = (e) => {
    const vid = e.target
    vid.muted = false
    vid.currentTime = 0
    vid.pause()
  }
Code language: JavaScript (javascript)We’ll need to trigger the two mouse events,onMouseEnter and onMouseLeave, to enable the preview. Modify the video element to:
  <video
    width='320'
    height='240'
    controls
    onMouseEnter={handleMouseEnter}
    onMouseLeave={handleMouseLeave}
  >
    <source src={media.video_url} type='video/mp4' />
  </video>
Code language: HTML, XML (xml)
The complete code in the Home component is shown below:
https://gist.github.com/Chuloo/115717b9474676deff93e54f236caf70
https://gist.github.com/Chuloo/115717b9474676deff93e54f236caf70
https://www.dropbox.com/s/zdi1nn58f787foi/localhost_3000%20%281%29.mp4?dl=0
We walked through uploading video files to our Cloudinary account, rendered the videos on a web page, and finally implemented an autoplay preview when hovering on the video.
Want to discuss this tutorial? Join us in the Cloudinary Community Discord server.
