
Many websites and mobile apps today allow their visitors to share their own photos. Users upload their profile images to dating sites, photos of their personal belongings to second hand market websites and real estate billboards. Users share their personal photos on social networks, and upload images to their favorite eCommerce websites, showcasing and reviewing their latest purchases.
It’s sometimes quite important to moderate these images. You might want to keep out offensive content. You may want to actively reject images that do not answer your website’s needs, for example, make sure there are visible faces in profile images, or that only photos of your brand appear on a shared marketing campaign. You may also want to make sure that photos are of high enough quality before making them available on your website.
In addition to image moderation, it’s crucial to consider the moderation of other user-generated content, such as text in comments or chat interfaces. Chat moderation involves overseeing and managing online conversations to ensure they align with established guidelines and standards. This can be especially important in live interaction scenarios, where a moderation interface can allow a speaker or moderator to view requests to ask questions and grant the floor to remote participants in real-time.
While image moderation can be very important, from the developer’s perspective, implementing such a flow can be very time consuming.
To eliminate all the hassle from implementing your own image moderation solution, we’ve built a complete image moderation solution into Cloudinary’s cloud-based image management service.
Besides, a comprehensive content moderation tool is necessary for platforms that require moderation of diverse content types, including social media posts. This involves controlling the desired content on online platforms like social media networking sites, ensuring it adheres to community guidelines and terms of service. A good moderation interface for such platforms would allow for adding new words and variations, moderating messages that were flagged, and building automations for more efficient content management.

You can start using Cloudinary’s image moderation in minutes, with a straightforward integration.
Cloudinary is an end-to-end cloud-based image management solution. To start moderating your images with Cloudinary, start by tagging them as “requiring moderation” during upload. Your moderators will then be able to view all the images that require moderation, and accept or reject them, in our online interface.
To upload images to Cloudinary, use the server-side upload API call, or allow users to upload the images directly from their browser using our jQuery plugin.
In the upload call, set the moderation parameter to manual. This tells Cloudinary to mark this image as pending manual moderation.
Check out the simple upload code below in Ruby, PHP, Node.js, Python and Java.
The response includes all image details and URLs by which you can deliver the image to your users, including the moderation status:
{
  "public_id": "zutqljpun3qc37asxbgi",`
  "version": 1398848882,
  "url":
    "https://.../image/upload/v1398848882/zutqljpun3qc37asxbgi.jpg",
  "moderation": [{"status": "pending", "kind": "manual"}],
    …
}
Code language: PHP (php)Images that are uploaded to Cloudinary, and tagged for manual moderation, can be viewed by moderators using Cloudinary’s Media Library. Moderators can browse recently uploaded images and decide to accept or reject them.
You can use Cloudinary’s user management capabilities to define multiple moderator users that can access only the image moderation console, and do not have access to other Cloudinary features such as image transformations, reports, etc.

In this scenario, a social web app asked that users upload a front-facing photo of themselves. While all the images might seem valid at first glance, a moderator might opt to reject some of them.
The first photo shows two people, however the social app specified a photo of a single person, so the image would be rejected.
The second and fourth photos show a front-facing person. The moderator should decide, based on site policy, whether both the close-up and the longer distance photo should be approved.
The third photo shows a front facing person, however there is an offensive symbol on the person’s T-shirt, which would cause it to be rejected. The fifth photo would also be rejected, as it is too blurry.
Rejecting and approving pending images can be done simply by hovering over a thumbnail in the media library, and clicking on the Reject (red) or Approve (green) button. Moderators can also click on an image to view further details, see a larger view and approve / reject the image in expanded mode.
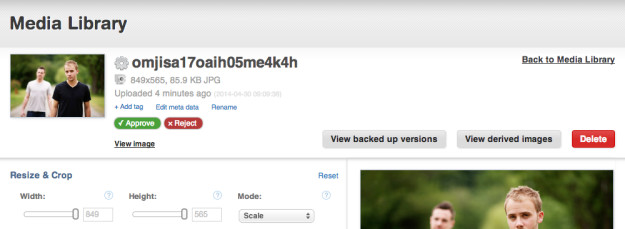
The list of approved images can be viewed from the same web interface, and moderators can change their minds at any time, and choose to reject a previously-approved image. Note that it can take up to ten minutes for cached copies to be updated.

Rejected images are still saved in your cloud-based media library, using Cloudinary’s backup repository. Only the moderator can access and view the original uploaded images. If the moderator changes his mind, the originally rejected images will be recovered from backup and made available for delivery on your site.


You can add a notification_url parameter while uploading the image, which instructs Cloudinary to notify your application of changes to moderation status, at this point your application will receive a notification with the details of the moderation event (approval or rejection).
When an image is rejected, you can use Cloudinary’s default image mechanism to display a placeholder image instead.
The default_image parameter (or d for URLs) allows you to specify a placeholder image to display, in case an image was rejected by your moderator.
The following sample code creates a 150×150 face-detection-based thumbnail of the uploaded images, then rounds the corner of the photos and increases color saturation. This is all done on-the-fly using Cloudinary’s image transformation feature. The example below also specified an alternative image to show if the original has been actively rejected.


Does moderation need to occur before an image is published on the site, or can the image be published and visible in the meantime? The answer will determine your moderation workflow.
Post-publishing moderation is easier to implement, but can sometimes result in users seeing inappropriate or even problematic images until they are moderated.
Pre-publishing moderation is safer, but comes at the cost of users having to wait for their images to appear, and a higher cost of manpower, because moderation needs to happen urgently as images are uploaded.
With Cloudinary, you can choose the workflow that is most appropriate to your website.
To implement pre-publishing moderation, it is recommended to use Cloudinary’s randomly-generated public IDs. As you can see in the response code above, Cloudinary returns a long URL with a random ID which is difficult to guess. This URL is publically-accessible, and you can use it to show the uploaded image to the user who uploaded the photo.
As for other visitors of your site, you can simply code your backend so it doesn’t display an image until it is set as “moderated”, and they won’t stumble upon it accidentally due to the long ‘unguessable’ URL.
If you want to completely hide images while they are under moderation, you can use our private images feature, detailed in this blog post.
To implement post-publishing moderation, you can simply take the publically-available URL returned by Cloudinary (or specify a more friendly URL) and display the image on the relevant page of your site.
When your moderators rejects and image, you’ll be able to catch this event and handle it accordingly.
Do you want to build your own image moderation interface, or already have one in place? You can use Cloudinary’s Admin API to easily integrate your custom interface with Cloudinary’s image upload, storage, CDN and moderation workflow.
The following sample code calls Cloudinary’s Admin API for listing all pending images waiting for manual moderation:
Here’s a sample output result:
    {"resources"=>
     [{
       "public_id"=>"omjisa17oaih05me4k4h", "format"=>"jpg",
       "version"=>1398848978,
       "resource_type"=>"image", "type"=>"upload",
       "created_at"=>"2014-04-30T09:09:38Z",
       "bytes"=>87932, "width"=>849, "height"=>565, "backup"=>true,
       "url"=>"https://.../image/upload/v1398848978/omjisa17oaih05me4k4h.jpg",
       "secure_url"=>"https://.../image/upload/v1398848978/omjisa17oaih05me4k4h.jpg"
      },
     {
       "public_id"=>"j6ayuxwr76qwvyjioq7b", "format"=>"jpg",
       "version"=>1398848970,
       "resource_type"=>"image", "type"=>"upload",
       "created_at"=>"2014-04-30T09:09:30Z",
       "bytes"=>43214, "width"=>390, "height"=>500, "backup"=>true,
       "url"=>"https://.../image/upload/v1398848970/j6ayuxwr76qwvyjioq7b.jpg",
       "secure_url"=>"https://.../image/upload/v1398848970/j6ayuxwr76qwvyjioq7b.jpg"
      },
      ...
    ]}
Code language: PHP (php)
You can then use the Admin’s API update method to approve or reject images. The following sample code shows an approval request of a pending image with ID j6ayuxwr76qwvyjioq7b:
Cloudinary::Api.update("j6ayuxwr76qwvyjioq7b", :moderation_status => "approved")
Code language: JavaScript (javascript)
Same goes for the rejection of pending images:
Cloudinary::Api.update("uznjsi2nzcbwqzacym7c", :moderation_status => "rejected")
Code language: JavaScript (javascript)
A notification callback (HTTP post) will be sent to your web application for each approval or rejection event, if you specified the notification_url while uploading images using the API.
You can also use the API to list images that were approved or rejected. The output of these methods has the same format as the pending queue listing shown above. You can allow moderators to revisit their decision regarding the approved or rejected images, and you can call the update method again for the same images, based on their public_id value, to change their moderation status.
The following sample code shows how to list approved and rejected images:
approved_list = Cloudinary::Api.resources_by_moderation("manual", "approved")

rejected_list = Cloudinary::Api.resources_by_moderation("manual", "rejected")
Code language: PHP (php)Moderation of user contributed content can be critical for modern websites and mobile applications. Cloudinary’s image management solution makes it easy to implement an image moderation workflow on your service, while optimizing storage and delivery of images, and enabling easy on-the-fly transformation of images as well. We also showed how Cloudinary’s powerful Admin API can be used to create a custom image moderation interface.
In this post we covered manual moderation by trained staff, which can ensure almost 100% accuracy, but might be time consuming. Cloudinary also supports automatic image moderation – stay tuned for an upcoming blog post discussing this feature.
The image moderation features discussed in this post, including the user interface and all API methods, are available for all Cloudinary plans, including the free tier. Try it out now by creating a free account. If you have any feedback or ideas on our manual image moderation, you’re most welcome to contact us, or add a comment at the bottom of this post.