JPEG images are either progressive or nonprogressive, depending on their encoding order, not politics.
Encoding of and decoding of nonprogressive occurs in this simple order: from top to bottom and from left to right. Consequently, when a nonprogressive JPEG is loading on a slow connection, you see the image’s top part first, followed by the other parts as loading progresses.
On the other hand, because progressive JPEGs are encoded differently, when they load, you see a blurry version, which gradually becomes sharper as the bytes arrive.
The encoding process of a progressive JPEG is what makes it unique. When saving an image as a progressive JPEG, this can be done easily through image editing software by selecting the option “Save as progressive JPEG” in the save dialog. This choice influences how the image is processed and displayed during loading.
Here is the same JPEG, the left version nonprogressive and the right one progressive, decoded in slow motion:
In essence, progressive and nonprogressive encodings for JPEGs are two ways in which to optimize images and make them display faster on sluggish connections.
JPEG performs two transformations for lossy compression:
- Convert RGB pixels to YCbCr pixels. Instead of Red, Green, and Blue channels, JPEG works with a luma (Y) channel and two chroma channels (Cb and Cr). Because the human eye is more sensitive to distortion in luma (brightness) than to that in chroma (color), JPEG handles channels separately and, optionally, downsample the chroma channels to half the original resolution—a process called chroma subsampling.
- Do mathematical magic, called Discrete Cosine Transform (DCT), with the pixels. That is, convert every block of 8×8 pixels (64-pixel values) to 64 coefficients, which convey the block’s information in a different way. The first coefficient, called the DC coefficient, is the average pixel value of all the pixels in the block. The other 63 coefficients, called AC coefficients, depict the horizontal and vertical details within the block in the order of low frequency (overall gradients) to high frequency (sharp details).
To further understand how a progressive JPEG image loads, it’s crucial to note the concept of “Scans” in JPEG encoding. During the encoding process, the number of scans determines how many times the image is refined during loading. Each scan adds more detail to the image, starting from a basic, blurry version and progressively enhancing the quality until the full picture is clear.
For human perception, luma and low-frequency signals are more important than chroma and high-frequency signals. Cleverly, JPEG encodes with less precision what we can’t see well anyway, resulting in smaller files. The article Unraveling the JPEG is a brilliant interactive demonstration of how those transformations work. And, as a bonus, they also enable progressive encoding and decoding of JPEGs.
Instead of going through an image block by block, you can encode each block’s coefficients through spectral selection, as nonprogressive JPEGs do, i.e., encode all the DC coefficients first, then some low-frequency AC coefficients and the high-frequency AC coefficients. Alternatively, you can apply successive approximation, i.e., store the most significant bits of the coefficients first and the least significant ones later in the bitstream.
Both spectral selection and successive approximation require that the encoder and decoder traverse the image multiple times. Each iteration is called a scan. Typically, encoding a progressive JPEG takes about 10 scans, which is why, during decoding, an image transitions from being blurry to being sharp after about 10 refinement steps.
One obvious advantage of progressive JPEGs is that they display a full preview while downloading an image on a slow connection. You can see the picture even when only a fraction of the file has been transferred and decide whether to wait for the download to complete. However, some people consider that loading behavior a disadvantage because it’s hard to tell when an image has finished loading. You might form a bad impression of the website because “the photos look blurry” when, in fact, the site is still loading and displaying a progressive preview of the images. More on that point later.
The ability to convert a progressive JPEG to a baseline JPEG adds flexibility in image handling. By opening a progressive JPEG in any image editing program and saving it as a standard JPEG, one can easily switch between these two formats based on the needs of the application or website. This flexibility is particularly useful for designers and web developers.
A less obvious advantage of progressive JPEGs is that they tend to be smaller in size than nonprogressive JPEGs even though the final image looks exactly the same. Because similar DCT coefficients across multiple blocks in progressive JPEGs are encoded together, smaller files result; whereas nonprogressive JPEGs, whose blocks are encoded one by one, weigh more. Oftentimes, the extra compression is only a few percentage points, yet it still saves bandwidth and storage without affecting the image quality.
As for the downsides of progressive JPEGs, first of all, they’re not always smaller. For small images like thumbnails, progressive JPEGs are often a bit larger than nonprogressive JPEGs. For such small image files, progressive rendering delivers no gains.
Additionally, it takes more CPU time to encode and decode progressive JPEGs because the algorithm must go over the image data multiple times, not in one single scan. Plus, the process incurs more memory since all the DCT coefficients must be stored in memory during decoding. In nonprogressive decoding, you need to store only one block of coefficients at a time.
Decoding progressive JPEGs takes about 2.5 times longer than decoding nonprogressive ones. So, despite the fast delivery of a preview, the overall CPU time is significantly longer—whether on a desktop or laptop computer. Actually, progressive or not, JPEG decoding is pretty fast, and memory and processing power are usually abundant. On low-power devices like smartphones, however, decoding does have a slight impact on battery life and load time.
Encoding progressive JPEGs also takes longer by about six to eight times, and it’s harder to do that in hardware. That’s why cameras, even high-end ones, produce nonprogressive JPEGs as a rule.
Encoding JPEGs is not a binary choice between progressive and nonprogressive. You can do something in between.
By default, most progressive JPEG encoders define the segment of the image data in each of the 10 scans with a scan script. Advanced encoders like MozJPEG try out different scripts and pick the one that results in the best compression, which might require fewer or more scans, depending on the image.
You can combine the advantages of progressive and nonprogressive encoding by customizing the scan script. After some experimentation and adoption of a few ideas from an inspiring talk by Tobias Baldauf, Cloudinary came up with the following scan script for encoding progressive JPEGs:
0 1 2: 0 0 0 0;
0: 1 9 0 0;
2: 1 63 0 0 ;
1: 1 63 0 0 ;
0: 10 63 0 0;
The script runs five scans, with each line corresponding to a scan:
- The first scan encodes the DC coefficients of all three channels (0=Y, 1=Cb, and 2=Cr).
- The second scan encodes the first nine AC coefficients of the luma channel.
- The third and fourth scans encode all the AC coefficients of the chroma channels: Cr first because it tends to be more important visually.
- The final, fifth scan contains the remaining 54 AC coefficients of the luma channel.
The scan script leverages spectral selection, not successive approximation, which has a larger negative impact on the decode speed because the same coefficient is revisited multiple times. Also, since the decode time lengthens in proportion to the number of scans, the script runs only five scans.
That’s a good trade-off, a medium-ground or semiprogressive option for nonprogressive and default progressive encoding. A few more details:
- Decode time: almost as fast as nonprogressive encoding. On my laptop, a nonprogressive JPEG decodes at about 215 megapixels per second; a default progressive JPEG, about 110 MP/s; and a semiprogressive JPEG, about 185 MP/s.
- Compression: usually between the result produced by nonprogressive encoding and the default progressive encoding. A few tests on several corpuses of images revealed that a default progressive JPEG was on average 4.5% smaller than a nonprogressive one; a semiprogressive JPEG was 3.2% smaller. In reality, the result depends on the image: semiprogressive JPEGs are sometimes even smaller than default progressive ones, but closer to the size of nonprogressive JPEGs.
- Progressive rendering: almost the same as default progressive encoding. The only difference is that progressing rendering takes fewer refinement steps, which is not necessarily a negative outcome, as explained later in this post.
Here is a comparison of an image encoded with MozJPEG as a nonprogressive JPEG (on the left), a default progressive JPEG (in the center), and a semiprogressive JPEG (on the right):
In this example, the nonprogressive JPEG is 283 KB; the default progressive JPEG, 271 KB; and the semiprogressive, 280 KB. Note that since the default progressive JPEG takes more refinement steps to process, it delivers a high-quality preview faster than the semiprogressive JPEG.
However, the gain in compression comes at a price:
- First, the default progressive JPEG takes longer to decode. On my laptop, the nonprogressive JPEG decodes in 8.2 ms., the semiprogressive JPEG, 11.9 ms; and the default progressive JPEG, 18.4 ms. Obviously, that’s not the main reason for slow page loads, but it does affect the speed.
- Second, the default way of progressive encoding takes longer. That’s usually not an issue unless you’re generating images on demand to avoid latency.
- A potentially bigger problem is that the first few progressive scans result in a weird-looking default progressive JPEG—at least with the image below, which was encoded with MozJPEG.
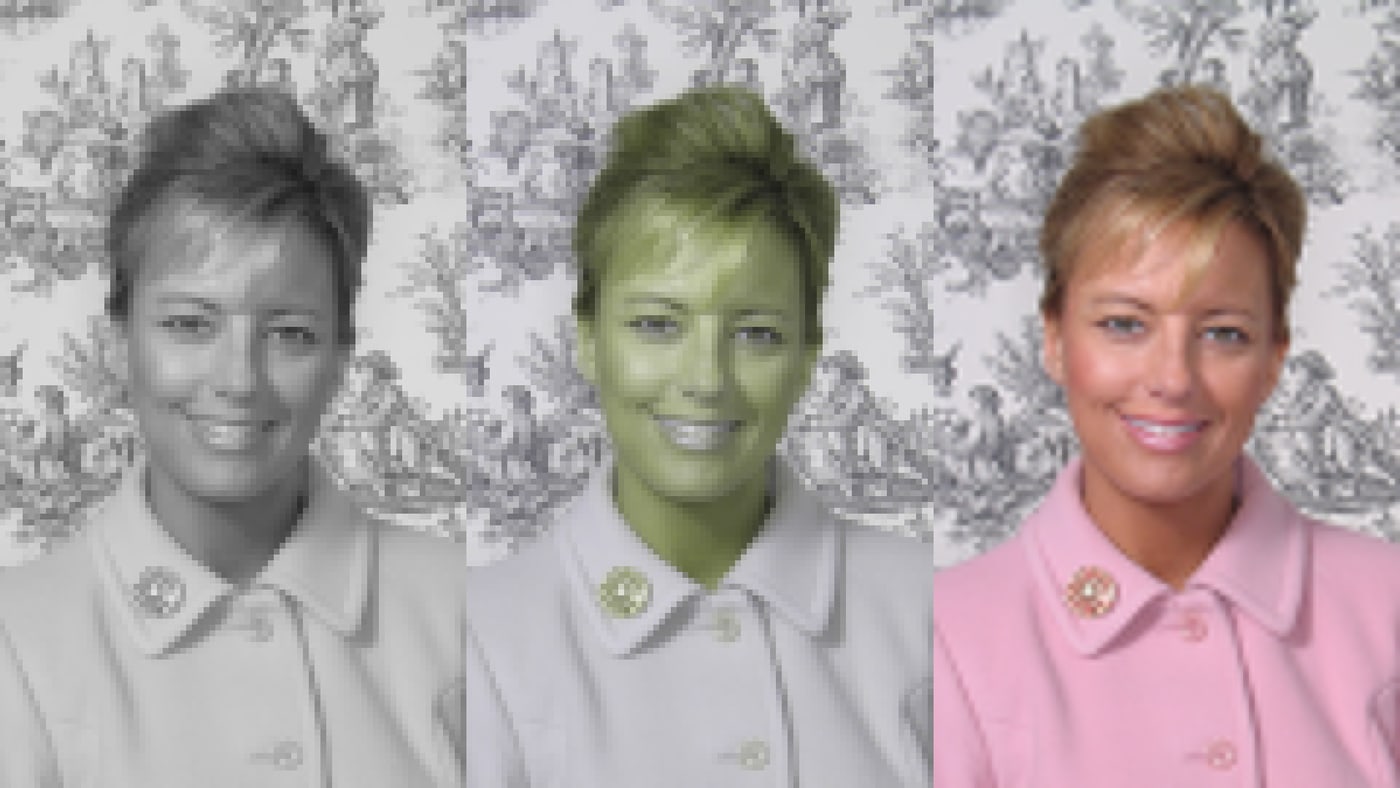
Yikes! Why do we get a green Martian first, which then turns out to be a human?
That’s because, in this case, MozJPEG decides that splitting the DC coefficients of the three channels into three separate scans yields more compression. The Martian is what you get if only one of the two chroma channels is available.
From a psycho-visual point of view, it’s probably just as unsettling to have images with a flash of strange colors as it is to have them with a flash of unstyled text. So, in this respect, the simpler semiprogressive scan script might be a better choice.
With the default progressive and semiprogressive scan scripts, it can be hard to tell exactly when the image has completely loaded. Whether or not this is a problem is debatable: after all, the progressive mechanism is doing its job of producing a high-quality preview fast.
At Cloudinary, we believe in giving users options, so let’s see about heading off this caveat.
Toward that end, some websites progressively render images in two steps: load small, low-quality placeholder images first and then replace them with the actual versions. Given the large gap between a placeholder image and an actual one, you can readily tell when loading is complete.
But wait. How about progressively rendering images in two steps with just one file through an appropriate scan script?
Unfortunately, given the limitations of the JPEG standard, a progressive scan script cannot consist of only two scans, at least not for color images. However, a scan, such as the one below, that delivers a quick low-quality preview, followed by a steep transition to the full-quality image, is viable. Let’s call it “steep-progressive.”
0 1 2: 0 0 0 2;
0 1 2: 0 0 2 1;
0 1 2: 0 0 1 0;
1: 1 63 0 0 ;
2: 1 63 0 0 ;
0: 1 63 0 0;
The scans work like this:
- The first scan encodes the DC coefficients of all three channels, except for the two least significant bits, churning out a rough preview in short order.
- The next two scans encode those two missing bits, delivering only minimal visual improvement.
- The next two scans encode the remaining chroma data, again lending only a minor quality boost because the blocky luma still remains.
- The final scan, which usually handles the bulk of the data, encodes the rest of the luma specifics. When it starts loading, this scan replaces the rough preview with the final image, from top to bottom, much like a nonprogressive image.
For comparison, the video below shows the various scan scripts in action as they scan the same exact image, but in a different order. From left to right in the video: nonprogressive, steep-progressive, semiprogressive, and default progressive.
So, how to make semiprogressive or steep-progressive JPEGs, you ask? Most image programs do not offer that option. However, you can copy and paste either of those two scan scripts into a text file on the command line and then run the following command with the libjpeg or MozJPEG encoder:
cjpeg -scans scanscript.txt < input.ppm > output.jpg
If you’re a Cloudinary user, you’re likely already serving semiprogressive JPEGs without realizing it. By setting the q_auto parameter, you automatically reap semiprogressive JPEGs unless the image is very small, in which case you should opt for nonprogressives.
q_auto also performs these useful tasks:
- Determine whether to enable chroma subsampling.
- Figure out which image format to adopt if combined with
f_auto. - Adjust the quality parameters to balance between avoiding artifacts and reducing the file size.
Absent the q_auto parameter, Cloudinary encodes nonprogressive JPEGs by default. Here are your options:
- To get a (default) progressive JPEG, set the flag
fl_progressive. - To leverage the semiprogressive scan script, set the flag
fl_progressive:semi. - To leverage the steep-progressive scan script, set the flag
fl_progressive:steep. - To force
q_autoto produce nonprogressive JPEGs, set the flagfl_progressive:none.
The overview below summarizes the pros and cons of the progressive scan scripts described in this post.
|
|
Non-progressive |
Steep-progressive |
Semi-progressive |
Default progressive |
|
Cloudinary flag: |
fl_progressive:none (default) |
fl_progressive:steep |
fl_progressive:semi (q_auto default) |
fl_progressive |
|
Progressive rendering |
❌ |
★ |
★★ |
★★★ |
|
Easy to tell when done loading |
★★★ |
★★ |
★ |
❌ |
|
Smaller files (on average) |
❌ |
❌ |
★★ |
★★★ |
|
Decode speed (and encode speed) |
★★★ |
★ |
★★ |
❌ |
The technicalities of image formats can be tricky to master, let alone that there remains much to be discovered even in “old” formats like JPEG. Even though you can decode images in only one way, you can encode them in many ways, one of which is to modify the JPEG encoding and fine-tune the image-loading behavior with custom progressive scan scripts .
Certain new image formats, such as JPEG XL, also support progressive decoding . In general, because progessive decoding makes little sense in video, that approach does not work with the formats that are derived from video codecs (WebP, HEIC, AVIF).
We at Cloudinary are fully aware that, as the web evolves to be more and more visual and most of the downloaded content on a page is images and videos, image optimization is key to user experience. In an ongoing effort to get the most out of every image format, we continuously enhance our image encoding and processing algorithms for the best possible end-user experience.
Concurrently, we strive to make life as easy as possible for developers. Do add q_auto,f_auto to your image URLs to automatically take advantage of the benefits from best practices and new image formats, now and in the future.
- Image Formats: Getting it Right
- How JPEG XL Compares to Other Image Codecs
- Animated WebP: How to Convert Animated GIF to WebP and Save Up To 90% Bandwidth
- JPEG Image Optimization Without Compromising Quality With JPEGmini and Cloudinary
- Check for WebP Browser Support to Dynamically Deliver Images
- Adopting the WebP Image Format for Android on Websites Or Native Apps
- Optimizing Animated GIFs With Lossy Compression