
You likely find yourself continually editing images for enhancement by eliminating flaws and tweaking the overall presentation, typically with software tools. Examples of basic editing are straightening, cleaning, and cropping images, as well as adjusting the contrast, exposure, and white balance. With advanced software like Cloudinary, you can automate not only editing tasks, such as quality adjustment and encoding, but also delivery.
This is part of an extensive series of guides about AI Technology.
This article addresses the following topics:
- Basics of image editing
- Cloudinary: an efficient and effective image-editing tool
- Automation of image edits with Cloudinary
- More about image editing
- References on media optimization
This section explains how to perform basic image edits with standard software. More advanced tools are available for fine-tuning or modifying image elements.
Even if you need not adjust all the elements described below, follow their order during the editing process.
Learn more in our detailed guide to react image gallery
Straightening images involves rotating or flipping them, typically for more realistic or more natural content. Unless you desire a specific effect, straighten images along the horizon to make it flat.
Cropping reduces the size or dimensions of an image by deleting part of it. Crop to remove unwanted elements or change the image’s composition or border shape, e.g., from a rectangle to a square. Eliminating distracting or unnecessary details can dramatically beef up images. Read our guide to face cropper.
Cleaning images removes minor imperfections, such as dust, lens flares, and artifacts. Most software programs offer gadgets for cleaning images, often called “spot healing” or “clone stamping” tools. Typically, those tools replace the spot you want to heal with a sample of the surrounding pixels. With other tools, you can select a location on the image you want to clone as a replacement.
This article shows you how to, in mere seconds, automate the removal of photo backgrounds with artificial intelligence (AI).
White balance is the amount of white in an image that affects its colors. In most image-editing software, white balance defines the type of lighting that was available during the photo shoot, e.g., daylight, flash, or cloudy, which either auto-corrects for the conditions that applied during the shoot or simulates them.
When working with images, especially photos, it pays to set the correct balance from the start. Note that white balance is easier to correct in RAW files than in JPEG files because more digital data is stored.
To adjust the exposure, modify the image’s brightness or darkness. Overexposure generates a washed-out look; underexposed images look murky or shadowy. While making adjustments, be careful not to overmodify the image to avoid creating noise or artifacts, hence a grainy appearance.
The contrast of images defines how close or far apart the tones are. High-contrast images might have both very bright and very dark tones, resulting in blocky shapes. Low-contrast images often look gray and muted with softer shapes. In general, aim for a middle contrast to spotlight the important elements without a jarring look.
Learn more in our detailed guide to 3d model from images
Color vibrancy and saturation are similar to white balance, except that they typically adjust on a cyan, yellow, and magenta scale instead of white. Adjusting the vibrancy of an image modifies its neutral colors while maintaining the brighter colors. Doing that brings forward more of the colors in your images, reducing the gap between the bright and neutral hues.
Changing the saturation modifies the intensity of all the colors. Such a step enhances the overall vividity and can make images look sharper or dreamlike.
Sharpening images can deliver a more crisp appearance. If certain aspects of your image are slightly out of focus or if you want to blur some parts to focus on a specific element, adjust the sharpness.
Adding text to images is another common task. To dynamically overlay text on images, follow the steps described in this article.
A cloud-based service for managing images and videos, Cloudinary offers a generous free-forever subscription plan. While on that platform, you can upload your images, apply built-in effects, filters, and modifications, including image edits.
Additionally, you can transform images programmatically with SDKs for all popular programming languages or simple URL parameters. Cloudinary applies changes dynamically, leaving your original images intact. That means you can modify images on the fly as your site design evolves and as you support more devices and screen sizes—a huge convenience and time saver.
Below are four automatic edits you can apply with Cloudinary to images. Each of the subsections links to a Cloudinary Cookbook page with more details on the editing technique.
You can have Cloudinary automatically define the format of your images for improved viewability and efficient delivery. The delivery format varies according to the client that is in use, such as a browser. Simply upload the image to Cloudinary and add the f_auto parameter to the URL. Cloudinary then delivers the image in WebP, JPEG-XR, or JPEG-2000, as appropriate.
 Image with the default quality setting (46 KB)
 Image with the low quality setting and the size reduced to 34 KB
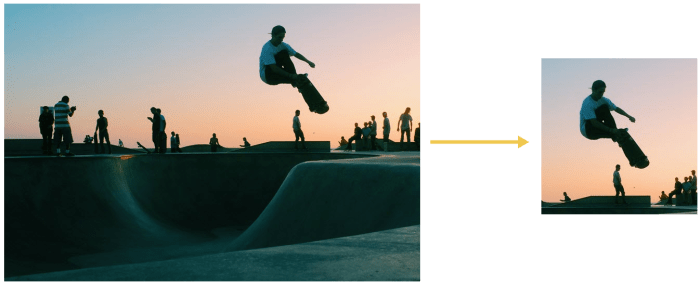
Cloudinary automatically crops images with content-aware, AI-based features by selecting faces, individual features, or areas of interest. To trigger that task, apply the gravity filter (g) with the features you want to preserve.
This example with the g_auto setting crops the most interesting area, as determined by AI:
Another example: to avoid irrelevant objects instead of the product in product images taking center stage, define the product as the focus. The picture on the right below has the backpack in focus.
 g_auto:classic
 g_auto:backpack
This tutorial shows you how to apply smart cropping.
Image breakpoints in responsive web designs determine where to break an image in case of insufficient space on the user’s screen or viewport for a full display.
By adding a few codelines in Ruby, PHP, Python, Node.js, or Java to your app or webpage, you can direct Cloudinary to automatically generate image breakpoints through its API. You can also create breakpoints for user-generated images.
See this example in Node.js:
cloudinary.v2.uploader.upload("woman_glasses.jpg",
        { responsive_breakpoints: [{
          create_derived: false, bytes_step: 20000,
          min_width: 200, max_width: 1000,
          max_images: 20}], public_id: "woman_glasses"},
        function(error, result) {console.log(result); });
Code language: JavaScript (javascript)You can edit images in many other ways. Below are a few excellent resources:
- The HTML5
<canvas>element is useful for animating website visuals, such as by adding small dynamic features or creating videos, through a combination of HTML, CSS, and JavaScript. This article defines HTML5 animation and explains the process for building simple animations along with examples and best practices. Also spelled out are the steps for creating and displaying dynamic content with Cloudinary. - By removing backgrounds from images, you can customize content and zero in on the elements you want to display. Manipulating backgrounds is especially important when creating crisp, eye-catching product images. This article elaborates on the Cloudinary features with which you can easily remove backgrounds and, if you wish, replace the deleted elements with others to enhance appeal.
- A popular way for displaying a site’s related content is through slideshows with which you can group images for albums, product galleries, or presentations. For a seamless experience, pick the slider and other controls with usability and optimal design in mind. This article showcases seven popular jQuery sliders and three resources for creating your own.
- You can transform the images for your site in many ways to make them stand out or to depict ownership. For example, watermarks can prevent theft; badges can add a personal touch to user icons or profiles; and text overlays, from captions to hero banners, can extend content or appeal. This article demonstrates how to add watermarks, badges, and text overlays to your site images with built-in Cloudinary features.
- Before making purchases, visitors would want to see product details, which are readily available at brick-and-mortar-stores but not on e-commerce sites. A breakthrough has arrived, thanks to the capability of adding 360-degree product views online.. Learn how to do that with Cloudinary’s 360-Degree Product Viewer in this article.
- Cropping images to highlight their significant elements can be a time sink, especially if you have a high volume of images, optimizing which being crucial for site responsiveness and performance. Cloudinary’s content-aware, smart-cropping capability is what you need. For details, see this article.
- Shopify is one of the most popular e-commerce platforms, enabling you to quickly build an online store. However, optimizing the images there and adding a product gallery would significantly enhance the user experience. By integrating Cloudinary into your Shopify store, you can accomplish all that, hassle free. For details, see this article.
- Overlaying text to images is an excellent way to add captions, banners, or design graphics there. Historically, to do that dynamically requires a working knowledge of CSS or JavaScript. With Cloudinary, you can add and style text easily with URL parameters or simple methods in many programming languages. For details, see this article.
- While building e-commerce sites on the popular Magento platform with its robust back-office system, you can apply extensions that facilitate site-management tasks. An example is the Cloudinary plugin, newly updated with enhanced support for product galleries, video, and digital asset management.
This article explains Cloudinary’s Magento extension and the procedures for customizing product pages, media assets, and galleries.
Learn more in our detailed guide to text extractor.
Together with our content partners, we have authored in-depth guides on several other topics that can also be useful as you explore the world of AI technology.
Authored by Instaclustr
- [Guide] Top 10 open source databases: Detailed feature comparison
- [Guide] Open source AI tools: Pros and cons, types, and top 10 projects
- [Blog] Multi Data Center Apache Spark™/Cassandra Benchmark
- [Product] NetApp Instaclustr Data Platform | Open-Source Data Infrastructure Platform
Authored by Exabeam
- [Guide] AI Cyber Security: Securing AI Systems Against Cyber Threats
- [Guide] AI Regulations and LLM Regulations: Past, Present, and Future
- [Blog] Cybersecurity Threats: Everything you Need to Know
- [Product] NetApp Instaclustr Data Platform | Open-Source Data Infrastructure Platform
Authored by Exabeam


