 Ask AI
Optimize images
Last updated: Jun-24-2026
Optimizing your images is important for improving performance for your website or application.
This page provides an overview of considerations that can impact image optimization and covers the various Cloudinary optimization features and options you can use to make sure your images are delivered to your users in the quickest and best way possible, a key component in improving Core Web Vitals metrics.
Image optimization video tutorial
Watch this video to see how to instantly optimize any image using q_auto and f_auto in a Cloudinary delivery URL.
This video is brought to you by Cloudinary's video player - embed your own!
Use the controls to set the playback speed, navigate to chapters of interest and select subtitles in your preferred language.
Tutorial contents
What is image optimization?
Optimizing an image involves delivering images in the format, dimensions, resolution, and quality that will yield the smallest possible file size while ensuring that the resulting image is appropriate for the specific content, the overall page design, the requesting device, and the expectations of your site visitors.
The following table summarizes the main elements that impact image file size and potential solutions for addressing those issues. However, in many cases, implementing the solutions on your own can be very time or labor intensive. Click the link on each issue to learn how to use Cloudinary functionality to implement these solutions with minimal or no coding.
| Issue | Problem | Possible Solutions |
|---|---|---|
| Image quality | Often photographs are delivered at their original extra-high resolution, for fear of losing too much visual quality or to make sure users with high-res (retina display and DPR 2+) devices will get the quality they expect. The result is a huge file and slow delivery speeds. | In most cases, you can significantly lower quality without a significant visual impact. Consider your image purpose and audience, and use the lowest possible quality that is acceptable for the image content, audience, and purpose. When it's important to deliver top-quality images for high-res devices, use the <picture> element and its srcset attribute to deliver different resolutions for different devices. |
| Image format |
|
|
| Image metadata | By default, images contain a lot of metadata stored by cameras and graphics applications, but this data is completely unnecessary in delivered images. | As a best practice, keep the metadata in your original copy of the graphics, but remove it in delivered images. |
| Image sizing and resizing | If you need to display an image at a size smaller than the original, and you rely on the browser to resize images, then you are delivering unnecessarily large files. This applies both to a standard image resize, and responsive design, which requires multiple different images sizes. | The required dimensions can be determined on the server side (before it is delivered to the browser). For responsive design, use the <picture> element and its srcset attribute to deliver different size images at different breakpoints.Even when resizing on the server side, keep in mind that you can crop to focus on important content, and not just scale down your images. |
Default optimizations
Cloudinary performs various default optimizations when delivering media assets. You can control these for your product environment in the Optimization Settings and override them through transformation parameters.
Certain plans include the ability to optimize format and size by default (see Optimize by default). All plans let you optimize image quality by default and strip metadata.
Default image quality
The Default image quality setting is applied to all images, except PNGs and PDFs, delivered from your product environment, but only if other transformations are also applied.

This applies a certain amount of compression to your images in order to reduce the weight of the image.
We recommend choosing an automatic quality setting to apply to all your transformed images rather than a specific quality level.
You can also choose to apply chroma subsampling by default to all your transformed images.
To override the default settings, set the quality parameter in your transformation (q_ in URLs).
Metadata stripping
When you deliver an image from Cloudinary with any transformation applied, Cloudinary strips all associated metadata from the transformed image file, except the following:
- JFIFVersion
- ResolutionUnit
- XResolution
- YResolution
- Colorspace
- DPI
To override this behavior and deliver a transformed image with all of its metadata intact, add the fl_keep_iptc flag. Alternatively, you can use the fl_keep_attribution flag to keep the copyright-related metadata in the transformed image, but still strip the other metadata content that gets stripped by default.
q_auto in URLs) is applied to the delivered image, either due to the default image quality setting or as a URL transformation parameter, the DPI and resolution metadata are also effectively stripped (the fields exist but you shouldn't rely on the values). To prevent this behavior, provide a quality value in the delivery URL, such as q_80.How to optimize image quality
The image quality setting defines the compression level to apply to an image.
The setting you choose entails a trade-off between visual quality and file size: the lower the quality value, the more the file is compressed to a smaller file size, and the more data is lost in the process, the result of which is a loss of visual quality. At the higher quality levels, the loss of visual quality is barely noticeable to the human eye. The ultimate visual quality result also depends on other factors such as the size of the original image and the resolution of the user's monitor or mobile screen.
Adjusting the quality of your images to a level that still provides good visual output, is one of the most powerful tools in image optimization. You can often deliver images at less than half of the original file size with little to no visually noticeable difference. Optimizing image quality can also help improve your Core Web Vitals score.
There are a few ways to control the quality of images delivered from Cloudinary:
- Set the default quality for your product environment
- Use automatic quality selection (q_auto)
- Set the quality when delivering an image
Automatic quality selection (q_auto)
Cloudinary's intelligent quality and encoding algorithm analyzes an image to find the best quality compression level and optimal encoding settings based on the image content and the viewing browser, in order to produce an image with good visual quality while minimizing the file size. Cloudinary automates the file size versus quality trade-off decision, on the fly using perceptual metrics and heuristics that tune the quality settings based on the specific image content and format. Analyzing every image individually to find the optimal compression level and image encoding settings allows for precise adjustment of the compression level complemented by fine tuning of the encoding settings, and can significantly reduce the file size without any degradation noticeable to the human eye.
To perform automatic quality selection and image encoding adjustments, set the quality transformation parameter to auto (q_auto in URLs) or apply one of the Automatic options as the default image quality setting for your product environment.
You can further fine-tune the automatic quality selection as follows:
-
q_auto: The optimal balance between file size and visual quality. By default, this is the same asq_auto:good, while it can automatically switch to the more aggressiveq_auto:ecomode (see the note on Save-data support below). -
q_auto:best: Less aggressive algorithm. Generates bigger files with potentially better visual quality. Example of a target audience: photography sites that display images with a high visual quality. -
q_auto:good: Ensuring a relatively small file size with good visual quality. -
q_auto:eco: More aggressive algorithm, which results in smaller files of slightly lower visual quality. Example of a target audience: popular sites and social networks with a huge amount of traffic. -
q_auto:low: Most aggressive algorithm, which results in the smallest files of low visual quality. Example of a target audience: sites using thumbnail images that link to higher quality images.
Here is an example of a photograph encoded using various automatic quality parameter values and the resulting file sizes:
 Original (569KB)
 q_auto:best (65.9KB)
 q_auto:good (56.9KB)
 q_auto:eco (45.0KB)
 q_auto:low:sensitive (39.6KB)
 q_auto:low (35.0KB)
q_auto tips and considerations
For extra granularity, you can append
:sensitiveto the quality selection, which raises the quality above that level but below the level above. For example,q_auto:good:sensitivegives a quality level abovegood, but not as good as thebestlevel. (q_auto:sensitiveis the same asq_auto:good:sensitive.)Network-aware delivery (optional): If your app detects constrained networks, you can request lower dimensions, set dpr to 1.0, or reduce
q_for refreshed images. Avoid changing URLs for assets already cached locally to prevent unnecessary reloads.
Save-Data support
Save-Data support is a feature included in the Client-Hints standard, which is already supported by Chrome and Opera browsers. The browsers send a special request header named Save-Data if the user has enabled data saving mode. When q_auto is specified and the Save-Data: on header reaches the CDN layer of Cloudinary, image compression and encoding will automatically switch to the eco mode (q_auto:eco) instead of the default good quality mode (q_auto:good). This feature has implications for using q_auto in named transformations.
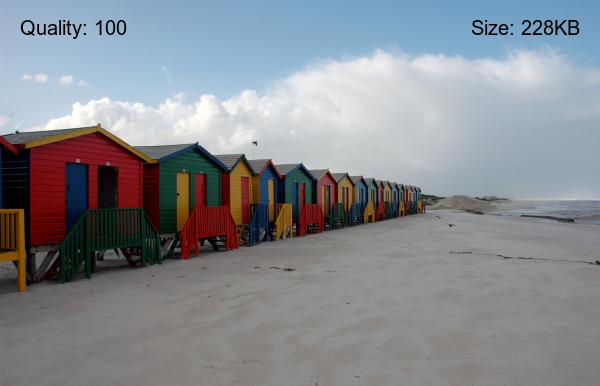
Interactive demo: automatic image quality
The interactive image example below shows the effect that the various auto quality settings have on the visual quality of the beach image. The image is initially displayed with a quality setting of 100, and clicking on one of the buttons below the image will display the image using that particular quality setting.
See also: q_auto for video
Set the quality when delivering an image
If you want more control over the quality of an image, then you can set a specific level for the quality parameter (q in URLs). Specify a value between 1 (smallest file size possible) and 100 (best visual quality). Reducing the quality is a trade-off between visual quality and file size: the lower the quality value, the more the file is compressed to a smaller file size, the more data is lost in the process, and the result is a loss of visual quality. The loss of visual quality is barely noticeable to the human eye at the higher quality levels, and final visual quality also depends on other factors such as the size of the image and the resolution of the user's monitor or mobile screen.
For example, reducing the quality of the following image to 70 results in a file size of 69 KB compared to the original file size of 195 KB with a barely noticeable reduction in visual quality (the lower quality image is on the right of the slider):


Interactive demo: image quality levels
The interactive image example below shows the effect that the various quality settings have on an image's visual quality. The image is scaled down to a width of 600 pixels and initially displayed with a quality setting of 100. Click on the quality buttons below the image to see how different quality settings impact the image quality.
- Images in the WebP format are lossless when specifying a quality of 100, and lossy when specifying a quality less than 100. See the How to support WebP images, save bandwidth and improve user experience blog post for more information on the WebP format.
- Images in the WebP format are lossless if the quality isn't specified and the original image's format is lossless (e.g., PNG).
- Animated GIFs ignore the quality setting unless the
lossyflag is added. See the Lossy compression for optimizing animated GIFs article for more information.
Toggle chroma subsampling
Chroma subsampling is a method of encoding images by implementing less resolution for chroma information (colors) than for luma information (luminance), taking advantage of the human visual system's lower acuity for color differences than for luminance. To override the default behavior of whether to perform chroma subsampling, a separate value can be added to the quality parameter as follows:
-
444can be added to prevent subsampling. For example:q_80:444 -
420can be added to force subsampling. For example:q_95:420.
How to optimize image format
Image formats can be lossy or lossless, each with its own compression algorithm. Each type gives better results on some types of image content, and poorer results on other types. Furthermore, some of the newer formats are only supported on some browsers. Optimizing image format can also help improve your Core Web Vitals score.
Choosing the right format to deliver each image can result in significant file size savings without sacrificing quality.
There are a couple of Cloudinary options you can use to address these issues:
Automatic format selection (f_auto)
There are many formats for encoding images, with some formats better than others at compression and reducing the file size without impairing visual quality. Since different browsers support different image formats, the best solution to optimize delivery time and save bandwidth is to deliver the best format according to the browser used by each of your visitors.
The fetch_format parameter can be set to auto (f_auto in URLs) in order to perform automatic format selection based on the requesting browser. Depending on the browser and which formats are enabled for f_auto on your product environment, the image could be delivered as, for example, AVIF, JPEG XL, or WebP (or animated AVIF or animated WebP, if it is an animated image). If a browser does not support any of the optimized formats that f_auto is enabled to return, then the image is delivered in the format specified by the file extension.
For example, rather than the source format of JPEG (33.5 KB) being delivered for this scaled down image, depending on the browser, an AVIF (14.6 KB), WebP (16.1 KB) or JPEG XL (21.4 KB) could be delivered. The table shows other formats for comparison:

| Format | Size |
|---|---|
| AVIF | 14.6 KB |
| GIF | 98.0 KB |
| JPEG | 33.5 KB |
| JPEG XL | 21.4 KB |
| JPEG XR | 17.3 KB |
| PNG | 190.0 KB |
| WebP | 16.1 KB |
- You can also specify a media type when using
f_auto. If no file extension is provided, automatic format selection will deliver an image by default. Therefore, using the media type option is more beneficial for other media types. - If you're on a plan that includes optimization by default settings, you can select the Automatic format setting instead of including
f_autoin your URLs.
Tips and considerations for using f_auto
-
Transformation counts: Using
f_automay increase your transformation counts and storage usage, due to the different formats being derived for a single transformation URL. You can limit the number of potential delivery formats by contacting support. -
Bandwidth usage: Generally, total bandwidth usage should decrease with use of
f_autodue to the delivery of more optimized (smaller file size) media files. However, in some cases, you may experience increased bandwidth usage, particularly with email campaigns, due to the use of the "private" cache-control directive, which prevents intermediate caches from delivering potentially unsupported formats to requesting browsers. -
AVIF and JPEG XL formats:
- If your account plan uses the image impressions metric, AVIF and JPEG XL formats are automatically supported as possible
f_autoformats. - If your account plan uses the image bandwidth metric, AVIF, animated AVIF and JPEG XL are not supported for
f_autoby default. To discuss options for gettingf_autosupport for these formats, contact support.NoteSmall images (under 5000 pixels) are not automatically delivered as AVIF because the overhead of the file format outweighs the byte-savings of the optimized image. Instead, they are delivered as WebP.
- If your account plan uses the image impressions metric, AVIF and JPEG XL formats are automatically supported as possible
-
Using f_auto with q_auto: When automatic format (
f_auto) is used in the same URL as automatic quality (q_auto):- The PNG format may be selected when the automatic quality algorithm decides that it better fits the specific image. This allows delivering better looking and economical image files.
- For JPEG images, if the automatic quality algorithm decides that no chroma subsampling should be performed, the WebP format is not selected because this lossy format always performs chroma subsampling, which might result in a lower visual quality for some images. The AVIF format could still be selected if this is supported by the requesting browser and enabled in your product environment.
- Using developer tools for f_auto testing: Be aware that if using developer tools to emulate different browsers, Cloudinary may return a format that is unsupported by the main browser, so images may not display as expected.
-
Using f_auto for transparent images: If
f_autois used to deliver an image that contains transparency, and the requesting browser does not support WebP or AVIF, then the image is delivered in PNG format instead of the JPEG format. -
Using f_auto with fl_any_format: Setting the
any_formatflag together with automatic quality (q_auto,fl_any_format) but without settingf_auto, will also allow switching to PNG8 encoding if the quality algorithm decides that it's more efficient. -
JPEG XR: JPEG XR is supported as a possible returned format for
f_autoonly for Cloudinary product environments created before April 2021 and is no longer supported by default. To add or remove this option, contact support. -
Using f_auto in named transformations:
f_autois not effective if used in named transformations. Learn more. -
Browser support: If you access an image by entering the Cloudinary delivery URL directly into a browser,
f_automay not return the expected format because the browser may not advertise its image support in theAcceptheader. - Native mobile apps (WebP): When consuming Cloudinary URLs in native apps (outside the browser), system frameworks may not decode WebP by default on all platforms. On Android 4.0+, WebP decoding is supported natively (lossy; 4.2.1+ for lossless/alpha). On iOS, bundle a WebP decoder (e.g., libwebp) or an imaging library that supports WebP to display f_auto-delivered WebP. On older/low-powered devices, software decoding can be slower than JPEG/PNG, so measure and provide fallbacks where appropriate.
See also: f_auto for video
Set the format when delivering an image
If your users upload images in a format that isn't ideal for the content, you can easily deliver in them a different type, just by changing the file extension in the delivery URL.
Alternatively, you can set the format parameter (f_ in URLs) to the desired format. For details, see Delivering images in a different format.
You can also deliver animated GIFs as lossy GIFs, for significant file size savings while maintaining acceptable quality. To do this, use the lossy flag (fl_lossy in URLs).
This lossy animated GIF is only 2.5 MB, compared to the 6.3 MB original:

In general, the time for resizing an image on the fly (the first time it is delivered via the CDN) is negligible, but if you are resizing a very large image or video, and every millisecond counts even for those first users, consider doing an eager or explicit transformation to pre-generate the transformed image.
Another way to lower the cost of animated graphics is to deliver animated GIFs as videos. You can do this by simply changing the file type extension to .mp4 (or .webm for Chrome, Android, and Opera) in the delivery URL.
For example, this mp4 is 95% smaller than the original animated GIF (319 KB instead of 6.3 MB):
For more information on working with animated GIFs, see Animated images.
How to optimize image sizing
Web site art-design generally requires displaying images at a variety of sizes, often much smaller than the original.
If you deliver full size images and rely on browser-side resizing (using CSS or HTML width and height attributes), users are forced to unnecessarily download large images. Therefore, images should always be delivered from the server at their final size, or at least, something close to that.
When you use any of the Cloudinary resizing transformations, the sizing (scaling/cropping) is performed on the server side, and the image is always delivered to the browser at the requested size.
There are several Cloudinary options that you can use for resizing:
Responsive image sizing
Server-side resizing becomes that much more important if your website is responsive and needs to select an image size based on the current size of your browser or the resolution of your device.
Cloudinary offers several solutions for responsive resizing. The best solution for you depends on your environment and application. You can learn about them all in Responsive images.
Analytics
Even after employing as many automated optimization solutions as possible, you may find that some images and formats are still especially big bandwidth eaters.
Take a look at the Delivery Reports page of the Cloudinary console. From here, you can view detailed information on a variety of data points that can help you understand where to make improvements.
For example, check the Top Assets and Top Delivered Assets sections, you can employ file-specific optimizations on these assets. Alternatively, scroll down to the Top Browsers to get an idea of how important each browser is to your users. This can give you insights on the relative value of using newer formats that are only supported on some browsers.

- Time for Next-Gen Codecs to Dethrone JPEG
- How to Adopt AVIF for Images With Cloudinary
- Rules for Rich-Media Optimization
- The holy grail of image optimization OR balancing visual quality and file size
- How Quality and Quantity can go Hand in Hand
- Top 10 mistakes in handling website images and how to solve them
- Image Optimization for Websites: Beautiful Pages That Load Quickly
- Reduce size of animated GIFs, automatically convert to WebM and MP4
- Lossy compression for optimizing animated GIFs
- Low Quality Image Placeholders (LQIP) Explained
Error
Rate this page:
