
One of the most important things to know about compressing image files is that a smaller file size comes at the cost of a lower image quality. How much lower, and whether low enough to make a difference visually, depends on the image. Compression can be very effective at reducing the size of the image, and besides lowering the costs of storage space and bandwidth, a reduced image size goes a long way to retaining your users’ attention with faster, smaller downloads.
On the other hand, a lot of developers are afraid to use aggressive compression for fear of degrading the visual quality, and tend to err on the side of caution, assigning higher quality values than are really needed. But adjusting the quality compression level doesn’t always lead to a loss of visual quality. Precise adjustment of the compression level, complemented by fine-tuning of the encoding settings, can significantly reduce the file size without any degradation noticeable to the human eye.
So, what’s the standard quality and encoding setting that works for all images? Unfortunately, there is no single setting that is optimal for all images, and simply lowering the image quality to a new setting is problematic:
- The image quality setting is usually specified on a sliding scale between 0 and 100, but what does this number actually represent for different image formats such as JPEG, WebP, and PNG? The compression algorithms used are complex and varied, so it’s not always known what these quality settings actually mean without a lot of experimentation. Different algorithms and formats tend to implement the settings in different ways, so any specific quality (e.g. 70) also means different things in different contexts and for different formats.
- The contents of an image determines to a large degree how well it can be compressed before losing visual quality. For example, does the image contain a huge range of colors? A large degree of complicated detail? Smooth color gradients? Selecting a single default quality setting for all your images fails to account for these differences in images: where one image may display perfectly with a given quality setting (e.g. 60), another image with different content may have visual artifacts with the same quality setting.
- The size of the image can require a different quality setting for each size displayed. Where an image of a certain size may display perfectly with a given quality setting (e.g. 75), the same image scaled to a different size may have visual artifacts with the same quality setting. An image’s quality setting should be optimized for each of the resized images and not just one quality setting for all sizes.
Taking the above points into consideration is all well and good when you have the time to fiddle with each image and find the optimal quality setting that gives the biggest saving on file size without affecting the visual quality. However, this time consuming process is not efficient when you have to fine tune a huge number of images, never mind the impossibility of manually finding the optimal quality if you have a lot of user-uploaded images to display.
The interactive image example below shows the effect that the various quality settings have on an image’s visual quality. The image is scaled down to a width of 600 pixels and initially displayed with a quality setting of 100. Click on the quality buttons below the image to see how different quality settings impact the image quality.
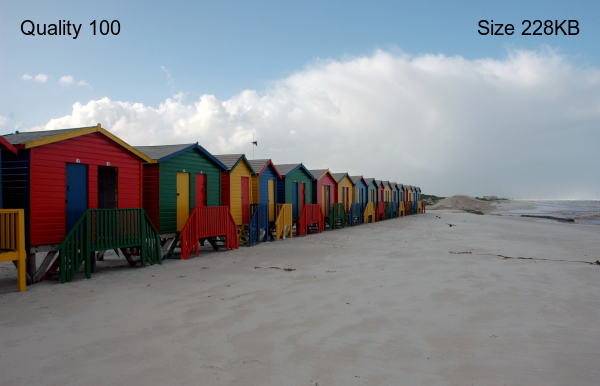
As you click between the quality settings from lowest to highest, initially there is a huge increase in the visual quality for a relatively small increase in file size, but towards the higher quality settings there is little to no improvement in the visual quality for a big increase in file size. The example JPEG image also highlights how different image content is visually affected by the various quality settings. The most prominent changes when transitioning down to lower qualities happens with the text overlays in the image, which become noticeable at relatively high quality settings. The smooth color gradients in the sky are the next to show the visual effects of compression and the complicated detail of the huts and the beach show obvious artifacts only at very low qualities.
Cloudinary can automate the file size versus visual quality trade-off decision, on-the-fly, by using perceptual metrics and heuristics that tune the encoding settings and select the appropriate image quality based on the specific image content and format. Analyzing every image individually to find the optimal compression level and image encoding settings allows for precise adjustment of the compression level complemented by fine tuning of the encoding settings, and can significantly reduce the file size without any degradation noticeable to the human eye.
To perform automatic quality selection and image encoding adjustments, simply add the quality parameter set to auto (q_auto in URLs). For example, using the same beach image scaled down to a width of 600 pixels and delivered with automatic quality (19.5KB – a saving of almost 60% in file size compared to 90 quality):

How you ultimately use the image may also influence the quality/size trade-off decision. For example:
- Is the image used as a thumbnail link to a high quality version?
- Do you sell images, or display high resolution images for printing, so that the visual quality is something you don’t want to compromise at all?
- Will the image receive a lot of traffic and therefore bandwidth considerations become even more important?
To address these and other considerations, you can influence how aggressively the quality automation algorithm reduces the file size, by adding an extra value to the q_auto parameter that describes the level of visual quality to aim for (best, good, eco, or low).
The interactive image example below shows the effect that the various auto quality settings have on the visual quality of the same beach image used in the first example above, also scaled down to a width of 600 pixels. The image is initially displayed with a quality setting of 100, and clicking on one of the buttons below the image will display the image using that particular quality setting.

The different automatic quality settings can be summarized as follows:
-
q_auto:best– The least aggressive algorithm, which compresses the files as much as possible without compromising the visual quality at all. -
q_auto:good– Delivers a relatively small file size with good visual quality. The image might include a few minor visual artifacts that are only apparent on very close visual inspection of the image. This setting is the optimal balance between file size and visual quality. -
q_auto:eco– A more aggressive algorithm, which prioritizes smaller files at the cost of a slightly lower visual quality that is only apparent on close visual inspection. -
q_auto:low– The most aggressive algorithm, which results in the smallest files, allowing for lower visual quality.
By default, specifying q_auto is the same as specifying q_auto:good, however this default value changes if the requesting browser has Save-Data support enabled, in which case q_auto defaults to q_auto:eco. Save-Data support is a feature included in the Client-Hints standard, which is already supported by Chrome and Opera browsers.
Note: For customers with a custom domain name or private CDN distribution, the Client-Hints processing needs to be set up: contact us for more details. UPDATE – September 2016: features that involve Client-Hints processing are now available for all customers without the need for a specific setup.
Take your image optimization to the next level by combining automatic image quality selection with automatic image format selection. The Cloudinary algorithm can then check if a different format (e.g. PNG8) is a better fit for a specific image based on its content. Some formats such as WebP and JPEG-XR are also more efficient for delivering web images, but they are not supported by all browsers. To optimize the image delivery, Cloudinary can also dynamically select the most efficient image format to deliver, based on the browser requesting the image.
To include automatic format selection for image delivery, simply add the format parameter and set it to auto (f_auto in URLs). For example, the same beach image as above, delivered with both automatic quality selection and automatic format selection (q_auto,f_auto), will be delivered as WebP (13.2KB) to Chrome browsers, JPEG-XR (15KB) to Internet-Explorer/Edge browsers, and JPEG (19.5KB) to all other browsers:

The combination of q_auto and f_auto is even more powerful when used together than either of them separately. The algorithm might detect that the PNG format is a better fit for specific images that contain content such as drawings. For some images, even the PNG8 format can be automatically selected for providing great looking results with a very efficient file size.
For example, the following URL dynamically generates a 500 pixels wide version of a drawing only using automatic image quality selection (q_auto without f_auto).

The result is a JPEG image (41KB) where, if you look carefully, you can see that the lossy nature of the JPEG format resulted in some visual artifacts. In the next example with the same drawing, we will combine both q_auto and f_auto:

In this case, the algorithm decided to encode the image using the PNG8 format. The image looks better, has no artifacts, and weighs even less – just 34.8KB.
See the Automatic format selection documentation page for more details.
Selecting an optimized quality setting for every image can now be easily automated with Cloudinary’s quality selection algorithm. The feature can also be combined with automatic format selection for a powerful and dynamic solution that delivers all your images using minimal bandwidth and maximum visual quality.
Try out the automatic quality interactive demo page and see the Automatic quality and encoding settings documentation for more details. All image manipulation and delivery features introduced here are available with no extra charge for all Cloudinary’s plans, including the free plan.
- Image Optimization for Websites: Beautiful Pages That Load Quickly
- PHP Image Compression, Resize, and Optimization
- Python Image Optimization and Transformation
-
Evolution of
: Gif without the GIF
- Top 10 Mistakes in Handling Website Images and How to Solve Them
- Three Popular and Efficient Ways for Loading Images
- Introducing Cloudinary’s WordPress Plugin for Dynamic Images and Video
- CDN for Images: Optimize and Deliver Images Faster
- Automatically Reduce Image Size Without Losing Quality