Compressing images is one form of image optimization. Its objective is to achieve the smallest possible file size but no loss in visual quality. This way, you save bytes and improve website performance because the smaller the image files, the faster the browser can download and render them on viewers’ screens. When choosing a compression format, you should consider the type, purpose, and features of the image. Lossy compression is best for photos and complex images, while lossless compression is best for logos and simple images.
In this article we’ll discuss:
- The advantages of PHP image compression and optimization.
- How to compress images with PHP.
- Added advantages of Cloudinary’s Free PHP Image API.
- How to pick the right format for PHP image compression
The faster images load on your website, the more likely visitors will return, yielding higher conversion rates. In fact, half of all visitors expect websites to load within two seconds. Surveys from Akamai and Gomez have revealed that—
- Lengthy load time is a major contributing factor of page abandonment, which becomes more likely with each additional second of load time. Nearly 40 percent of visitors abandon a page after only three seconds.
- Seventy-three percent of mobile users have experienced problems with load times on their devices.
- A one-second delay in load time can cut visitor satisfaction by 16 percent, leading to a seven-percent-or-higher drop in conversion rate.
You can compress images in PHP in one of the following ways:
- Through PHP’s built-in functions, such as
imagejpeg(), which takes the path of the output image and quality specification between 1 and 100. As a prerequisite, install the PHP’s GD Graphics Library. - Through the PHP Image Optimizer, a PHP library built by Piotr Sliwa, which leverages several libraries, , including OptiPNG, pngquant, and jpegoptim. The Image Optimizer can compress image files by 10-70 percent without sacrificing visual appeal.
- With the PHP Image Cache, a simple PHP class that compresses images on the fly. Once PHP Image compression is complete, the Image Cache caches the image in your browser and then returns the image’s new source.
- With Imagick, a native PHP extension for creating and modifying images by means of the [ImageMagick API].
With Cloudinary, you can efficiently optimize media assets—regardless of programming language. One reason is that, by default, Cloudinary automatically performs certain optimization steps on all transformed images. Plus, its integrated, fast delivery capability through content delivery networks (CDNs) ensures that images are seamlessly displayed on viewers’ devices. Click here to claim your free forever Cloudinary account.
Cloudinary offers the following image compression capabilities:
-
Automatic quality adjustment and encoding. Once you have added the
q_autoparameter to an image URL, Cloudinary chooses the optimal quality-compression level and encoding settings according to the image content, its format, and the viewing browser. The result is a compressed image with superior visual quality.To fine-tune the visual quality of your images through automation, add the
q_auto:best.q_auto:low,q_auto:good, orq_auto:ecoparameter, as you desire. -
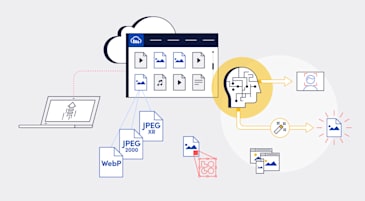
Automatic formatting. Adding the
f_autoparameter to image URLs causes Cloudinary to optimally format images. In most cases, Chrome users would receive a WebP (.webp); Internet Explorer users, a JPEG-XR (.jxr); and Safari users, a JPEG 2000 (.jp2). If a browser does not support any of those formats, Cloudinary delivers the image in the format depicted by the file extension.In case you add both the
f_autoandq_autoparameters to the URL of a JPEG image, Cloudinary’s automated quality algorithm halts chroma subsampling, retaining the JPEG format with no switch to WebP. That’s a quality safeguard because the lossy WebP format always performs chroma subsampling, which might reduce the visual quality of some images. -
Resizing and cropping. By adding the width (
w) and height (h) parameters to their URLs, you can resize images with Cloudinary, as in this example:Loading code examples 
Loading code examples 
Here, Cloudinary maintains the aspect ratio but resizes the image to the height and width you specified.

Cloudinary supports many image-cropping modes: scale, fit, mfit, fill, lfill, limit, pad, lpad, mpad, crop, thumb, imagga_crop, and imagga_scale. This documentation provides context for each mode.
When it comes to selecting a compression format for your images, it’s important to consider the type of content you’re dealing with. Different compression algorithms offer various trade-offs between image quality and file size.
Here are some guidelines for picking the right format for your PHP images:
- JPEG: This is the most common format for photographs and complex images with many details and colors. JPEG offers lossy compression, meaning that some image data will be lost, but usually not noticeably. With Cloudinary, you can automatically set the level of compression to retain visual quality while reducing file size to a minimum.
- PNG: Ideal for images that have areas with flat color, such as logos or text graphics. PNG is a lossless compression format, so it preserves all the image data. This can result in larger file sizes, but the image quality is preserved.
- WebP: This is a newer format that offers both lossy and lossless compression. WebP tends to produce smaller files than both JPEG and PNG for a similar level of visual quality. Not all browsers fully support WebP, but with Cloudinary you can dynamically serve WebP to visitors who have a supporting browser.
- SVG: Best for vector graphics like logos and illustrations, SVG files are resolution-independent, meaning they look crisp at any size. However, SVG is not suitable for photographs.
Here are some important factors to consider when compressing images:
- Image content: As mentioned, photos often work best in JPEG or WebP, while simpler images like logos are better in PNG or SVG.
- Browser support: Always check the compatibility of your chosen format with the range of browsers you expect your visitors to use. Or use Cloudinary to dynamically serve the most appropriate image to each user.
- Load time: Depending on the user’s network speed, smaller files will typically result in faster load times. Use browser tools to test how long it takes for images to load in various formats.
- Quality requirement: Some images may require higher quality because they include intricate details or text. In these cases, it might be worth accepting a larger file size for a higher-quality image.
Properly optimizing and caching images is a crucial step for enhancing website performance. The tips this post offers are just a start. See the Cloudinary documentation for more ideas on optimization of JPEG images without compromising quality and on image transformations.