Image optimization is an important step to reducing page load times, improving user experience and reducing bandwidth costs. When using the JPEG image format, which is best used for photos, the most common optimization is controlling the JPEG quality level.
By lowering JPEG quality, say to 90%, 80% or even 50%, you’ll get much smaller JPEG files. But will image quality be good enough? JPEG optimization is tricky because if quality is too low, you’ll get blurry images, pixelation and visible compression artifacts; if it’s too high, images will look good but take too long to load.
We thought it would be great to let our users automatically optimize their JPEGs without sacrificing quality. So we partnered with JPEGmini, an online service that does exactly that – it smartly balances the need to reduce file size, with the need to deliver high quality visual results. JPEGmini’s JPEG optimization can reduce the file size of your photos by up to 5x, while maintaining their original quality.
We’ve integrated JPEGmini with our cloud-based image management solution, allowing our users to generate JPEGs on the fly with JPEGmini’s smart optimization built in. Read on to see how it’s done.
Cloudinary is a cloud-based, end-to-end media management solution that automates and streamlines your entire media asset workflow, from upload to transformation to delivery via multiple CDNs.
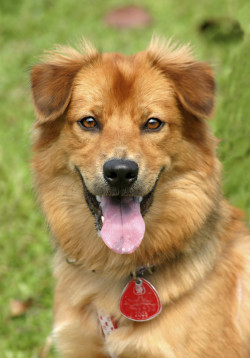
One of the image transformations we offer is changing JPEG quality. Let’s take a JPG image of a dog that was uploaded to Cloudinary, and assigned the ID ‘happy_dog’.
The original image is a high-resolution photo of 2082×2975. Is was saved as high-quality JPG and weighs 2.5MB, which is quite a lot of data to deliver to your web or mobile viewers.
Cloudinary allows you to modify the quality level of a JPG by setting the quality parameter (or q if specified within the image URL) to a value between 1 to 100. In addition, further lossless optimizations are applied to the generated images. The following code, or dynamic transformation URL, converts the original image on-the-fly to a JPEG with 90% quality (for illustration purposes, the image below was resized to a 250×358 thumbnail). The generated image weighs only 681KB, which is just 19% of the original high-quality size:
In the example above we used 90% quality, which is quite high and ensures a good visual result. However, for photos like the one above, you may be able to set a lower JPEG quality level while is indiscernible from the original to the naked eye. Using Cloudinary’s new JPEGmini add-on, you can apply a JPEG optimization with the best possible quality for the specific photo you’ve uploaded.
Applying JPEGmini optimization is done by simply setting the quality parameter, in the code that generates the image URL, to jpegmini. The following transformation URL and code optimizes an image uploaded to Cloudinary using JPEGmini, while delivering the result via a CDN. The resulting photo weighs only 425KB. This means we saved almost 40% of file size compared to the 90 quality JPG or more than 80% compared to the original photo. Across an entire site, this can significantly improve user experience and minimize bandwidth costs.
As you can see, the generated photo looks identical to the original photo, which weighs so much more.
The thumbnails above were generated on-the-fly by Cloudinary, by specifying the width and height parameters – this is an easy way to automatically create thumbnails of large images for your site or mobile app.
Note that the 250×358 thumbnail optimized by JPEGmini weighs only 15.9KB, which means saving almost 50% of file size compared to a 90 quality version of the same thumbnail which weighs 30.2KB, while the results seem identical to the human eye.
Reducing file size, and thus improving user experience and reducing bandwidth costs is an important goal. In parallel, you’ll also want to make sure that all photos are visually clear and are displayed with acceptable (or higher) quality. JPEGmini’s JPEG optimization reduces JPEG quality and image size, but only up to the point at which the JPEG still looks good to the human eye. It analyzes each image and finds the quality threshold required to keep this specific image looking good, and applies that level of quality to the image.
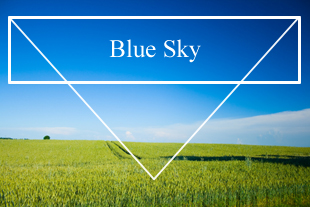
For example, the following image was uploaded to Cloudinary with the ID of ‘blue_sky’. This image is 310×207 and weighs 87.1KB.
Trying to convert the image to a JPEG of quality 80 indeed reduces file size to 17.5KB, which saves 80% of the original file size. However, the result doesn’t look good enough. The sky’s gradient has some “noise”, and so do the white lines and text.
Setting the quality parameter to jpegmini generates a better looking image with less “noise”, so you can safely embed it in your site. The image weighs 28KB, which is larger than the 80% quality version, but still saves almost 70% of the original image’s size.
Cloudinary lets you apply various transformations to your images. We’ve shown you a few above and many more image transformations are supported. The JPEGmini optimization can be combined with any other image transformations supported by Cloudinary. Here’s a taste of advanced editing you can do with Cloudinary’s image transformations , combined with JPEGmini.
The following dynamic transformations URL and sample code crops the dog’s photo to a 200×230 ellipse, applies a smart photo-improving filter, adds a shadow, and finally, optimizes the result using JPEGmini for best delivery.
JPEGmini is a computing-intensive operation, and you probably want to prevent unauthorized use of it. As a result, you may have noticed that all the transformation URLs in this blog posts were signed (for example, in the last image, the URL included the secret s--J23CuGrX--). By signing URLs, you apply a layer of security, ensuring that the JPEGmini JPEG optimization can’t be performed by just anyone directly typing a URL.
Another way to prevent external users from performing the JPEGmini optimization, is to “eagerly” generate optimized JPEGs while uploading your images. For more details about these options and the JPEGmini add-on in general, please refer to the documentation.
In this post we showed how JPEGmini can be used to smartly balance between JPEG compression and a high-quality visual result, and how simple it is to apply JPEGmini’s optimization using Cloudinary’s cloud-based image management service.
You can add the free tier of the JPEGmini add-on to your Cloudinary account and try it out on your photos using our interactive Media Library.
As always, any feedback or comments you have would be much appreciated, either in the comments below or via Facebook or Twitter.
- Image Formats: Getting it Right
- Progressive JPEGs and green Martians
- Animated WebP – how to convert animated GIF to WebP and save up to 90% bandwidth
- JPEG Image Optimization Without Compromising Quality With JPEGmini and Cloudinary
- Check for WebP Browser Support to Dynamically Deliver Images
- Adopting the WebP Image Format for Android on Websites Or Native Apps
- Optimizing Animated GIFs With Lossy Compression


