Are slow-loading videos on your website causing users to lose interest and move on? Mobile video optimization is the solution you need. By optimizing your videos for mobile devices, you can ensure that they load quickly and play seamlessly, keeping users engaged and interested in your content.
Delivering high-quality video to mobile devices is difficult, but utilizing a collection of tools and services for optimizing videos can help you improve the user experience for your mobile app or website. This article will demonstrate using robust features to improve your mobile video approach.
In this article:
- What is Mobile Video Optimization?
- What Are the Key Aspects of Mobile Video Optimization?
- Content vs. Technical Optimization
- 5 Tips for Technical Mobile Video Optimization With Cloudinary
What is Mobile Video Optimization?
Mobile video optimization is the process of creating and delivering video material that is suitable for viewing on mobile devices. This entails several strategies, including reducing the size of the video file, scaling the video to suit the screen, adjusting the video bitrate to the available network bandwidth, and using video codecs that are appropriate for mobile devices and streaming services.
Regardless of the limitations of their device or network, mobile users should be able to watch videos in a fluid, seamless, and high-quality manner. Because it substantially impacts user engagement, retention, and conversion rates, mobile video optimization is crucial for creating mobile apps, websites, and social media content.
Why Do You Need to Optimize Videos for Mobile?
Optimizing your videos for mobile devices lets you ensure they load quickly and play smoothly, keeping users engaged and interested in your content. So let’s explore why you need mobile video optimization and how it can help you create a fast, engaging website that users will love:
- Mobile devices have smaller screens and less computing power, so video content that is not mobile-optimized may not show correctly or may load slowly, creating a bad user experience.
- Unoptimized videos may take longer to load and cause buffering or stuttering playback because mobile networks have different speeds and bandwidth restrictions.
- Unoptimized videos can use mobile data quickly, increasing users’ data usage costs.
- Mobile users are more likely to give up on material that is slow to load or displays improperly.
By making your videos mobile-friendly, you can ensure they are efficiently and smoothly delivered to mobile users, giving them a positive watching experience that can boost user engagement, retention, and conversion rates.
What Are the Key Aspects of Mobile Video Optimization?
From file formats to compression techniques, several factors should be considered when optimizing your videos for mobile devices. Paying attention to these key aspects ensures that your videos load quickly, play smoothly, and look great on any device. So let’s explore the key aspects of mobile video optimization and how they can help you create a fast, engaging website that keeps users coming back for more:
- Video Compression: To make a video load quicker and use less data, file size must be reduced without compromising the video’s quality.
- Video Resolution: Making the video suit the mobile device’s screen without cropping or stretching.
- Bitrate Adaptation: This technique matches the video bitrate to the network bandwidth to guarantee buffer-free playback.
- Video Format: To guarantee compatibility and proper playback, use video formats widely supported by mobile devices.
- Delivery Network: To reduce latency and minimize loading periods, videos should be delivered via a content delivery network (CDN).
By ensuring your videos are optimized for these crucial factors, you can deliver them to mobile users effectively and efficiently, resulting in a positive watching experience that can raise user engagement, retention, and conversion rates.
Content vs. Technical Optimization
Creating high-quality content that appeals to your audience’s requirements and optimizing its format, keywords, and structure to increase discoverability and engagement is known as content optimization. Optimizing your content can increase traffic, establish authority and confidence, and boost conversions.
Technical optimization enhances your website’s or online content’s technical components to enhance functionality, efficiency, and speed. Your website’s code, media, navigation, and structure should be optimized to enhance user experience, lower bounce rates, and boost interaction. You can raise the ranking, accessibility, and user interaction of your website by optimizing its technical efficiency.
5 Tips for Technical Mobile Video Optimization With Cloudinary
Now that we know how important it is to optimize your videos for mobile applications, let’s look at five tips that can help you optimize your videos to enhance user experience.
1. Scale Videos to Display the Size
Using a more optimized image format may be advantageous if your users have limited bandwidth. One option is to use Google’s libwebp to display webp images from Cloudinary, which can be up to 30% smaller than similar-quality jpgs.
To deliver the image as webp, simply add format(webp) (on Android) to your Cloudinary transformation or a .webp suffix to the URL. Quality settings can also be adjusted to your preference.
Cloudinary’s HTTP caching is also designed with mobile best practices in mind. The default max-age of our cache control headers is one year, making it nearly “semi-permanent.” If you use images that are updated with the same URL, make sure to invalidate the cache when you overwrite them. This is automatically done in the media library, but when using the Cloudinary API, include the invalidate parameter.
Finally, to accommodate different image densities, there are several options available. For instance, Cloudinary offers a JavaScript-based solution for supporting retina displays, and for native images, you can use scaleFactor as your Cloudinary DPR (Device Pixel Ratio) parameter to generate the URL.
2. Automatic Video Quality
Cloudinary’s Automatic Video Quality feature offers a solution by dynamically adjusting the video’s quality based on the device and network conditions. Using the Cloudinary SDK, you can easily implement Automatic Video Quality with just a few lines of code. Let’s start by creating a sample.
Before creating a sample, the first step would be to create a free Cloudinary account by visiting their website. Once your account is up and ready, the next step will be to install the latest version of Node.js on your computer. If you don’t have Node.js installed on your device, you can download it for free from the official Node.js website.
Once you have everything set up, the next step is to install the Cloudinary Node.js SDK. You can do this using the following command:
npm install cloudinary
Open up your project directory and start by creating a new JS file. Next, start by importing the Cloudinary SDK and defining our API with our account details:
const cloudinary = require('cloudinary').v2;

// Replace with your CLOUD_NAME, API_KEY, and API_SECRET
cloudinary.config({
    cloud_name: 'CLOUD_NAME',
    api_key: 'API_KEY',
    api_secret: 'API_SECRET'
  });
You must also provide your cloud_name, api_key, and api_secret, which you can get from your Cloudinary account dashboard.
For now, we will be using Cloudinary’s demo cloud:
// Replace with your CLOUD_NAME, API_KEY, and API_SECRET
cloudinary.config({
    cloud_name: 'demo'
    });
Next, we will define the video that we want to use. If you are using your own image, then you can define their own public_id. For our purposes, we will be using the elephants video available in the demo cloud:
const publicId = 'samples/elephants';

Now, to generate a video URL with Automatic Video Quality, you need to use the cloudinary.video method and pass the public ID of your video asset as a parameter. You can also specify a transformation to resize and crop your video, as well as the quality parameter set to auto to enable Automatic Video Quality:
// quality auto - dynamic
const videoUrl = cloudinary.video(publicId, {
  transformation: [
    { width: 640, height: 360, crop: 'fill' },
    { quality: 'auto' }
  ]
});

console.log(videoUrl);
In the code provided, the quality parameter is set to auto, which tells Cloudinary to adjust the video’s quality automatically based on the device and network conditions. Additionally, the transformation parameter can be used to define the video’s desired dimensions and aspect ratio. In this case, the video is resized to 640×360 and cropped using the fill method to ensure the entire frame is visible.
Running the code yields the following video:

Remember that setting the quality parameter to a static value, like 50, would encode the video with a quality level of 50 out of 100. The lower the quality setting, the smaller the video file size, but the lower the visual quality will also be.
3. Bitrate Control
Adaptive bitrate streaming is a video delivery method that dynamically adjusts the video quality based on the device’s available bandwidth and processing power. This approach ensures that the video starts playing quickly, with minimal buffering, and at the best possible quality that the device and network can handle, enhancing the user’s viewing experience.
You can use the bit_rate parameter (referred to as br in URLs) to exercise greater control over the bitrate of your audio and video files. This parameter determines the number of bits representing the audio or video data.
By default, the br_ value employs a variable bitrate, with the specified value indicating the maximum bitrate. The actual bitrate and quality of the content are optimized based on the audio or video content to save on bandwidth and storage. Specifying a constant bitrate value by including br_[value]:constant in your URLs is also possible.
For example, in the code below, the video will be encoded with a bitrate of 250 kilobits per second. Higher bitrates result in higher quality videos but also larger file sizes. In this case, a lower bitrate of 250 kbps has been chosen, which may result in a lower-quality video and a smaller file size:
const videoUrl = cloudinary.video(publicId, {
  transformation: [
    { width: 640, height: 360, crop: 'fill' },
    {bit_rate: "250k"}
  ]
});
Executing the code will deliver the video asset with the specified transformations applied, including the specified bitrate. The URL can then be used to display the video on a web page or application.
4. Control the Quality of webm Transcoding
If you transcode videos from mp4 to webm (VP8/9 encoding), the resulting video may sometimes appear pixelated. To prevent over-quantization of the video, you can specify a maximum quantization percentage value (in the 1-100 range) using the qmax parameter, in addition to a fixed quality value.
For example, you can set the quality parameter to 80:qmax_90 to ensure that the transcoded video is quantized no more than 90% of the maximum possible quantization. When you specify a qmax value, the quality value is relative to the quantization value.
For instance, consider transcoding the elephant video to .webm without specifying a maximum quantization value, resulting in a noticeable reduction in visual quality compared to its .mp4 counterpart. However, by setting the maximum quantization to 70, you can achieve better visual quality:
const videoUrl = cloudinary.video(publicId, {
  transformation: [
    { width: 640, height: 360, crop: 'fill' },
    {duration: "5.0"},
    {quality: "70:qmax_20"}
  ]
});
Additionally, we set the duration parameter to 5, indicating that we only use 5 seconds of the total video. Here is what our video looks like:

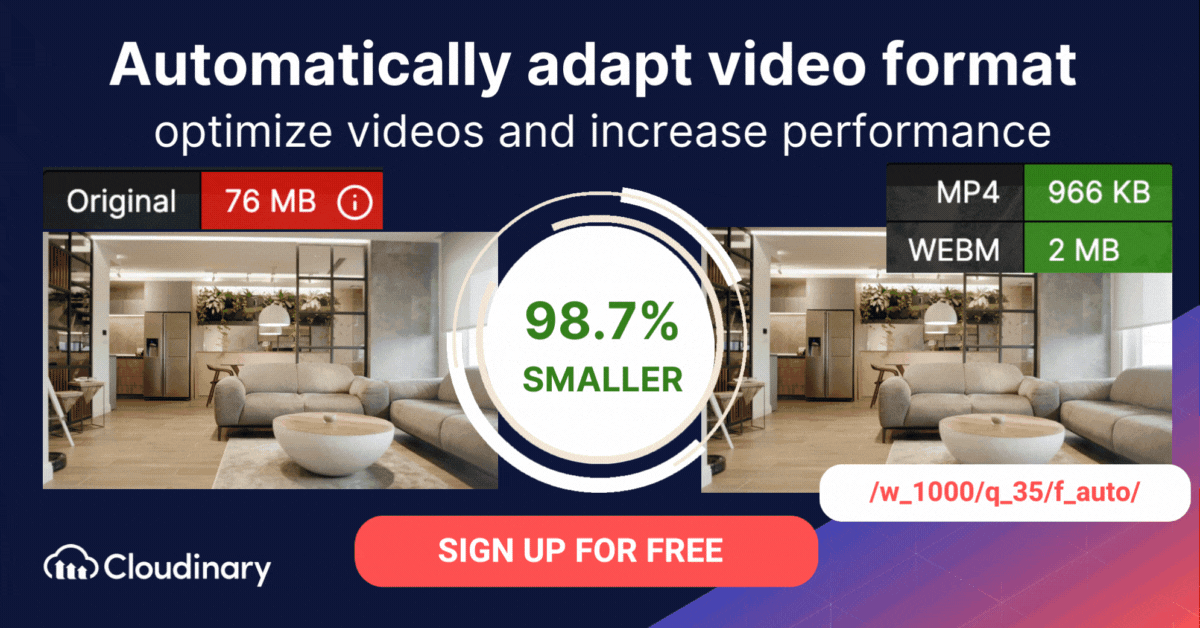
5. Automatic Video Format
Choosing the right video format can be challenging, given the various formats available, each with distinct characteristics and compression capabilities. There are numerous formats and codecs to encode videos, with some being more efficient at compressing videos while preserving visual quality than others. As different web browsers support different video formats and codecs, it’s optimal to deliver the most appropriate format for each visitor’s browser to reduce bandwidth consumption and optimize delivery time.
To accomplish this, you can set the fetch_format parameter to auto (or f_auto in URLs), which enables automatic format and codec selection based on the browser making the request.
For instance, we could set the fetch_format as auto for our elephants video. In that case, it can be scaled down to a height of 360 pixels and delivered as .webm to Chrome browsers, as an MP4 to Safari browsers, or as an MP4 to browsers that support neither format:
const videoUrl = cloudinary.video(publicId, {
  transformation: [
    { width: 640, height: 360, crop: 'fill' },
    {fetch_format: "auto"}
  ]
});
Final Thoughts
In conclusion, mobile video optimization is essential for delivering the best user experience. With Cloudinary’s comprehensive video optimization solution, you can easily convert, resize, and compress your videos for optimal mobile performance. The ability to quickly deliver high-quality video content on any device is essential for engaging and retaining viewers. You can take advantage of Cloudinary’s robust features to optimize your videos and gain a competitive edge in today’s digital landscape. So, sign up now to reap the full benefits of Cloudinary’s video optimization solution.
Learn more:

