
Did you know that Flutter is not just about building static, beautiful UIs? It’s also about bringing those interfaces to life with dynamic features, one of which is video preview. According to a recent survey, video content is consumed by over 85% of internet users, emphasizing the significance of video features in app development.
In this guide, we will learn about video previews in Flutter. Video previews are an essential tool that allows developers to provide a sneak peek into the video content, enhancing the user experience and engagement. Flutter, with Cloudinary’s SDK support, makes the implementation of video previews a breeze. We will walk you through the process of creating an app that will allow you to fetch video content and display a preview using Flutter. So, let’s get started!
In this article:

How To Implement Video Preview in Flutter
Before we begin, it is important we have Flutter set up on our system. If you don’t have it installed, you can download the latest version from the official Flutter website and follow the guide to get the latest version of Flutter. For this tutorial, we will be using Flutter version 3.19.5, so anything higher will work.
Once you have installed Flutter, run the following command to check if it was installed successfully:
flutter --version
The next thing you will need is an IDE that works with Flutter. We’ll be using Android Studio, so if you don’t have it installed, you can download the latest version from the Android Studio website.
Once installed, we need to install some plugins that will help us create Flutter apps on Android Studio. To do this, open Android Studio and head to the Plugins tab. In the search bar, search for the Flutter plugin, click on Install and install the plugin.

This will take some time, but once completed, restart Android Studio. Now, go to the Projects tab and open up the SDK Manager:

Here, navigate to the Android SDK page, click and open up the SDK Tools tab, and search for the Android SDK Command-line tools. Tick the checkbox and click on Apply to start installing:

With this, we can begin creating our Flutter project.
Initializing a Flutter Project
To create your Flutter project, start by opening up Android Studio and clicking on the new option called New Flutter Project. Click on this option and head to the next window:

Here, open up the Flutter page and click the … button to configure your Flutter SDK path. Click on Next when finished:

Now, we will define our project. Here, we have named our project previewvideo and provided a small description of what we are going to do. Make sure that the project name you choose is a valid Dart package name, i.e., it should not have any spaces or capital letters. Additionally, we have defined a project path by clicking on the … button.
Finally, click on Create to create a blank Flutter project.

Once your project has been created, open up your pubspec.yaml file and add in the Cloudinary Flutter SDK and other dependencies:
http: ^0.13.5
cloudinary_flutter: ^0.9.0
cloudinary_url_gen: ^0.9.0
video_player: ^2.8.6
file_picker: ^8.0.3
With our project now set up, all we need to do is retrieve our Cloudinary API credentials and create an unsigned upload preset, which allows us to upload our assets to the Cloudinary cloud.
Let’s begin by retrieving our API credentials. To do this, head to the Cloudinary website and log in to your Cloudinary account. Next, open up the Programmable Media Dashboard by clicking the Programmable Media button located on the top right corner of your screen.

Here, you will find your Cloudinary credentials. Copy and save these, as we’ll use them later in the tutorial. Also, make sure you have an “unsigned upload preset” created in your Cloudinary account that allows all desired video formats. You should save the name of this preset for later use, too.
With this, we are now ready to begin coding our Flutter app!
Creating Our Flutter App
Let’s start by opening up our main.dart file in our project’s lib directory. Here, you will see that Flutter has initialized a basic structure of your app. However, we will not be needing it, so erase everything in your file and start by adding our imports:
// Import the necessary packages
import 'package:flutter/widgets.dart';
import 'package:http/http.dart' as http;
import 'dart:convert';
import 'package:file_picker/file_picker.dart';
import 'dart:io';
import 'package:flutter/material.dart';
import 'package:video_player/video_player.dart';
Next, initialize your main() function and create a simple MyApp class:
void main() async {
 WidgetsFlutterBinding.ensureInitialized(); // Ensure Flutter engine is initialized
 runApp(MyApp());
}

class MyApp extends StatelessWidget {
 @override
 Widget build(BuildContext context) {
   return MaterialApp(
     home: VideoApp(),
   );
 }
}
Here, the MyApp class is a stateless widget that acts as the root of the application’s widget tree. It renders a MaterialApp container for a material design interface and defines the home screen as VideoApp.
Next, we will create a stateful widget VideoApp. Stateful widgets are used for UI elements that can change over time, like a video player. The VideoApp class itself doesn’t handle the video playback functionality. Instead, its purpose is to create an internal state (_VideoAppState) that will manage the video player and update the UI as needed:
class VideoApp extends StatefulWidget {
 @override
 _VideoAppState createState() => _VideoAppState();
}
Now, we can define our _VideoAppState class. This class will contain the main logic of our project and will display the preview of our videos:
class _VideoAppState extends State {
 VideoPlayerController _controller = VideoPlayerController.network('');
 Future _initializeVideoPlayerFuture = Future.value();

 @override
 void initState() {
   super.initState();
   pickAndUploadVideo();
 }
Here, we have initialized a _controller variable, which will be responsible for managing the video’s playback. It’s initialized with an empty network URL. We have also defined a _initializeVideoPlayerFuture, which represents the asynchronous process of initializing the video player.
Initially, it holds a completed future with no value. We also call the initState Method, which is called once when the widget is inserted into the widget tree. It calls on the super.initState() to handle the basic setup and the pickAndUploadVideo() function to initiate the video selection, upload, and preview process.
Next, we will define our pickAndUploadVideo() function. The pickAndUploadVideo() function is the heart of the video upload and preview process. It’s an asynchronous function, allowing it to perform operations that take time, like file picking and network calls. The entire function is wrapped in a try...catch block to handle any potential errors during the process:
void pickAndUploadVideo() async {
 try {
   // Pick the video file
   FilePickerResult? result = await FilePicker.platform.pickFiles(
     type: FileType.video,
   );

   if (result != null) {
     File videoFile = File(result.files.single.path!);
     // Upload the video file
     var data = await upload(videoFile);
     print(data);

     // Generate the preview URL
     String previewUrl = generatePreviewUrl(data['public_id']);
     print('Preview URL: $previewUrl');

     // Initialize the video player controller
     _controller = VideoPlayerController.network(previewUrl);
     _initializeVideoPlayerFuture = _controller.initialize(); // Initialize the future here
     _initializeVideoPlayerFuture.then((_) {
       // Ensure the controller is updated when the video is initialized
       setState(() {});
     });
   } else {
     print('No file selected.');
   }
 } catch (e) {
   print('Error picking and uploading video: $e');
 }
}
The function starts by using the FilePicker plugin to allow the user to select a video file from their device storage. Here, we use FilePicker.platform.pickFiles() to filter the file selection options to show only videos. The result is stored in the result variable. If the user selects a video, the code extracts the file path and creates a File object representing the chosen video.
Next, we call the upload() function to begin uploading the video file. The result of the upload is stored in the data variable. Once the video is uploaded, the function extracts a public ID from the data. It then calls the generatePreviewUrl() function, takes the public ID of our video, and constructs a URL for the preview version of the video.
Finally, the _controller variable, which holds the VideoPlayerController, is updated with the generated preview URL. This tells the video player where to find the video to play. The _initializeVideoPlayerFuture is then set to the result of calling _controller.initialize(), starting the asynchronous process of preparing the video for playback.
Next, we will define our upload() function. The upload() function handles uploading the video file to the Cloudinary cloud. It’s an asynchronous function as uploading a file over the network takes time:
Future<Map<String, dynamic>> upload(File videoFile) async {
 var stream = http.ByteStream(videoFile.openRead());
 stream.cast();
 var length = await videoFile.length();

 var uri = Uri.parse('//api.cloudinary.com/v1_1/your_cloud_name/upload');
 var request = http.MultipartRequest("POST", uri);
 request.fields['upload_preset'] = 'your_upload_preset';
 request.fields['api_key'] = 'your_api_key';
 request.fields['public_id'] = 'your_public_id';
 request.files.add(http.MultipartFile('file', stream, length, filename: videoFile.path.split("/").last));

 var response = await request.send();
 var responseData = await response.stream.toBytes();
 var result = String.fromCharCodes(responseData);
 return json.decode(result);
}
Here, we begin by defining some variables. We first create a ByteStream object that allows for the efficient transfer of video data in chunks. We then retrieve the size of the video file in bytes using videoFile.length().
Next, we begin creating our upload request. We define the upload Uri object that stores the Cloudinary upload endpoint. We then create our request and define the necessary fields for our request. Finally, the function uses request.send() to upload our video to the cloud and return the result of the API call.
Now, we define a simple helper function called generatePreviewUrl() that uses the public ID of our video and returns a URL of our video as a string. Here is what our function looks like:
String generatePreviewUrl(String publicId) {
 return 'https://res.cloudinary.com/drkbps78i/video/upload/e_preview:duration_6/$publicId.mp4';
}
Next, we override the dispose() function of our StatefulWidget class. Here, we will call the _controller.dispose() properly releases resources associated with the VideoPlayerController object. This is crucial to avoid memory leaks and potential issues when dealing with video playback. We will also call the parent’s dispose() function to ensure that any additional cleanup required is handled by the parent widget. Here is what our function looks like:
@override
void dispose() {
 _controller.dispose();
 super.dispose();
}
Finally, we will define our Widget. We create a simple app that displays the title of our project and creates a VideoPlayer once the user has selected a video. We added a video button to the bottom-right corner of the screen that allows the user to play the video preview once the entire file has been uploaded. Here is what our Widget looks like:
@override
Widget build(BuildContext context) {
 return Scaffold(
   appBar: AppBar(
     title: Text('Video Preview'),
   ),
   body: FutureBuilder(
     future: _initializeVideoPlayerFuture,
     builder: (context, snapshot) {
       if (snapshot.connectionState == ConnectionState.done) {
         return AspectRatio(
           aspectRatio: _controller.value.aspectRatio,
           child: VideoPlayer(_controller),
         );
       } else {
         return Center(child: CircularProgressIndicator());
       }
     },
   ),
   floatingActionButton: FloatingActionButton(
     onPressed: () {
       setState(() {
         if (_controller.value.isPlaying) {
           _controller.pause();
         } else {
           _controller.play();
         }
       });
     },
     child: Icon(
       _controller.value.isPlaying ? Icons.pause : Icons.play_arrow,
     ),
   ),
 );
}
Here is what our main.dart file’s code:
// Import the necessary packages
import 'package:flutter/widgets.dart';
import 'package:http/http.dart' as http;
import 'dart:convert';
import 'package:file_picker/file_picker.dart';
import 'dart:io';
import 'package:flutter/material.dart';
import 'package:video_player/video_player.dart';

void main() async {
 WidgetsFlutterBinding.ensureInitialized(); // Ensure Flutter engine is initialized
 runApp(MyApp());
}

class MyApp extends StatelessWidget {
 @override
 Widget build(BuildContext context) {
   return MaterialApp(
     home: VideoApp(),
   );
 }
}

class VideoApp extends StatefulWidget {
 @override
 _VideoAppState createState() => _VideoAppState();
}

class _VideoAppState extends State<VideoApp> {
 VideoPlayerController _controller = VideoPlayerController.network('');
 Future<void> _initializeVideoPlayerFuture = Future.value();

 @override
 void initState() {
   super.initState();
   pickAndUploadVideo();
 }

 void pickAndUploadVideo() async {
   try {
     // Pick the video file
     FilePickerResult? result = await FilePicker.platform.pickFiles(
       type: FileType.video,
     );

     if (result != null) {
       File videoFile = File(result.files.single.path!);
       // Upload the video file
       var data = await upload(videoFile);
       print(data);

       // Generate the preview URL
       String previewUrl = generatePreviewUrl(data['public_id']);
       print('Preview URL: $previewUrl');

       // Initialize the video player controller
       _controller = VideoPlayerController.network(previewUrl);
       _initializeVideoPlayerFuture = _controller.initialize(); // Initialize the future here
       _initializeVideoPlayerFuture.then((_) {
         // Ensure the controller is updated when the video is initialized
         setState(() {});
       });
     } else {
       print('No file selected.');
     }
   } catch (e) {
     print('Error picking and uploading video: $e');
   }
 }


 Future<Map<String, dynamic>> upload(File videoFile) async {
   var stream = http.ByteStream(videoFile.openRead());
   stream.cast();
   var length = await videoFile.length();

   var uri = Uri.parse('https://api.cloudinary.com/v1_1/your_cloud_name/upload');
   var request = http.MultipartRequest("POST", uri);
   request.fields['upload_preset'] = 'your_upload_preset';
   request.fields['api_key'] = 'your_api_key';
   request.fields['public_id'] = 'your_public_id';
   request.files.add(http.MultipartFile('file', stream, length, filename: videoFile.path.split("/").last));

   var response = await request.send();
   var responseData = await response.stream.toBytes();
   var result = String.fromCharCodes(responseData);
   return json.decode(result);
 }

 String generatePreviewUrl(String publicId) {
   return 'https://res.cloudinary.com/drkbps78i/video/upload/e_preview:duration_6/$publicId.mp4';
 }

 @override
 Widget build(BuildContext context) {
   return Scaffold(
     appBar: AppBar(
       title: Text('Video Preview'),
     ),
     body: FutureBuilder(
       future: _initializeVideoPlayerFuture,
       builder: (context, snapshot) {
         if (snapshot.connectionState == ConnectionState.done) {
           return AspectRatio(
             aspectRatio: _controller.value.aspectRatio,
             child: VideoPlayer(_controller),
           );
         } else {
           return Center(child: CircularProgressIndicator());
         }
       },
     ),
     floatingActionButton: FloatingActionButton(
       onPressed: () {
         setState(() {
           if (_controller.value.isPlaying) {
             _controller.pause();
           } else {
             _controller.play();
           }
         });
       },
       child: Icon(
         _controller.value.isPlaying ? Icons.pause : Icons.play_arrow,
       ),
     ),
   );
 }

 @override
 void dispose() {
   _controller.dispose();
   super.dispose();
 }
}
Note: If Android Studio creates a test folder in your project directory, your project may not work. To fix this, open up the widget_test.dart file located in the test directory of your project. Here, simply remove the const keyword accompanying your MyApp() class. This will fix your issue.
Running the Project on an Emulator
Now, all we need to do is to test our app. To do this, select your Android device in the Flutter Device Selection drop-down and click the Play button at the top-right corner of your screen. This will launch your mobile emulator and run your Flutter image overlay app:

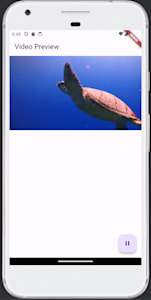
Here’s what our app looks like:
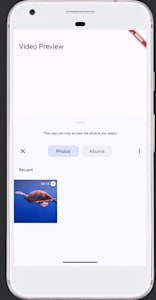
Here, select the file you want to upload. Now, sit back and wait until the file finishes uploading. Once the file has been uploaded, simply click on the Play button to play the video preview:
Getting the Most Out of Flutter Video Preview
This guide explored techniques for implementing video previews within Flutter applications. Cloudinary’s integration with Flutter allows you to upload videos, generate high-quality preview thumbnails, and manage video delivery efficiently. You can leverage Cloudinary’s video manipulation tools for basic editing and transcoding, ensuring optimal playback across various devices.
So, empower your Flutter apps with seamless video previews using Cloudinary! Sign up for a free account and explore its comprehensive video management features.
More from Cloudinary:
Enhanced Support for Long-Form Video in Latest Video API Innovations

