 Ask AI
Image resizing and cropping
Last updated: Jun-19-2026
Responsive design and art direction generally requires displaying images at a variety of sizes, often much smaller than the original.
If you deliver full size images and rely on browser-side resizing (using CSS or HTML width and height attributes), users are forced to download unnecessarily large files. Therefore, images should always be delivered from the server at their final size.
When you use any of the Cloudinary resizing transformations, the sizing (scaling/cropping) is performed on the server side, and the asset is always delivered to the browser at the requested size.
Here are some examples of different cropping techniques used on the same image. Click each image to see the URL parameters applied in each case:
 Original image
 Focus on the
model in a
portrait crop
 Detect the
face for a
thumbnail crop
 Automatically determine what to keep in a banner crop
- To help you learn about the different cropping and resizing modes, try out the interactive demo.
- Resizing images can lead to a reduction in image quality. Cloudinary provides solutions for both upscaling and downscaling to help retain the details in your images.
Resize dimensions
You can set the target dimensions of your resized image by specifying width, height, and/or the target aspect ratio as qualifiers of your resize transformation.
To set dimensions using exact pixel values:
- Use an integer value for w (width) or h (height). For example,
w_150sets the width to exactly 150 pixels.
To set dimensions relative to the original:
- Use a decimal value for width or height. For example,
w_0.5sets the width to half the original width. - Use
ihoriwas values to set the dimension to the initial height or initial width of the original image respectively. For example,w_iwsets the width to the same value as the original width. This may be useful when applying chained transformations or setting the dimensions of an overlay.
To set dimensions using aspect ratio:
Use the ar (aspect ratio) parameter with one of the following formats:
-
a:bwhereasignifies the relative width andbthe relative height (e.g.,ar_4:3orar_16:9). - A decimal value representing the ratio of the width divided by the height (e.g.,
ar_1.33orar_2.5). 1.0 is a perfect square.
Automatic dimension calculation:
When specifying the dimensions for a scale crop, you'll generally want to only specify one dimension, and let Cloudinary automatically determine the other dimension to ensure the original aspect ratio is preserved.
Conversely, when using a resize mode that's intended to crop part of the asset and change the aspect ratio compared to the original, it's generally recommended to specify both width and height or width/height along with an aspect ratio to define the exact required dimensions. However, in rare cases, you may choose to specify only one of these three resize qualifiers, and let Cloudinary automatically determine the missing dimension as follows:
-
If you provide only width or only height, then the other dimension is automatically calculated to deliver the original aspect ratio. For example, if your original asset is 400*600, then specifying
c_crop,w_200is the same as specifyingc_crop,w_200,h_300. Supported for all resize and crop modes.
-
If you provide only the aspect ratio (for cropping modes only):
- If
ar> 1, the original width is maintained and the height is cropped to deliver the requested ratio. - If
ar< 1, the original height is maintained, and the width is cropped accordingly. - If
ar== 1:- If the image is wider than taller, the result will use the full height of the image and crop the width as needed.
- If the image is taller than wider, the result will use the full width of the image and crop the height as needed.
- Providing only the aspect ratio is not supported for
imagga_crop.
- If
Resize and crop modes
When changing the dimensions of an uploaded image by setting the image's height, width, and/or aspect ratio, you need to decide how to resize or crop the image to fit into the requested size. Use the c (crop/resize) parameter for selecting the crop/resize mode. Cloudinary supports the following image resize/crop modes:
| Crop/resize mode | Behavior |
|---|---|
| Cropping modes | If the requested dimensions have a different aspect ratio than the original, these modes crop out part of the image. |
| fill | Resizes the image to fill the specified dimensions without distortion. The image may be cropped as a result. |
| lfill | Same as fill, but only scales down the image. |
| fill_pad | Same as fill, but avoids excessive cropping by adding padding when needed. Supported only with automatic cropping. |
| crop | Extracts a region of the specified dimensions from the original image without first resizing it. |
| thumb | Creates a thumbnail of the image with the specified dimensions, based on a specified gravity. Scaling may occur. |
| auto | Automatically determines the best crop based on a specified gravity. Scaling may occur. |
| Resize modes | These modes adjust the size of the delivered image without cropping out any elements of the original image. |
| scale | Resizes the image to the specified dimensions without necessarily retaining the original aspect ratio. |
| fit | Resizes the image to fit inside the bounding box specified by the dimensions, maintaining the aspect ratio. |
| limit | Same as fit, but only scales down the image. |
| mfit | Same as fit, but only scales up the image. |
| pad | Resizes the image to fit inside the bounding box specified by the dimensions, maintaining the aspect ratio, and applies padding if the resized image does not fill the whole area. |
| lpad | Same as pad, but only scales down the image. |
| mpad | Applies padding to fill the whole area specified by the dimensions if the original image is smaller than those dimension. |
| Add-on resize and crop modes | These modes adjust the size and/or crop the image using an add-on. |
| imagga_scale | Performs smart scaling, using the Imagga Crop and Scale add-on. |
| imagga_crop | Performs smart cropping, using the Imagga Crop and Scale add-on. |
c_<mode>), the image is scaled to the new dimensions by default. However, there is no default cropping mode when using the Cloudinary SDK helper methods (see Embedding images in web pages using SDKs), so a cropping mode must be explicitly set.Some of the cropping modes keep only a certain part of the original image in the resulting image. By default, the center of the image is kept in the crop, but this is not always ideal. To keep the parts of the image that are important to you, you can use the gravity parameter. For example, you can specify to keep faces, text, or certain objects in the crop, or gravitate towards an automatically determined area of interest. You can also guide the crop towards areas of your image defined by compass points, for example, north to keep the top part of the image, or south_east to keep the bottom-right part. Additionally, if you know the coordinates of the area you want to keep, you can explicitly specify these.
Resize and crop mode examples
The following examples show the same image resized to a width and height of 200 pixels, using different methods of resizing and cropping.
The original image is 640 x 427 pixels:

Resizing the image to 200 x 200 pixels, using crop, scale, fill and pad results in the following images:
 c_crop,h_200,w_200
 c_scale,h_200,w_200
 c_fill,h_200,w_200
 b_brown,c_pad,h_200,w_200
You could deliver the c_fill transformation shown above as follows:
Resizing and cropping interactive demo
Try out this interactive demo to see the results of different cropping and resizing methods, given a specific viewport size.
Choose your starting image, cropping mode, gravity and cropping/viewport dimensions, then click the button to generate the new image.
Square
|
Portrait
|
Landscape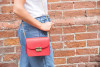
|
Small
|
|
Original image size: |
|||
|
|
|
|
|
|

Things to know about this demo:
- Not all combinations of cropping and gravity are valid, for example, gravity can't be used together with
scale, or any of thefitorpadoptions (exceptfill with padding), andfill with paddingonly works with auto-gravity options. - The gravity options
g_auto:handbagandg_handbaguse the Cloudinary AI Content Analysis Add-on. - Although Cloudinary recommends storing your highest resolution images, and delivering scaled-down versions, here you can choose between two sizes of one of the images to show how some modes can give different results depending on the resolution, and to demonstrate the different fit modes.
- The option to specify no dimensions is intended for use with
g_handbagand a cropping option. You can also use it to compare the difference in bytes delivered with and without dimensions using other cropping modes, by inspecting the resulting image properties in your browser.
-
Image crop modes: Detailed examples of all cropping modes, including
fill,lfill,fill_pad,crop,thumb, andauto, plus an interactive demo. -
Image resize modes: Detailed examples of
scale,fit,limit, andmfit. -
Image padding modes: Detailed examples of
pad,lpad, andmpad. - Image gravity for crops: Control which part of the image is kept when cropping, using compass positions, face detection, object positions, or liquid rescaling.
- Automatic gravity for image crops: Use AI-powered gravity to keep the most important content in frame, including focal preferences, algorithm selection, and device pixel ratio.
- Image upscaling and downscaling: Upscale with super resolution or preserve quality when downscaling.
- Face-detection based transformations: Crop and transform images based on detected faces.
- Cloudinary AI Content Analysis add-on: AI-powered content analysis for smarter cropping decisions.
Error
Rate this page:
