Custom focus areas
Last updated: Dec-17-2025
When cropping images, or placing layers, you may have certain areas of interest in the composition of the picture that you want to focus on. Although there are AI-based ways to focus on areas of an image, sometimes you need to ensure accuracy and consistency, so Cloudinary provides the capability to define and refine custom areas of an image.
for cropping
and overlays
 Use custom regions
for cropping
face-detection based
transformations
This guide focuses on custom coordinates (including on-the-fly custom coordinates), custom regions and custom face coordinates, which allow you to define specific areas of an image to focus on (also known as gravity). You can learn more about gravity in Gravity positions for crops and Image layer placement. You may also be interested in Face-detection based transformations.
Custom coordinates
If you know which part of an image you want to focus on, you can specify the coordinates of its bounding box while uploading the image using the custom_coordinates parameter of the upload method. You can also set the custom_coordinates parameter for an existing image, either using the explicit method of the Upload API, or the update method of the Admin API.
The coordinates indicate a region contained in the image that can be used for cropping or adding layers using the custom gravity mode.
Specify the area by the X and Y coordinates of the top left corner and the width and height of the region, as a comma-separated list. For example, 225,230,250,240. In an SDK you can specify this as an array, for example, [225, 230, 250, 240].
The response includes the set coordinates:
Crop with custom coordinates
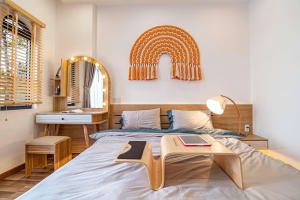
This is the uploaded image:

You can crop the image to the exact area defined by the custom coordinates using the crop mode and custom gravity (c_crop,g_custom):

Custom coordinates with auto gravity
The custom coordinates override automatic gravity (g_auto),
but if you don't want them to, then you can specify none for the gravity focal point:
If you want to weight the gravity towards the custom coordinates, but not override the automatic gravity entirely, then specify custom_no_override as a focal point. You can also take other objects into account, in addition to your custom coordinates, for example the bed:

Overlay with custom coordinates
You can use custom coordinates to position overlays on an image by specifying custom gravity. In this example, the sale icon is scaled down to 75% of the custom area and overlaid in the center of that area:
Multiple custom coordinates
You can add more than one set of custom coordinates using the following syntax:
If an image has more than one set of custom coordinates defined, then the cropping and overlay mechanisms use the largest of the defined areas.
You can create conditional transformations based on the number of custom coordinate sets defined (ccc).
For example, overlay the sale icon only if there is one custom coordinate set defined: (if_ccc_eq_1):
Here's the same transformation for an image that doesn't have any custom coordinates defined:
Custom coordinates on the fly
You can specify custom coordinates directly in the transformation URL using the aoi (area of interest) focal position of auto gravity.
Specify the area by the X and Y coordinates of the top left corner and the width and height of the region, joined with underscores: <top left x>_<top left y>_<width>_<height>.
Custom coordinates specified on the fly override any custom coordinates already specified for an image.
For example, automatically extract a 330 x 160 pixel area of an image, starting at (420, 230) (g_auto:aoi_420_230_330_160):

Custom regions
You can define custom regions in an image, which you can name, and use as gravity for cropping.
To define custom regions, set the regions parameter of the upload, explicit or update methods.
Each region is specified by a name (alphanumeric characters and hyphens permitted) and an array of at least two X,Y coordinate pairs, e.g., { "name1": [[1, 2], [3, 4]], "name2": [[5,6], [7,8], [9,10]] }. If two pairs are specified, these refer to the top left and bottom right coordinates of a rectangle. Otherwise, if more pairs are specified, they refer to the corners of a custom region.
The response includes the regions:
Crop with custom regions
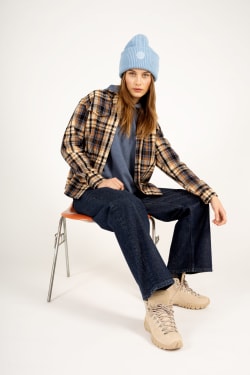
This is the uploaded image:

You can use the named regions when defining gravity for a crop. For example, create a thumbnail of an image 150 pixels square while focusing on the region defined as shoes (c_auto,g_region_!shoes!,h_150,w_150):

And the same for the region named hat:

You can create conditional transformations based on the number of regions defined (rc), and the names of the regions (rn).
For example, crop this image only if there is a region named hat defined (if_!hat!_in_rn):

See full syntax: g_region in the Transformation Reference.
Custom face coordinates
When images are uploaded to your product environment, Cloudinary automatically detects faces in the images and stores the coordinates of those faces for use with face-detection based transformations. For example, this image was uploaded with no special parameters, and yet you can specify c_crop,g_face to crop to the face:
You can override these face coordinates, using the face_coordinates parameter of the upload method. You can also set the face_coordinates parameter for an existing image, either using the explicit method of the Upload API, or the update method of the Admin API.
Specify a face by the X and Y coordinates of the top left corner and the width and height of the region, as a comma-separated list. For example, 220,80,200,220. In an SDK you can specify this as an array, for example, [220, 80, 200, 220]. You can specify multiple faces by separating each list with a pipe, for example, 220,80,200,220|420,120,180,250, or as another array in SDKs: [[220, 80, 200, 220],[420, 120, 180, 250]].
In the request, you can set faces to true to return the coordinates of the faces.
The response includes the set coordinates:
This is the uploaded image:

You can see the coordinates of the automatically detected faces that these custom face coordinates override, by uploading the same image without setting the coordinates (and with the faces parameter set to true):
Cropping around the faces, you can see the difference between the automatically determined coordinates and the custom face coordinates:
Face-detection based transformations
Setting custom face coordinates means that any of the face-detection based transformations applied to the image will use those face coordinates instead of the automatically detected ones.
For example, pixelating the faces in the image uploaded with the custom face coordinates:
Focus Area Refiner
The Focus Area Refiner lets you fine-tune, or specify new custom focus areas in an image using a graphical interface.
You can open the Focus Area Refiner for any image from Studio. Click Refiners in the left panel, then select the Focus Area button.
The Focus Area Refiner contains three tabs:
- Face: lets you adjust the areas automatically detected as faces on upload, in addition to adding new ones.
- Custom: lets you define or edit a custom region for the image.
- Region: lets you define or edit multiple named regions for the image.
You can either enter exact coordinates for the focus areas, or drag your mouse to select the desired region on the displayed image, which automatically populates the coordinates.
 Ask AI


