 Ask AI
Upload widget
Last updated: Jun-02-2026
Cloudinary's Upload widget is a complete, interactive user interface that enables your users to upload files from a variety of sources to your website or application. The widget, requiring just a couple lines of code to integrate, eliminates the need to develop in-house interactive media upload capabilities.
This guide describes the latest version of the Cloudinary Upload widget.
Cloudinary supports only the documented configuration and the supplied files with the widget. Any direct changes to the widget code and its elements (for example, CSS and JS files) might break its functionality, and won't be supported.

The Upload widget responsively resizes to fit in the available width, with the display functionality automatically adjusting on the fly for use in mobile applications.

The widget offers uploading from a variety of sources, such as: your local device, a remote URL, the device camera, image search, popular social media accounts and a variety of stock photography sites. The widget supports drag & drop functionality, interactive cropping, upload progress indication, and thumbnail previews. The widget also monitors and handles uploading errors and offers extensive event handling for integrating your own code.
You can implement the widget for unsigned uploading directly from the browser to Cloudinary storage, without involving your servers in the process. The widget sends JavaScript callbacks on successful uploads, so you can integrate the upload process back into your existing media pipeline. You can additionally configure Cloudinary to send server-side callbacks. Advanced users can also use the Upload widget with signed uploads for a more secure process when required.
Once uploaded, images and videos can be resized, cropped and transformed by Cloudinary on the fly so they can be embedded as needed in your website or mobile app.
The Upload widget requires only pure JavaScript to integrate and is easy to use within any web development framework.
- Quick example
- Sample apps
- Cloudinary Upload widget video tutorial
- How to set up and integrate the Upload widget
- Third-party upload sources
- API events
- Pre-batch validation
- Prepare upload parameters
- Tagging suggestions
- Upload preset selection
- Webhook notifications
- Look and feel customization
- Accessibility
- Localization
- Encryption
- Upload widget reference
Quick example
To use Cloudinary's Upload widget in your site with unsigned uploads, include the widget's remote JavaScript file and then specify the following (minimum) information when calling the createUploadWidget method to initialize the widget:
- Your product environment cloud name
- The upload preset to use for uploading files
Once initialized, the widget is ready to be rendered when needed. The following sample includes code for binding to the click event of a button element in a web page, in order to call the widget's open method and display the initialized widget:
You can try out this simple Upload widget example by clicking the button below:
The following buttons were implemented with a few additional parameters to demonstrate additional capabilities.
These and many additional options are described on the rest of this page.
Sample apps
Sample app: Basic Upload widget
Check out the following Upload widget sample app that you can use to try out some sample configuration changes:
The code for this app is available in GitHub.
- React Upload widget (also uses the React SDK for displaying the uploaded image)
- Angular Upload widget
- Vue Upload widget
For implementation instructions, see Unsigned uploads.
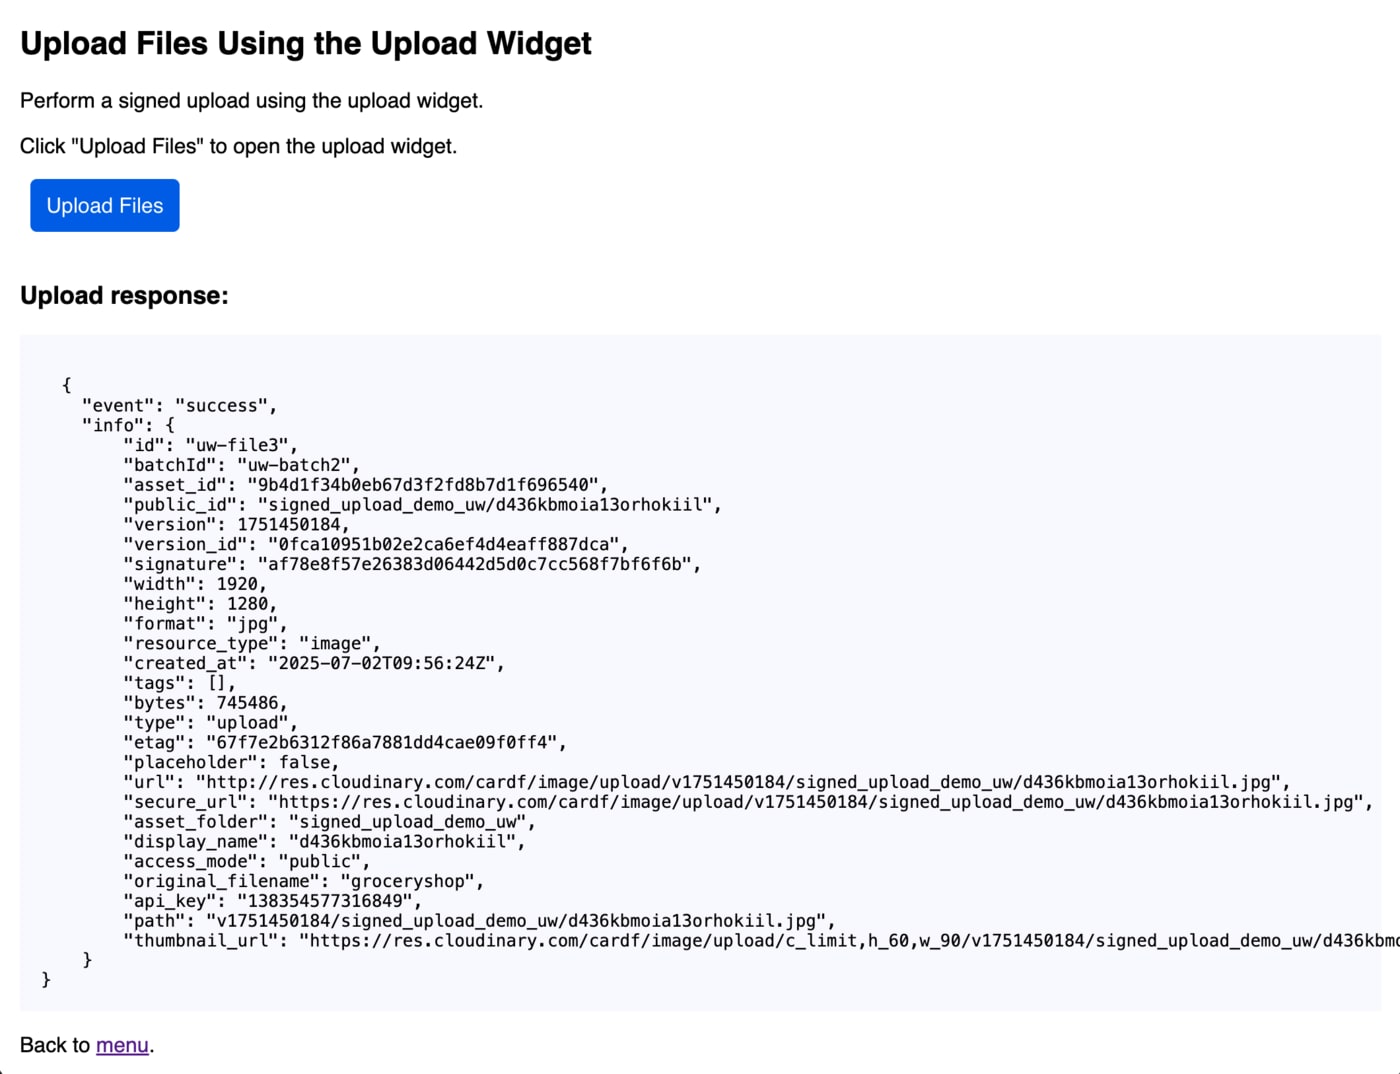
Sample app: Signed uploads using the Upload widget
This Node.js app demonstrates how to perform a signed upload using the Upload widget.
The widget is constructed in signed-uploads/public/js/uploadclientwidget.js and the signature is generated in signed-uploads/modules/signuploadwidget.js, using the api_sign_request method.
Setup instructions (after cloning from GitHub)
-
Install all dependencies from the top level:
Open signed-uploads/public/js/config.js
Set
cloud_name,api_keyandapi_secretwith the corresponding account details from the API Keys page of the Console Settings.-
Run the app to start the server:
The response should be:
Open
http://localhost:3000in a browser.
Go to GitHub to try it out:
For implementation instructions, see Signed uploads.
Cloudinary Upload widget video tutorial
This video demonstrates how to integrate a basic Upload widget using a code sandbox.
This video is brought to you by Cloudinary's video player - embed your own!
Use the controls to set the playback speed, navigate to chapters of interest and select subtitles in your preferred language.
Tutorial contents
How to set up and integrate the Upload widget
For most needs, you can set up the Upload widget for unsigned uploads. Using unsigned uploads with your widget makes it quick and simple for you to provide a UI where users can upload content to your site.
Signed uploads require a bit more setup and coding, but provide a more secure upload process when required.
Unsigned uploads
Unsigned uploads are somewhat less secure than signed uploads. For example, it's possible for a customer to inspect your client-side HTML code to find your cloud name and preset, and use that information to upload unwanted files to your Cloudinary product environment. For this reason, unsigned uploads have some protective limitations. For example, existing assets can't be overwritten. The options you set in the unsigned preset can also limit the size or type of files that users can upload to your Cloudinary product environment using that preset.
To setup and add an Upload widget for unsigned uploads:
1. Include the Cloudinary widget JavaScript file in your web page
You can choose between always importing the latest version of the Upload widget or importing a specific version:
- We generally recommend including the
latestversion to ensure that your users always get the latest fixes and functionality.
However, if you want to maintain more control over the pace of updates, you can test and use a specific version. In this case, we recommend that you watch the Upload widget changelog (or register for the Upload widget changelog RSS feed) and regularly test and upgrade to the latest versions. - When using both the Upload Widget and Video Player on the same page, the video player scripts must be loaded first to prevent any conflicts.
2. Optional. Set your cloud name globally
If you include multiple widgets in your web page, you can use the setCloudName method to instruct all widgets on the page to upload to the same Cloudinary product environment.
Alternatively, you can set the product environment cloud_name as a parameter of each widget creation call.
3. Create an unsigned upload preset
- In the Upload section of the Console Settings, create a new, unsigned upload preset. This preset serves as a form of security override, allowing client-side unsigned uploads.
Alternatively, you can create an unsigned upload preset using the Admin API or in your LLM-based IDE using the Cloudinary Asset Management MCP server.
- Note the preset name. You'll need it in your widget creation call, step 4.
- Optional. Edit the preset to:
- Modify its name
- Apply incoming transformations to control the size or type of asset users can upload using your widget
- Automatically generate certain eager transformations on all uploaded assets
For details, see Upload presets.
4. Add your widget
- Use one of the widget initialization methods to create your widget.
- When you call the method, specify:
-
uploadPreset- The preset name you created in step 3 -
cloudName- Your cloud name (if you didn't set it globally) - Any additional widget options you want to apply
-
For example, in the demo example earlier on this page, the createUploadWidget method call includes the cropping option, which enables users to define cropping coordinates, and the folder option, which uploads all images from the widget to a specified folder:
Signed uploads
Instead of providing an upload preset name, you initialize the widget for signed uploads with the public API key and an upload signature that's generated either when the page is loaded or when the upload request is submitted.
To setup and implement the Upload widget for signed uploads:
1. Include the Cloudinary widget JavaScript file in your web page
You can choose between always importing the latest version of the Upload widget or importing a specific version:
- We generally recommend including the
latestversion to ensure that your users always get the latest fixes and functionality.
However, if you want to maintain more control over the pace of updates, you can test and use a specific version. In this case, we recommend that you watch the Upload widget changelog (or register for the Upload widget changelog RSS feed) and regularly test and upgrade to the latest versions. - When using both the Upload Widget and Video Player on the same page, the video player scripts must be loaded first to prevent any conflicts.
2. Optional. Set your cloud name globally
If you include multiple widgets in your web page, you can use the setCloudName method to instruct all widgets on the page to upload to the same Cloudinary product environment.
Alternatively, you can set the product environment cloud_name as a parameter of each widget creation call.
3. Optional. Create a signed upload preset
When you use the Upload widget for signed uploads, an upload preset isn't mandatory. However, you can optionally create a signed preset if you want to define incoming or eager transformations on the uploaded asset.
- Define the signed upload preset as described in Upload presets.
- Supply the preset name in the
uploadPresetoption when you call the widget initialization method in step 5.
4. Select string or function as the upload_signature type and prepare the required code
Select one of the following options and prepare the required code:
Option A: String signature
Use this option when all parameters required for signing are known at page load time.
Characteristics:
- Requires your page to connect to the web server on page load to generate the signature.
- Requires that all parameters required for signing are known at page load time. If user input will affect the parameters (for example, if you are using the widget's interactive cropping option), you must use Option B: Function signature.
- The signature is valid for one hour from the timestamp used in the signature. If a user keeps the page open for a long time, the signature string may expire.
To prepare a string signature:
-
Generate the signature string from all parameters used, including
source=uw.The
source=uwis a hidden parameter sent automatically by the Upload widget, but must still be included in the string to sign.For example:
timestamp), serialize them in alphabetical order by parameter name. For details on generating the signature string, see Generating authentication signatures.Option B: Function signature
Use this option when user interaction will affect upload parameters.
Characteristics:
- Requires you to create a function to generate the signature.
- The function runs when you submit the upload request, therefore, the timestamp doesn't risk expiring if the user keeps the page open.
- The function receives the final parameters of the upload, including any parameters impacted by user interaction.
To prepare a function signature:
-
Create a function that uses a server-side endpoint to generate the signature.
For example: A function that uses a server-side endpoint to generate the signature:
params_to_sign) and not create your own timestamp value.5. Add your widget
- Use one of the widget initialization methods to create your widget.
- When you call the method, specify:
-
api_key- Your API key -
cloudName- Your cloud name (if you didn't set it globally) -
uploadSignature- The string or function from step 4 -
uploadSignatureTimestamp- For string signatures only - Any additional widget options you want to apply
-
For example, the applyUploadWidget method creates the Upload widget and calls the signature function shown in the previous step:
Third-party upload sources
In addition to the 'My Files', 'Web Address', and 'Camera' sources, the Upload widget supports a variety of third‑party upload sources from which your users can upload images and videos.

Desktop source tabs:
- If there are more sources than fit within the widget width, carousel arrows appear for horizontal scrolling.
- The number of visible sources depends on the length of their labels. With default text, about 7–8 sources fit without scrolling.
- If you customize or translate the labels, the number of visible sources may change accordingly.
Mobile display:
At responsive widths narrower than 768px, the widget switches to the mobile display with a collapsible side menu.
The sources parameter
The sources parameter defines which upload options appear in the Upload Widget, and allows you to configure those options. Provide an array of strings, where each value adds a corresponding upload tab or option.
If you don’t include the sources parameter, all available sources are shown by default.
To customize the sources available in your Upload widget:
Include the sources parameter when creating the Upload Widget and specify the sources you want to enable:
- List the source values in the order you want them to appear.
- Select from the following possible values:
| Value | Description |
|---|---|
| local | Upload a file from your local device. Adds the My Files source option. |
| url | Upload a file from a remote location. Adds the Web Address source option. |
| camera | Upload an image file via the device's camera. Adds the Camera source option.
Note: Desktop/laptop only - a mobile device's camera is accessed through the local (My Files) source option. |
| dropbox | Upload a file from your Dropbox account. Adds the Dropbox source option. |
| image_search | Upload a file from the web using Google's Search Engine. Adds the Image Search source option. |
| shutterstock | Upload an image from a Shutterstock account. Adds the Shutterstock source option. |
| gettyimages | Upload an image from a Getty Images account. Adds the gettyimages source option. |
| istock | Upload an image from an iStock account. Adds the iStock source option. |
| unsplash | Upload an image from Unsplash. Adds the Unsplash source option. |
| google_drive | Upload a file from a Google Drive account. Adds the Google Drive source option. |
Image Search source
The image_search option allows your users to select images from the web using your Google Custom Search account, and then upload them to Cloudinary. The search can be optionally confined to specific sites (e.g., your own website) and can be filtered by specified licensing criteria.

- Restrict HTTP referrers: In the Google Cloud Console, add HTTP referrer restrictions to your API key so that only requests from your domain(s) are accepted.
- Restrict API access: Limit the key to the Custom Search API only, so it can't be used to call other Google APIs.
- Set up quotas and billing alerts: Configure daily usage quotas and billing alerts in the Google Cloud Console to detect and limit unexpected usage or abuse.
To include Image Search in your customized sources:
- Add the
googleApiKeyparameter with the API key for your Google Custom Search account. - Add the
sourcesparameter (array of strings) to customize the available upload options and include theimage_searchsource. - Optional. Add the
searchBySitesparameter (array of strings) with the domain names of sites you want to allow for the search:- If more than one site is specified, a Search by Site drop-down will be added so your users can select the site to search.
- To allow searching the entire web, use the value
all(default).
- Optional. Add the
searchByRightsparameter and set totrueto add a drop-down box so that users can select a licensing filter to apply to the image search (default:false).
Basic example:
Example with sites filter and rights filter:

Dropbox source
The dropbox option allows your users to login to their own Dropbox account, browse through their folders and files, and then select the files to upload to Cloudinary. This option requires that the Upload widget is embedded in a secure (HTTPS) page because the user sign-in to Dropbox must be over a secure connection.
To include Dropbox in your customized source:
- Create a new app on the Dropbox App Console:
- Click My apps
- Select the Dropbox API and Full Dropbox options
- Name your app
- Click the Create app button
- On the next page, set the following redirect URI for your Dropbox application:
https://widget.cloudinary.com/v2.0/global/auth/index.html - Copy the auto-generated App key for your Dropbox app. You will supply it as the value of the
dropboxAppKeyparameter in step 5. - Set your Dropbox app status:
- Your Dropbox app is initially created in Development status for testing purposes.
- You can enable additional users with the Enable additional users button.
- When your app is ready to go live, click Apply for Production status to enable all your users to upload via the Dropbox app.
- For more information on creating Dropbox apps, see their documentation and take note of their branding guidelines.


- Configure the Dropbox source in your Upload widget by adding the following parameters to the method you use for creating the Upload widget:
-
dropboxAppKey(String) - The App key from step 3. -
sources(Array of strings) - Use this parameter to customize available sources, and includedropboxin the array to add the Dropbox option.
-
For example:
Shutterstock source
The shutterstock option allows your users to log in to their own Shutterstock account, browse the assets and then select the ones to upload to Cloudinary. If they haven't yet purchased the Shutterstock asset they select, they can purchase it as part of this process.

To include Shutterstock in your customized sources:
Add the sources parameter (array of strings) to customize available sources, and include shutterstock in the array to add the Shutterstock option,
For example:
Getty Images source
The gettyimages option allows your users to log in to their own Getty Images account, browse the assets and then select the ones to upload to Cloudinary. If they haven't yet purchased the asset they select, they can purchase it as part of this process.

To include Getty Images in your customized sources:
Add the sources parameter (array of strings) to customize available sources, and include gettyimages in the array to add the Getty Images option.
For example:
iStock source
The istock option allows your users to log in to their own iStock account, browse the assets and then select the ones to upload to Cloudinary. If they haven't yet purchased the iStock asset they select, they can purchase it as part of this process.

To include iStock in your customized sources:
Add the sources parameter (array of strings) to customize available sources, and include istock in the array to add the iStock option.
For example:
Unsplash source
The unsplash option allows your users to browse the assets on Unsplash, and then select the ones to upload to your Cloudinary account.

To include Unsplash in your customized sources:
Add the sources parameter (array of strings) to customize available sources, and include unsplash in the array to add the Unsplash option.
For example:
Google Drive source
The google_drive option allows your users to login to their own Google Drive account, browse through their files and then select the files to upload to Cloudinary.

To include the Google Drive in your customized sources:
- Add the
sourcesparameter (array of strings) to customize available sources, and includegoogle_drivein the array to add the Google Drive option. - Optional. Add the
googleDriveClientIdparameter (string) with the Client ID of your own Google Drive application for accessing your users' Google Drive accounts. If not provided, uses the Cloudinary Google Drive app.
For example:
API events
The Upload widget methods include a callback function for implementing event handling.
To implement event handling in your Upload widget:
- Add a callback function with the signature:
function(error, result), where:-
error- Eithernullif successful or an error message if there was a failure -
result- A JSON object detailing the triggered event
-
- In your callback function, check for specific events and handle them accordingly.
For example, to log a message to the console when a user clicks the 'show completed' button:
For a full listing of available events, see the Events section in the Upload widget API reference.
Pre-batch validation
You can run validation on the files in the upload queue before they're uploaded to Cloudinary.
To implement pre-batch validation:
-
Add
preBatchto the widget configurationProvide a function with the signature
(cb, data). -
Run your validation logic inside the
preBatchfunctionCheck
data.filesand then choose whether to continue or cancel the upload:-
Cancel: call
cb({ cancel: true }) -
Proceed: call
cb()
-
Cancel: call
For example, to cancel the upload if the file name is 'TopSecret':
Prepare upload parameters
You can prepare upload parameters for files in the upload queue before they're uploaded to Cloudinary. Use this to specify tags, metadata for each file, or prepare an upload signature for a signed upload.
To prepare upload parameters:
- Set the
prepareUploadParamsparameter with a function to run before the upload. - In your function, prepare any upload parameters you need (see supported parameters in the note below).
- Call the callback function with the prepared parameters.
Example 1: Generate the signature for a signed upload
Example 2: Change the file name after selecting a file
You can dynamically modify the public_id (the uploaded asset’s filename) after a user selects a file by using the prepareUploadParams callback.
This is useful when you want to rename an asset based on user input or selected file details before the upload is finalized.
- The prepareUploadParams callback only supports preparing the following parameters:
apiKey,auditContext,context,folder,invalidate,metadata,overwrite,publicId,qualityAnalysis,resourceType,signature,tags,uniqueFilename,uploadPresetuploadSignatureTimestamp,useFilename. - If the
prepareUploadParmasparameter is included then theuploadSignatureparameter is ignored. If you also need to provide a signature, make sure to include that code in yourprepareUploadParamsfunction and pass the signature as part of the data passed to the callback (cb). - If the code in your function determines that the upload should be canceled, you can include the
cancelboolean parameter set totruewhen calling the callback function (the same way you can cancel the upload with Pre-batch validation).
Tagging suggestions
You can add tagging suggestions that appear while your users are typing in the Add a Tag (Advanced options) text field.
To enable tagging suggestions:
- Create a function that's called whenever the text changes in the field. Your function should call the callback function with the list of tagging suggestions to display.
- Add the
getTagsparameter with the function to call. - Set the
showAdvancedOptionsparameter totrue.
The following example demonstrates a mini auto-complete function that returns only suggestions matching the current text entered in the field:
Here's the Upload widget with tagging enabled:

Upload preset selection
You can offer your users an additional Advanced option with a selection of Upload Presets to choose from.
To enable upload preset selection:
- Create a function that's called to provide the list of presets to offer. Your function should call the callback function with the list of presets to display.
- Add the
getUploadPresetsparameter with the function to call. - Set the
showAdvancedOptionsparameter totrue.
The following example demonstrates an upload preset selection function that returns 3 presets:
Here's the Upload widget with upload preset selection enabled:

Webhook notifications
If you are implementing the widget and also need to process upload information in your server-side code, you can set up notifications.
To receive server-side webhook notifications of widget uploads:
- Include a notification URL in the upload preset you use for the widget.
- Create a server-side endpoint to receive the notification.
- In your endpoint, parse the response from the widget upload.
- Process the upload information as needed (e.g., store in database, trigger workflows).
In the following Python example, the widget response is used to store the image model:
Look and feel customization
The look & feel of the Upload widget can be fully customized. You can modify the colors, fonts, and other elements.
To customize the Upload widget appearance:
- Add the
stylesparameter to your widget creation method with a JSON structure defining the elements to override. - Within the
stylesparameter, specify:-
palette- To define the colors of the various elements as an RGB or RGBA hex triplet or quadruplet, or a 3- or 4-digit RGB/RGBA hex -
fonts- To define the font to use for all the text elements (currently only supports fonts from Google available viafonts.googleapis.com)
-
- Include only the elements you want to override (all other elements will use default values).
The following example sets all elements to their default values (for reference purposes):
Accessibility
Web accessibility ensures that your website is inclusive for all visitors, including those with disabilities. The Web Content Accessibility Guidelines (WCAG) 2.1 AA provide an internationally recognized standard for making digital content accessible.
The Cloudinary Upload widget is designed to meet these accessibility requirements. It includes built-in support for keyboard navigation, screen readers, and low-vision use cases (requires configuration), all without requiring changes to your core workflows.

Motor and mobility support
For users who rely on a keyboard instead of a mouse, the Upload widget is fully navigable:
-
Keyboard navigation: Users can reach images and items in scrollable regions using Tab and Shift+Tab, following a logical and predictable focus order.
- This includes interactive items within scrollable regions, buttons, tabs, and other controls.
- Enter activates the currently focused element.
Focus management: When panels open (e.g., filter results), focus moves automatically to the first control in the panel and stays within that panel until it closes, ensuring users never lose context or accidentally navigate behind an active modal.
Support for screen readers
For users with sight disabilities, it's critical that assistive technologies are able to interpreted the interface accurately. The Upload widget provides semantic markup, accessible names, and other features to support this:
All form controls have programmatically associated labels.
Actionable elements, such as buttons and links, expose clear, descriptive names.
Informative images include alternative text, while decorative images are marked to be ignored.
Lists use semantic containers (
<ul>,<ol>), and landmarks are uniquely named to make navigation more efficient with screen readers.Filter results display in a live region so that screen reader users are aware of changes without needing to move focus.
Support for low vision and color blindness
For users with low vision or color-vision deficiencies:
Zoom and scaling: Users can enlarge text and interface elements as needed, ensuring they can comfortably read and interact with the widget.
Color and contrast: You can configure an accessible color theme with sufficient contrast by.
To configure an accessible color theme:
- Go to the Upload widget Demo page.
- In the Theme dropdown, select the predefined Accessible theme.
- Copy the generated Upload Widget instantiation code and paste it into your app to use the accessible color palette.
OR
Define your own accessible palette programmatically.
Example: Upload widget configuration with the Accessible theme applied
See also: Cloudinary Upload widget in the Accessibility guide.
Localization
The text used in the Upload widget can be fully customized for different languages.
To localize the Upload widget:
- Add the
textparameter with a JSON structure defining the value to use for each text element in each language. - Add the
languageparameter to specify which language to use from those defined in thetextparameter (default:en). - Specify any elements from the upload widget text.json that you want to override. Any element you don't specify will use the default values shown in that file.
For example, to customize only the queue title, queue title_uploading_with_counter, and the crop title:
{{...}}) are replaced with the actual value at runtime. Only the elements that already contain the double braces in the default localization file support variables.Encryption
Files can be encrypted and then uploaded to Cloudinary as raw files. These files can't be previewed within Cloudinary and will need to be decrypted after downloading them.
To enable file encryption in the Upload widget:
- Add the
encryptionparameter to your widget creation method. - Within the
encryptionparameter, specify:-
key- Your encryption key -
iv- Your initialization vector
-
The widget uses the browser's AES-GCM TextEncoder encryption with the SubtleCrypto library.
For example:
Decryption
Files that are uploaded and encrypted by the widget can be decrypted using the AES-GCM SubtleCrypto library.
To decrypt a file that was encrypted by the Upload widget:
- Use the AES-GCM SubtleCrypto library's
decryptmethod. - Pass the following parameters to the
decryptmethod:-
key- The same encryption key used when uploading the file -
iv- The same initialization vector used when uploading the file -
buffer- The file in base64 format
-
The decrypt method signature:
For example, using the decrypt method that passes the "dog.jpg" file in base64 format, a key of "ff234fe526725753fa45b53325", and an iv of "cd8a46d72e26a365dca78ef":
Upload widget reference
For details on all the available methods, parameters and events, see the Upload widget reference.
Error
Rate this page:
