Dart media transformations
Last updated: Apr-23-2025
After you or your users have uploaded media assets to Cloudinary, you can deliver them via dynamic URLs. You can include instructions in your dynamic URLs that tell Cloudinary to transform your assets using a set of transformation actions. All transformations are performed automatically in the cloud and your transformed assets are automatically optimized before they are routed through a fast CDN to the end user for optimal user experience.
For example, you can resize and crop, add overlay images or concatenate videos, blur or pixelate faces, apply a large variety of special effects and filters, and apply settings to optimize your media and to deliver them responsively.
Cloudinary's Dart SDK simplifies the generation of transformation URLs for easy embedding of assets in your Dart application. You can use the Dart reference to find all available transformations, syntax and examples.
Syntax Overview
The Cloudinary Dart SDK provides a simple and enhanced developer experience:
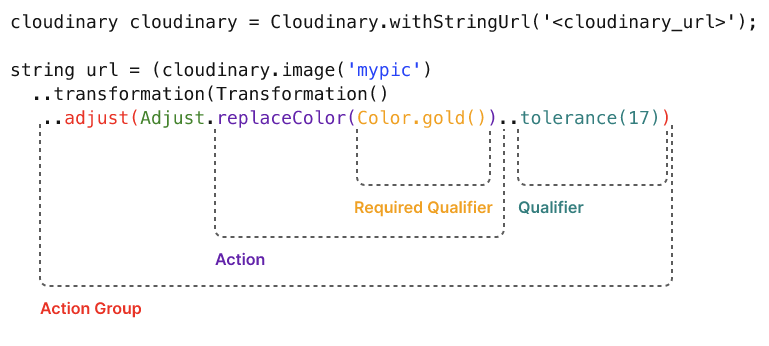
- When compiled to the final delivery URL, each action represents a different transformation component.
- It allows discovering the available options from within your development environment, and ensures that only options that are supported can be used together.
-
Action Group: An
Action Grouprepresents a directive to Cloudinary on how to transform a specific aspect of an asset (e.g.,adjust,effectorresize). -
Action: The
Actiondefines the specific Action to apply (e.g.,adjust(Adjust.replaceColor()),effect(Effect.blur())orresize(Resize.crop())). -
Qualifier:
Qualifiersfurther define how to apply an Action (e.g.,tolerancequalifies theadjust(Adjust.replaceColor())Action with a value oftolerance(17)). Some Actions also have a required qualifier which is then given as part of the action method (e.g.,adjust(Adjust.replaceColor(Color.gold()))to specify the color to apply).
The output of each Action is a complete transformation component (separated by slashes) in the URL. For example, the syntax example above would generate a URL similar to the following:
Supported action groups
Most transformations can be passed as parameters that follow Cloudinary's new action based syntax. You can discover all supported parameters by using the enhanced code autocomplete feature. Enter the Action Group that you'd like to use and all supported Actions in that group and their syntax will be displayed. Once you choose an Action, its supported Qualifiers will be displayed.
The following Action Groups are currently supported:
-
adjust: Consists ofActionsthat make subtle changes and improvements to the asset, such asbrightnessandopacity. -
border: Draws a border around your asset. -
delivery: Enables you to set quality, format, and DPR settings for delivering your assets. -
effect: Allows you to add special effects to your images (cartoonify,blur, andpixilate) and videos (boomerangandloop). -
addTransformation: Enables you to pass a transformation directly as a string. -
resize: Provides many options for resizing and cropping assets, including padding, scaling, fitting, adding a specific height and width, specifying gravity, and more. -
rotate: Provides settings for rotating your assets. -
roundCorners: Rounds the corners of the asset. Depending on your specifications, the effect ranges from subtle rounding to a fully rounded circle or oval shape.
import statement is inserted automatically, with the exception of:
-
border: Manually add theimport 'package:cloudinary_url_gen/transformation/border.dart' as border;import statement to differentiate Cloudinary'sborderclass from Dart's. -
adjustwithreplaceColor: Manually add theimport 'package:cloudinary_url_gen/transformation/color.dart';import statement.
Passing transformations as strings
Most transformations can be passed as parameters using the action based syntax. However, some transformations can only be passed as strings.
- Use the autocomplete feature to find out which transformations are supported for the new action based syntax.
- See the Transformation URL API reference for a comprehensive listing of all available transformations and the syntax to use when passing them as strings.
- Pass the string transformation via the
addTransformation()Action Group.
The following example shows a resized image. An overlay is applied to it using transformations passed as a string:
Deliver and transform images
You can deliver your media using direct URL-building directives, and then add them to your image or video view.
Direct URL building
To build an image, video, or non-media file URL, use the cloudinary.image, cloudinary.video or cloudinary.raw helper methods.
When building image or video URLs, you can add transformations as shown in the example below:
Applying named transformations
You can pre-define a set of transformations and assign them a name. Then, you can simply apply that entire set of transformations to URLs by referencing their name. This shortens complex transformation URLs and makes it easy to reuse transformations on multiple assets.
You can create and manage named transformations via the API or in the console UI using the Transformation Builder.
Let's say you have a named transformation called fun_effects that contains the cartoonify and outline effects, as well as a pad resize transformation with a height parameter of 300px.
These transformations can then be automatically applied when building a URL:
Combining transformations
Cloudinary supports powerful transformations. You can even combine multiple transformations together as part of a single transformation request, e.g. crop an image and add a border. In certain cases you may want to perform additional transformations on the result of the previous transformation request.
To support multiple transformations in a transformation URL, you can include multiple transformation components, each separated by a '/'. Each transformation component is applied to the result of the previous one. In Dart, applying multiple transformations is achieved by simply adding the next Action to the transformation. The following example first fills the image within a 250px square, then rounds the result to a circle, and finally delivers the image in the optimal transparent format:

The following example applies 4 chained transformations: fill to a 250*400px portrait, then rotate the result by 20 degrees, then add a brown outline to the rotated image, and optimize the resulting image to deliver with the best compression that gives good visual quality and in the optimal transparent format:

Apply common image transformations
This section provides an overview and examples of the following commonly used image transformation features, along with links to more detailed documentation on these features:
- Resizing and cropping
- Converting to another image format
- Applying image effects and filters
- Adding text and image overlays
- Image optimizations
Keep in mind that this section is only intended to introduce you to the basics of using image transformations with Dart.
For comprehensive explanations of how to implement a wide variety of transformations, see Image transformations. For a full list of all supported image transformations and their usage, see the Transformation URL API Reference.
Resizing and cropping
There are a variety of different ways to resize and/or crop your images, and to control the area of the image that is preserved during a crop.
You can also use automatic gravity to determine what to keep in the crop automatically.
For details on all resizing and cropping options, see resizing and cropping images.
Converting to another image format
You can deliver any image uploaded to Cloudinary in essentially any image format. There are three main ways to convert and deliver in another format:
- Specify the image's public ID with the desired extension.
- Explicitly set the desired format using the
Delivery.format()action. - Use the
Format.autoQualifier to instruct Cloudinary to deliver the image in the most optimized format for each browser that requests it.
For example:
1. Deliver a .jpg file in .png format:
2. Let Cloudinary select the optimal format for each browser. For example, in Chrome, this image may deliver in .avif or .webp format (depending on your product environment setup):
The above code generates a URL with the f_auto parameter:
For more details, see:
- Delivering images in different formats
- Automatic format selection (f_auto)
- Tips and considerations for using f_auto
Applying image effects and filters
You can select from a large range of image effects, enhancements, and filters to apply to your images. The available effects include a variety of color balance and level effects, tinting, blurring, pixelating, sharpening, automatic improvement effects, artistic filters, distortion and shape changing effects, outlines, backgrounds, shadows, and more.
For example, the code below applies a cartoonify effect and an outline effect, rounds the corners, adds a border, and then pads the image to a width of 300 pixels.
For more details on the available image effects and filters, see Visual image effects and enhancements.
Adding text and image overlays
You can add images and text as overlays on your main image. You can apply the same types of transformations on your overlay images as you can with any image and you can use gravity settings or x and y coordinates to control the location of the overlays. You can also apply a variety of transformations on text, such as color, font, size, rotation, and more.
For example, the code below overlays a couple's photo on a mug image. The overlay photo is cropped using face detection with adjusted color saturation and a vignette effect applied. The word love is added in a brown, fancy font and placed to fit the design. Additionally, the final image is cropped and the corners are rounded.

Image optimizations
By default, Cloudinary automatically performs certain optimizations on all transformed images. There are also a number of additional features that enable you to further optimize the images you use in your application. These include optimizations to image quality, format, and size, among others.
For example, you can use the auto value for the Format and Quality attributes to automatically deliver the image in the format and quality that minimize file size while meeting the required quality level. In addition, resize the image to make it even lighter. Below, these parameters are applied, resulting in a 25.66 KB AVIF file (in Chrome) instead of a 1.34 MB JPG with no visible change in quality.

For an in-depth review of the many ways you can optimize your images, see Image optimization.
Apply common video transformations
This section provides an overview and examples of the following commonly used video transformation features, along with links to more detailed documentation on these features:
- Resizing and cropping videos
- Concatenating videos
- Trimming videos
- Adding video overlays
- Adding video effects
Keep in mind that this section is only intended to introduce you to the basics of using video transformations with Dart.
For a full list of all supported video transformations and their usage, see the Transformation URL API Reference.
For comprehensive explanations of how to implement a wide variety of transformations, see Video transformations.
Resizing and cropping videos
There are a variety of different ways to resize and/or crop your videos, and to control the area of the video that is preserved during a crop. The following examples:
- crop the video to a height of 800px and a width of 750px in a specified area starting at 200px from the left and 450px from the top.
- resize the video to a height of 320px and width of 480px while padding the extra space with the original asset blurred playing in the background to preserve the original aspect ratio.
c_crop,x_200,y_450
Pad with blurred videob_blurred:400/c_pad,h_320,w_480
For all the ways in which a video can be cropped, see the parameters under the c (crop) section of the Transformation URL Reference that are marked as supported for video.
For details on all resizing and cropping options, see Resizing and cropping videos.
Concatenating videos
You can concatenate videos with a variety of options, including concatenating only a portion of the videos, concatenating a video at the beginning or end of another, creating custom transitions between concatenated videos, and concatenating an image to a video.
The following example shows two videos shortened to 5 seconds each (du_5.0), the main video starting with an offset of 1 second (so_1), with both videos uniformly resized (c_fill,h_300,w_450) and concatenated (fl_splice):
For a detailed description of how to concatenate videos, see the splice parameter of the fl_flag section of the Transformation URL Reference.
For details on all the ways in which you can concatenate videos, see Concatenating media.
Trimming videos
When trimming your videos, you can determine when to start trimming, when to stop, and / or the duration of the trimmed video.
The following example shows trimming a video to the section that starts at 3.5 seconds (so_3.5) with a duration of 5 seconds (du_5):
For all the ways in which a video can be trimmed, see the so (start_offset), du (duration), eo (end_offset) parameters the Transformation URL Reference that are marked as supported for video.
For more details on trimming videos, see Trimming videos.
Adding video overlays
You can add video, text, or image overlays onto your videos.
The following example shows one video scaled down (c_scale,w_80) and placed in the north-east corner (g_north_east) as an overlay (l_video:exercise2), starting 3 seconds after the main video starts playing (so_3):
For all the ways in which you can add video overlays, see the parameters under the l (layer) section of the Transformation URL Reference that are marked as supported for video.
For more details on video overlays, see Placing layers on videos.
Adding video effects
You can select from a large variety of video effects, enhancements, and filters to apply to your video. The available effects include speed, direction, and looping control, adding a progress indicator overlay, different transparency settings, AI generated preview, a variety of color balance and level effects, blurring, fading, and automatic improvement effects.
The following example shows a video that fades in and out Effect.fadeIn(2000), Effect.fadeOut(4000), loops twice Effect.loop(2), and has a vignette filter applied Effect.vignette().strength(50):
For all video effects, see the parameters under the e (effect) section of the Transformation URL Reference that are marked as supported for video.
For an in-depth review of all the available video effects, see Video Effects.
 Ask AI


