Quick start for web address media source
For a complete overview of Media Optimizer and how it can help you to optimize the media on your site, see the Media Optimizer Overview.
If you've followed the Media Optimizer walkthrough you'll have seen how easy it is to get started using a web address media source. This quick start is similar, but demonstrates how to set up Media Optimizer using your own web address media source.
Prerequisites
This quick start assumes that you have already signed up to create your Media Optimizer account and are now logged in.
Create an optimization profile
An optimization profile encapsulates everything you need to configure to get Media Optimizer up and running, including the media source, path prefix and base transformation.
Step 1: Start configuring an optimization profile
You can start configuring an optimization profile in any of these ways:
- From the Getting Started tab, click Configure an Optimization Profile.

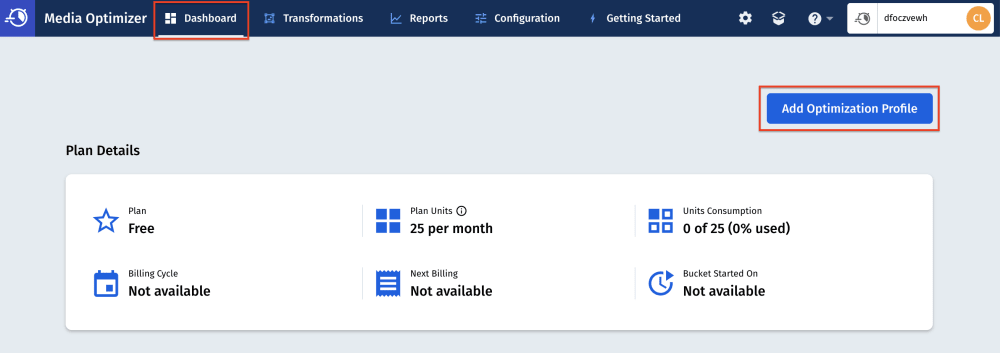
- From the Dashboard tab, click Add Optimization Profile.

- From the Configuration tab, click Optimization Profiles > Configure Your First Optimization Profile, or Add New.

Step 2: Complete the form
Optimization profile name
Enter a name for the optimization profile.
Media sources
Connect your media source to Media Optimizer as follows:
Click Connect a new media source.
-
Complete the form:
- Media source name: Enter a name for your media source.
-
Type: Select
Web Address. - URI base: Enter the base part of the URLs that you use to access your media.
Click Save.
Select your media source from the drop-down list.
If you have more media sources to connect, repeat these steps for each media source.
Optimization profile URL
- Leave the Domain as it is - it will be of the format:
<cloud name>.mo.cloudinary.net. - The Path prefix acts as an identifier for the optimization profile. Set it to something meaningful for the media that you'll be optimizing using this path. You can create further optimization profiles to apply specific transformations to different types of media.
Notice how the URL example changes to
https://<cloud name>.mo.cloudinary.net/<path prefix>.
Base transformation
Leave this as auto_format_auto_quality_responsive_width*. This transformation is recommended for all media. It automatically changes the format and quality level of your media and limits its width based on the viewing device to deliver every asset in the optimal way.
* If you don't see auto_format_auto_quality_responsive_width as an option, you can manually create this transformation, or simply use auto_format_auto_quality for now.
Step 3: Save and enable the optimization profile
- Click Save to save the optimization profile.
- Click Enable Optimization Profile in the popup dialog.
Try it out
You can now start delivering your media through Media Optimizer and see the benefits of the optimizations.
- Use the copy button on the optimization profile you created to copy the optimization profile URL.

It will be of the form <cloud name>.mo.cloudinary.net/<path prefix>. - Take one of your current media URLs, and replace the text that you specified as URI base in your media source with the text that you copied. For example:
Original media URL:
- https://<URI base>/rest of path/image.jpg
Media Optimizer delivery URL:
- https://<cloud name>.mo.cloudinary.net/<path prefix>/rest of path/image.jpg
- Paste this URL in a browser, and see your media being delivered through Media Optimizer.
What next?
All you need to do now is update all the media URLs on your website to Media Optimizer delivery URLs, and start enjoying the performance benefits of optimized media immediately!
See the size and format for yourself using whatever media inspection tools your browser provides when you right-click on each image, or try the Cloudinary Media Inspector browser extension.
*Depending on your browser, you may see a different format and size.
There's a lot more to learn about Media Optimizer, for example:
- You can apply different transformations to different types of media using optimization profiles.
- You can connect more than one media source and add them to the same or different optimization profiles.
- If you want to use a custom domain, rather than
<cloud_name>.mo.cloudinary.net, you can configure a domain and use this in your optimization profile. - If you are migrating from a platform that performs media optimizations, you can create a mapping function to avoid having to update every URL on your site manually.
- If you want to customize the transformations applied to your media, you can create named transformations and add these to your optimization profile.
 Ask AI


