
Have you ever wondered how your videos are doing once you upload them to Cloudinary? Knowing who’s watching, from where, and how they engage with your videos can be super helpful. It’s like getting a sneak peek into your audience’s likes and dislikes, helping you make even cooler videos in the future.
In this blog post, we’ll dive into how you can gather all these insights, or as the tech folks call it, analytics, for your videos on Cloudinary. We’ll also introduce PostHog, a versatile analytics tool, to demonstrate how to extend these insights beyond Cloudinary and enrich your analytics capabilities across different platforms. And we’ll do all of this using Next.js.
While Cloudinary will handle the video management, PostHog will provide us with the detailed insights we need. It will seamlessly integrate with our Next.js framework to ensure we’re not just uploading videos but also understanding how our audience receives them.
There are a few things we need to set up. Don’t worry. It’s all pretty straightforward.
- Cloudinary account. If you haven’t already, sign up for a Cloudinary account. It’s where all our videos will live and be managed.
- PostHog account. Sign up for PostHog, too. This is where we’ll gather all the analytics on our videos.
- Next.js App Router. Make sure you’ve got the Next.js App Router setup. That’s where our app will hang out. We could use the regular pages router, but for this demo, let’s stick with the App Router to stay on the cutting edge.
- Next-Cloudinary package. Grab the next-cloudinary package. It’s a handy tool that makes integrating Cloudinary into our Next.js app a breeze.
- PostHog-JS package. To seamlessly integrate PostHog analytics into our Next.js app, we’ll also need the posthog-js package. This will allow us to track and analyze how users interact with our videos directly from our app.
With our Cloudinary and PostHog accounts ready, it’s time to kick things off by setting up our Next.js app. Let’s start with this command:
npx create-next-app@latestCode language: CSS (css)This will get the ball rolling. You’ll see a few prompts asking for details about your new app. Here’s what you need to do:
- Name your app. Pick a cool name that resonates with your project.
- Enable app router. Make sure to turn this feature on; it’s crucial for navigating our app.
The other steps are optional and entirely your choice. In my case, I went with TypeScript and Tailwind CSS as well.
Once our app is scaffolded, the next step is to beef it up with some necessary packages. Run the following command to install both next-cloudinary for easy Cloudinary integration in our app:
npm install next-cloudinaryOnce you have these ready, there’s one more step: setting up environment variables in your Next.js app. These variables will securely store key information needed for our app to communicate with Cloudinary and PostHog:
NEXT_PUBLIC_CLOUDINARY_CLOUD_NAME. This is your Cloudinary cloud name, a unique identifier for your Cloudinary account.NEXT_PUBLIC_POSTHOG_KEY. Your PostHog project API key is essential for sending data to PostHog.NEXT_PUBLIC_POSTHOG_HOST. The PostHog server URL. For most users, this will be https://app.posthog.com.
And just like that, we’re ready to dive into the fun part: building our app!
Now that we’re done with our environment and dependencies, it’s time to dive into the core of our project: integrating video content with analytics. We’ll start by building a video player component in our Next.js app that uses Cloudinary for video management.
First, let’s set up the component where our videos will live. In the root of your Next.js app, navigate to the App directory and create a new folder named components.
Inside the components folder, create a new file for our component and name it VideoPlayer.tsx (or just jsx, depending on if you didn’t choose typescript). This component will utilize the next-cloudinary package to render videos stored in Cloudinary.
When working with Next Cloudinary, especially in the app directory, it’s essential to mark the parent page or component as a Client Component. This ensures that our Cloudinary components run on the client side, where they can fully access the browser’s capabilities.
To avoid marking an entire page as a Client Component, which might not always be desirable, we can create a simple wrapper. This wrapper acts as a Client Component, enveloping other components and allowing them to run client-side. Here’s how we set up our VideoPlayer component with these considerations in mind:
// This directive ensures our component is treated as a Client Component
"use client";

// Importing the CldVideoPlayer component from next-cloudinary
import { CldVideoPlayer } from "next-cloudinary";

function VideoPlayer() {
  // Rendering the Cloudinary video player with our desired dimensions and video source
    return (
    <div className="absolute top-1/2 left-1/2 transform -translate-x-1/2 -translate-y-1/2 h-[50vh] w-[50vw]">
      <CldVideoPlayer
        className="rounded-lg shadow-xl"
        width="1920"
        height="1080"
        controls
        src="samples/sea-turtle"
      />
    </div>
  );
}

// Exporting VideoPlayer for use across our application
export default VideoPlayer;
Code language: JavaScript (javascript)
With this simple component, we can display any video stored in our Cloudinary account by specifying the src attribute. We’re using a sample video for this demo, but feel free to replace samples/sea-turtle with the path to your video in Cloudinary.
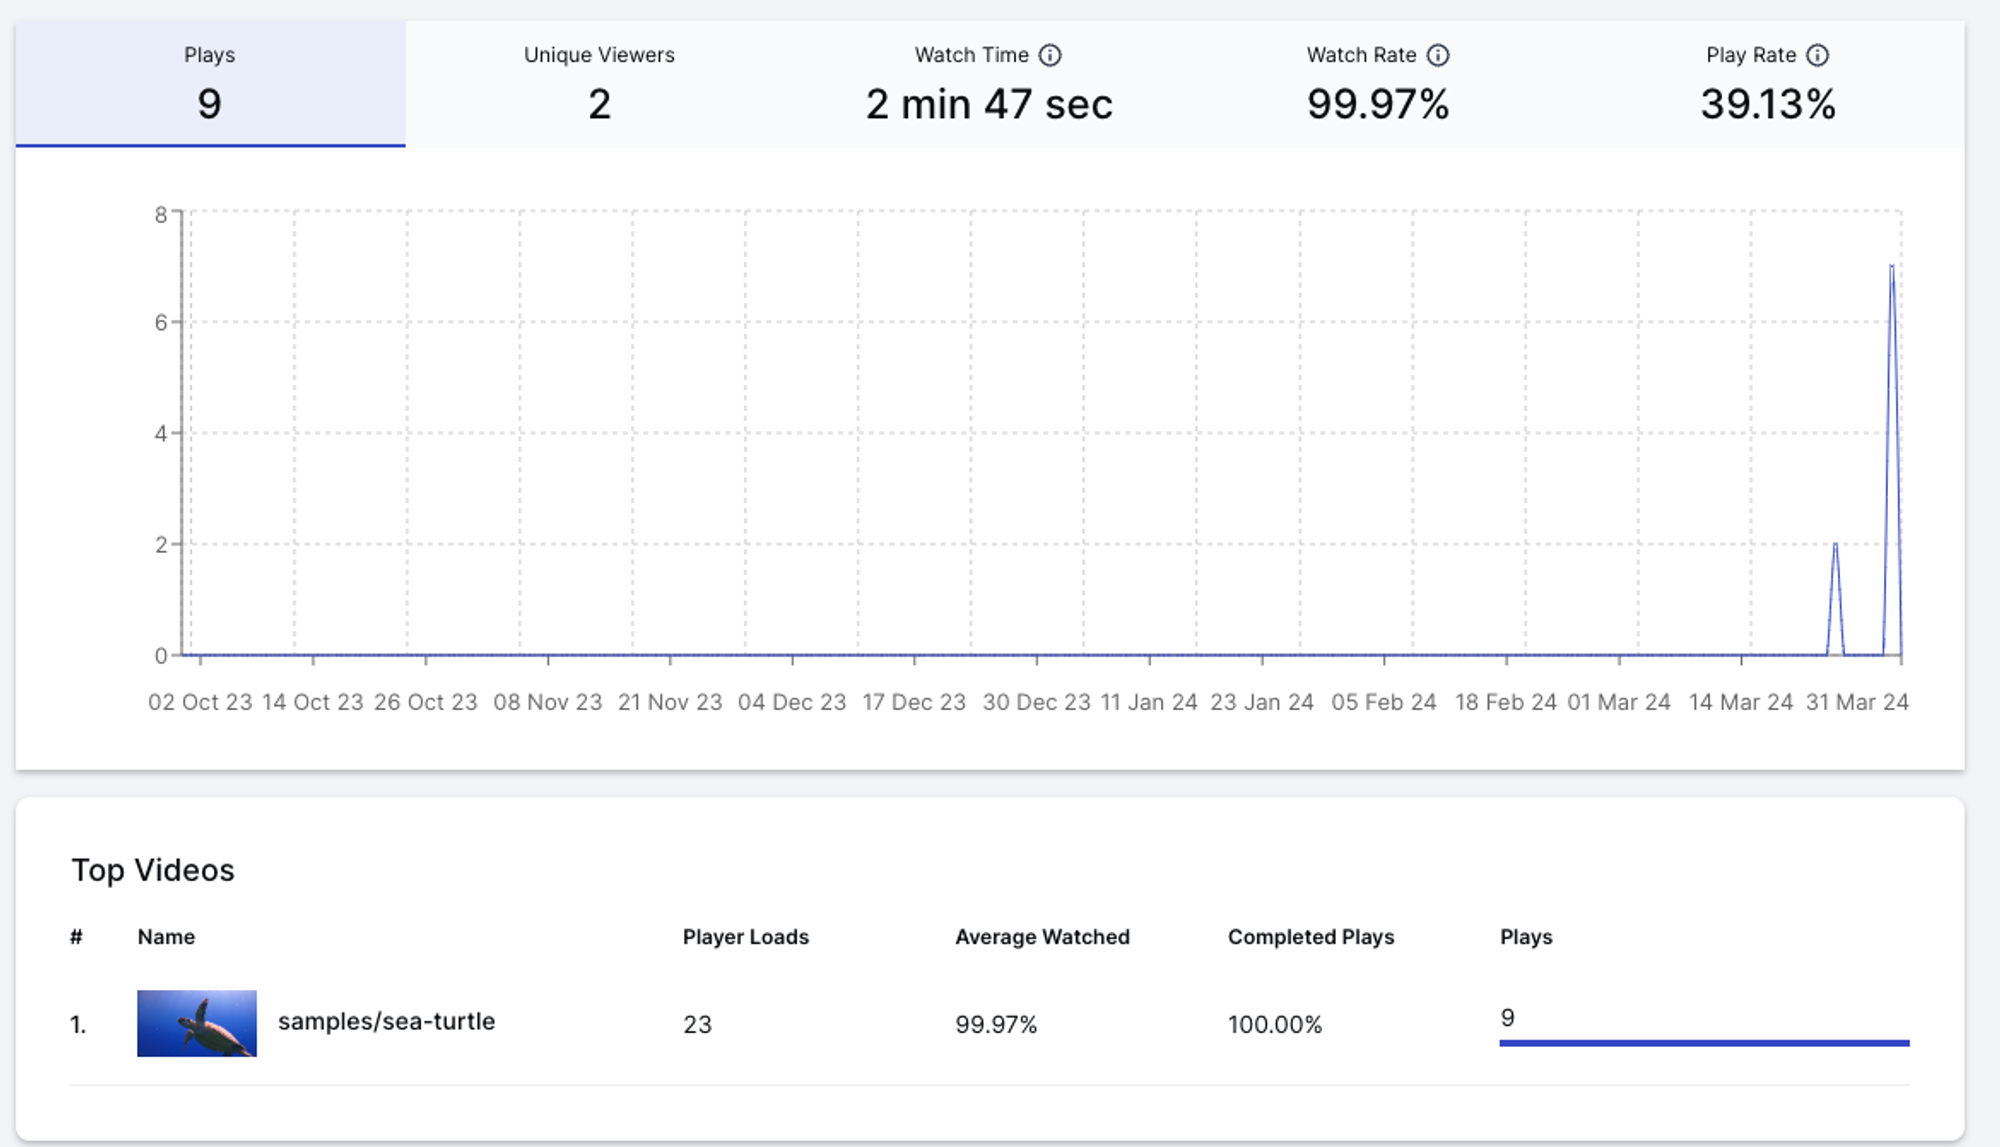
Cloudinary offers a straightforward solution to gather analytics on your video content with minimal effort. By simply adding analytics property to our CldVideoPlayer component, Cloudinary automatically begins to track various metrics associated with our videos. This feature is incredibly useful for obtaining a quick overview of video performance without complex integration.
Here’s how to enable analytics within our VideoPlayer component:
"use client";
import { CldVideoPlayer } from "next-cloudinary";
function VideoPlayer() {
return (
<div className="absolute top-1/2 left-1/2 transform -translate-x-1/2 -translate-y-1/2 h-[50vh] w-[50vw]">
<CldVideoPlayer
className="rounded-lg shadow-xl"
width="1920"
height="1080"
controls
src="samples/sea-turtle"
analytics // Enables Cloudinary's built-in analytics
/>
</div>
);
}
export default VideoPlayer;
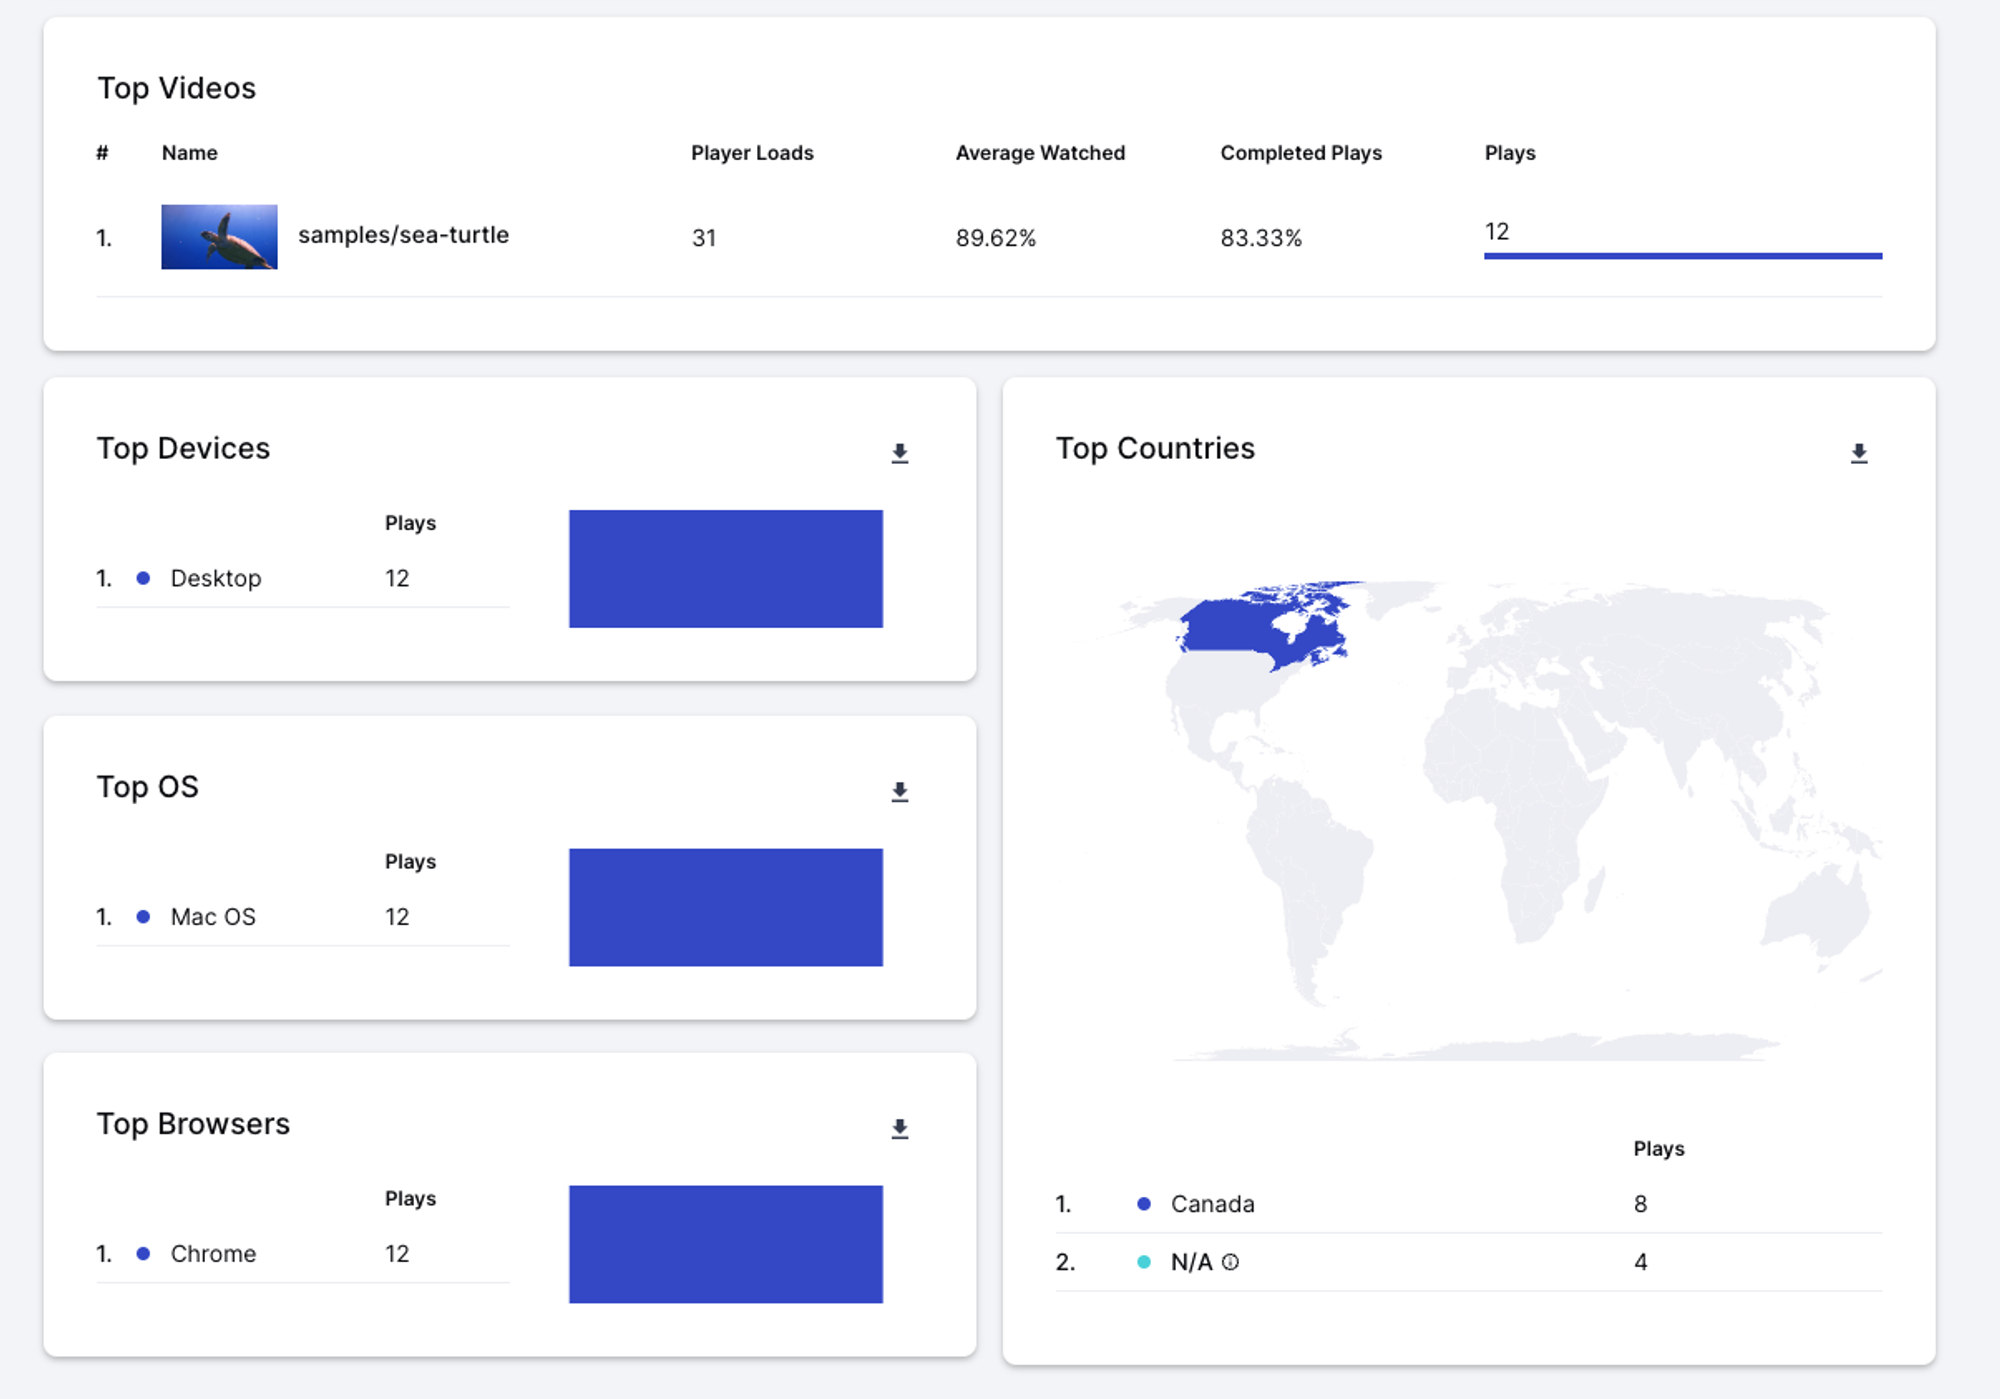
Code language: JavaScript (javascript)By adding analytics, Cloudinary starts to collect and analyze data related to the video. You can access these insights directly within your Cloudinary dashboard, providing a convenient and straightforward way to monitor your video content’s performance.
While Cloudinary’s built-in analytics provide valuable insights into video performance, integrating PostHog into our app will offer a deeper dive into user interactions and behaviors.
To kick off PostHog integration, we’ll start by setting up a dedicated provider to manage PostHog’s functionality across our app.
// Ensures the code runs client-side where PostHog can access browser features
'use client';

// Imports necessary PostHog functionalities
import posthog from 'posthog-js';
import { PostHogProvider } from 'posthog-js/react';

// Initializes PostHog only if running in a browser environment
if (typeof window !== 'undefined') {
    posthog.init(process.env.NEXT_PUBLIC_POSTHOG_KEY || "", {
        api_host: process.env.NEXT_PUBLIC_POSTHOG_HOST,
    });
}

// Defines a function that wraps children components with PostHogProvider
export function CSPostHogProvider({ children }: {children: React.ReactNode}) {
    return (
        <PostHogProvider client={posthog} apiKey={process.env.NEXT_PUBLIC_POSTHOG_KEY}>
            {children}
        </PostHogProvider>
    );
}
Code language: JavaScript (javascript)
Afterwards, import the CSPostHogProvider component in your app/layout.js file and wrap your app with it.
// app/layout.js
import './globals.css'
import { CSPostHogProvider } from './providers'

export default function RootLayout({ children }) {
  return (
    <html lang="en">
      <CSPostHogProvider>
        <body>{children}</body>
      </CSPostHogProvider>
    </html>
  )
}
Code language: JavaScript (javascript)
With PostHog ready to go in our app, we can now add a layer of analytics to our VideoPlayer component. This step involves capturing key video interaction events like play, pause, and end, and sending this data to PostHog for insightful analysis.
Let’s refine our VideoPlayer component to include PostHog event tracking:
"use client";
import { CldVideoPlayer } from "next-cloudinary";
// Imports the PostHog library
import posthog from "posthog-js";
function VideoPlayer() {
<div className="absolute top-1/2 left-1/2 transform -translate-x-1/2 -translate-y-1/2 h-[50vh] w-[50vw]">
<CldVideoPlayer
className="rounded-lg shadow-xl"
width="1920"
height="1080"
controls
src="samples/sea-turtle"
analytics
onPlay={({ player }) => {
// Captures and sends a 'video played' event to PostHog when the video is played
posthog.capture("video played", {
currentTime: player.currentTime(),
});
}}
onPause={({ player }) => {
// Captures and sends a 'video paused' event to PostHog when the video is paused
posthog.capture("video paused", {
currentTime: player.currentTime(),
});
}}
onEnded={({ player }) => {
// Captures and sends a 'video ended' event to PostHog when the video finishes playing
posthog.capture("video ended", {
currentTime: player.currentTime(),
});
}}
/>
</div>
);
}
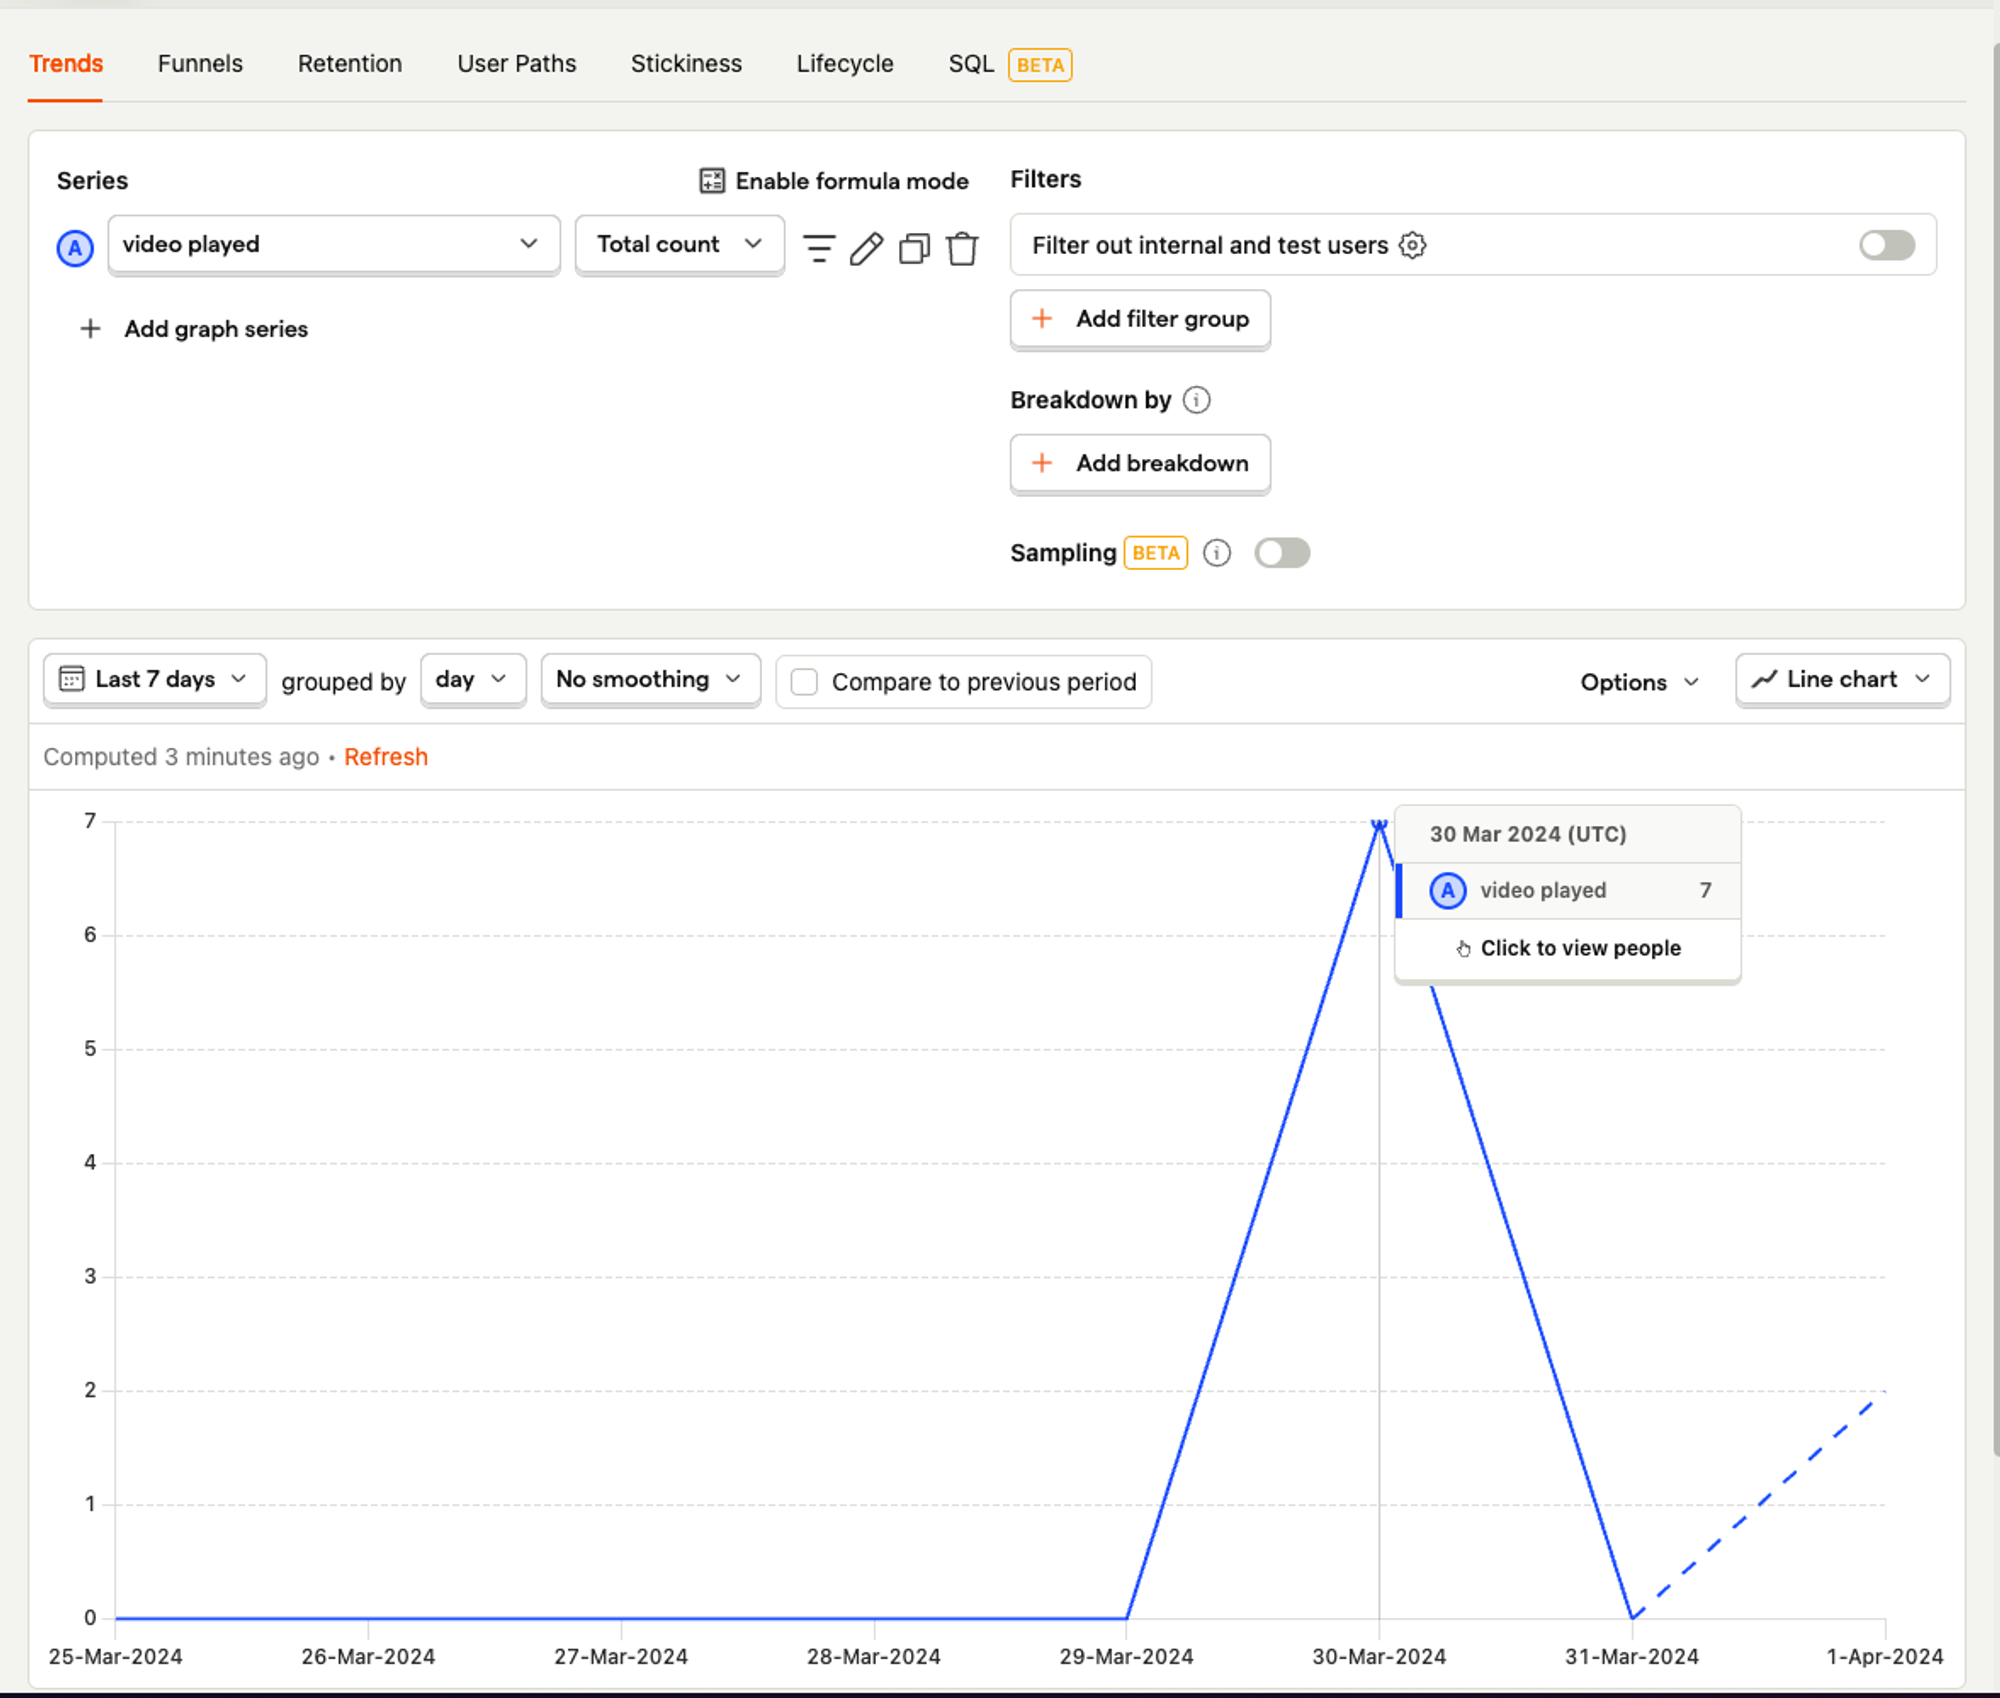
export default VideoPlayer;Code language: JavaScript (javascript)In this updated component, we’ve added event handlers for the CldVideoPlayer's onPlay, onPause, and onEnded events. Each handler captures the video’s current time when the event occurs and sends this information to PostHog using the posthog.capture method. This allows us to track how users interact with our videos.
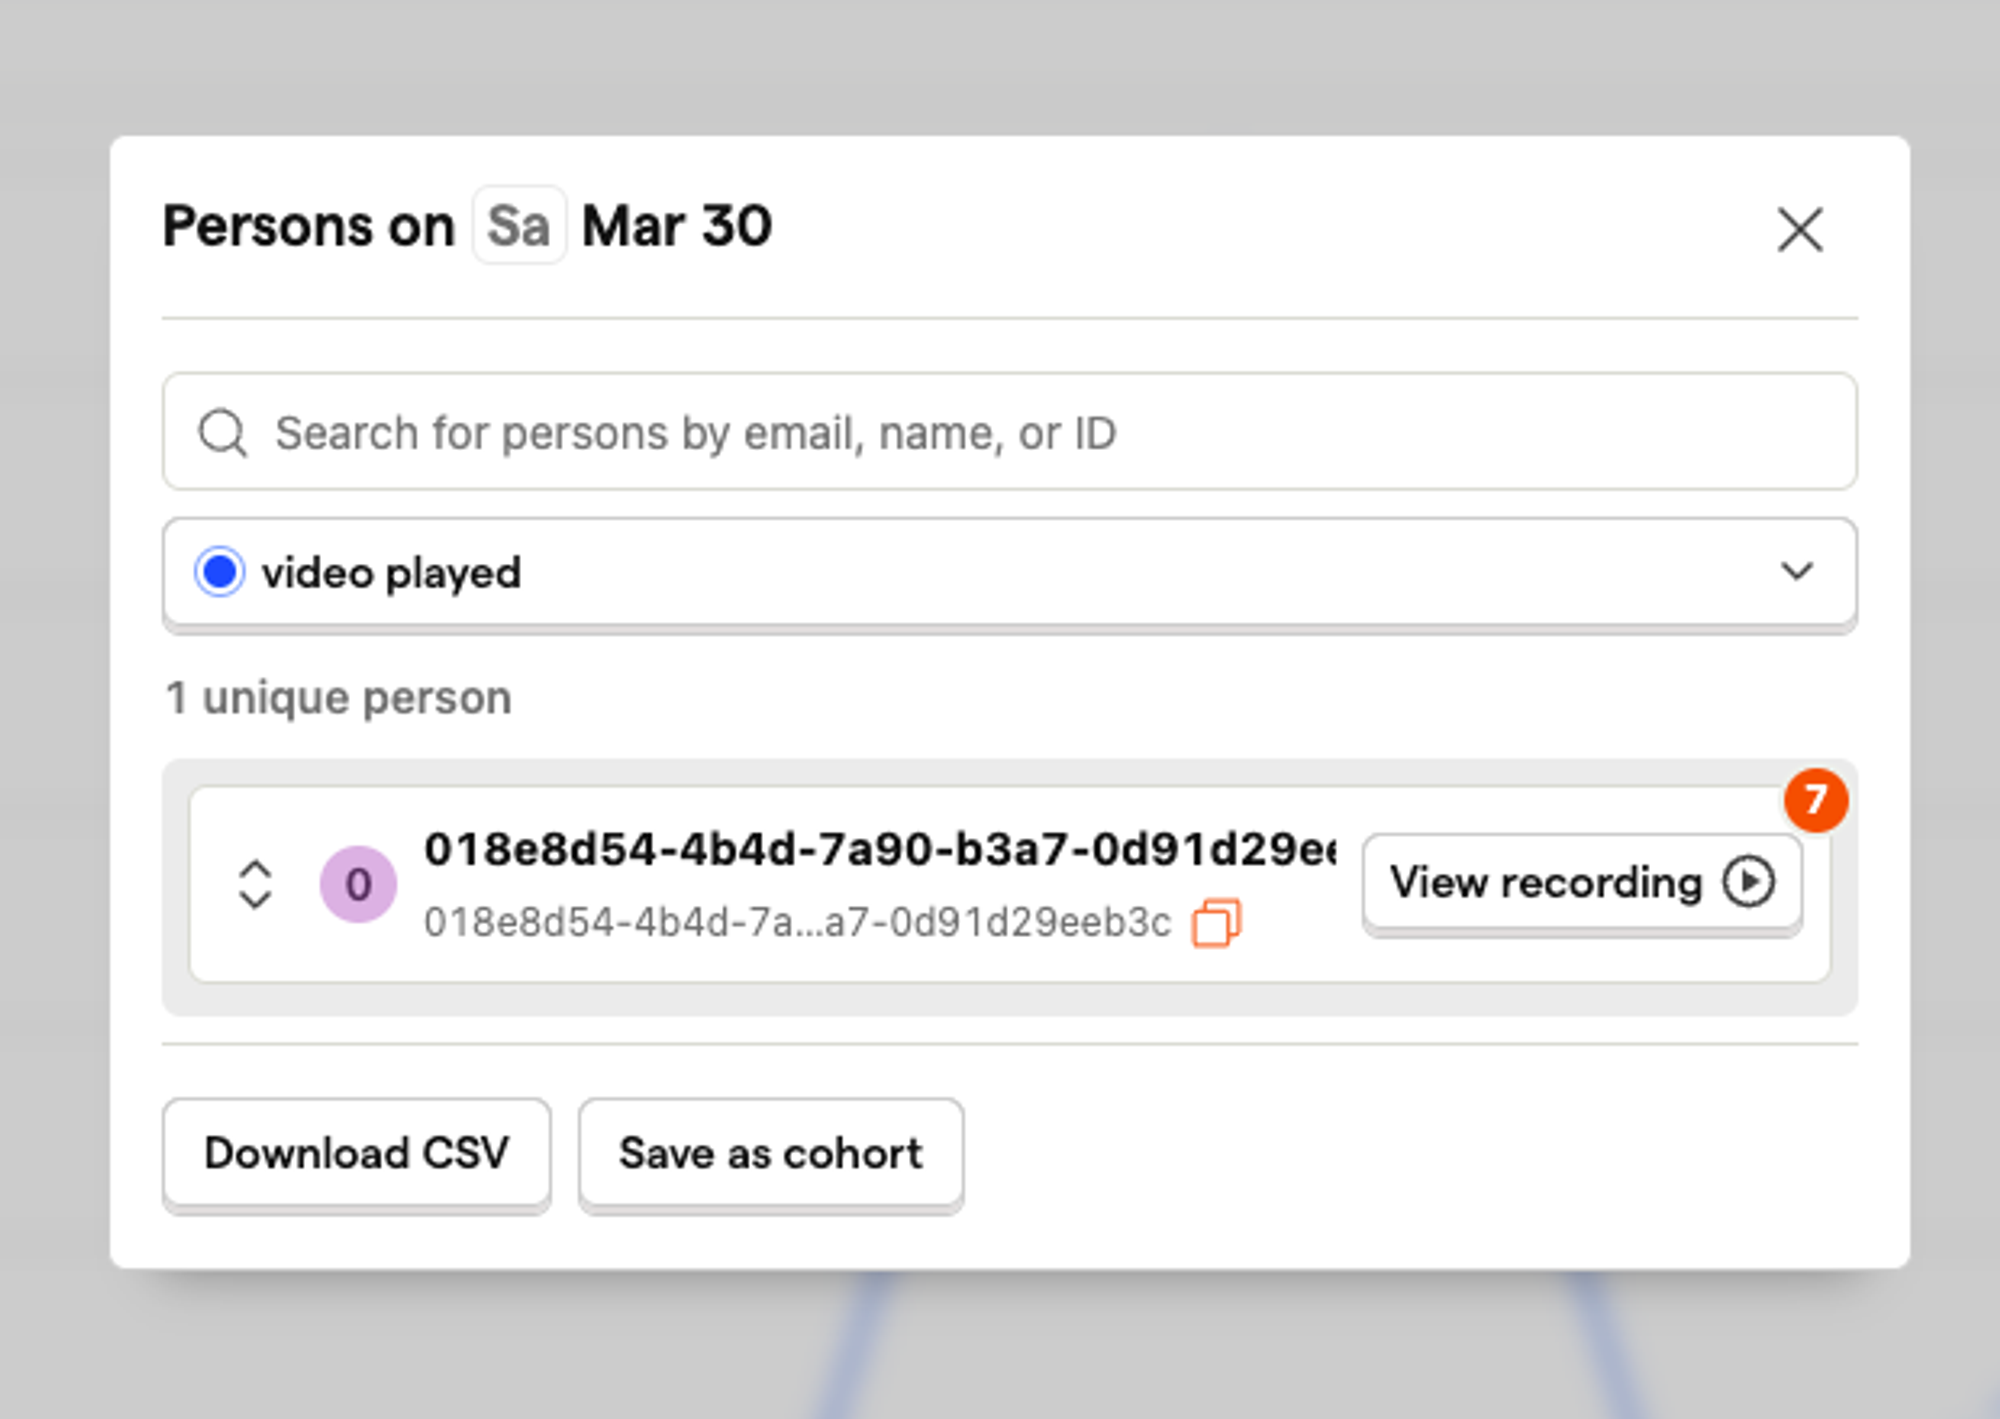
Now, just pop over to our PostHog dashboard, set up a new insight, and watch our analytics work their magic!
And there you have it! Getting a grip on how viewers interact with our videos is super important for making content that really connects. Every step, from getting everything set up to keeping an eye on how videos are played, has helped us get smarter about what our audience likes and doesn’t like.
We’ve learned that turning on analytics in Cloudinary is a breeze, and sending that data over to tools like PostHog is just as easy. These insights are invaluable for refining content strategies and enhancing user experiences. Happy analyzing!
If you found this blog post helpful and want to discuss it in more detail, head over to the Cloudinary Community forum and its associated Discord.


