
What is Image Cropping?
Image cropping is a way of photo editing that involves removing a portion of an image to emphasize a subject, change the aspect ratio, or improve the framing. You can then reframe a subject or direct the viewer’s attention to a certain part of the photo. Automated image cropping performs the same task on a large number of images.
Here are the key terms that relate to image cropping:
- Crop rectangle — The region, defined by four coordinates, to which to crop the image. The cropping operation removes all the details outside the crop rectangle, delivering a modified image of the crop rectangle’s size.
- Aspect ratio — The ratio of the image’s width to its height. This ratio is denoted by two numbers separated by a colon, for example, 4:3 or four-to-three.
- Pixels — A digital photo is made up of a grid of vertical and horizontal pixels. Cropping removes specific sections of the image, reducing the number of pixels and shrinking the overall image size.
This is part of a series of articles about Auto Image Crop.
This article covers the following topics:
- Cropping Images in Python With Pillow
- Cropping Images in Python With OpenCV
- Resizing and Cropping Python Images Through Automation With Cloudinary
How to Crop Images in Python With Pillow
A fork of the Python Image Library (PIL), the Pillow library offers an easy way through the crop() function for cropping images in Python. Here’s syntax:
Image.crop(box=None)
The box parameter accepts a tuple with four values of the four coordinates for the crop rectangle: left, upper, right, and lower. The crop rectangle is drawn within the image, which depicts the part of the image you want to crop. Image.crop returns an image object.
To crop an image with Pillow:
- Import Pillow’s Image class:
from PIL import Image
- Load an image from the file system and, with the
Image.open()class, convert the image into an instance of theImageclass. AddingImage.show()displays the image in an external viewer.img = Image.open('./myimage.png') img.show() - Crop the image. Assuming that the image
myimage.pngis 1,000×1,000 pixels, crop it to a square of 500×500 pixels at the center of the image:box = (250, 250, 750, 750) img2 = img.crop(box)
- Save the cropped image, a Python object called
img2, to the file system:img2.save('myimage_cropped.jpg') img2.show()
Note the following issues vis-à-vis cropping images with Pillow:
- Content-aware cropping. Most cropping operations depend on the context. For example, you don’t want to remove important parts of the image, but that’s difficult to ensure programmatically because the crop() function is not sensitive to the image content.
- Cropping and resizing. Oftentimes, you must resize and crop an image at the same time. Even though you can resize images in Python with a similar technique, combining cropping and resizing can get tricky, let alone that it’s challenging to generate the exact image you need for your design.
- Image management. A large number of crop operations might lead to multiple versions for each image, all to be stored on the server. Besides procuring extra storage space, you must also put in place a clear, consistent convention to facilitate locating the right version of the image. A much more efficient approach is to simply dynamically generate the required version of the image without saving all its versions to the file system.
Crop an Image in Python With OpenCV
Python OpenCV is a library that offers advanced computer vision features, including a range of functions for processing and transforming images. To import the OpenCV library into your program, use the following command:
import cv2
Here’s the syntax for image cropping:
image[start_x:end_x, start_y:end_y]
Interestingly, this syntax slices the image[] in the form of an array by passing the start and end index x and y coordinates for each segment. The portion of the image between the start and end coordinates is returned as a truncated array object.
For example:
import cv2
image = cv2.imread(r"C:\file\path\imagename.png")

y=0
x=0
h=300
w=510
crop_image = image[x:w, y:h]
cv2.imshow("Cropped", crop_image)
cv2.waitKey(0)
The statement cv2.imread(r"image path") opens the image in read-only mode. The cv2.imshow() function near the bottom displays the cropped image.
Pro Tip!Transform Images On-The-Fly
Manually transforming a large number of images can be time-consuming and labor-intensive. Cloudinary makes it easy to transform your images on the fly into any required format, style, and dimension, while also allowing you to apply effects and other visual enhancements.
Resizing and Cropping Python Images Through Automation With Cloudinary
Cloudinary is a cloud-based service for managing images and videos that offers a generous free-forever subscription plan. On the platform, you can upload your images and apply built-in effects, filters, and modifications.
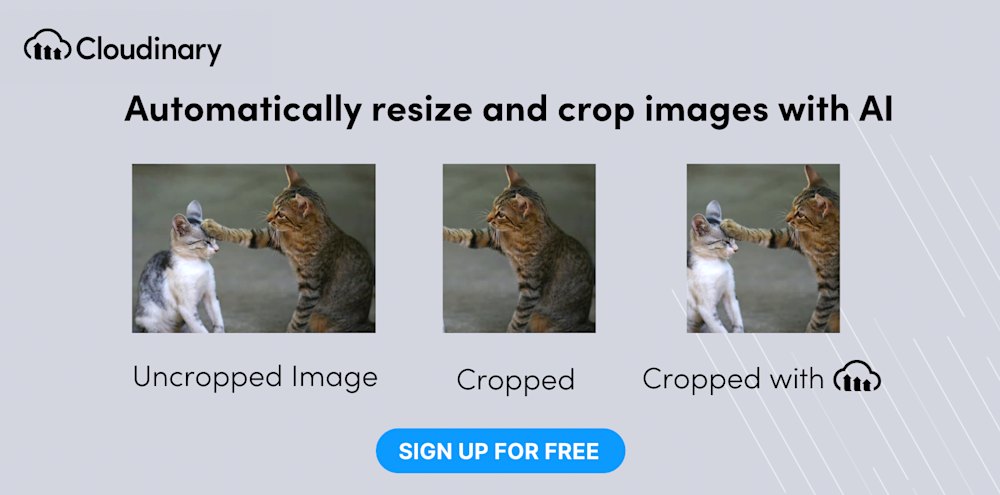
You can also resize images through automation, focusing on the most important elements with AI, or adapt them to your website design by, for example, specifying the width, height, and aspect ratio as qualifiers for the new image instances. Cloudinary then automatically performs the resizing and cropping tasks to meet the criteria. No manual efforts are required.
Take this 1,200×1,200-pixel image:

Resizing it to 200×200 pixels with crop, scale, fill, and pad results in the following images:


To automate image resizing and cropping on Cloudinary:
- Sign up for a free Cloudinary account.
- Install the Python SDK.
- Set the transformation criteria for the above examples:
# Focus on the model in a portrait crop.

CloudinaryImage("docs/model.jpg").image(gravity="person", height=600, width=450, crop="fill")

# Detect the face for a thumbnail crop.

CloudinaryImage("docs/model.jpg").image(gravity="face", height=250, width=250, crop="thumb")

# Crop to a banner, automatically focusing on a region of interest.

CloudinaryImage("docs/model.jpg").image(gravity="auto", height=150, width=600, crop="fill")

