
Ever implemented an upload file feature with React using an npm package, but it doesn’t have options for selecting multiple images? In this article, we’ll solve that challenge by implementing a simple React app where users can select multiple images.
You should have:
- Knowledge of JavaScript and React basics.
- Node >=v14 installed.
The complete project is set up on Codesandbox below. Click the button in the sandbox to launch and get started with your React multiple image upload project.
Let’s start by bootstrapping a new React project with create-react-app. Run the command below to do this:
#bash
npx create-react-app upload-multiple-images
Code language: CSS (css)
When it’s done installing, run these commands in your terminal to start the React app.
#bash
cd upload-multiple-images
npm run start
Code language: CSS (css)
The app should start at http:localhost:3000.
Navigate to the src directory and delete all the files except index.js, App.js, and index.css. This will break the React app that’s running but we’ll fix that soon.
Update the index.js with the code snippet below:
//index.js
import React from 'react';
import ReactDOM from 'react-dom/client';
import './index.css';
import App from './App';

const root = ReactDOM.createRoot(document.getElementById('root'));
  root.render(
    <React.StrictMode>
      <App />
    </React.StrictMode>
  );
Code language: JavaScript (javascript)
In this project, we’ll use react-bootstrap components, so head to your terminal and run the following commands to install the packages.
#bash
npm install react-bootstrap bootstrap
Code language: CSS (css)
If you’ve gotten to this point, you’re awesome!
For this project, we’ll use some mock images to demonstrate multiple selections. Go ahead and create a mock.js file at the root directory.
Paste this code snippet in mock.js.
//mock.js

export const mockData = [
    {
      src: "https://images.unsplash.com/photo-1653325532801-20505a866e9d?crop=entropy&cs=tinysrgb&fm=jpg&ixlib=rb-1.2.1&q=80&raw_url=true&ixid=MnwxMjA3fDB8MHxwaG90by1wYWdlfHx8fGVufDB8fHx8&auto=format&fit=crop&w=387",
    },
    {
      src: "https://images.unsplash.com/photo-1534353436294-0dbd4bdac845?crop=entropy&cs=tinysrgb&fm=jpg&ixlib=rb-1.2.1&q=80&raw_url=true&ixid=MnwxMjA3fDF8MHxwaG90by1wYWdlfHx8fGVufDB8fHx8&auto=format&fit=crop&w=387",
    },
    {
      src: "https://images.unsplash.com/photo-1471897488648-5eae4ac6686b?crop=entropy&cs=tinysrgb&fm=jpg&ixlib=rb-1.2.1&q=80&raw_url=true&ixid=MnwxMjA3fDF8MHxwaG90by1wYWdlfHx8fGVufDB8fHx8&auto=format&fit=crop&w=387",
    },
    {
      src: "https://images.unsplash.com/photo-1653325297180-2ba1b7e34215?crop=entropy&cs=tinysrgb&fm=jpg&ixlib=rb-1.2.1&q=80&raw_url=true&ixid=MnwxMjA3fDB8MHxwaG90by1wYWdlfHx8fGVufDB8fHx8&auto=format&fit=crop&w=379",
    },
    {
      src: "https://images.unsplash.com/photo-1652534603944-2ebdf360d6c7?crop=entropy&cs=tinysrgb&fm=jpg&ixlib=rb-1.2.1&q=80&raw_url=true&ixid=MnwxMjA3fDB8MHxwaG90by1wYWdlfHx8fGVufDB8fHx8&auto=format&fit=crop&w=725",
    },
    {
      src: "https://images.unsplash.com/photo-1653349859617-48672bdfa490?crop=entropy&cs=tinysrgb&fm=jpg&ixlib=rb-1.2.1&q=80&raw_url=true&ixid=MnwxMjA3fDB8MHxwaG90by1wYWdlfHx8fGVufDB8fHx8&auto=format&fit=crop&w=423",
    },
    {
      src: "https://images.unsplash.com/photo-1653356677409-27ecda2dcba4?crop=entropy&cs=tinysrgb&fm=jpg&ixlib=rb-1.2.1&q=80&raw_url=true&ixid=MnwxMjA3fDB8MHxwaG90by1wYWdlfHx8fGVufDB8fHx8&auto=format&fit=crop&w=387",
    },
    {
      src: "https://images.unsplash.com/photo-1653359406652-843d58aec2c8?crop=entropy&cs=tinysrgb&fm=jpg&ixlib=rb-1.2.1&q=80&raw_url=true&ixid=MnwxMjA3fDB8MHxwaG90by1wYWdlfHx8fGVufDB8fHx8&auto=format&fit=crop&w=387",
    },
    {
      src: "https://images.unsplash.com/photo-1653376774810-a81964615abb?crop=entropy&cs=tinysrgb&fm=jpg&ixlib=rb-1.2.1&q=80&raw_url=true&ixid=MnwxMjA3fDB8MHxwaG90by1wYWdlfHx8fGVufDB8fHx8&auto=format&fit=crop&w=391",
    }
]
Code language: JavaScript (javascript)
Now we’ve created our mock data, let’s go ahead and make use of the data in our App component.
Let’s create a simple image grid UI.
Navigate to App.js and add the code snippet below:
//App.js

import 'bootstrap/dist/css/bootstrap.min.css';
import { Container, Col, Row, Image } from 'react-bootstrap'
import { mockData } from './mock';

function App() {
  const handleClick = () => { }
return (
  <Container>
    <Row>
      {mockData.map((data, index) => (
        <Col md={4} key={index} >
          <div className="img-card" onClick={() => handleClick(data.src)}>
            <Image style={{ width: '300px', height: "300px" }} thumbnail src={data.src} />
          </div>
        </Col>
      )
     )}
    </Row>
  </Container>
);
}
export default App;
Code language: JavaScript (javascript)
Let’s break down the code snippet into chunks.
First, we’ll import bootstrap css so we can use bootstrap styles with our react-bootstrap components.
Next, we’ll import react-bootstrap components, and use them in the template.
We also imported the mock data and used it in templates.
There’s also a handleClick() function we’ll work on in the next section.
Let’s also use some custom css styles. Go to index.css and add these lines of code:
//index.css

body {
    margin: 0;
    font-family: -apple-system, BlinkMacSystemFont, 'Segoe UI', 'Roboto', 'Oxygen',
      'Ubuntu', 'Cantarell', 'Fira Sans', 'Droid Sans', 'Helvetica Neue',
      sans-serif;
    -webkit-font-smoothing: antialiased;
     -moz-osx-font-smoothing: grayscale;
}

.img-checked {
  padding: 10px;
  width: 300px;
  background: rgb(49, 132, 199);
  color: white;
  border-radius: 20px;
  font-weight: bolder;
  position: relative;
  /* margin-top: 2px ; */
}
.img-card{
  border: 3px solid rgb(95, 95, 95);
  margin: 10px;
  width: 300px;
}
.img-card:hover {
  border: 2px solid red;
}
Code language: JavaScript (javascript)
Run the app with npm run start and navigate to your browser. You should have something like this:
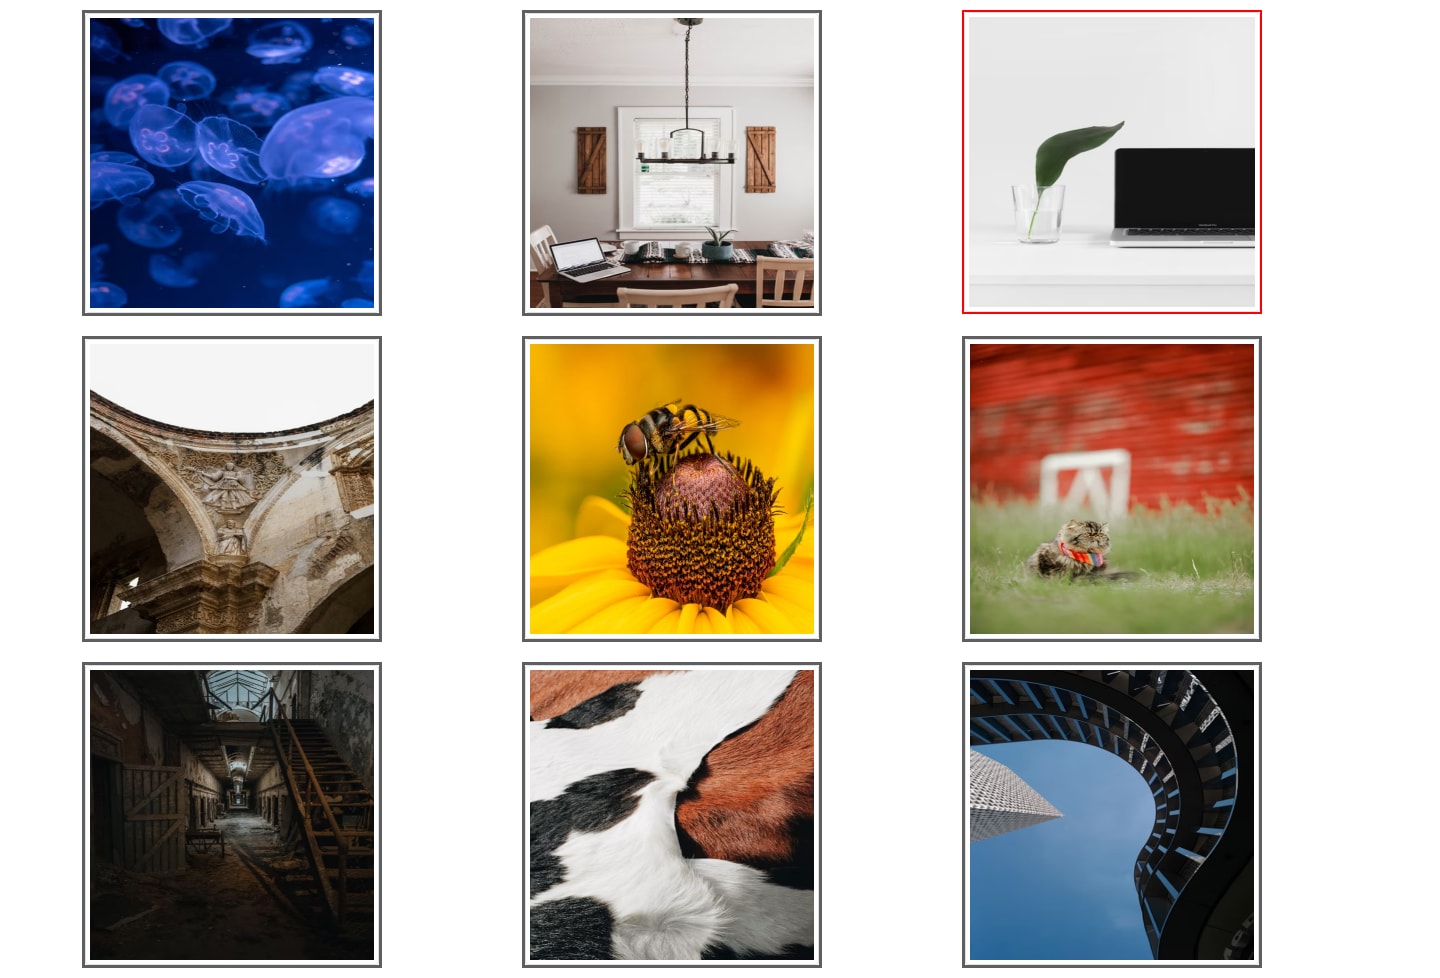
Awesome. Let’s now go ahead to implement select functionality.
After displaying the image gallery, we’ll create a hover event for marking images that will be uploaded. Navigate to the App``.js file and update with the following lines of code:
//App.js
...
import { useState } from 'react'
...

function App() {
  const [allImages, setAllImages] = useState([]);
  const handleClick = async (source) => {
    const check = allImages.includes(source)
    if (check) {
      const id = allImages.indexOf(source)
        let newArr = allImages
        newArr.splice(id, 1)
          setAllImages([...newArr])
    } else {
      allImages.push(sourc)
      setAllImages([...allImages])
    }
  }

return (
    ...
  <div className="img-card" onClick={() => handleClick(data.src)}>
    ....
  {allImages.includes(data.src) ?
    <div className="img-checked" >Selected</div>
      : null}
    </div>
)
}
Code language: PHP (php)
The above code snippets include some state variables.
- allImages: This is an array of the selected images.
-
handleClick: This function handles the
onClickevent when adding an image to the list.
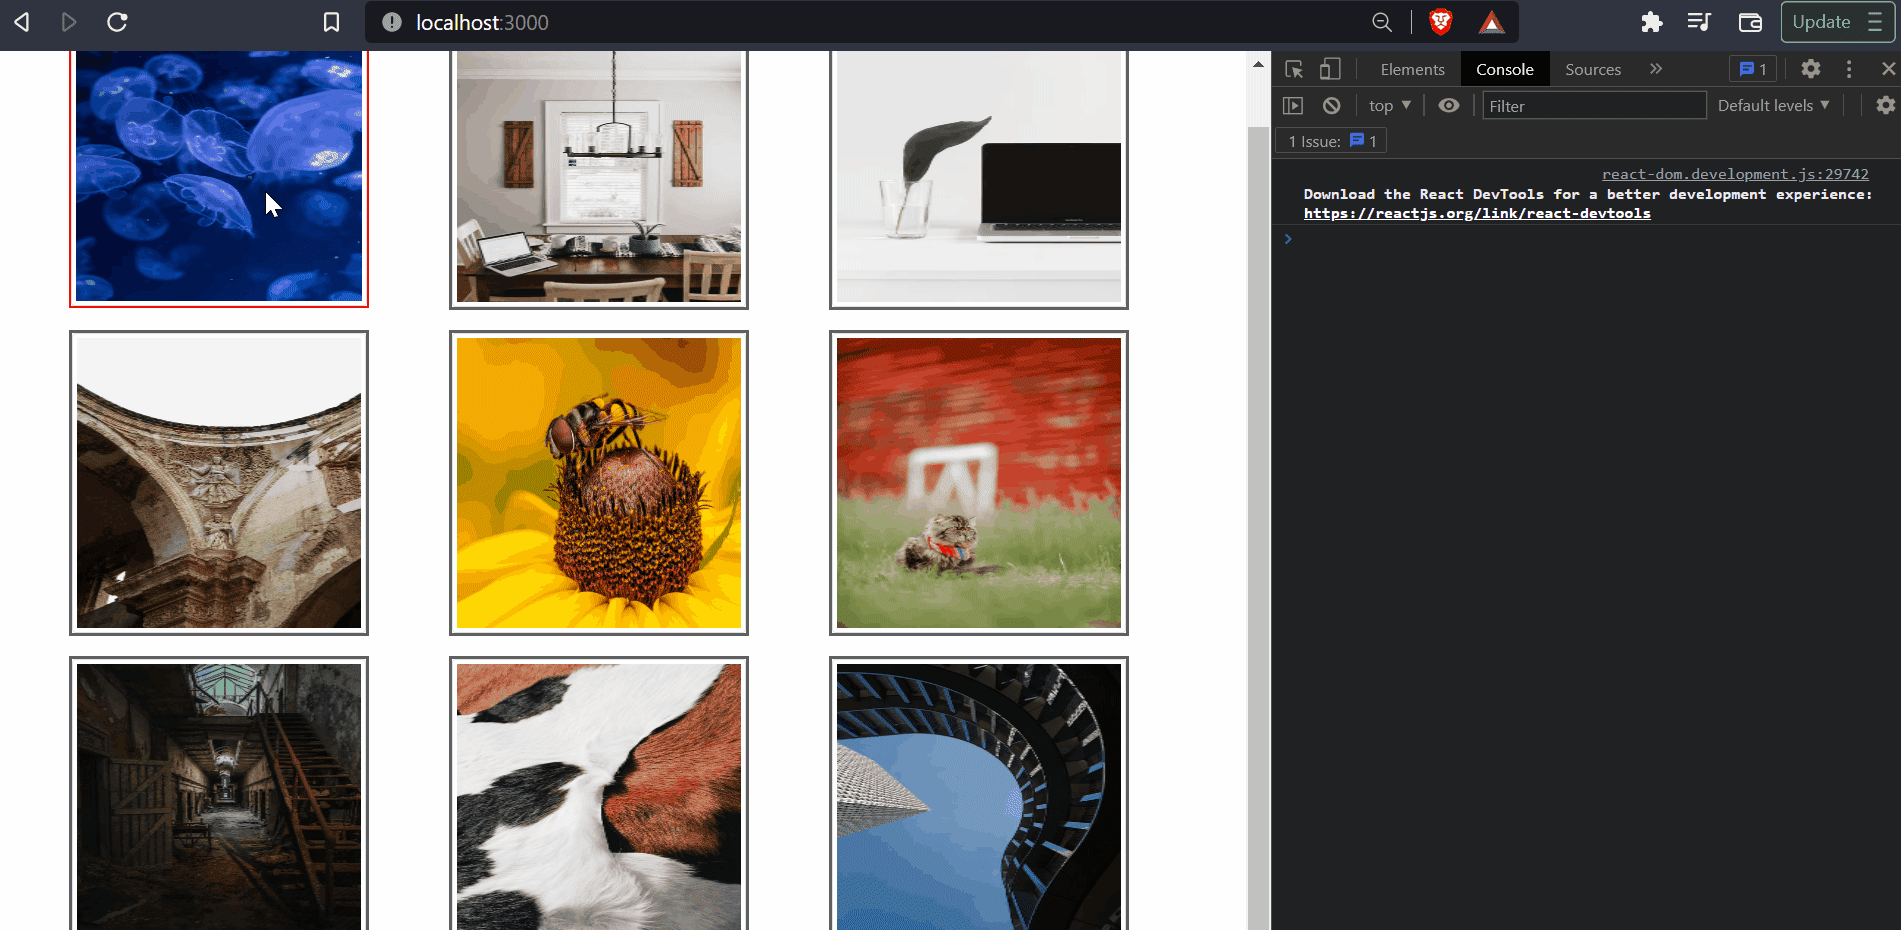
We wrapped our image tag with a div that has an on hover event, such that a border appears on hover. We then displayed a text selected when an image is selected.
We then implemented the handleClick function.
The function handles the onClick event. It checks if the value passed exists in the mockData ****array. If so, it will pop the value from the array. If not, it will push the value into the array.
Save and run the app on your terminal. You should see something like this:
We can now upload the array of images to an external platform or an upload media API endpoint.
In this part, we learned how to build a React application that handles multiple image uploads with React Bootstrap. Let’s see an alternative way to upload multiple images in React.
As an alternative to the visual selection method described above, you can also use a direct file input to allow users to select images from their file system. This section details how to incorporate this method into your React application.
Incorporate the <input type="file"> component into your app, which allows users to select multiple files:
<input type="file" multiple onChange={(e) => images.push(e.target.files[0])} />
This line of code lets users choose files directly from their computer, giving them an intuitive and familiar way to select images.
After selecting images, it’s useful to display the names of the selected files as feedback:
<ul>
    {images.map((image) => (
        <li key={image.name}>
            {image.name}
        </li>
    ))}
</ul>
This list of filenames ensures users can confirm their selections before proceeding to upload.
This component allows users to initiate the file upload to a server:
function handleFileUpload(files) {
  // Upload the files to the server
}

const ImageUploader = ({ images }) => {
  const [uploading, setUploading] = useState(false);

  const handleUpload = () => {
    setUploading(true);
    handleFileUpload(images)
      .then(() => {
        setUploading(false);
      })
      .catch((error) => {
        console.log(error);
        // Optionally, you can display a user-friendly error message
      });
  }

  return (
    <div>
      <input type="file" multiple onChange={(e) => images.push(e.target.files[0])} />
      <button onClick={handleUpload} disabled={uploading}>
        Upload
      </button>
    </div>
  );
}
Ensure to include error handling in case the upload process fails. The .catch() method can be utilized to handle errors gracefully, perhaps showing an error message to the user via a Toast or modal.
While the visual selection method offers a graphical way to pick images, the direct file input provides an alternative approach that some users might find more intuitive. Whichever method you opt for, always remember to handle errors gracefully and provide adequate user feedback. Use the provided code with caution.
We at Cloudinary want to help you be a better developer. If this article helped you out today, take a minute to see how Cloudinary helps developers build amazing web and app experiences while making your work easier along the way.


