
Image tagging, the process of labeling the contents of an image with tags – words or short phrases, plays a crucial role in organizing and finding images efficiently. Tags can range from specific terms like ‘wedding’, ‘couple’, and ‘marriage’ to more abstract concepts such as ‘love’ and ‘relationship’. They can also include color tags, object tags, and other descriptive phrases. This process is integral not only for personal photo organization, such as in platforms like Instagram where users can perform manual photo tagging, but also for professional asset management.
Various tools like Eagle App, Adobe Lightroom, Pixave, Google Photos, Air, Nero AI, Imagga, and SnipTag offer diverse photo tagging capabilities. They cater to different needs, from personal photo libraries to professional photo management software like Daminion, DigiKam, ACDSee Photo Studio, and PicaJet FX. These tools, each with their unique features, help in categorizing and retrieving photos based on specific criteria set by users. However, they do not always offer scalable, programmatic photo tagging solutions.
In this article:
- What Is Automatic Image Tagging?
- When Do You Need to Use Automatic Image Tagging?
- Benefits of Automatic Image Tagging
- How To Use Automatic Image Cropping with Cloudinary
What Is Automatic Image Tagging?
Automatic image tagging has become possible thanks to AI/ML, which enables computers to analyze photographs and identify objects within them. By creating machine learning algorithms and training them on vast amounts of data, machines can accurately detect and tag objects in even the most complex or crowded photos.
These algorithms identify objects within an image and assign relevant tags and categories, making it easier to search and organize images based on specific criteria. This results in improved efficiency and productivity for you and your team, allowing them to spend less time on manual image management tasks and more time on other important aspects of their work.
However, not all tagging needs to be automated. For instance, in Windows 10 or 11, users can manually tag their photos. They simply select the photos they want to tag, right-click on the selected images, click on the Properties menu item, go to the Details tab, click on the Tags field, and type in their desired tags. This method, while manual, provides a direct and straightforward way to categorize photos based on personal criteria.
In addition to automatic tagging, there’s also the traditional method of manual photo tagging. This involves looking at each image and typing in a description or keyword that best represents it. While this method can be time-consuming, it offers a personalized approach to categorizing your photos. This manual process can be particularly useful for specific photographs, locations, or techniques that might not be easily recognized by automated systems.
When Do You Need to Use Automatic Image Tagging?
Manually arranging and tagging a large number of photographs can be a daunting task. However, automatic image tagging can significantly reduce the time and effort required while improving the organization and searchability of your digital asset library. Here are a few scenarios where automatic image tagging can be especially beneficial:
- E-commerce Websites. With a vast inventory of products and images, e-commerce websites can benefit significantly from automatic tagging, which can help categorize products and make it easier for users to find what they’re looking for.
- Photographers. Whether you’re an amateur or a professional photographer, automatic tagging can be a valuable tool for organizing and searching your photographs based on criteria such as location or subject matter.
- Social Media Platforms. Social media platforms rely heavily on user-generated content, making automatic tagging valuable for identifying and categorizing photos. This can help users find specific subjects or events more easily.
- Asset Management. Many large businesses require digital assets, including photos and marketing materials. By using automatic image tagging, they’re able to sort and manage their assets and keep their branding consistent.
These are only a few instances where automatic image tagging is useful. In general, this effective technology can help any website or platform that utilizes a lot of photos.
Benefits of Automatic Image Tagging
Automatic image tagging offers several benefits that can streamline your image management process and improve your website’s user experience. Here are some of the main advantages:
- Time savings. When compared to manually tagging each image, automatic image tagging can save you a lot of time. This is especially important for websites that need to process or host an extensive amount of images or companies that deal with a lot of digital assets.
- Consistency. Automated picture tagging can ensure that all your photographs are categorized consistently, lowering the possibility of mistakes and facilitating search and sorting.
- Increased SEO. Image tags can enhance your website’s SEO by giving search engines context and pertinent keywords.
- Improved user experience. Automated picture tagging can enhance the user experience by making it simple for them to search for the content they’re looking for.
Additionally, software like Adobe Lightroom offers advanced tagging and search capabilities. With Lightroom, users gain advanced tagging capabilities, making it easier for users to categorize and search for images based on various criteria. They also offer color analysis capabilities, allowing users to extract and analyze color information from images, further enhancing the search and categorization process.
How To Use Automatic Image Cropping with Cloudinary
Cloudinary is a powerful platform that uses intelligent automation to automatically tag images by identifying objects and concepts within them. This technology significantly reduces the time and effort required for manual tagging and ensures that images are appropriately labeled. Plus, we’ve made it simple and easy to set it up within any workflow.
Our platform can be used for image tagging with powerful ML models offered by various cloud services providers such as Amazon Rekognition, Imagga, Google Auto Tagging, and Azure Video Tagging.
Today, we’ll show you how to set up Cloudinary to automatically tag your images for you. To do so, we’ll use a few different methods; each presented as an add-on within the Cloudinary platform. So let’s dive in!
Amazon Rekognition
Rekognition is a service offered by Amazon that uses deep learning models to analyze images and videos. It can detect objects, scenes, and faces and perform facial recognition and text detection. Amazon Rekognition can automatically tag images based on the detected objects and scenes.
Before we get started, you’ll need a Cloudinary account. You can sign up for free if you don’t have one already. Additionally, you’ll need Node.js installed on your computer. You can download it for free from the official Node.js website if you don’t already have it.
With Cloudinary, you can modify your images either during the upload process to the cloud or when retrieving them by generating a new version. To get started, let’s create a Node.js script that will assist in uploading your assets to Cloudinary.
Let’s begin by setting up our API. We will use the Cloudinary Node.js SDK to set up our API, which will help us call our API and authenticate our API requests. To install this library, start by creating a project folder in a directory of your choice. Next, open up your terminal, navigate to your project directory, and type the following command:
npm install cloudinary
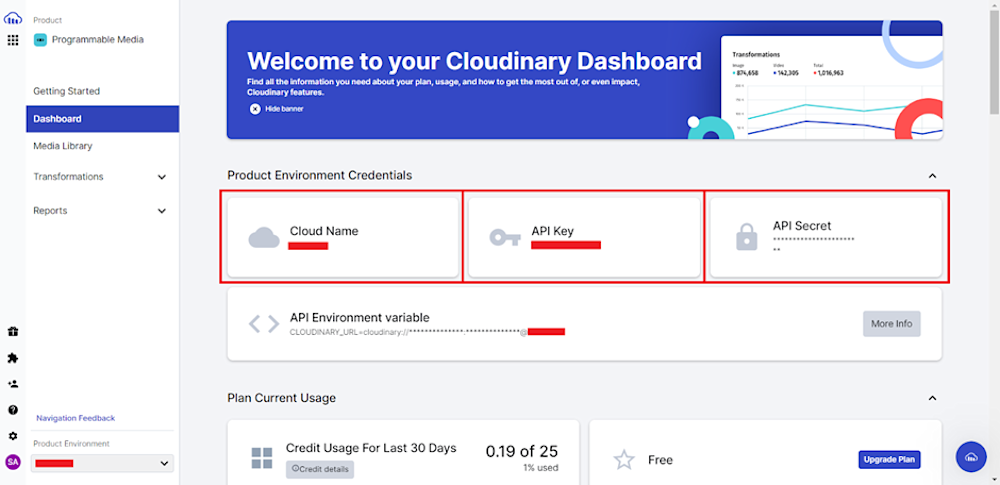
Now that our SDK is installed, we are ready to set up our API. Log in to your account and head to the Dashboard. Copy your Cloud Name, API Key, and API Secret:
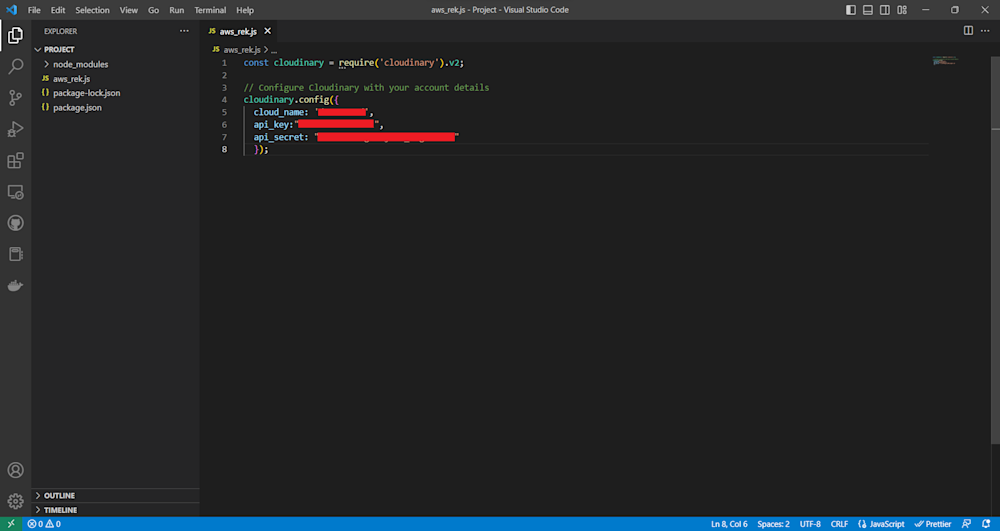
Now, open up the project folder in your favorite IDE, and create a new file named aws_rek.js. Open up the file and start by importing the Cloudinary SDK and defining our API with our account details:
const cloudinary = require('cloudinary').v2;

// Configure Cloudinary with your account details
cloudinary.config({
    cloud_name: 'CLOUD_NAME',
    api_key: 'API_KEY',
    api_secret: 'API_SECRET'
  });
With this, we’re ready to make API calls to Cloudinary. Let’s start by uploading sample images to the cloud. You can upload images via their Node.js SDK or their website.
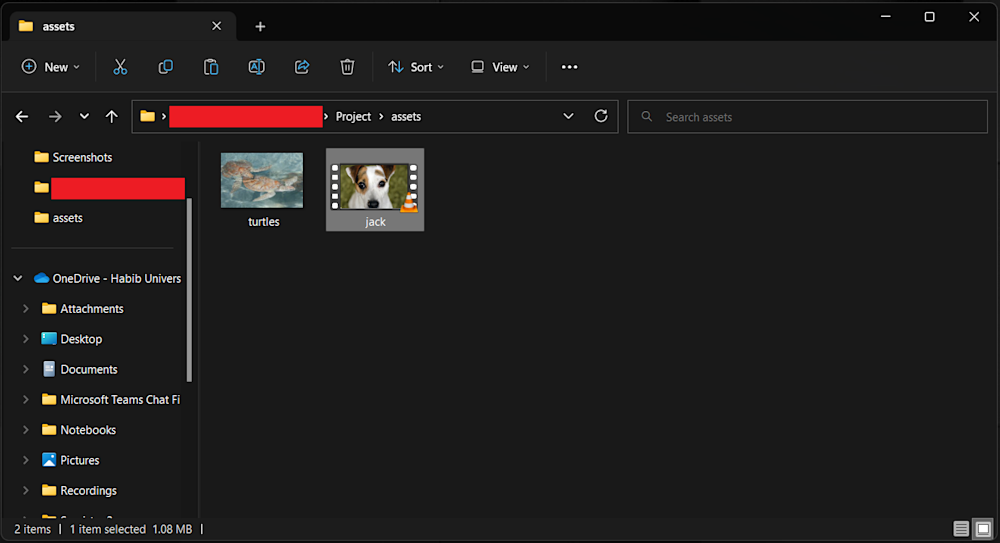
Now let’s use the images that we want to tag. Open up your project’s folder and create an assets folder. Here add the images you want to tag. For this, we’ll be using turtles.jpg:
Next, open up your aws_rek.js file and define the image you want to crop:
// Specify the directory of the image you want to crop
const id = 'assets/turtles.jpg';
Next, call the Cloudinary upload API with the assets you want to upload. As you can see in the code below, we are defining extra parameters: type, public_id, categorization, and auto_tagging.
As the name implies, the type parameter allows us to specify the type of upload to perform. Here we define it as 'upload', meaning the image will be uploaded as a new asset. The public_id parameter is a unique identifier that helps us keep track of our resources in the cloud. Defining it explicitly will help us keep track of our resources. Otherwise, Cloudinary will assign a random public_id that we must check in our Media Library.
The categorization parameter specifies the type of automatic tagging to perform on the uploaded asset. In this case, it’s set to 'aws_rek_tagging', which means that Cloudinary will use Amazon Rekognition to tag the image automatically. Finally, the auto_tagging parameter specifies the confidence threshold for automatic tagging. Any tags with a confidence score below this threshold will not be included. In this case, it’s set to 0.7, meaning only tags with a confidence score of 0.7 or higher will be included.
// Calling upload API
cloudinary.uploader
.upload("assets/upload.png", {
    // Specifying the resource type of the image
    // image is the default resource type even if
    // you don't specify
    resource_type: "image", public_id: "nothing",
})
.then((result) => {

    // JSON.stringify will provide output in a formatted
    // string
    console.log("success", JSON.stringify(result, null, 2));

})
.catch((error) => {
    console.log("error", JSON.stringify(error, null, 2));
});
Here is what our final aws_rek.js looks like:
const cloudinary = require('cloudinary').v2;

// Configure Cloudinary with your account details
cloudinary.config({
    cloud_name: 'CLOUD_NAME',
    api_key: 'API_KEY',
    api_secret: 'API_SECRET'
  });

// Specify the directory of the image you want to crop
const id = 'assets/turtles.jpg';

// Upload the image to Cloudinary and perform automatic tagging using Amazon Rekognition
cloudinary.uploader.upload(id, {
    type : 'upload',
    public_id: 'turtles',
    categorization: 'aws_rek_tagging',
    auto_tagging: 0.7
  })
  .then(result => {
    // Print the automatic tags generated by Amazon Rekognition
    console.log(result.info.categorization.aws_rek_tagging);
  })
  .catch(error => {
    console.error(error);
});
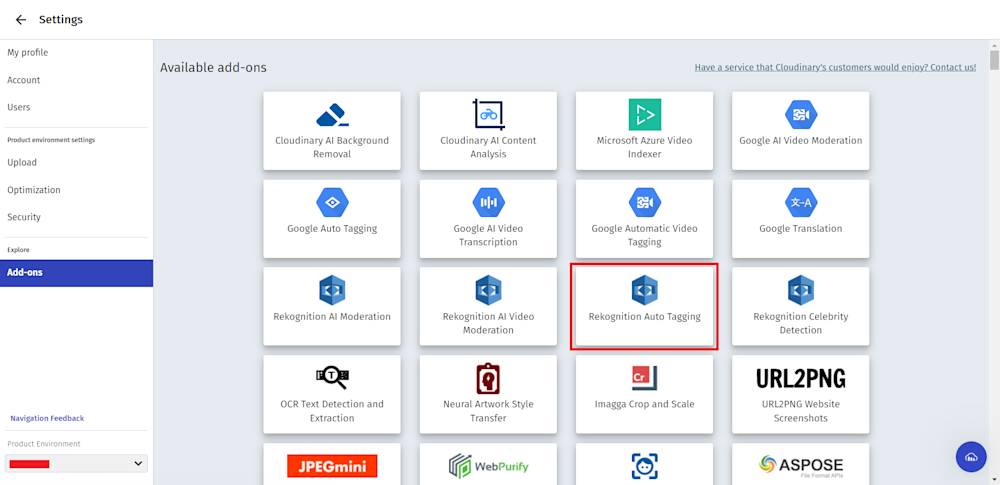
But before we can run our code, we’ll have to subscribe to the Amazon Recognition service. So log in to your Cloudinary account and head to Add-ons.
Next, search for the Rekognition Auto Tagging add-on:
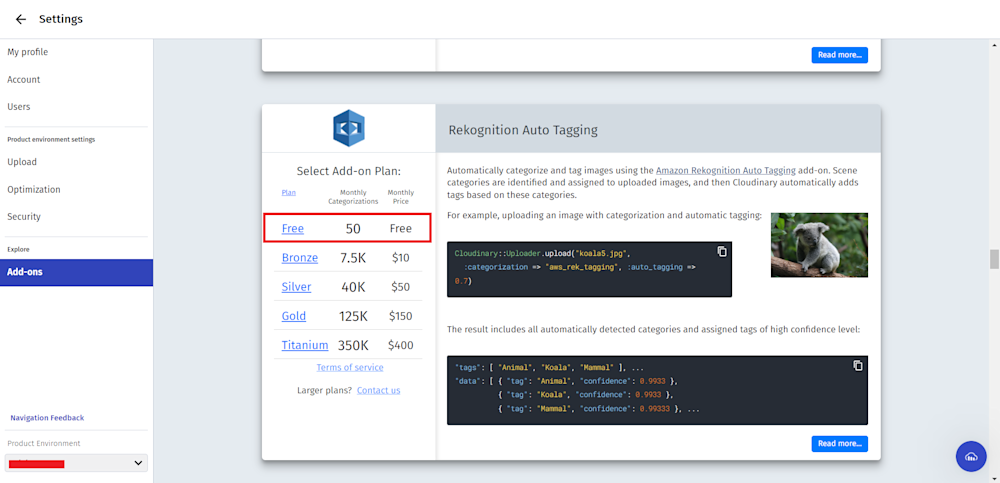
Click on the add-on and subscribe to the free plan:
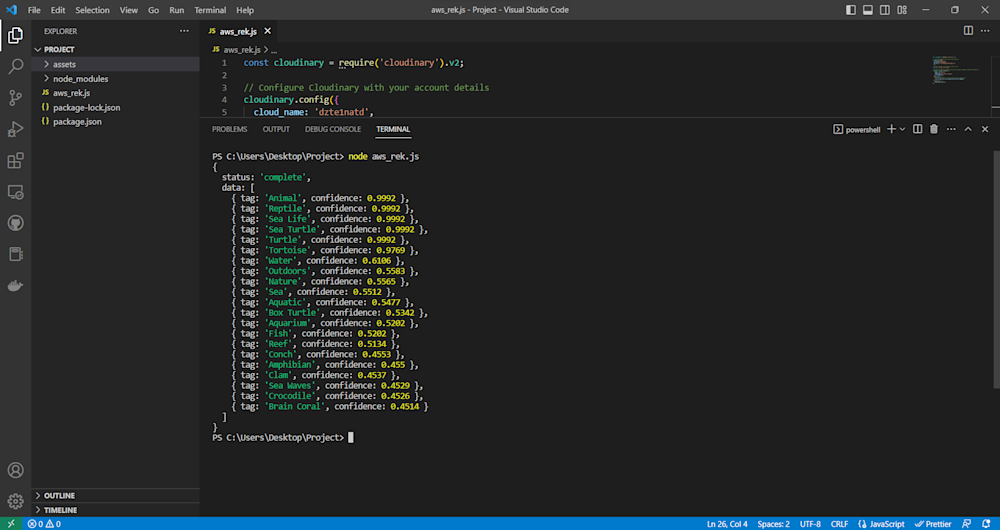
Now you can simply run the code using Node:
node Upload.js
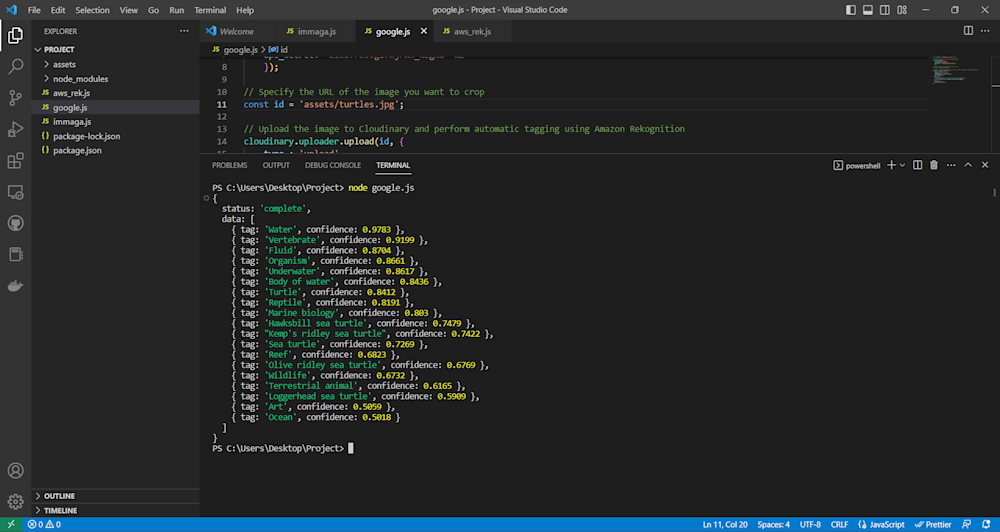
The output shows how the Amazon Rekognition service has analyzed the picture and generated tags that describe the objects and environment in the image. This information can then be used for other applications, as it gives you a JSON object to parse.
As you can see, the JSON output has a status and data field. The status field indicates that the request was successful. The data field contains an array of objects, each representing a tag generated along with its corresponding confidence level.
For example, the first object in data indicates that the image was tagged as an Animal with a confidence level of 0.9992. Similarly, the second object suggests that the image was tagged as a Reptile with the same confidence level of 0.9992. The tags continue with decreasing confidence levels and cover a range of labels related to sea life and aquatic environments.
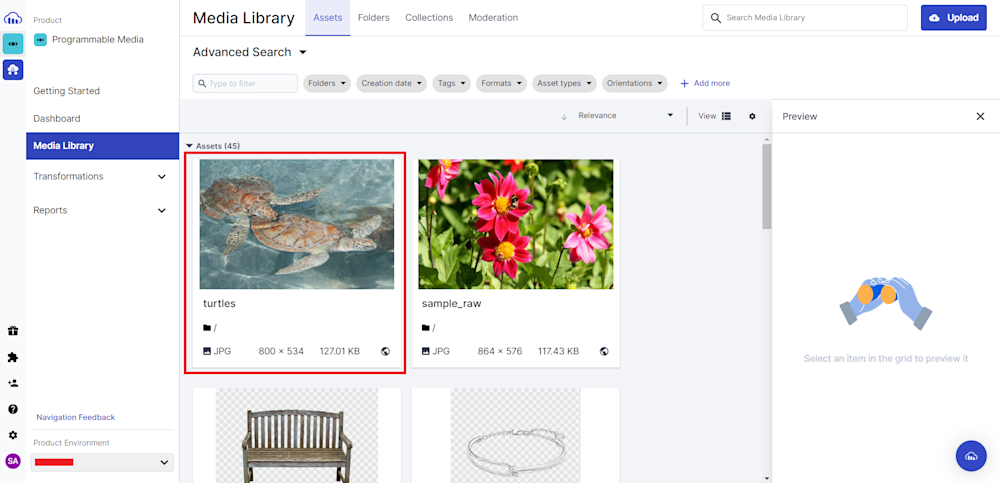
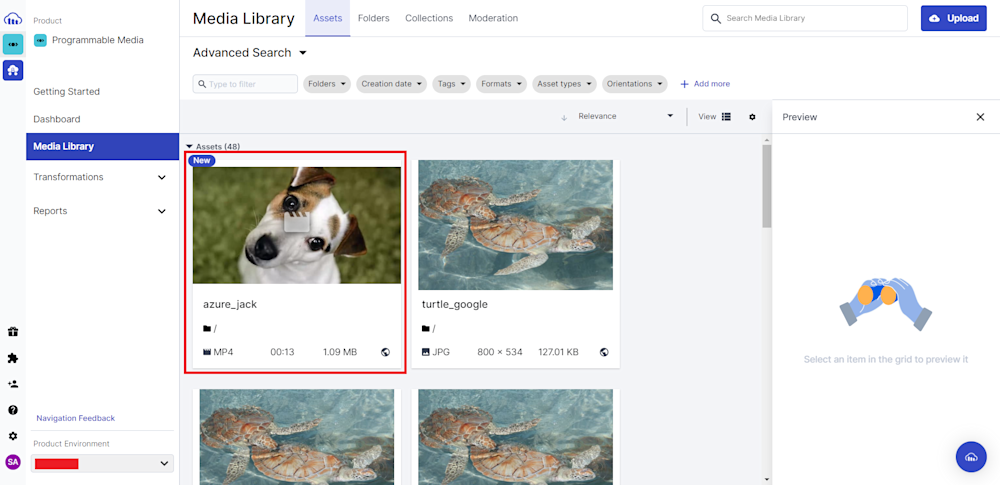
To verify your upload, follow the URL in the terminal output or head on to the Media Library tab in your Cloudinary account:
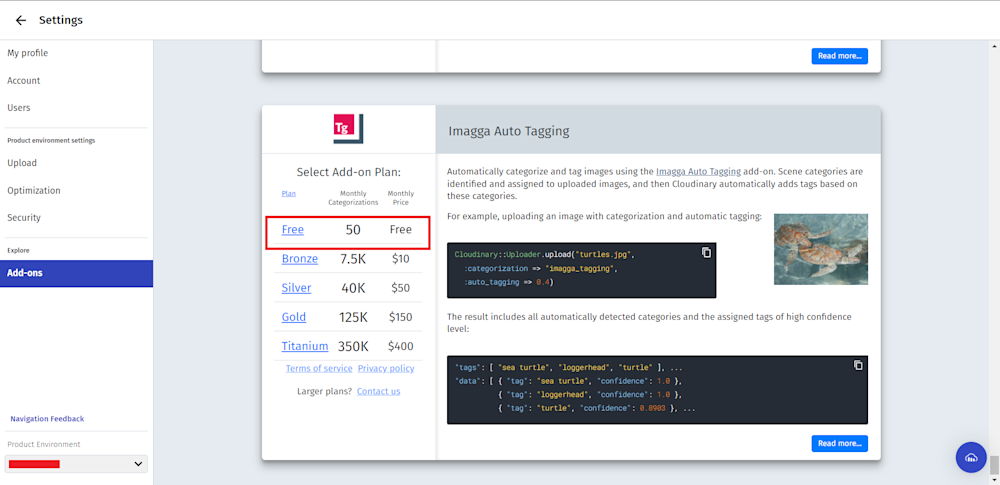
Imagga
Imagga is a powerful image analysis tool that utilizes advanced deep-learning models to analyze and categorize images. Its image tagging API is available within Cloudinary to automatically tag images as they are uploaded.
Imagga’s deep learning models enable it to identify and assign multiple tags to each image, making it easier to categorize and search for images based on various criteria. They also offer color analysis capabilities, allowing you to extract and analyze color information from images.
To use Imagga, head over to the Add-on tab on Cloudinary and subscribe to the Imagga Auto Tagging service:
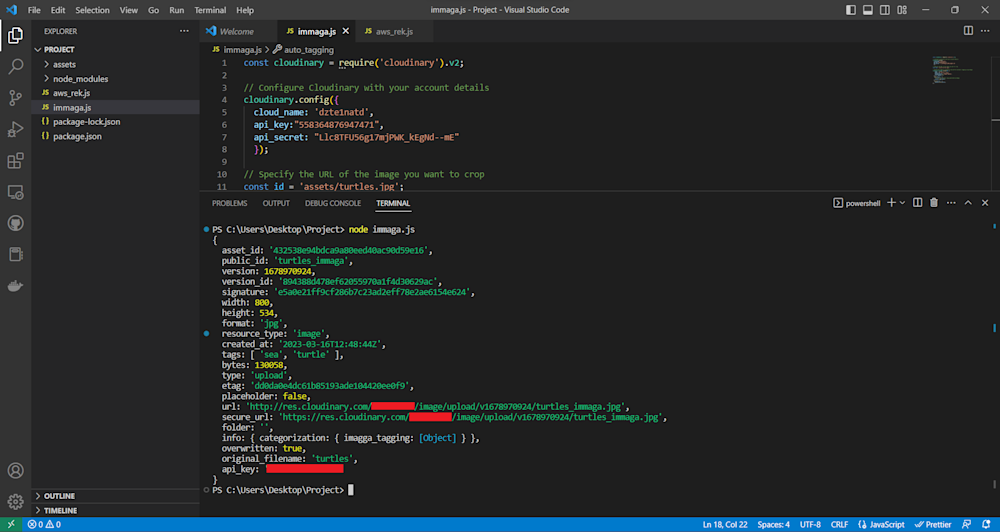
Next, create a new file in your project directory named imagga.js. We will be using the same image and API, so you can copy and paste the entire contents of your aws_rek.js file with two extra modifications.
First, we will redefine our public_id to turtles_immaga to help distinguish it from other files in our Media Library. Secondly, we will change our categorization parameter to imagga_tagging to use the Imagga deep learning models. Our final imagga.js file looks like this:
const cloudinary = require('cloudinary').v2;

// Configure Cloudinary with your account details
cloudinary.config({
    cloud_name: 'CLOUD_NAME',
    api_key: 'API_KEY',
    api_secret: 'API_SECRET'
  });

// Specify the URL of the image you want to crop
const id = 'assets/turtles.jpg';

// Upload the image to Cloudinary and perform automatic tagging using Imagga
cloudinary.uploader.upload(id, {
    type : 'upload',
    public_id: 'turtles_imagga',
    categorization: 'imagga_tagging',
    auto_tagging: 0.7
  })
  .then(result => {
    // Print the automatic tags generated by Imagga
    console.log(result);
  })
  .catch(error => {
    console.error(error);
});
Running the code yields the following output:
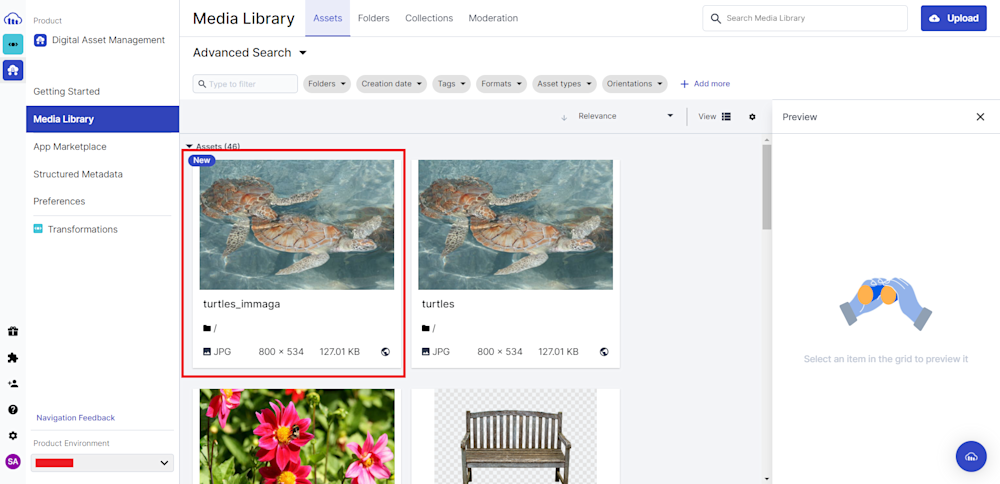
Again, you can verify your upload by checking out the Media Library tab on Cloudinary:
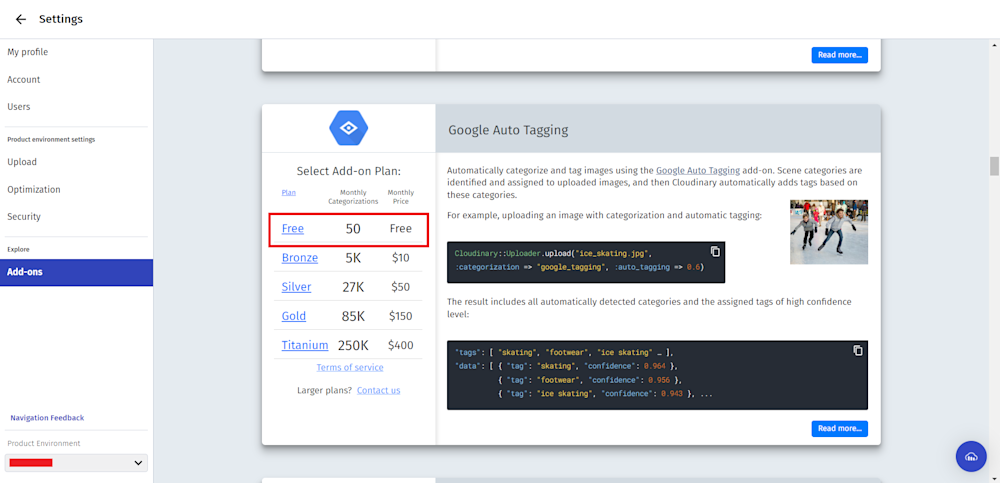
Google Auto Tagging
Google Cloud Vision API’s Auto Tagging feature is a powerful tool that automatically assigns relevant tags to images based on their content. Using machine learning models, this feature can analyze images and detect objects, landmarks, logos, faces, and text, allowing it to assign multiple tags to each image.
Like before, to use Google Auto Tagging, head over to Add-ons on our Cloudinary account and subscribe to the service:
Next, create a new js file in your project directory named google.js. Following the same instructions as before, copy and paste the entire contents of your aws_rek.js file with two extra modifications.
First, we will be redefining our public_id to turtles_google, and secondly, we will change our categorization parameter to google_tagging to use the Google deep learning models. We will also change the console.log function to display the result more appropriately. Our final google.js file looks like this:
const cloudinary = require('cloudinary').v2;

// Configure Cloudinary with your account details
cloudinary.config({
    cloud_name: 'CLOUD_NAME',
    api_key: 'API_KEY',
    api_secret: 'API_SECRET'
  });

// Specify the URL of the image you want to crop
const id = 'turtles.jpg';

// Upload the image to Cloudinary and perform automatic tagging using Amazon Rekognition
cloudinary.uploader.upload(id, {
    type : 'upload',
    public_id: 'turtle_google',
    categorization: 'google_tagging',
    auto_tagging: 0.7
  })
  .then(result => {
    // Print the automatic tags generated by Amazon Rekognition
    console.log(result.info.categorization.google_tagging);
  })
  .catch(error => {
    console.error(error);
});
Running the code yields the following output:
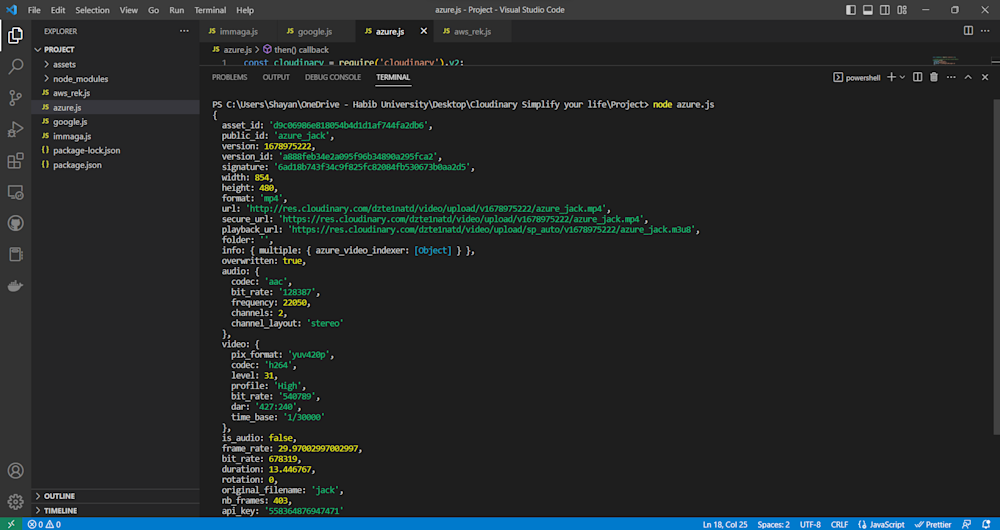
Azure Video Tagging
Microsoft Azure’s Video Tagging service is an advanced tool that uses cutting-edge machine learning models to automatically analyze and tag videos based on their content. This powerful service can detect a wide range of features, including objects, scenes, and motion, enabling it to assign multiple tags to each video.
Like the other methods, you’ll need to activate this add-on on the Cloudinary platform before we get started. Next, we need to add a video we want to tag. Open up your assets folder and paste the video you want to tag. We will be using jack.mp4:
Next, create a new js file in your project directory named azure.js, and follow the same procedures. Here is the final code for our file:
const cloudinary = require('cloudinary').v2;

// Configure Cloudinary with your account details
cloudinary.config({
    cloud_name: 'CLOUD_NAME',
    api_key: 'API_KEY',
    api_secret: 'API_SECRET'
  });

// Upload the video to Cloudinary with categorization and auto-tagging
cloudinary.uploader.upload("assets/jack.mp4",
{ resource_type: "video",
  public_id: "azure_jack",
  categorization: "azure_video_indexer",
  auto_tagging: 0.7 })
.then(result => {
    // Output the public ID and tags of the uploaded video
    console.log(`Public ID: ${result.public_id}`);
    console.log(`Tags: ${result}`);
})
.catch(error => {
    // Handle upload errors
    console.error('Failed to upload video:', error);
});
Finally, run the code using Node. This will give the following output:
Again, you can verify your upload by following the URL given in the terminal output or head on to the Media Library tab on Cloudinary:
The Wrap-Up
Automatic image tagging is a potent tool that can reduce labor costs and enhance user satisfaction with your website. It can effectively recognize objects and concepts inside an image and apply pertinent tags by utilizing AI/ML, leading to consistent and pertinent labeling throughout your image library.
And by using Cloudinary, you can incorporate automatic image tagging into your workflow in just minutes. Plus, you’ll have access to the rest of the Cloudinary platform, including asset management and delivery.
Get started with Cloudinary and revolutionize the way you manage your images today.
More from Cloudinary:
