
Advertisement, popularly known as ads, is a marketing strategy that aims to sell a product or service to a target audience. Popular video sharing and streaming platforms like Youtube, Twitch, e.t.c, generate significant revenue by embedding adverts on their videos to promote products and businesses.
This post discusses creating custom video adverts using Cloudinary and Nuxt. At the end of this tutorial, we will learn how to serve videos in Nuxt using Cloudinary, play an advert at a particular time and for a specific period.
We completed this project in a CodeSandbox. Fork and run it to quickly get started.
Github link here.
To fully grasp the concepts presented in this tutorial, a good knowledge of JavaScript and Vue.js is required. Experience with Nuxt isn’t a requirement, but it’s nice to have.
We also need a Cloudinary account to store and transform media assets. Signup is completely free.
We need to create a Nuxt starter project by navigating to the desired directory and running the command below in our terminal.
npx create-nuxt-app video_ads && cd video_ads
This command will ask us some questions on how to configure our application. We can answer the questions as shown below:
Ok to proceed? (y) < PRESS "y" and hit ENTER>
project name: <PRESS ENTER>
programming langauge: <JAVASCRIPT>
package manager: <NPM>
UI framework: <TAILWIND CSS>
Nuxt.js modules: <AXIOS - PROMISE BASED HTTP CLIENT>
Linting tools: <ESLINT, PRETTIER>
Testing framework: <NONE>
Rendering mode: <UNIVERSAL (SSR/STATIC)
Deployment target: <STATIC/JAMSTACK HOSTING>
Deployment tools: <JSCONFIG.JSON>
Continous integration: <NONE>
Version control system: <GIT>
Code language: PHP (php)
The command creates a Nuxt.js project with TailwindCSS called video_ads and navigates into the project directory.
TailwindCSS is a utility-first CSS framework packed with classes to help us style our web page.
Configuring Cloudinary in Nuxt
First, we need to modify the nuxt.config.js file by adding Cloudinary CDNs to the link and script section as shown below:
    head: {
        title: 'video_thumbnail',
    htmlAttrs: {
      lang: 'en',
    },
    meta: [
      { charset: 'utf-8' },
      { name: 'viewport', content: 'width=device-width, initial-scale=1' },
      { hid: 'description', name: 'description', content: '' },
      { name: 'format-detection', content: 'telephone=no' },
    ],
    link: [
      { rel: 'icon', type: 'image/x-icon', href: '/favicon.ico' },
      {
        rel: 'stylesheet',
        href: 'https://unpkg.com/cloudinary-video-player@1.5.9/dist/cld-video-player.min.css',
      },
    ],
    script: [
      {
        src: 'https://unpkg.com/cloudinary-core@latest/cloudinary-core-shrinkwrap.min.js',
      },
      {
        src: 'https://unpkg.com/cloudinary-video-player@1.5.9/dist/cld-video-player.min.js',
      },
    ],
},
Code language: JavaScript (javascript)
Next, we need to include Cloudinary’s cloud name as an environment variable. To do this, first, we need to create a .env file in the root directory, and in this file, add the snippet below:
NUXT_ENV_CLOUDINARY_CLOUD_NAME=<YOUR CLOUD NAME HERE>
PS: We can get Cloudinary’s cloud name by logging into the Cloudinary console.
Next, we need to upload a sample video to create a custom video advert.
Video URL
In our Cloudinary dashboard, we uploaded the video by clicking on the Media Library tab, clicking on Upload, selecting the Web Address option, inputting the url, and clicking on the Arrow Button to upload.

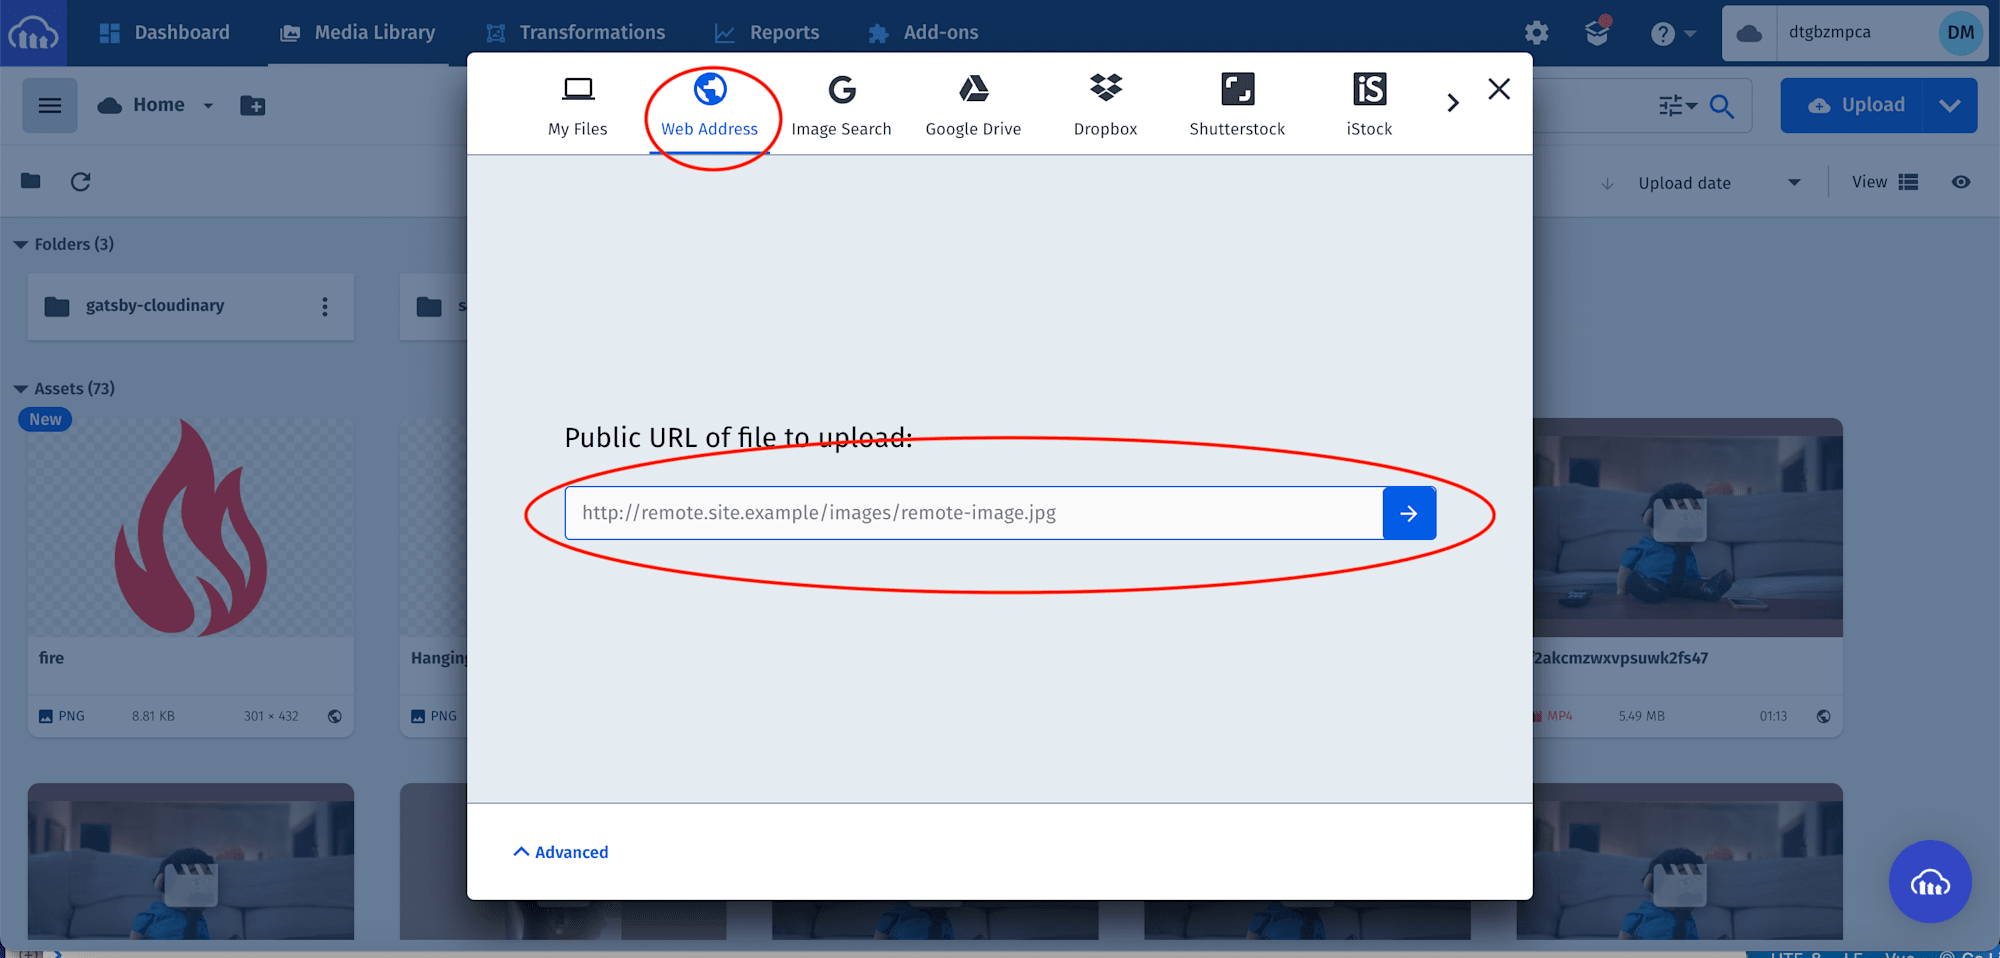
After uploading the video, we will see it displayed on the console with its publicId. The ID will come in handy when creating a custom video advert.
We modify the index.vue file in the pages folder to the following:
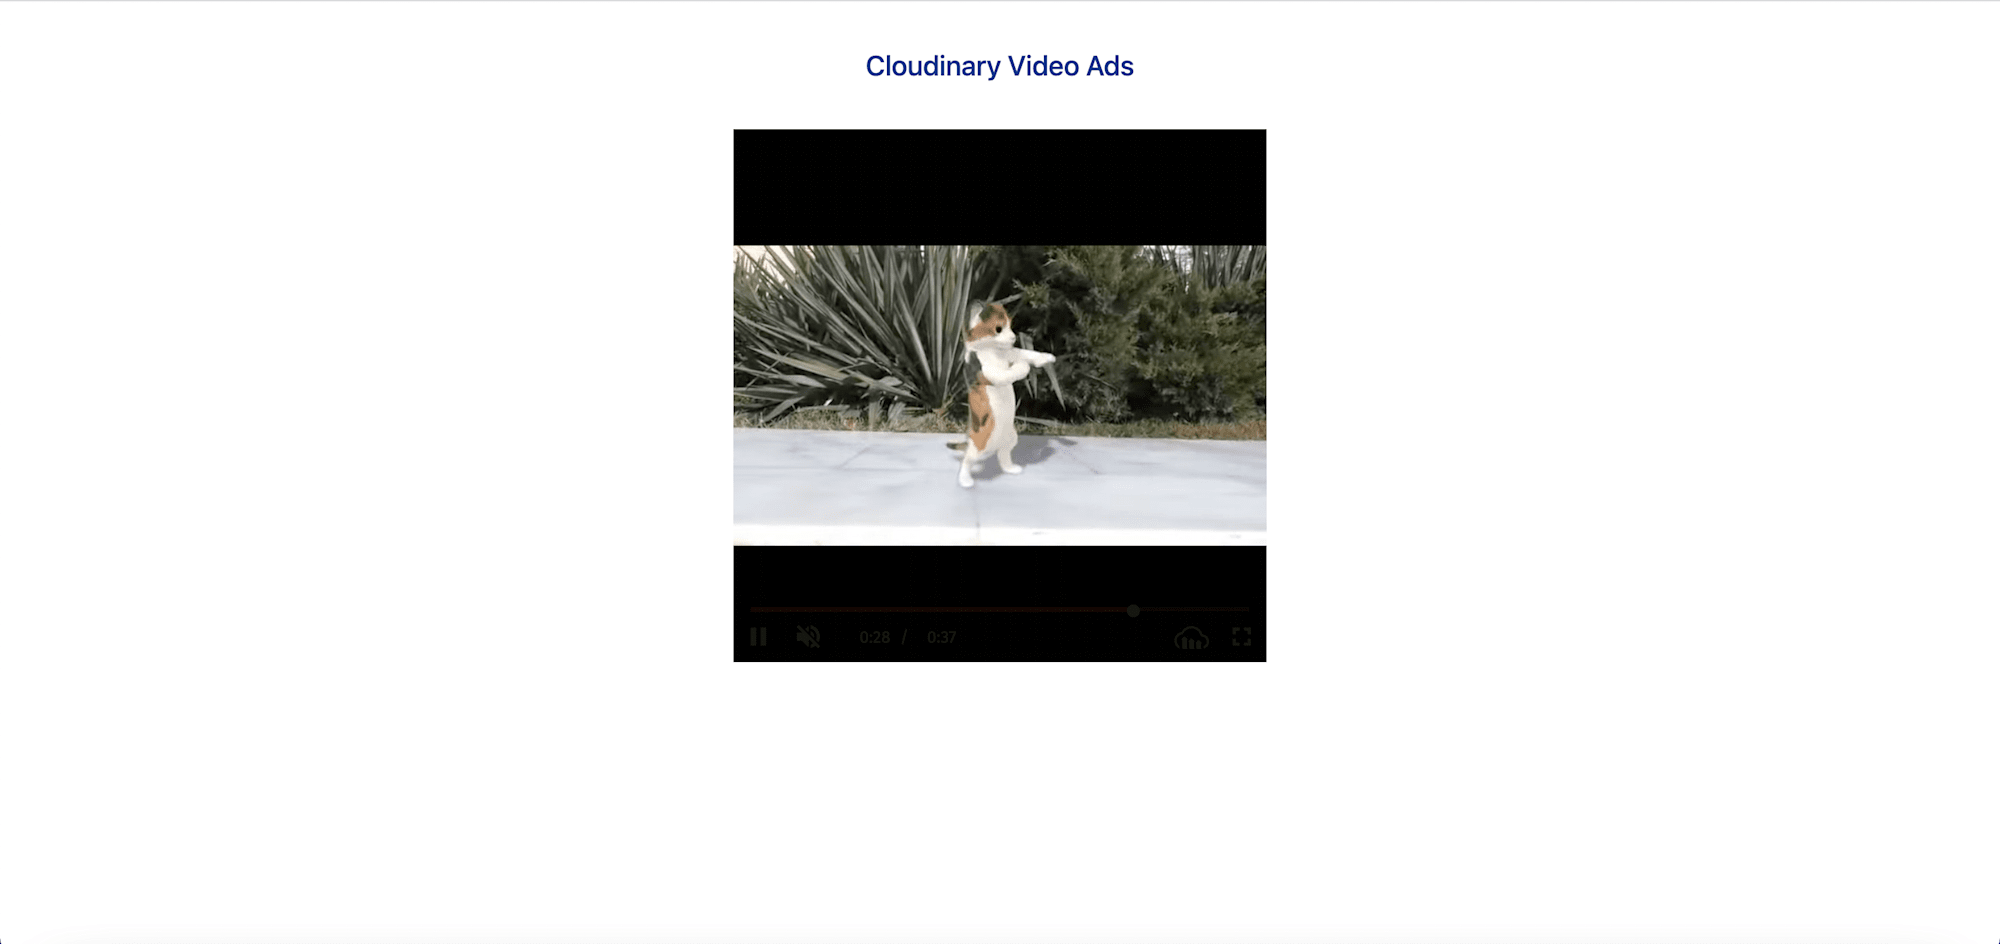
<template>
<div class="flex flex-col items-center p-8">
<h1 class="text-xl font-medium text-blue-900 mb-8">Cloudinary Video Ads</h1>
<div class="relative">
<video :id="`video-player`" class="w-96 h-96" muted controls></video>
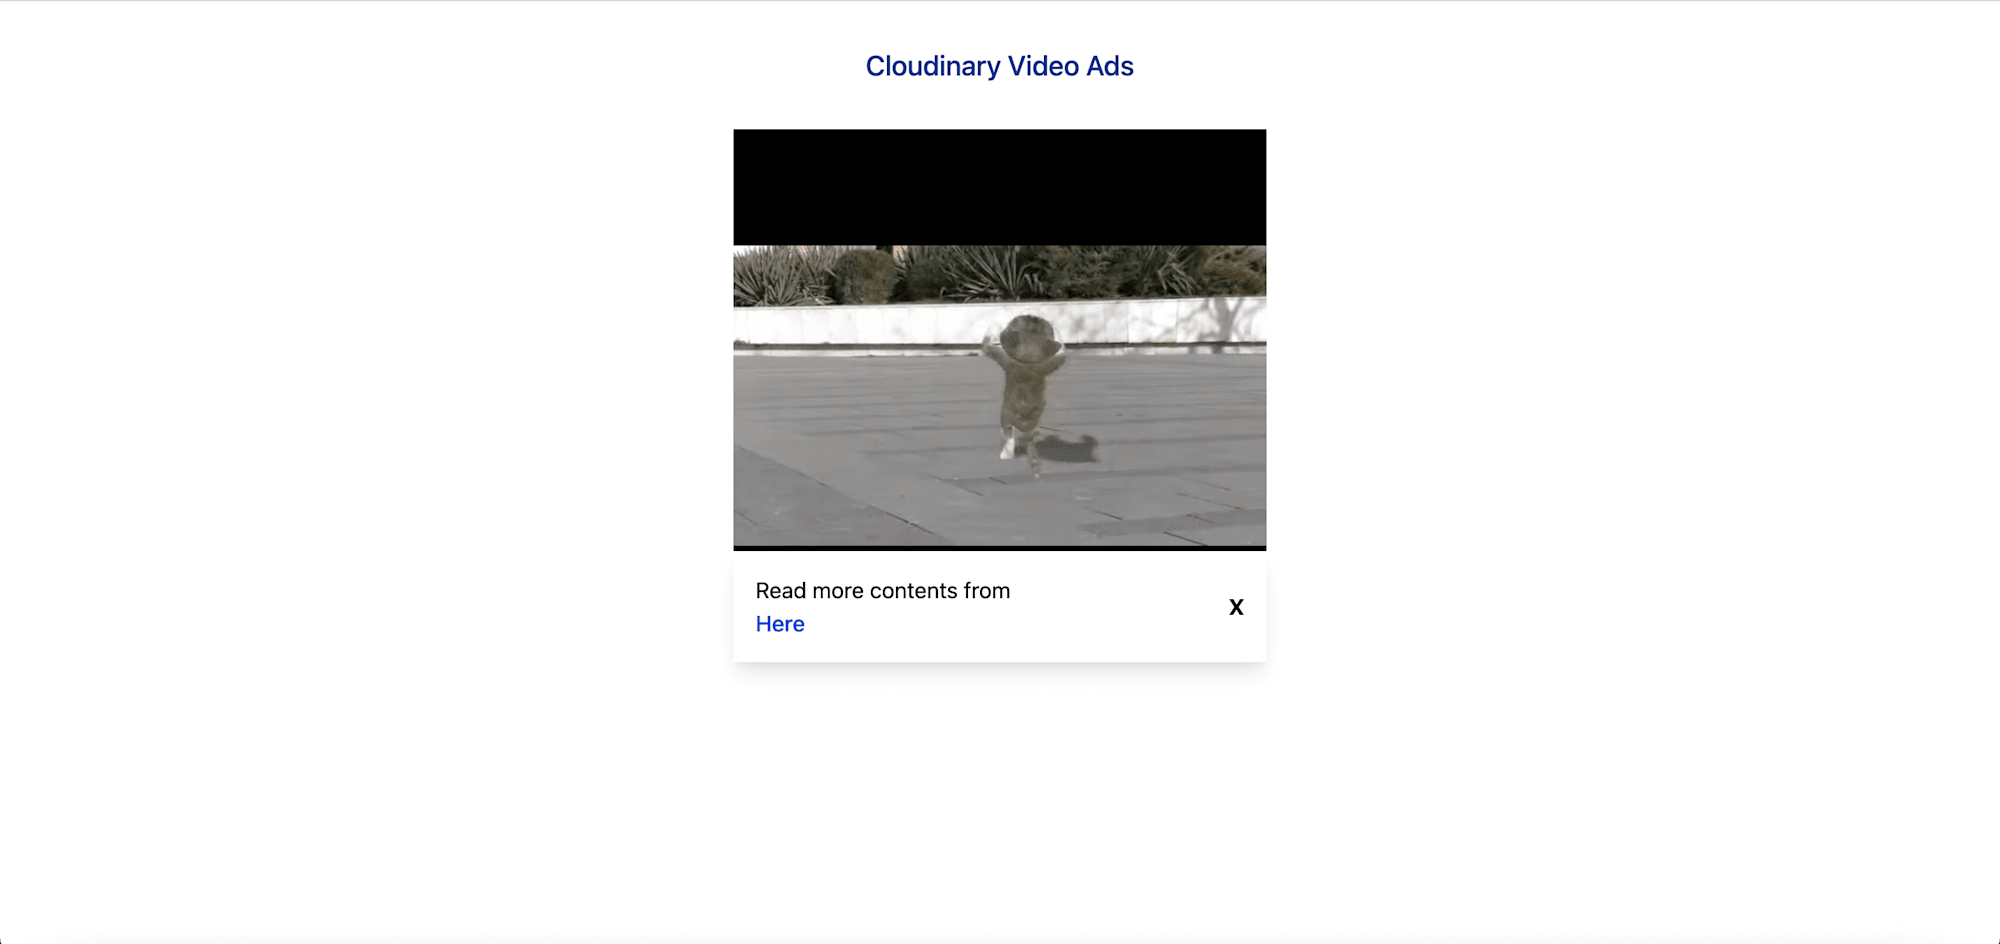
<div
v-if="showAds"
class="flex justify-between w-96 py-4 px-4 bg-white shadow-lg absolute bottom-0 z-10"
>
<section class>
<p>Read more contents from</p>
<a href="https://hackmamba.io/" target="_blank" class="font-medium text-blue-700">Here</a>
</section>
<button class="font-bold" @click="closeShowAds">X</button>
</div>
</div>
</div>
</template>
<script>
export default {
name: 'IndexPage',
data() {
return {
cld: null,
player: null,
showAds: false,
interval: null,
timeRun: 0
}
},
mounted() {
this.player = this.videoList;
this.cld = cloudinary.Cloudinary.new({
cloud_name: process.env.NUXT_ENV_CLOUDINARY_CLOUD_NAME,
secure: true,
})
this.player = this.cld.videoPlayer(`video-player`)
this.player.source(`dancing-catvideo.jpg`)
this.player.play()
},
methods: {
closeShowAds() {
this.showAds = false;
},
openShowAds() {
this.showAds = true;
},
},
created() {
this.interval = setInterval(() => {
this.timeRun += 1;
if (this.timeRun === 10) {
this.openShowAds()
}
if (this.timeRun === 20) {
this.closeShowAds()
}
}, 1000);
},
}
</script>
Code language: HTML, XML (xml)The snippet above does the following:
- Create data properties to manage Cloudinary instance, video element, toggling advert, monitoring video player, and showing advert.
- Use the
mountedlifecycle method to create a Cloudinary instance, initialize the video player, assign a source to the video using the uploaded video’spublicId, and play the video on page load. - Create a
closeShowAdsandopenShowAdsmethod to close and show the advert. - Use the
createdlifecycle method to monitor the video to show an advert after 10 seconds and close the advert after running for additional 10 seconds. - Markup to show the video and advert section.
With that done, we can start a development server using the command below:
npm run dev
This post discussed creating custom video adverts using Cloudinary and Nuxt.
These resources might be helpful: