
In this media jam series, we will build a clone of Product Hunt, a website to share and discover new products with Next.js. In addition, we will use Auth0 for authentication, Airtable for storing product data, and Cloudinary for storing product images.
In part 1, we will configure the initial Next.js app with Auth0, Cloudinary, and Airtable. Then, we will fetch the data from Airtable and display them on the homepage. We will also discuss how to add new products to our app.
If you want to jump right into the code, check out the GitHub Repo here.
You can refer to the second part here: How to build a Product Hunt Clone with Next.js – Part 2 of 2
Since the preview in the CodeSandbox is embedded inside another page, you will see the products but you will not be able to log in via the preview. Instead, to explore and play navigate to deployed or live version, https://qc1kx.sse.codesandbox.io/.
We will use Create Next App to initialize a Next.js project quickly. In your project’s root directory, run the following commands in the terminal.
npx create-next-app product-hunt-clone
cd product-hunt-clone
npm run dev
Code language: PHP (php)
The last command, npm run dev, will start the development server on your system’s port 3000.
You can close the server by hitting the CTRL+C in the terminal.
In this tutorial, you will use Tailwind CSS to style your Product Hunt Clone app. Run the following command in the terminal to install Tailwind CSS.
npm install -D tailwindcss@latest postcss@latest autoprefixer@latest @tailwindcss/forms
npx tailwindcss init -p
Code language: CSS (css)
The last command will create a tailwind.config.js and postcss.config.js file in your project’s root directory.
Update the tailwind.config.js file like this.
module.exports = {
  purge: {
    content: ["./pages/**/*.js", "./components/**/*.js"],
    options: {},
  },
  darkMode: false, // or 'media' or 'class'
  theme: {},
  plugins: [require("@tailwindcss/forms")],
};
Code language: JavaScript (javascript)-
@tailwindcss/forms– A @tailwindcss plugin that provides a basic reset for form styles. You will use this to create the form for adding/updating new products.
Update styles/global.css file like this.
@tailwind base;
@tailwind components;
@tailwind utilities;
Code language: CSS (css)
You can refer to https://tailwindcss.com/docs/guides/nextjs#install-tailwind-via-npm for detailed instructions on setting up a Next.js app with Tailwind CSS.
In this tutorial, you will use Auth0 for all your authentication and authorization needs. In addition, you will use the @auth0/nextjs-auth0 SDK for quick and easy installation and configuration.
Create an account on Auth0.com if you haven’t already.

Run the following command in the project’s terminal to install @auth0/nextjs-auth0 SDK.
npm install @auth0/nextjs-auth0
Code language: CSS (css)
On your Auth0 dashboard, create a Regular Web Application and name it Product Hunt Clone.

Under Settings–>Application URIs, configure the following URLs for your application:
- Allowed Callback URLs: http://localhost:3000/api/auth/callback
- Allowed Logout URLs: http://localhost:3000/

Remember to click on the SAVE CHANGES button afterward.

In your project, create a new file named .env.local by running the following command.
touch .env.local
Code language: CSS (css)
Copy and paste the Client ID, Client Secret, and Domain of your application from your Auth0 dashboard inside the .env.local file.
# A long secret value used to encrypt the session cookie
AUTH0_SECRET='F(5^&wMh&nDvbr!!&jxJ01TYjh4reUcs'

# The base url of your application
AUTH0_BASE_URL='http://localhost:3000'

# The url of your Auth0 tenant domain
AUTH0_ISSUER_BASE_URL='https://YOUR_AUTH0_DOMAIN.auth0.com'

# Your Auth0 application's Client ID
AUTH0_CLIENT_ID='YOUR_AUTH0_CLIENT_ID'

# Your Auth0 application's Client Secret
AUTH0_CLIENT_SECRET='YOUR_AUTH0_CLIENT_SECRET'
Create a Dynamic API Route handler at /pages/api/auth/[...auth0].js by running the following command.
cd pages/api
mkdir auth
touch auth/[...auth0].js
Add following code to the [...auth0].js file.
import { handleAuth } from '@auth0/nextjs-auth0';
export default handleAuth();
Code language: JavaScript (javascript)
This will create the following urls: /api/auth/login, /api/auth/callback, /api/auth/logout and /api/auth/me.
Wrap your pages/_app.js component in the UserProvider component.
// pages/_app.js
import "../styles/globals.css";
import { UserProvider } from "@auth0/nextjs-auth0";

function MyApp({ Component, pageProps }) {
  return (
    <UserProvider>
        <Component {...pageProps} />
    </UserProvider>
  );
}

export default MyApp;
Code language: JavaScript (javascript)
You will use Cloudinary, a media management platform for web and mobile developers, to store the media related to products like images or thumbnails.
Create a free account on Cloudinary if you haven’t already.

After creating the account, head over to your dashboard and create a Product Hunt Clone folder; to store the product’s images, take note of your Cloudinary’s Cloud name, API Key, and API Secret.

Paste this Cloud name, API Key and API Secret in your .env.local file along with other credentials.
NEXT_PUBLIC_CLOUDINARY_CLOUD_NAME = 'YOUR_CLOUDINARY_CLOUD_NAME'
CLOUDINARY_API_KEY = 'YOUR_CLOUDINARY_API_KEY'
CLOUDINARY_API_SECRET = 'YOUR_CLOUDINARY_API_SECRET'
Next.js has built-in support for loading environment variables from .env.local into process.env.
By default, all environment variables loaded through .env.local are only available in the Node.js environment. This means that they won’t be exposed to the browser. However, using the NEXT_PUBLIC_ prefix exposes the environment variable to the browser. You can read more about it here.
Run the following command in the terminal to install the Cloudinary React SDK and Cloudinary Node.js SDK.
npm install cloudinary-react cloudinary
The next step is to configure your product’s database, i.e., Airtable. Then, finally, create an Airtable account, if you haven’t already.
After creating an account, create a base named Product Hunt Clone, and inside this base, create a table named products with the following schema.
-
Name– Name of the product – Single line text -
Description– Short description of the product – Long text -
Link– Link to the product website – URL -
Sub– Unique Identifier to identify the creator of product – Single line text -
PublicId– Public Id of the Image stored on Cloudinary – Single line text

After creating the schema, make sure to add at least one entry to the table. You can copy the sample data from here. In the next part, you will update the schema to add upvotes of the product.
Head over to your Airtable account settings and copy your API Key.

Head over to https://airtable.com/api and choose the Product Hunt Clone base.

On your base’s API documentation page, copy the base ID of the Product Hunt Clone base.
 Paste both Airtable API Key and Airtable Base ID in your
 .env.local file.
AIRTABLE_API_KEY = ''
AIRTABLE_BASE_ID = ''
You can refer to the .env.local file of this project here.
Run the following command in the terminal to install the Airtable JS official API client, airtable.
npm install airtable
There are a few other dependencies that you will need in this project. Run the following command to install them.
npm install react-dropzone
-
react-dropzone– React hook to create a HTML5-compliant drag-drop zone for files. You can read more about this package here.
In this section, you will create the Navbar component, which will display the application name and a Login/SignUp button.
Run the following command in the project’s root directory to create the Navbar.js file inside the components directory.
mkdir components
cd components
touch Navbar.js
Code language: CSS (css)
Add the following code to the Navbar.js file.
import React from "react";
import { useUser } from "@auth0/nextjs-auth0";
import Link from "next/link";

export default function Navbar() {
  const { user} = useUser();

  return (
    <div className="relative bg-white">
      <div className="max-w-7xl mx-auto px-2 sm:px-3">
        <div className="flex flex-col md:flex-row justify-between items-center border-b-2 border-gray-100 py-6  md:space-x-10 ">
          <div className="flex  justify-start lg:w-0 lg:flex-1">
            <Link href="/">
              <a>
                <img
                  className="h-10 w-auto sm:h-12"
                  src="https://res.cloudinary.com/singhashutoshk/image/upload/v1622888633/product-hunt-clone/b2beawbhpjcy7kwnipo4.svg"
                  alt=""
                />
              </a>
            </Link>
            <Link href="/">
              <a>
                <h1 className="leading-normal text-3xl md:text-4xl font-serif tracking-tight font-bold ml-1 text-gray-800">
                  <span className="block text-purple-600 xl:inline">
                    Product Hunt Clone
                  </span>
                </h1>
              </a>
            </Link>
          </div>
          {user ? (
            <Link href="/products/insert">
              <a className="inline-flex font-medium text-gray-500 bg-transparent  text-indigo-500 font-semibold px-3 py-2 my-1 border border-indigo-500 rounded">
                <svg
                  xmlns="http://www.w3.org/2000/svg"
                  className="h-6 w-6 hover:bg-white"
                  fill="none"
                  viewBox="0 0 24 24"
                  stroke="#6366F1"
                >
                  <path
                    strokeLinecap="round"
                    strokeLinejoin="round"
                    strokeWidth={2}
                    d="M9 13h6m-3-3v6m5 5H7a2 2 0 01-2-2V5a2 2 0 012-2h5.586a1 1 0 01.707.293l5.414 5.414a1 1 0 01.293.707V19a2 2 0 01-2 2z"
                  />
                </svg>
                Add Product
              </a>
            </Link>
          ) : null}

          {user ? (
            <div className=" flex items-center justify-end md:flex-1 lg:w-0">
              <Link href="/user/profile">
                <a className="whitespace-nowrap text-base font-medium text-gray-500 hover:text-gray-900">
                  My Profile
                </a>
              </Link>

              <Link href="/api/auth/logout">
                <a className="ml-8 whitespace-nowrap inline-flex items-center justify-center px-4 py-2 border border-transparent rounded-md shadow-sm text-base font-medium text-white bg-red-400 hover:bg-red-600">
                  Log Out
                </a>
              </Link>
            </div>
          ) : (
            <Link href="/api/auth/login">
              <a className="ml-8 whitespace-nowrap inline-flex items-center justify-center px-4 py-2 border border-transparent rounded-md shadow-sm text-base font-medium text-white bg-purple-600 hover:bg-purple-700">
                Login
              </a>
            </Link>
          )}
        </div>
      </div>
    </div>
  );
}
Code language: JavaScript (javascript)
You start by importing useUser() hook from @auth0/nextjs-auth0. The useUser() hook will give you the UserProfile object from the server-side session by requesting it from the HandleProfile API Route handler.
The user object from userUser() hook contains the current user’s information and defaults to undefined if there is no user. Here is how it looks like.
{
  "nickname": "lelouchB",
  "name": "ASHUTOSH KUMAR SINGH",
  "picture": "https://avatars.githubusercontent.com/u/45850882?v=4",
  "updated_at": "2021-06-06T05:52:11.117Z",
  "email": "ashutoshksingh@outlook.com",
  "sub": "github|45960883"
}
Code language: JSON / JSON with Comments (json)
The sub in the user object is the unique identifier to identify the creator of the product.
In the Navbar.js file, you use this user object with the ternary operator to either show the Login button or the Logout button. The Login and Logout buttons are links with href equal to /api/auth/login and /api/auth/logout routes.
Along with the Logout button, you show a link, My Profile, which takes the user to /user/profile page. This page shows the user their name and their products. Also, in the Navbar, you create a link to the /products/insert page. This page contains a form to add new products to the database.
You will create the /user/profile page in part 2 and /products/insert page later in this jam.
The next step is to import and use the Navbar component to index.js.
// index.js
import Head from "next/head";
import { useEffect, useState } from "react";
import Navbar from "../components/Navbar";
import { useUser } from "@auth0/nextjs-auth0";

export default function Home() {
  const { user, error, isLoading } = useUser();

  if (isLoading) {
    return (
      <div className="mx-auto my-64 text-gray-800 text-center text-3xl">
        Loading
      </div>
    );
  }

  return (
    <div className="contianer px-3">
      <Head>
        <title>Product Hunt Clone</title>
        <link rel="icon" href="/favicon.ico" />
      </Head>
      <Navbar />
    </div>
  );
}
Code language: JavaScript (javascript)
Start the development server by running the npm run dev command. Next, navigate to http://localhost:3000/ in your browser.
Here is how your app will look.

Click on the Login button and either log in with Google OAuth or register a new user on the Auth0 Login Page.

Here is how the Navbar will look after you have logged in.

The next step is to create a container or a Card component that will be used to display the products with their name, image, and description.
In this section, you will create the Product component inside the components directory.
Run the following command to create the Product component.
cd components
touch Product.js
Code language: CSS (css)
Add the following command to the Product.js file.
import React from "react";
import { Image, Transformation } from "cloudinary-react";
import { useUser } from "@auth0/nextjs-auth0";
import { useRouter } from "next/router";

export default function Product({
  name,
  id,
  publicId,
  description,
  link,
  check,
}) {
  const router = useRouter();
  const { user, error, isLoading } = useUser();

	const deleteThisProduct = async (e) => {
	    await fetch("/api/deleteProduct", {
	      method: "DELETE",
	      body: JSON.stringify({ id, publicId }),
	      headers: {
	        "Content-Type": "application/json",
	      },
	    });
	    router.reload();
	  };

	  return (
    <div className="max-w-md mx-auto my-4 bg-white rounded-xl shadow-xl overflow-hidden md:max-w-2xl">
      <div className="md:flex">
        <div className="md:flex-shrink-0">
          <Image
            className="h-48 w-full object-cover md:w-48"
            publicId={publicId}
            cloudName={process.env.NEXT_PUBLIC_CLOUDINARY_CLOUD_NAME}
            alt={name}
            format="webp"
            secure
          >
            <Transformation width="800"  gravity="auto" crop="fill" />
          </Image>
        </div>
        <div className="p-8 w-full">
          <div className="flex justify-between  items-start">
            <a
              href={link}
              className="block mt-1 text-xl font-semibold leading-tight font-medium  text-indigo-700 hover:underline"
            >
              {name}
            </a>
          </div>
          <p className="mt-2 text-gray-600 w-10/12">{description} </p>
          {check && (
            <div className="flex justify-end">
              <button
                className="mx-1 h-6 w-6"
                onClick={() =>
                  router.push({
                    pathname: "/update/[id]",
                    query: {
                      id: id,
                    },
                  })
                }
              >
                <svg
                  xmlns="http://www.w3.org/2000/svg"
                  className="h-6 w-6"
                  fill="none"
                  viewBox="0 0 24 24"
                  stroke="gray"
                >
                  <path
                    strokeLinecap="round"
                    strokeLinejoin="round"
                    strokeWidth={2}
                    d="M11 5H6a2 2 0 00-2 2v11a2 2 0 002 2h11a2 2 0 002-2v-5m-1.414-9.414a2 2 0 112.828 2.828L11.828 15H9v-2.828l8.586-8.586z"
                  />
                </svg>
              </button>
              <button  onClick={deleteThisProduct} className="px-1">
                <svg
                  xmlns="http://www.w3.org/2000/svg"
                  className="h-6 w-6"
                  fill="none"
                  viewBox="0 0 24 24"
                  stroke="gray"
                >
                  <path
                    strokeLinecap="round"
                    strokeLinejoin="round"
                    strokeWidth={2}
                    d="M19 7l-.867 12.142A2 2 0 0116.138 21H7.862a2 2 0 01-1.995-1.858L5 7m5 4v6m4-6v6m1-10V4a1 1 0 00-1-1h-4a1 1 0 00-1 1v3M4 7h16"
                  />
                </svg>
              </button>
            </div>
          )}
        </div>
      </div>
    </div>
  );
}
Code language: JavaScript (javascript)
Most of the above code is Tailwind CSS styling. You use the props passed to this component and display them on the page. Here are the props that are passed to this component.
-
name– Name of the Product -
id– Id of the product -
publicId–public_idof the image, used with the Image component fromcloudinary-reactto display the product’s image. -
description– Short description of the Product. -
link– URL to the product. -
check– A boolean. You check whether the current user is the product’s creator or not and pass eithertrueorfalse. It compares thesubin the product with thesubof the current user.
The above code uses the check boolean to show the edit and delete buttons to the creator of the product. The edit button takes the user to /update/[id] page. The id of the product is passed in the query of the route with the router object. You can read more about the router object here.
<button
  className="mx-1 h-6 w-6"
  onClick={() =>
    router.push({
      pathname: "/update/[id]",
      query: {
        id: id,
      },
    })
  }
>
	  // SVG Code
</button>
Code language: HTML, XML (xml)
On the edit or /update/[id] page, you will use the product’s id to update it in the Airtable database.
When the delete button is clicked, the deleteThisProduct is triggered, sending a DELETE request to /api/deleteProduct route.
In the request body of this DELETE request, you send both the id and publicId of the image. When a product is deleted, its data should be deleted from both Airtable and Cloudinary.
You will create this API route in the last section.
const deleteThisProduct = async (e) => {
	    await fetch("/api/deleteProduct", {
	      method: "DELETE",
	      body: JSON.stringify({ id, publicId }),
	      headers: {
	        "Content-Type": "application/json",
	      },
	    });
	    router.reload();
 };
Code language: JavaScript (javascript)
The router.reload() functions reloads the current URL and is equivalent to window.location.reload().
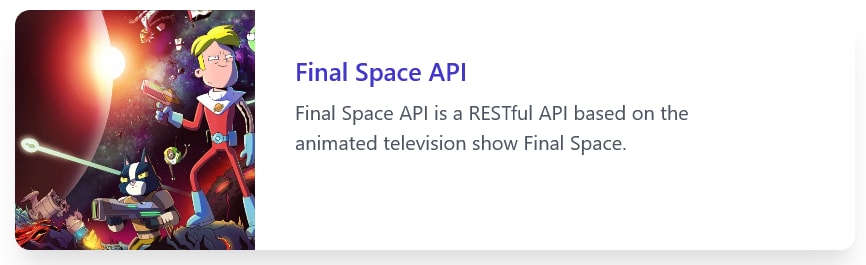
Here is how the Product component looks like.
In this section, you will fetch the products from Airtable and display them on the app using the Product component.
Create a new file named api.js inside the lib directory by running the following command.
mkdir lib
cd lib
touch api.js
Code language: CSS (css)
You will create all the functions to fetch, update or delete records from Airtable in this file.
Add the following code to api.js file.
const Airtable = require("airtable");

const base = new Airtable({ apiKey: process.env.AIRTABLE_API_KEY }).base(
  process.env.AIRTABLE_BASE_ID
);

const table = base("products");

export const getAllProducts = async () => {
  const data = await table
    .select({
      view: "Grid view",
    })
    .firstPage();
  return data.map((record) => {
    return { id: record.id, ...record.fields };
  });
};
Code language: JavaScript (javascript)
You start by creating an instance of airtable and then access the Product Hunt Clone base bypassing the base ID and API key stored in the .env.local file to this instance.
You then access the table products bypassing "products" to the Product Hunt Clone base.
You create and export an asynchronous function named getAllProducts which fetches all the products using the .select({view:"Grid view"}) and .firstPage() methods to be displayed on the landing page. You can read more about these methods on your base’s documentation page from where you copied the base ID.
Here is how the data array looks like.
[
	Record {
		_table: Table {
			_base: [Base],
			id: null,
			name: 'products',
			// Functions
		},
		id: 'rec6Jv8UmrQk1ZoMc',
		_rawJson: {
			id: 'rec6Jv8UmrQk1ZoMc',
			fields: [Object],
			createdTime: '2021-06-04T07:37:01.000Z'
		},
		fields: {
			Sub: 'google-oauth2|1053578586999545372338041',
			Description: 'Final Space API is a RESTful API based on the animated television show Final Space. ',
			Name: 'Final Space API',
			PublicId: 'product-hunt-clone/qfadnlboijexxvuqan08',
			Link: 'https://finalspaceapi.com/'
		},
		// Functions
	}
]
Code language: JavaScript (javascript)
You map over the data array to destructure each record in the array to return only the id and the fields.
Here is how the array looks like after destructuring. Less messy and easy to use.
[{
	id: 'rec6Jv8UmrQk1ZoMc',
	Sub: 'google-oauth2|1053578586999545372338041',
	Description: 'Final Space API is a RESTful API based on the animated television show Final Space. ',
	Name: 'Final Space API',
	PublicId: 'product-hunt-clone/qfadnlboijexxvuqan08',
	Link: 'https://finalspaceapi.com/'
}]
Code language: JavaScript (javascript)
The next step is to import and use the getAllProducts() function in index.js file.
Update index.js file like this.
import Head from "next/head";
import Product from "../components/Product";
import Navbar from "../components/Navbar";
import { useUser } from "@auth0/nextjs-auth0";
import { getAllProducts } from "../lib/api";

export default function Home({ products }) {
  const { user, error, isLoading } = useUser();

  if (isLoading) {
    return (
      <div className="mx-auto my-64 text-gray-800 text-center text-3xl">
        Loading
      </div>
    );
  }

  return (
    <div className="contianer px-3">
      <Head>
        <title>Product Hunt Clone</title>
        <link rel="icon" href="/favicon.ico" />
      </Head>
      <Navbar />
      <span className="mb-4"></span>
      {products.length>0 &&
        products.map((product) => (
          <Product
            key={product.id}
            id={product.id}
            name={product.Name}
            link={product.Link}
            publicId={product.PublicId}
            description={product.Description}
            check={user && product.Sub === user.sub ? true : false}
          />
        ))}
    </div>
  );
}

export async function getServerSideProps() {
  const products = await getAllProducts();
  return {
    props: { products },
  };
}
Code language: JavaScript (javascript)
In the above code, you create and export async function getServerSideProps(). This function uses the getAllProducts() function to fetch the products from Airtable and pass it as props to the Home component. You can read more about getServerSideProps() function here.
You map over the products array and pass its data to the Product component. Notice the check prop of the Product component. You check whether the sub of product is equal to the sub of the current user.
check={user && product.Sub === user.sub ? true : false}
Code language: JavaScript (javascript)
Navigate to http://localhost:3000/ in your browser. Here is how your app will look.

In this section, you will create the form for adding new products. Run the following command to create the product/insert page.
cd pages
mkdir products
cd products
touch insert.js
Code language: CSS (css)
Before proceeding further, copy the code for the
insert.jsfile from GitHub and paste it to theinsert.jsfile.Raw Link: https://raw.githubusercontent.com/lelouchB/product-hunt-clone-part-1/main/pages/products/insert.js
You might notice that in the insert.js file, you are exporting the AddNewProduct component with the withPageAuthRequired() function. This function protects the page it is used with and redirects any anonymous user to the login page.
You will need to be logged in to access the /products/insert page in simple words, which makes sense to discourage spam inserts in the database. You can read more about this method here.
export default withPageAuthRequired(function AddNewProduct() {
		// Code
	}
)
Code language: JavaScript (javascript)
In the insert.js file, you are ultimately making a POST request to the /api/createProduct API route with the product’s name, link, description, and the data URL of the image.
The next step is to accept data from the user. You can split this task into two parts. The first is to store the textual data, i.e., name, link, description, and the second, to create a Drag N Drop area to accept the image and then create a data URL of that image. You will also show the preview of the image to the user.
- You initialize three states, namely
name,link, anddescription. These states stores the name, link, and description of the product using thevalueproperty andonChange()event handler.
<input
  type="text"
  name="product_name"
  id="product_name"
  value={name}
  onChange={(e) => setName(e.target.value)}
  autoComplete="given-name"
  className="mt-1 focus:ring-indigo-500 focus:border-indigo-500 block w-full shadow-sm sm:text-sm border-gray-300 rounded-md"
  required
/>
Code language: HTML, XML (xml)- Creating Drag N Drop is rather tricky compared to storing the textual data. You will use the
react-dropzonelibrary installed in the first section for the drag n drop component.
const { getRootProps, getInputProps } = useDropzone({
  accept: "image/*",
  multiple: false,
  onDrop: (acceptedFiles) => {
    const file = acceptedFiles[0];
    const reader = new FileReader();
    reader.readAsDataURL(file);
    reader.onloadend = () => {
      setUploadImage(reader.result);
    };
    reader.onerror = () => {
      console.error("Something has happend.");
    };

    setFiles(
      acceptedFiles.map((file) =>
        Object.assign(file, {
          preview: URL.createObjectURL(file),
        })
      )
    );
  },
});
Code language: JavaScript (javascript)
In the above code, you use the useDropzone hook to configure your dropzone. You set accept property to image only and the multiple property to false, which means you can only upload one image.
Inside the onDrop property, you use the FileReader API’s .readAsDataURL() method to convert the image to data URL. This data URL is stored inside the uploadImage state.
Here is how the data URL of an image looks like. This data URL has been trimmed. You can see the original data URL here.
data:image/png;base64,iVBORw0KGgoAAAANSUhEUgAAB2oAAAOMCAYAAACM7zM................
You use the .createObjectURL() method to convert the image to Object URL stored inside the file state and is later used to preview the image.
Here is how the Object URL of an image looks like.
blob:http://localhost:3000/6d511357-c6fa-43ce-9374-0f5ddb7c5445
Code language: JavaScript (javascript)
This file state is used to preview the selected image to the user.
<aside className=" flex flex-row flex-wrap justify-center mt-2">
  <span className="flex min-w-0  overflow-hidden">
    <img src={file} className="block w-auto h-32 w-32" />
  </span>
</aside>
Code language: HTML, XML (xml)
When the Add New Product button is clicked, the handleSubmit function is triggered which sends the data in a POST request to /api/createProduct route.
const createProduct = async ({ name, description, link, uploadImage }) => {
  try {
    await fetch("/api/createProduct", {
      method: "POST",
      body: JSON.stringify({ name, description, link, uploadImage }),
      headers: {
        "Content-Type": "application/json",
      },
    });
  } catch (err) {
    console.error(err);
  }
};

const handleSubmit = async (e) => {
  await e.preventDefault();
  await setName("");
  await setDescription("");
  await setLink("");
  await setUploadImage("");
  await setFile("");
  await setLoading(true);
  await createProduct({ name, description, link, uploadImage });
  await router.push("/");
};
Code language: JavaScript (javascript)
While the data is being added to Airtable, the loading state is set to true, which makes the form disappear and a message
Uploading! New Product is being added. is shown to the user. After a successful POST request, the user is redirected to the landing page.
The next step is to create the /api/createProduct route or createProduct.js file inside the pages/api directory. Run the following command in the terminal to create the file.
touch pages/api/createProduct.js
Add the following code to the createProduct.js file.
import { withApiAuthRequired, getSession } from "@auth0/nextjs-auth0";
const cloudinary = require('cloudinary').v2;
var Airtable = require('airtable');

cloudinary.config({
    cloud_name: process.env.NEXT_PUBLIC_CLOUDINARY_CLOUD_NAME,
    api_key: process.env.CLOUDINARY_API_KEY,
    api_secret: process.env.CLOUDINARY_API_SECRET,
});

const base = new Airtable({ apiKey: process.env.AIRTABLE_API_KEY }).base(
  process.env.AIRTABLE_BASE_ID
);

export const config = {
  api: {
    bodyParser: {
      sizeLimit: "3mb",
    },
  },
};

export default withApiAuthRequired(async function handler(req, res) {
  const session = getSession(req, res);
  const sub = await session.user.sub;

  if (req.method !== "POST") {
    return res.status(405);
  }
  const { name, description, link, uploadImage } = req.body;

  const image = await cloudinary.uploader.upload(
    uploadImage,
    { folder: "product-hunt-clone" },
    (error, result) => {
      if (error) {
        console.error("An error has occured while uploading the image");
      }
      console.log("Image was uploaded successfully");
    }
  );
const public_id = image.public_id;

    base('products').create([
      {
        "fields": {
          "Name": name,
          "Description": description,
          "Link": link,
          "Sub": sub,
          "PublicId": public_id
        }
      }
    ], function(err, records) {
      if (err) {
        console.error(err);
      return  res.status(500).json({ msg: "Something went wrong." });
      }
    });
    return res.status(200).json({ msg: "Product Added" });

});
Code language: JavaScript (javascript)
You might notice that similar to the /product/insert route, this route is also protected, and anonymous users cannot access it. The only difference is that this route is protected with the withApiAuthRequired() function and not the withPageAuthRequired() function. You can read more about the withApiAuthRequired() function here.
You will also notice that in this API route you export a config object from this API route. This limits the request body size to 3mb.
export const config = {
  api: {
    bodyParser: {
      sizeLimit: "3mb",
    },
  },
};
Code language: JavaScript (javascript)
To store the public_id of the image in Airtable, you first need to upload the image to Cloudinary and then use the public_id sent from Cloudinary to create a new record in Airtable.
You create an instance of cloudinary and pass the Cloud Name, API Key, and API Secret, stored in the .env.local file, to the instance. You then use the uploader.upload() function to upload the data URL of the image inside the product-hunt-clone folder in your Cloudinary account. You store the public_id of the uploaded image in the public_id variable.
You create an instance of airtable similar to the one created in the lib/api.js file and create a new record using create() method.
base("products").create([
  {
    fields: {
      Name: name,
      Description: description,
      Link: link,
      Sub: sub,
      PublicId: public_id,
    },
  },
])
Code language: JavaScript (javascript)
One thing to notice is how you are getting the user’s sub since it was not sent in the request body along with other data. The sub is accessed using the getSession() function from @auth0/nextjs-auth0 SDK.
const session = getSession(req, res);
const sub = await session.user.sub;
Code language: JavaScript (javascript)
Head over to http://localhost:3000/products/insert in the browser or click on Add Product button in the Navbar.
Here is how this page will look.
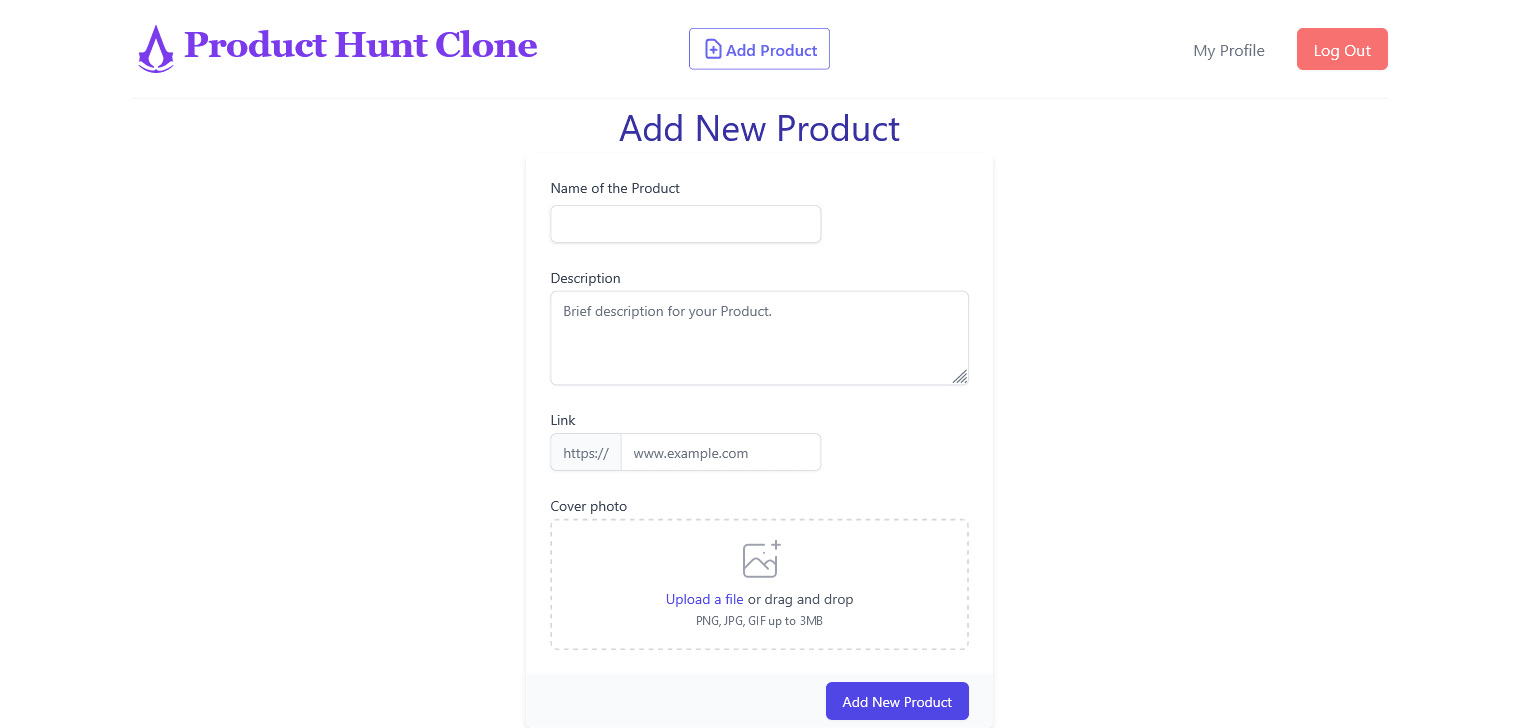
Add some dummy data and click on Add New Product button.

Once the new product has been added in the Airtable, you will be redirected to the landing page.
You have already created the delete button. which triggers deleteThisProduct() function, in the Product component. The deleteThisProduct function makes a DELETE request to the /api/deleteProduct API route.
Run the following command to create the deleteProduct.js file in the pages/api directory.
touch pages/api/deleteProduct.js
Add the following code to deleteProduct.js file.
import { withApiAuthRequired } from "@auth0/nextjs-auth0";
const cloudinary = require("cloudinary").v2;
var Airtable = require("airtable");

cloudinary.config({
  cloud_name: process.env.NEXT_PUBLIC_CLOUDINARY_CLOUD_NAME,
  api_key: process.env.CLOUDINARY_API_KEY,
  api_secret: process.env.CLOUDINARY_API_SECRET,
});

const base = new Airtable({ apiKey: process.env.AIRTABLE_API_KEY }).base(
  process.env.AIRTABLE_BASE_ID
);

export default withApiAuthRequired(async function handler(req, res) {
  if (req.method !== "DELETE") {
    return res.status(405);
  }
  const { id, publicId } = req.body;

  try {
    const deletedProduct = await base("products").destroy(id);
    const deleteImageFromCloudinary = cloudinary.uploader.destroy(
      publicId,
      function (error, result) {
        if (error) {
          console.log(error);
        }
      }
    );
    return res.status(200).json({ msg: "Product Deleted" });
  } catch (err) {
    console.error(err);
    res.status(500).json({ msg: "Something went wrong." });
  }
});
Code language: JavaScript (javascript)
In the above cove, you use the destroy(id) method to delete the record from Airtable.
You use the uploader.destroy() method to destroy or delete the image from Cloudinary. After successful deletion, the Product Deleted message is sent as a response to the frontend.

In this media jam, we configure our initial Next.js app and created Navbar and Product components. We also fetched and displayed the products on the home page. Finally, we made a form to add new products to the database.
** In the next part, we will**
- Create the
My Profilepage. - Create the
/update/[id]page to update the product. - Create the
upvotebutton in theProductcomponent to allow logged-in users to upvote a product.
You can refer to the second part here: How to build a Product Hunt Clone with Next.js – Part 2 of 2
Here are a few resources that you might find helpful.
Happy coding!