
I’m still rather new to Cloudinary, but what got me interested in the service, what hooked me near instantaneously, was when I saw that I could learn Cloudinary by literally opening up my browser tab and playing with a URL. Part of the reason this grabbed my attention is that I still remembered being impressed by the similar functionality of Google’s Static Maps API years ago. I thought mixing both services could lead to some impressive results and I’d like to share some examples.
Let’s start off by quickly explaining what the Google Static Map API (or Maps Static API as the documentation refers to it) actually provides. I think nearly everyone is familiar with Google Maps and it’s many interactive features. You can pan a map, pinch and zoom, even draw on some implementations. Routing and other features are baked in as well. While this is absolutely a powerful thing, it’s also possibly way overpowered for some uses, and obviously not something that could be used without JavaScript, for example in an HTML email.
The Static Map API provides a way to create a static map that’s simply an image. The maps can be styled in multiple ways and markers with labels can be added.
As a basic requirement, you must supply a credential key in the URL, but keys can be locked to specific domains making them safe to use on the web. Let’s look at a minimal example. To create a map, you need a location (in either latitude and longitude or free text), a size (for the image), and a zoom. While zoom isn’t required, if you don’t pass it, you get the entire planet.
This URL – https://maps.googleapis.com/maps/api/staticmap?center=30.22,-92.02&size=500×500&zoom=12&key=AIzaSyCA0y7kh6V8poL-faDyVf3TpnLDNf9XtQY – will render as so:
To use an address, you simply provide a text version of it. In the URL below, I’ve encoded “200 Terminal Dr, Lafayette LA 70508”:
And the result:
Both markers and paths can be drawn on a map, here’s an example where I put a marker in the center. Markers can have styles, text, and a location. I’ve added it to the example below after the center value.
https://maps.googleapis.com/maps/api/staticmap?center=30.22,-92.02&markers=color:red|30.22,-92.02&size=500×500&zoom=12&key=AIzaSyCA0y7kh6V8poL-faDyVf3TpnLDNf9XtQY
As I said, there’s also some styling options and more, so check the docs for a look into what can be done. Now for the fun part – how can we integrate Cloudinary?
When I began learning Cloudinary, I thought that it was a great service, but that I’d need to start using the media library to make any use of it. When I discovered the fetch feature and the ability to work with images anywhere, I knew this would make Cloudinary even more useful. (As an example, on my blog I’ve got a huge number of images stores in Amazon S3. By using the fetch feature, I was able to add repsonsive images to my header images and not move a single resource!)
The basic format of the fetch request simply appends /fetch/(the remote url) to the end of your Cloudinary URL. Let’s consider an example. Here’s an original Google Static Maps URL:
And here’s the Cloudinary remote version:
Note that the question mark in the Google URL has been replaced with %3F. If you view both, they’ll look the exact same, which is expected of course:

Ok, so outside of switching to Cloudinary’s CDN, that alone doesn’t give us much, but we can look at other transformations as way to help improve the map. One idea that comes to mind right away is the ability to add a text layer. While Google’s API lets you add markers with basic labels, we can use Cloudinary to add a nicer, formatted label to a map. Let’s take a look at adding a text layer, step by step.
First, we’ll add text using the sample provided by the docs:
res.cloudinary.com/raymondcamden/image/fetch/l_text:Arial_80:Flowers/fl_layer_apply/https://maps.googleapis.com/maps/api/staticmap%3Fcenter=51.477222,0&zoom=14&size=400×400&key=AIzaSyCA0y7kh6V8poL-faDyVf3TpnLDNf9XtQY
Which renders:

Next, let’s move it into the bottom right corner using the gravity feature:
res.cloudinary.com/raymondcamden/image/fetch/l_text:Arial_80:Flowers/fl_layer_apply,g_south_east/https://maps.googleapis.com/maps/api/staticmap%3Fcenter=51.477222,0&zoom=14&size=400×400&key=AIzaSyCA0y7kh6V8poL-faDyVf3TpnLDNf9XtQY

Now let’s do a bit of formatting, first, a black border around the text label:
res.cloudinary.com/raymondcamden/image/fetch/l_text:Arial_80:Flowers/fl_layer_apply,g_south_east,bo_10px_solid_black/https://maps.googleapis.com/maps/api/staticmap%3Fcenter=51.477222,0&zoom=14&size=400×400&key=AIzaSyCA0y7kh6V8poL-faDyVf3TpnLDNf9XtQY

And then let’s change the text color to white and add a black background to it:
res.cloudinary.com/raymondcamden/image/fetch/b_black,co_white,l_text:Arial_80:Flowers/fl_layer_apply,g_south_east,bo_10px_solid_black/https://maps.googleapis.com/maps/api/staticmap%3Fcenter=51.477222,0&zoom=14&size=400×400&key=AIzaSyCA0y7kh6V8poL-faDyVf3TpnLDNf9XtQY

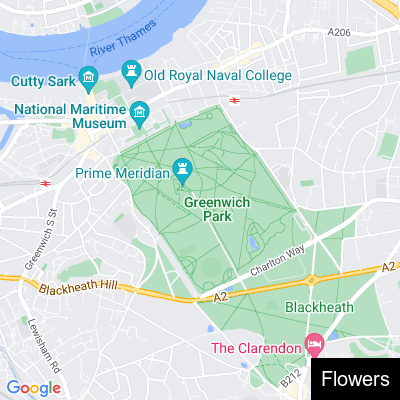
And lastly, let’s shrink that a bit so it’s not quite so large:
res.cloudinary.com/raymondcamden/image/fetch/b_black,co_white,l_text:Arial_20:Flowers/fl_layer_apply,g_south_east,bo_10px_solid_black/https://maps.googleapis.com/maps/api/staticmap%3Fcenter=51.477222,0&zoom=14&size=400×400&key=AIzaSyCA0y7kh6V8poL-faDyVf3TpnLDNf9XtQY
Beautiful! Let’s take this approach and demonstrate a simple example with “real” data. I’m going to take a list of locations where each location has an address and label, like so:
const locations = [
{ "address": "30.22359,-93.21788", "label": "Lake Charles, LA (Store 1)" },
{ "address": "30.45045,-91.17188", "label": "Baton Rouge, LA (Store 9)" },
{ "address": "31.30929,-92.44911", "label": "Alexandria, LA (Store 4)" },
{ "address": "30.22,-92.02", "label": "Lafayette, LA (Store 3)" }
]
Code language: JavaScript (javascript)Let’s write a bit of code to iterate over these and render out maps. We’ll assume a div with the ID of maps in our DOM. For each of our locations, we need to create a Cloudinary URL that does what we demonstrated above, add a label in the corner, style it correctly, and fetch the Google Static Map. Here’s the code I used:
let html = '';
locations.forEach(l => {

		// Credit: https://support.cloudinary.com/hc/en-us/community/posts/200788162/comments/200128802
		let label = encodeURIComponent(l.label).replaceAll('%2C','%252C');

		html += `<p><img src="https://res.cloudinary.com/raymondcamden/image/fetch/b_black,co_white,l_text:Arial_20:${label}/fl_layer_apply,g_south_east,bo_10px_solid_black/https://maps.googleapis.com/maps/api/staticmap%3Fcenter=${l.address}&zoom=14&size=400x400&key=AIzaSyCA0y7kh6V8poL-faDyVf3TpnLDNf9XtQY"></p>`;

});

document.querySelector('#maps').innerHTML = html;
Code language: JavaScript (javascript)
For the most part, this should be pretty straightforward, but pay special attention to how we handle the label. At first, I simply used encodeURIComponent, but commas in Cloudinary text labels need special attention, as I found on the forum post linked to in the comment. You can see the complete demo of this at the CodePen here: https://codepen.io/cfjedimaster/pen/JjBaoqj?editors=1111
This was only one example, but there’s definitely more that could be done. Take a look at the image transformations available and let me know what you come up with!


