
Thumbnails of website screenshots are a common visual design element. Search engines, such as Google, display webpage screenshots in their search results. Social news sites, such as DZone, embed screenshot thumbnails of shared pages. Bloggers and technology news sites embed screenshots of company websites and online services they discuss in their posts. Development companies embed screenshots of websites they helped develop.
Embedding a screenshot in your website is quite a hassle. You’ll need to install a screen capture solution, browse to the web page in question, capture the relevant screen part, open the screenshot image in a graphic editor such as Photoshop, resize and crop the image, add borders and shadows, add arrows and other notation elements, save the resulting image file, upload the image to your CMS and embed it in the relevant HTML code.
While manually creating a screenshot is somewhat time-consuming, the challenges involved in dynamically generating perfect screenshots for many web pages are much more significant.
In this blog post we wanted to explain how you can use Cloudinary with its new URL2PNG add-on to dynamically generate screenshots of any website. You can use Cloudinary’s rich set of cloud-based image transformation capabilities to resize the screenshot, crop it, transform it using various filters and effects and seamlessly deliver the screenshot thumbnails to your users via a fast CDN.
Screenshot generation using Cloudinary’s URL2PNG add-on are performed synchronously. This should dramatically simplify the process of adding screenshot thumbnails to your website as you’re not required to display a placeholder until a screenshot is fully generated.
Screenshots creation with URL2PNG is done using Cloudinary’s transformation and delivery URLs. You need to set the image type to ‘url2png‘ and specify the URL of the remote website. To ensure that your Cloudinary account only captures screenshots of allowed URLs, you should either use Cloudinary’s explicit authenticated API or sign the dynamic URL with the API Secret of your Cloudinary account.
For example, the following URL captures a screenshot of ‘http://cloudinary.com‘ on-the-fly, stores the generated image in the cloud and delivered it optimized and cached via a CDN. You can see a scaled down sample of the generated screenshot image below.
https://res.cloudinary.com/demo/image/url2png/s–Kveu6Noy–/http://cloudinary.com

You can generate such URLs, with or without their HTML image tags, using Cloudinary’s client libraries for Ruby on Rails, Python & Django, PHP, Node.js, jQuery, Java, .NET, iOS, Android and Scala.
The following sample code embeds an HTML image tag with a dynamic screenshot creation URL:
Ruby on Rails:
<%= cl_image_tag("http://cloudinary.com", :sign_url => true, :type => "url2png") %>
PHP:
<?php echo cloudinary_url("http://cloudinary.com",
  array("type" => "url2png", "sign_url" => true)); ?>
Python:
cloudinary.CloudinaryImage("http://cloudinary.com", type = "url2png").build_url(
  sign_url = True)
Node.js:
cloudinary.url("http://cloudinary.com",
  { type: "url2png",
    sign_url: true });
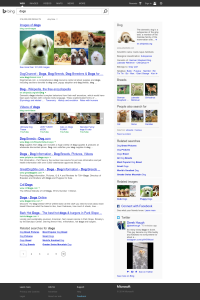
You can also generate screenshot thumbnails of websites that require query strings (URL parameters). The example below captures a screenshot of ‘http://www.bing.com/search?q=dogs‘. Cloudinary’s client libraries automatically encodes the special characters to ensure a valid URL:
<%= cl_image_tag("http://www.bing.com/search?q=dogs",
                 :sign_url => true, :type => "url2png") %>
https://res.cloudinary.com/demo/image/url2png/s–OflFn9CX–/http://www.bing.com/search%3Fq=dogs
Modern websites sometimes render pages differently when viewed on mobile devices. So far we’ve shown how you can capture website screenshots as viewed on a desktop machine. We’ll now show how to capture screenshots of websites as displayed on mobile devices.
Any URL2PNG parameter can be specified when building Cloudinary URLs of URL2PNG screenshots. Parameters are prefixed with ‘/url2png/‘ and are of the format ‘key1=value1|key2=value2‘.
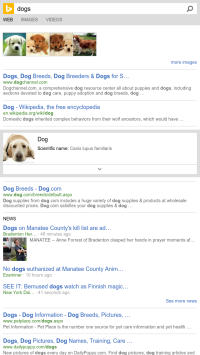
The following code sample returns a dynamic URL that generates a screenshot as displayed on an iPhone 5 device. The ‘view_port‘ parameter is set to 640×1136, the user agent is set to the mobile Safari’s user agent and we also request non full page capturing.
<%= cl_image_tag("http://www.bing.com/search?q=dogs/url2png/viewport=640x1136|fullpage=false|user_agent=Mozilla/5.0 (iPhone; CPU iPhone OS 7_0 like Mac OS X; en-us) AppleWebKit/537.51.1 (KHTML, like Gecko) Version/7.0 Mobile/11A465 Safari/9537.53",
                 :sign_url => true, :type => "url2png") %>
https://demo-res.cloudinary.com/image/url2png/s–oZYfCoKo–/http://www.bing.com/search%3Fq%3Ddogs/url2png/viewport%3D640x1136%7Cfullpage%3Dfalse%7Cuser_agent%3DMozilla/5.0%20%28iPhone%3B%20CPU%20iPhone%20OS%207_0%20like%20Mac%20OS%20X%3B%20en-us%29%20AppleWebKit/537.51.1%20%28KHTML%2C%20like%20Gecko%29%20Version/7.0%20Mobile/11A465%20Safari/9537.53
The graphic design of your web or mobile applications will most likely require screenshots of very explicit dimensions. Cloudinary’s cloud-based image transformations can be applied on generated screenshots to get a perfect resize and crop.
In the example below, we embed a 500×300 cropped version of the much larger original screenshot. Note that we didn’t need to sign the URL in this example because we already generated a screenshot of the ‘http://cloudinary.com’ homepage in the example above.

The following Ruby on Rails code line generates an image tag with the URL above:
<%= cl_image_tag("http://cloudinary.com", :type => "url2png",
                 :width => 500, :height => 300, :crop => :fill, :gravity => :north) %>
Another example, this time generating a 200×200 square thumbnail of the top part of the same screenshot while converting the image to grayscale:

Same example in Java:
cloudinary.url().type("url2png").transformation(
  new Transformation()
    .width(200).height(200).crop("fill").gravity("north").effect("grayscale"))
  .imageTag("http://cloudinary.com"));
When embedding screenshots, you may want to add an embedded caption with the site’s name or URL. You can use Cloudinary’s dynamic text overlays to add a text over the screenshot image.
The dynamic URL below first creates a 500×300 cropped version of the screenshot with a border of 2 pixels. A semi transparent black overlay is then added at the bottom of the image. Finally, the ‘http://cloudinary.com’ white text label is added at the bottom of the page:

Same example in PHP:
<?php echo cloudinary_url("http://cloudinary.com",
  array(
    "transformation" => array(
      array("crop" => "fill", "gravity" => "north",
            "height" => 300, "width" => 300, "border" => "2px_solid_#222"),
      array("overlay" => "black_bar", "width" => 1.0, "height" => 0.1,
            "flags" => "relative", "gravity" => "south", "opacity" => 70),
      array("overlay" => "text:helv_bd_18_white:cloudinary.com",
            "gravity" => "south", "y" => 6)
    )
  )); ?>
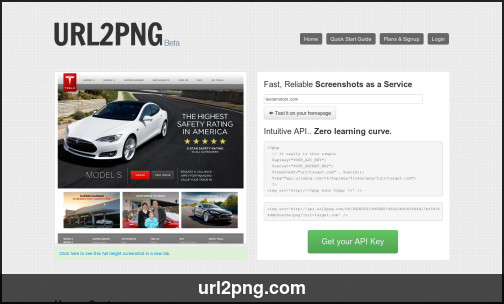
Building a dynamic application? The same exact code and dynamic URL of the example above can be used for any web page by changing the origin URL both for the actual screenshot creation and for the text overlay. For example, here is the same method applied on the screenshot of ‘http://url2png.com’.
As mentioned above, graphic designers and bloggers usually prefer to apply certain styling on embedded screenshots. For example, I prefer to round the corners of a screenshot image, add a gray border and a light shadow.
As you can see in the example below, Cloudinary’s cloud-based image transformations can be used to create such a result when applied on a screenshot dynamically created by the URL2PNG add-on.

One last example – another common practice is to mark and label certain elements of a screenshot. The following transformation URL, that can be easily generated using Cloudinary’s client libraries, adds an overlay blank image with a red border and a red text overlay.
URL2PNG provides an easy and useful solution to online web pages screenshot generation. As a Cloudinary add-on, URL2PNG screenshots can be enhanced on-the-fly and their integration in your website or mobile application is further simplified.
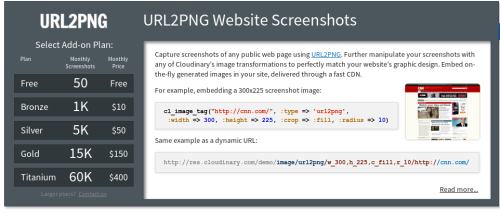
You can try out the URL2PNG add-on by signing up to a Cloudinary account if you haven’t done so already and subscribe to the free plan of the URL2PNG add-on.
Additional documentation and code samples are available here.