Nowadays, no way can we build modern apps for the web without considering visuals, which are one of the most efficient ways of communicating online. However, improvements in image quality over the years have exacted a price in larger files, slowing down page loads, especially in low-bandwidth regions or on mobile devices. To resolve that conundrum, turn to Cloudinary, a platform that offers the infrastructure for managing images in web apps. Additionally, Cloudinary’s reliable APIs serve visuals through multiple, fast content delivery networks (CDNs).
This article describes how to save, display, and transform images in a Nuxt app with Cloudinary. Of remarkable help is Cloudinary’s npm package, which abstracts all the processes in Nuxt. You upload images with this.$cloudinary.uploadand view them with the custom, out-of-the-box component <cld-image/>.
First, integrate Cloudinary with Nuxt by means of a simple project, in which you’ll upload an image to Cloudinary and then transform the image. For the code for a more complex app, check out the CloudyBadge project.
Follow these steps:
-
Verify if you have installed Node.js on our computer by typing this command on a terminal:
node -vIf the output shows that Node.js is not in your computer, download the latest version.
-
Scaffold a new project called
nuxt-cloudinarywith this npm command:npx create-nuxt-app nuxt-cloudinaryAfter a few installations, several prompts are displayed. Pick as many settings as you desire, but be sure to choose Universal (SSG/SSR) for rendering.

-
Go to the
nuxt-cloudinarydirectory with the commandcd nuxt-cloudinaryand then launch your server by typingnpm run dev. -
Optional. Clone the project’s complete code on GitHub to your machine. Having a copy of the code handy makes it easier to follow the next steps.
If you don’t have one yet, sign up for a free Cloudinary account, which offers you credits for transformations, storage, and bandwidth. Alternatively, upgrade to a paid account for more credits and other features.
Do the following:
-
Install the
@nuxtjs/cloudinarydependency to your Nuxt project. Type:npm install @nuxtjs/cloudinarynpm install @nuxtjs/cloudinary -
Add
@nuxtjs/cloudinaryas a module in themodulessections of yournuxt.config.jsfile:export default { modules: [ '@nuxtjs/cloudinary' ] } -
Create a
.envfile to hold your three credentials:CLOUDNAME=YOUR_CLOUD_NAME API_KEY=YOUR_API_KEY API_SECRET=YOUR_API_SECRETThe credentials’ values are displayed on your Cloudinary dashboard.
-
Open the
nuxt.config.jsfile, which was generated in your project’s root directory bycreate-nuxt, and create a Cloudinary object that encompasses the credentials in your.envfile:cloudinary: { cloudName: process.env.CLOUDNAME, apiKey: process.env.API_KEY, apiSecret: process.env.API_SECRET, useComponent: true }
Setting useComponent to true means that you can use the out-of-the-box Vue components with the @nuxtjs/cloudinary library.
Your nuxt.config.js file now reads like this:
export default {
  head: {
    title: 'nuxt-cloudinary',
    htmlAttrs: {
      lang: 'en'
    },
    meta: [
      { charset: 'utf-8' },
      { name: 'viewport', content: 'width=device-width, initial-scale=1' },
      { hid: 'description', name: 'description', content: '' }
    ],
    link: [
      { rel: 'icon', type: 'image/x-icon', href: '/favicon.ico' }
    ]
  },
  components: true,
  modules: [
    '@nuxtjs/cloudinary'
  ],
  // Build configuration: https://go.nuxtjs.dev/config-build.
  build: {
  },
  cloudinary: {
    cloudName: process.env.CLOUDNAME,
    apiKey: process.env.API_KEY, //Needed only if you are using server-side upload.
    apiSecret: process.env.API_SECRET, //Needed only if you are using server-side upload.
    useComponent: true //Use Vue components.
  }
}
Code language: JavaScript (javascript)Upload preset is a default behavior that reduces repetition on upload requests through saved settings. You can set up multiple presets.
To create an upload preset:
-
Click the Upload tab near the top of your Cloudinary settings page.
Under Upload presets, two modes are displayed: unsigned and signed. A signed upload preset applies to secured (server-side) uploads; an unsigned one, browser (client-side) uploads.

-
Note the name of the unsigned upload preset, which you’ll need later for client-side uploads.
To upload images to Cloudinary:
-
Go to your component (
pages/index.vue) and add the<input/>element that uploads files.<input id="file-input" type="file" ref="fileInput" accept="image/*" @change="onFilePicked" required />Code language: HTML, XML (xml)@changetriggers theonFilePickedfunction when you select an image;refgets data from<input/>. -
Add
datato your components to manage their state.data() { return { formData: { imageName: "", imageUrl: '' } } };Code language: JavaScript (javascript)
You store the image name and URL before uploading the image. When you attach the image, onFilePicked sends the name and the image in Base64 format to Cloudinary through the FileReader Web API.
methods: {
  onFilePicked(event) {
    const files = event.target.files;
    const fileReader = new FileReader();
    fileReader.addEventListener("load", () => {
      this.formData.imageUrl = fileReader.result;
      console.log(this.formData.imageUrl)
    });
    fileReader.readAsDataURL(files[0]);
    const fileName = this.$refs.fileInput.value;
    this.formData.imageName = fileName.split("\\").pop().replace(/\.[^/.]+$/, "");
  }
}
Code language: JavaScript (javascript)
Create a button to trigger the function that initiates the upload:
<button @click="cloudinary">Upload</button>
Within that function is this.$cloudinary.upload, which is available globally through the library you installed.
methods: {
  cloudinary() {
    this.$cloudinary
      .upload(this.formData.imageUrl, {
        public_id: this.formData.imageName,
        folder: "content",
        upload_preset: "your-preset-name"
      })
      .then(res => console.log(res))
      .catch(err => cosole.log(err));
  },
}
Code language: JavaScript (javascript)
You’re sending the image in Base64 format in this.formData.imageUrl. The public ID (as denoted by public_id) represents the image name. The folder takes the name of the Cloudinary folder where you save the image, and then you add the name of the upload preset you created earlier.
Here’s an example of the response, which contains all the relevant information, including a link to the image hosted on Cloudinary, the image format, and the public ID:
{
  access_mode: "public"
  asset_id: "952a355221ce840b1f4fcd91b93a2021"
  bytes: 12701
  created_at: "2021-10-07T07:55:48Z"
  etag: "1bd19b75a275ee715b1130e72ba6e985"
  existing: false
  format: "png"
  height: 1080
  placeholder: false
  public_id: "content/Bmvp (1)"
  resource_type: "image"
  secure_url: "https://res.cloudinary.com/dfkuxnesz/image/upload/v1633593348/content/Bmvp%20%281%29.png"
  signature: "d74486803815e872ca92ddabbc361351ad13ea83"
  tags: []
  type: "upload"
  url: "http://res.cloudinary.com/dfkuxnesz/image/upload/v1633593348/content/Bmvp%20%281%29.png"
  version: 1633593348
  version_id: "6b3e6b601197ac0ba28bc9da5a377b16"
  width: 1080
}
Now display the uploaded image with the Vue component <cld-image/>, which requires a few parameters, including the public ID you received after uploading the image.
<cld-image
public-id="your-public-image-id"
width="200"
crop="scale"
fetchFormat="auto"
quality="auto"
loading="lazy"
/>
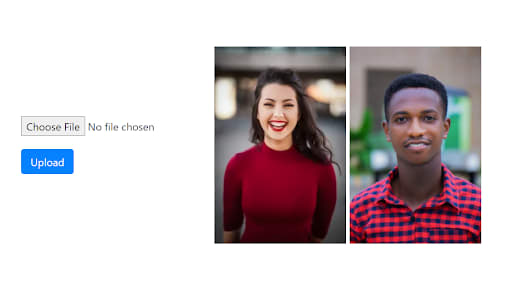
Code language: HTML, XML (xml)Be sure to replace your-public-image-id with your image’s public ID. The image then shows up in your app, as in this example in the case of two uploaded images:
Suppose you want to automatically create a circular image centered on each person’s face in the above example. That would normally be tough to do in the browser, but not with Cloudinary. Simply transform the images with <cld-transformation/>, like this:
<cld-image
  public-id="/content/woman"
  fetchFormat="auto"
  quality="auto"
  loading="lazy"
>
  <cld-transformation
    width="200"
    height="200"
    gravity="face"
    crop="fill"
    radius="max"
  />
</cld-image>
Here, you set the width and height to 200, resize the image around each person’s face with crop, and round off the image border by setting the radius to the maximum. The two transformed images look like this:

Easy, right? The nice circular headshots are now ready for display on a profile page. You could also feature them on physical assets like conference badges and ID cards.
The complete code repository is on GitHub.
Cloudinary offers numerous valuable ways for managing images in apps at scale, enabling you to generate smaller yet high-quality images, correspondingly enhancing page performance. Additionally, other Vue components, including <cld-video/> for managing videos, are available from Cloudinary.
All those features are especially helpful for creating social-media apps or photo-management systems, or for scaling side projects. An example: Build a fun photo-management app with Nuxt so that your users can upload pictures to one handy location. Afterwards, the app can edit the pictures with Cloudinary’s image-transformation capabilities for a similar look and a consistent user experience.
Cloudinary is also a big boon for authentication apps, e.g., you can upload profile photos and store their URLs in a database for later use, or pull those photos with the Vue component and set their radius, center them, and round off the border for an appealing look.
Let your imagination fly! Build a fun Nuxt app or spiff up an existing one. As a start, register for a free Cloudinary account and explore the platform’s site for details on how to forge impressive image effects.
David Atanda is a front-end developer and technical writer dedicated to making the web more accessible while building scalable and high-performance web applications.