
There are many options to consider when allowing a user to upload an image to your website or mobile app. You might wish to limit the size and format of the uploaded images. You may want to apply specific transformations to the images, such as cropping, resizing and adapting the image to your site’s look & feel. Beyond that, it’s common to create a variety of thumbnails from a newly uploaded image.
In many cases, image upload options are hard-coded in the application code. This makes it difficult to adapt to new design requirements and new types of content that are introduced over time. Also, if you’re developing a mobile app, when making a change to an upload parameter, you might have to re-submit your app to the app store and wait for users to upgrade – until then, the new image settings will not take effect.
In this post, we’ll show how to centrally control image upload options using Cloudinary. Cloudinary is a cloud-based image management solution that gives you a ready-made implementation of the image upload process – and also stores your images in the cloud and helps you deliver them to users in an optimal manner. Cloudinary’s upload mechanism includes special options like eagerly generating face-detection-based thumbnails, flagging images for moderation, callback notification, automatic categorization based on image content, image format conversion and normalization, and more.
Our new feature, called upload presets, allows you to update your uploaded image settings centrally via a web interface or API, while auto-applying to all your web sites and mobile applications.
In Cloudinary, upload presets include one of more upload parameters. Any of Cloudinary’s upload parameters can be defined and included in a preset. A preset can be modified at any time using Cloudinary’s Management Console (UI) or Admin API, and changes are applied immediately.
Some common examples of upload presets:
-
Defining that uploaded images should be limited to a certain size and converted to a given image format. This is usually done as an “incoming transformation” which performs transformation on the image while it is uploaded, and before it is stored on the cloud.
-
Assigning tags for listing and managing an image or file in Cloudinary’s Media Library.
-
Creating a folder and organizing uploaded images into specific folders.
-
Defining and updating an ‘upload-completed’ callback notification URL, enabling your application to get notification from Cloudinary when an upload is complete.
-
Defining image transformations that occur automatically after upload, and generate one or more processed images – thumbnails, face-detection-based cropped versions, artistic effects like sepia or saturation, and more – to automatically fit images to your site’s look and feel (these are called ‘eager image transformations’).
-
Restricting image upload to certain allowed image formats.
-
Marking images for manual moderation (see our blog post explaining Cloudinary’s built-in UI and API allowing editors to moderate, accept and reject user uploaded images).
-
Enabling automatic backup of uploaded files.
For a full list of supported upload parameters, see this documentation page.
Each upload preset has a unique name. To apply an upload preset when uploading an image from your code, simply specify this name as the value of the upload_preset parameter, when calling the upload API.
You can use this parameter in two types of upload: (1) Upload initiated by a server-side call of Cloudinary’s authenticated upload API, and (2) Upload directly from the user’s browser to Cloudinary – via signed file input fields in your HTML pages.
The following Ruby, PHP and Node.js code samples show a server-side upload request that specifies an upload preset named ta2ozk9e:
A dedicated upload preset can be defined for each type of image users upload to your application. So you could have one set of options for profile photo uploading, and a different set for uploading to shared albums.
In addition, if you are using authenticated signed uploads, you can specify custom upload parameters in the upload API call, and these custom parameters will override the default settings of the upload preset.
Cloudinary’s Management Console can be used to list, create and edit upload presets:
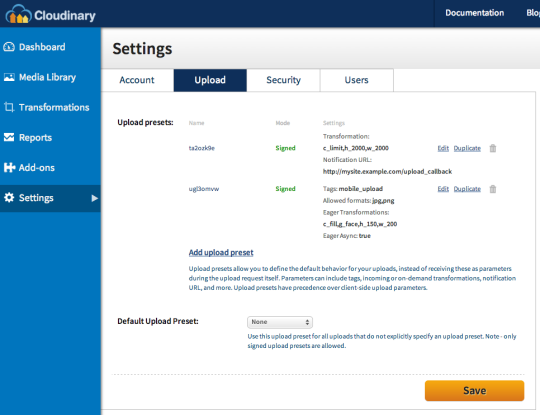
A preset name is randomly generated by default, to ensure uniqueness. In the Upload Settings page, you can edit this default name, and define which upload parameters should be applied in this preset. The interface allows you to create presets, list them, edit existing presets and delete unused presets.
In addition, you can apply any of Cloudinary’s image transformations as part of the upload preset. The Edit Transformation dialog, shown below, allows you to interactively define an image transformation which should be performed immediately after an image is uploaded.
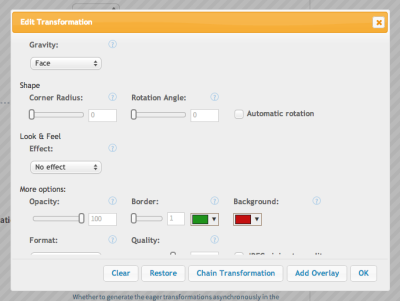
For example, you can easily define that after an image is uploaded, Cloudinary should generate a thumbnail, modify image dimensions, rotate the image or create rounded corners. All of these are applied automatically, and the user’s uploaded image is already modified before it is saved to cloud storage.
You may also want to manage your presets programmatically. Cloudinary provides an authenticated Admin API for managing upload presets in your account.
For example, the following Ruby, PHP and Node.js code snippets define an upload preset that limits images to 2000×2000 before storing in the cloud. In addition, images are tagged as ‘mobile_upload’.
To modify an upload preset, call the update_upload_preset API method, supplying the preset name:
Use the following code to list all upload presets defined in your account, with their details:
Even though images uploaded in different situations require different settings, there are many settings that are common across all uploaded images. Therefore, you might want to apply a certain upload preset to all uploaded images by default. To do that, you can mark a certain preset as default.
Defining a default preset means that all upload requests that don’t specify a preset name, are applied with the default settings. It also means that you can now modify the behavior of your existing production sites or mobile apps, even if you didn’t explicitly use a preset in your code.
For example, you can modify your live iPhone application, without requiring an update of the app, to add the following upload options: create face-detection-based thumbnails eagerly to improve user experience, add the tag ‘iPhone uploads’, allow only images of file type JPG, and mark for manual moderation.
The default upload preset is also applied to images automatically uploaded via remote fetch URLs – see our blog post on automatic migration of images.
Cloudinary provides a rich set of upload options and image transformation capabilities. With the introduction of upload presets, our platform allows a healthy separation between generic upload code and upload settings. You should be able to control and apply settings centrally from a management console or API, without updating production code or releasing new versions of your mobile app.
The upload presets described in this post are used for signed (authenticated) upload requests to Cloudinary, based on a public API Key and a private API Secret. In addition, we also support unsigned client side uploading based on upload presets. Stay tuned for more details regarding our new unsigned upload feature.
Creation, management and usage of upload presets if available for all Cloudinary’s plans, including the free tier. Try it yourself by opening a free account. We will also greatly appreciate your feedback on this feature – give us a shout out in the comments below or via Facebook or Twitter.