
In Africa, where Internet access and bandwidth are limited, it’s not cost-effective or feasible to establish and maintain a connectivity for security and surveillance applications. That challenge makes it almost impossible to build a service that detects, with facial-recognition technology, if someone entering a building is authorized to do so. To meet the final-year research requirement for my undergraduate studies, I developed a facial-surveillance system. Armed with a background in computer vision, I decided to push the limits and see if I could build a surveillance system that does not require recording long video footage.
Gratifyingly, I succeeded and was able to build an offline, real-time facial-surveillance system that comprises two parts:
- A vision system.
- A web interface that enables you to see, in real time, the identity of someone who has entered a building and determine if that person has been preauthorized to be there.
I built the system with several technologies, as follows:
- Python (OpenCV and Tensorflow) for the vision segment
- Laravel PHP for the administrative dashboard
- Pusher for triggering of real-time events
- Cloudinary for uploading and serving images to the administrative dashboard
Here is how the system works.
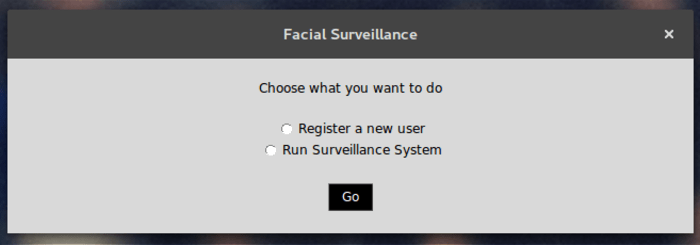
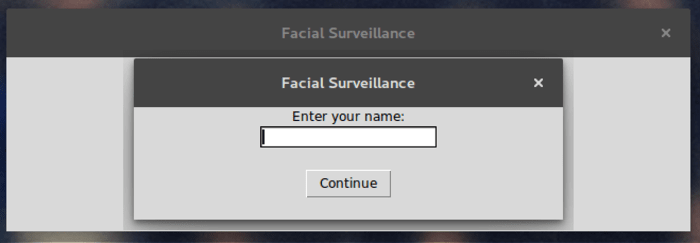
First, the system is “trained” to perform a few critical tasks, as follows:
The system takes about 20 facial images of each of the individuals who are authorized to enter the building and then saves the images locally on the device with a unique ID for each person. The system sends the unique IDs as an API call to the web server for the purpose of tracking those people with entrance privilege. The system aligns all the images and then uses them in the local storage to retrain the last layer of FaceNet, a deep, neural Google network that enables face identification and clustering with the images of the people with entrance privilege. Image embeddings become available as a result. The system fits a Support Vector Classifier with the extracted embeddings for the preauthorized people. This classifier can then recognize human faces.
Clicking the button for running facial surveillance opens a live video stream. Then, for every frame (picture) in the video stream, the system attempts to detect a face. If no face is detected, the system moves to the next frame. In case of a detection, the system obtains the facial embeddings from FaceNet and then feeds them to the classifier for prediction, that is, determine how similar the extracted embedding for the detected face is to the faces of the preauthorized people.
An 80-percent similarity to an preauthorized face authenticates the person entering the building. Otherwise, the system flags that person as a suspect. In case of authentication, the system broadcasts a message to the security panel, informing the people concerned, for example, security personnel, that an authorized face has been spotted.
All the computations take place on the local machine without any calls to the web server until the system determines the person entering the building has entrance privilege.
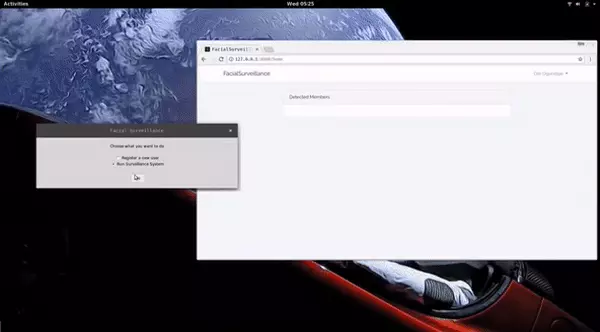 Working Demo of a System Recognizing an Authorized Building Entrant
As a final step, I needed to upload the face of any suspect identified by the system and reference the image afterwards. For that task, I chose Cloudinary because of its simple and straightforward integration process with no overhead at all.
To get started, I installed the Cloudinary module for Python with the following command:
pip install cloudinary
Afterwards, I imported the module into my codebase and then configured the module, as follows:
import cloudinary
from cloudinary.uploader import upload

[...]
# configure the cloudinary module
cloudinary.config(
    cloud_name="CLOUD_NAME",
    api_key="CLOUDINARY_API_KEY",
    api_secret="CLOUDINARY_API_SECRET"
)
[...]
# determine if detected face is suspect or not
[...]
# save image of suspected face from frame
cloudinary_resp = upload(image_loc, public_id=time_string)
# the url of the uploaded image is stored as part of the response of uploading the image : cloudinary_resp['url']
message = {'type': 'unverified', 'time': current_time.strftime("%Y-%m-%d %H:%M"), 'image_url': cloudinary_resp['url']}
# this message is then broadcast using pusher
[...]
When uploading an image with Cloudinary, specify the public ID (public_id) as an identification of that image. For easy reference, I set the the time the suspect was spotted as the value of public_id.
If the system spots a suspect, the administrative dashboard would look like this:

Thanks to Cloudinary’s intuitive interface and robust capabilities, image uploads and display for my facial-surveillance project was a breeze. What a great platform!