
Have you shared a link to a post on any social platform and been unhappy with the image displayed because it didn’t fit the article title or your brand? In this article, we will build an application that dynamically generates social images based on a template.
You can use an image or a banner that suits your brand as a base image, and with Cloudinary, we can dynamically layer texts on that image to generate custom social images for blog posts.
Here is a link to the demo on CodeSandbox.
We need a banner that will serve as the base image. You can choose a random background if you don’t have one that suits your brand or design a custom layout using any design tool (Figma, Adobe XD, Sketch, e.tc).
For this tutorial, I will be using this simple layout I designed with Figma.

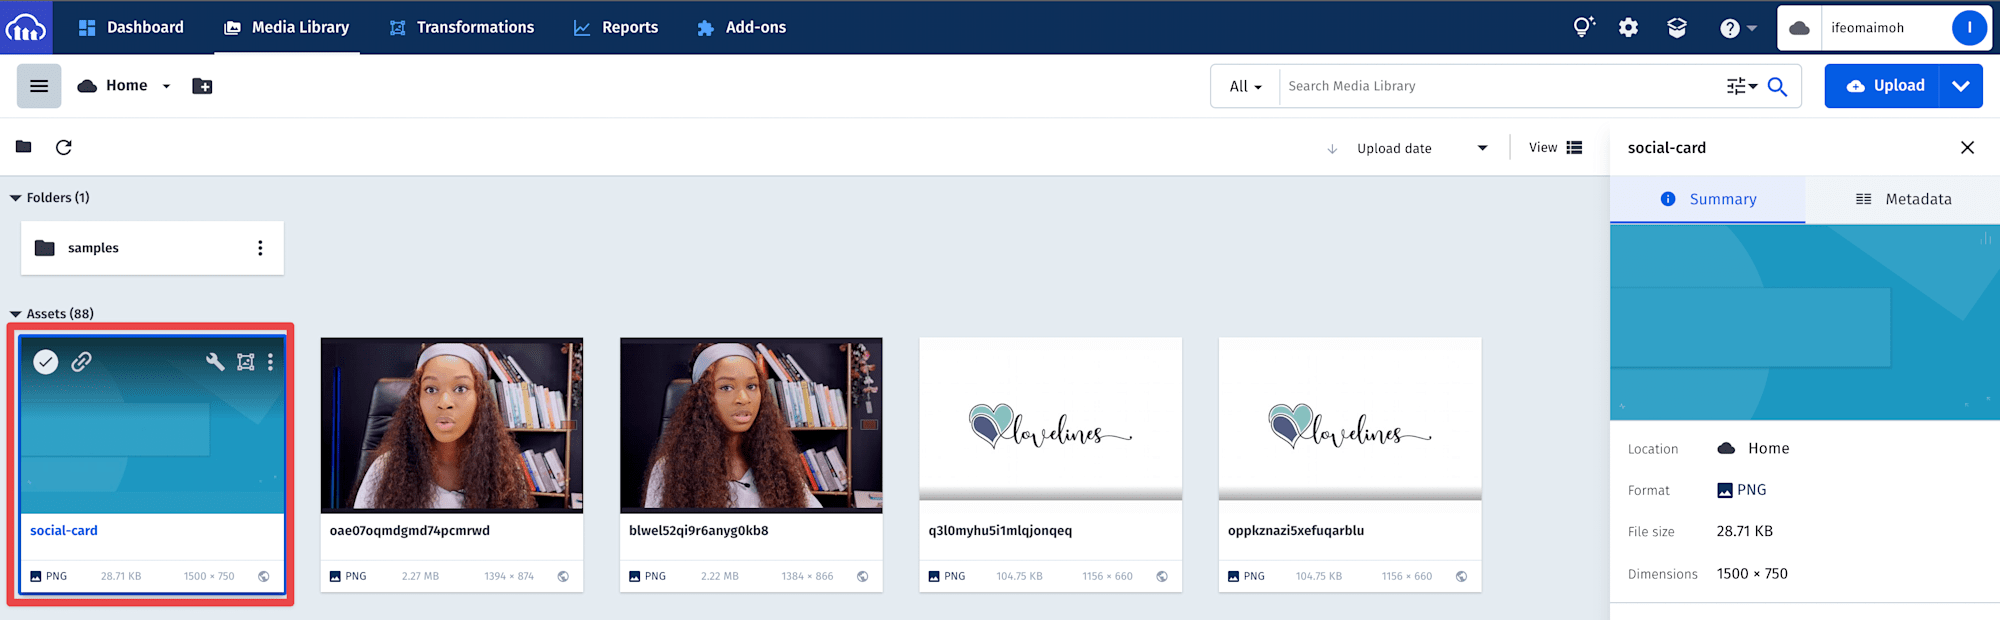
First, we need to upload our image to Cloudinary. If you are new to Cloudinary, you can sign up here for a free account. After successful signup, see this documentation for options on uploading assets to your Cloudinary Media Library. Upload the image you want to use as your base image and assign it a name you can easily remember.
Open your terminal and run the following command to create a React application in a folder named social-media-card.
npx create-react-app social-image-template
Next, let’s install the dependencies we will need for this project. Run the following command to install them.
npm install cloudinary-react --save
The command above installs the Cloudinary’s React SDK.
After the installation, and add the following to the App.js file inside your src folder:
    import "./App.css";
    import React, { useState } from "react";
    import { Image, Transformation } from "cloudinary-react";

    function PostTitle({ title, onTitleChange }) {
      return (
        <div>
          <label htmlFor="blog title">Blog Title:</label>
          <input
            value={title}
            onChange={onTitleChange}
            type="text"
            placeholder="Enter a post title"
          />
        </div>
      );
    }

    function Author({ authorName, onNameChange }) {
      return (
        <div>
          <label>Author:</label>
          <input
            value={authorName}
            onChange={onNameChange}
            type="text"
            placeholder="Enter author's name"
          />
        </div>
      );
    }

    const App = () => {
      const [blogInput, setBlogInput] = useState("");
      const [authorName, setAuthorName] = useState("");
      return (
        <div className="wrapper">
          <div className="container">
            <div className="form">
              <form>
                <PostTitle
                  title={blogInput}
                  onTitleChange={(e) => setBlogInput(e.target.value)}
                />
                <Author
                  authorName={authorName}
                  onNameChange={(e) => setAuthorName(e.target.value)}
                />
                <div className="button-wrapper">
                  <button>Generate Social Image</button>
                </div>
              </form>
            </div>
          </div>
        </div>
      );
    };

    export default App;
Code language: JavaScript (javascript)
In the code above, we’re importing two components, Image and Transformation, from the cloudinary-react library we installed.
We then defined three components. The first two components return a label and an input. They will render a UI layer for interactively modifying the post title and the author’s name fields, respectively.
We also have our App component, where we defined some state variables which manage the states of our PostTitle and Author components. Our App component renders a form containing the PostTitle and Author components, and they both receive as props their states and mechanisms for updating them.
Add the following styles to your App.css file:
    .form-control {
      display: flex;
      align-items: center;
    }
    label {
      font-weight: 700;
      font-size: 18px;
      width: 100px;
      display: block;
    }
    input {
      width: 70%;
      border: 1px solid #ccc;
      border-radius: 4px;
      padding: 12px 20px;
      margin: 5px 0;
    }
    button {
      width: 50%;
      background-color: #38a6d2;
      color: white;
      font-weight: 600;
      font-size: 20px;
      padding: 15px;
      border: none;
      border-radius: 4px;
      cursor: pointer;
    }
    button:hover {
      background-color: #37963c;
    }
    .button-wrapper {
      display: flex;
      justify-content: center;
      margin-top: 20px;
    }
    .form {
      margin: 50px;
      background-color: #e0e6e9;
      padding: 30px;
      border-radius: 10px;
    }
    .container {
      width: 100%;
    }
    .wrapper {
      display: flex;
      justify-content: center;
    }
Code language: CSS (css)
Navigate to localhost:3000 in your browser, and you should see the following:

So far, the idea is that when a user fills out the form and clicks the button, we want to generate an image based on the user’s information. Let’s add the logic for that.
Add the following to your App.js file:
    import "./App.css";
    import React, { useState } from "react";
    import { Image, Transformation } from "cloudinary-react";

    function PostTitle({ title, onTitleChange }) {
      return (
         //...
      );
    }

    function Author({ authorName, onNameChange }) {
      return (
        //...
      );
    }

    const App = () => {
      const [blogInput, setBlogInput] = useState("");
      const [authorName, setAuthorName] = useState("");
      {/* Add the following */}
      const [showBanner, setShowBanner] = useState(false);
      const displayImage = (e) => {
        e.preventDefault();
        if (blogInput && authorName) {
          setShowBanner(true);
        }
      };

      return (
            //...
            <div className="form">
              {/* Add the onSubmit handler to the form element*/}
              <form onSubmit={displayImage}>
                <PostTitle
                  //...
                />
                <Author
                 //...
                />
                <div className="button-wrapper">
                  <button>Generate Social Image</button>
                </div>
              </form>
            </div>
            {/* Add the following */}
            {showBanner && (
              <div className="display">
                <Image publicId={"social-card"} cloudName="ifeomaimoh">
                  <Transformation width="800" height="500" crop="fit" />
                </Image>
              </div>
            )}
          </div>
        </div>
      );
    };
    export default App;
Code language: PHP (php)
In the App component, we added a state variable, showBanner, which stores a boolean. We can then check the value to determine whether to show the banner or not.
We then created a function called displayImage which, when called, flips the value of showBanner. The function is also passed as an event handler to the onSubmit event for the form element.
We’re using the state variable showBanner to conditionally render our image with the Cloudinary Image component we imported.
To use Cloudinary React components, you need to configure your cloudName. We’re specifying that directly to the Image component with the publicID of the image we uploaded to Cloudinary.
The Image component currently accepts a Transformation element that allows us to define the width and height of our image. We defined a maximum width of 500 pixels for our image template using the fit crop mode in the Transformation element.
Next, we need to add Transformation elements to the Image component that adds and positions text overlays on our image when a user fills the form.
Add the following to the Image component in your App.js file:
      <Transformation
        overlay={{
          fontFamily: "Arial",
          fontSize: 40,
          fontWeight: "bold",
          letter_spacing: 4,
          text: `${blogInput}`,
        }}
        color="#FFFFFF"
        width="500"
        height="200"
        crop="fit"
      />
      <Transformation flags="layer_apply" gravity="west" x="40" />
      <Transformation
        overlay={{
          fontFamily: "Arial",
          fontSize: 25,
          text: `Author: ${authorName}`,
          textAlign: "",
          fontWeight: "bold",
        }}
        color="#FFFFFF"
        width="100"
        height="100"
        crop="fit"
      />
      <Transformation flags="layer_apply" gravity="south_west" x="40" y="50" />
Code language: JavaScript (javascript)
We are adding two text overlays to our image template for the post title and the author name. We’re using the text property of the overlay transformation prop to dynamically add the post title and the author name to the image, depending on the information provided by the user.
For the post title, we defined a maximum width of 500px and added the fit crop mode so that if we have a multiline text, Cloudinary automatically wraps the text content to the new line.
The default text position when using the gravity parameter is center. For both overlays, we’re controlling the positions of the text overlays the base image by combining the gravity parameter with the X and Y coordinates.
Now you can head over to your browser and fill in the form, then click the Generate social image button to create an image with the text overlay you entered in the form.
Here’s what mine looks like:

Find the project here on GitHub.
In this post, we saw how to generate social images for blog posts using Cloudinary’s cloud-based media-management solution to layer texts on an image dynamically. You can further customize this image by adding your logo or a picture of yourself.
Resources you may find useful: