In a previous post, I explained the main aspects of uploading images and rendering them in the browser through a Drag & Drop component written in Angular and TypeScript.
In this MediaJam we’ll use the same Angular project as a starting point to enable the files uploading in a secure cloud storage system, provided by Cloudinary, in just a few steps.
According to the official website:
Developers and marketers use Cloudinary to quickly and easily create, manage, and deliver their digital experiences across any browser, device, and bandwidth.
The platform provides image and video APIs to store, transform, optimize, and deliver media assets. The APIs are easy-to-use, and the platform comes with powerful widgets too!
You can create an account for free, and you’ll be ready to upload your images along with this tutorial.
The Cloudinary platform provides a variety of options for customizing how the files can be uploaded from your application:
- Upload from a server-side code. It supports different programming languages already.
- Upload using the REST API, which is customizable, and can be used from the browser.
- Upload using the Cloudinary’s client libraries(SDK). These libraries wrap Cloudinary’s REST APIs and add useful helper methods.
In this example, we’ll use the REST API available to perform the request directly from the browser.
Please be logged into the Cloudinary platform, and have the following data ready to use in the source code:
- The Cloud Name. This can be found under the
Dashboard > Account Detailsmenu. - The Upload Preset. To get that value go to the
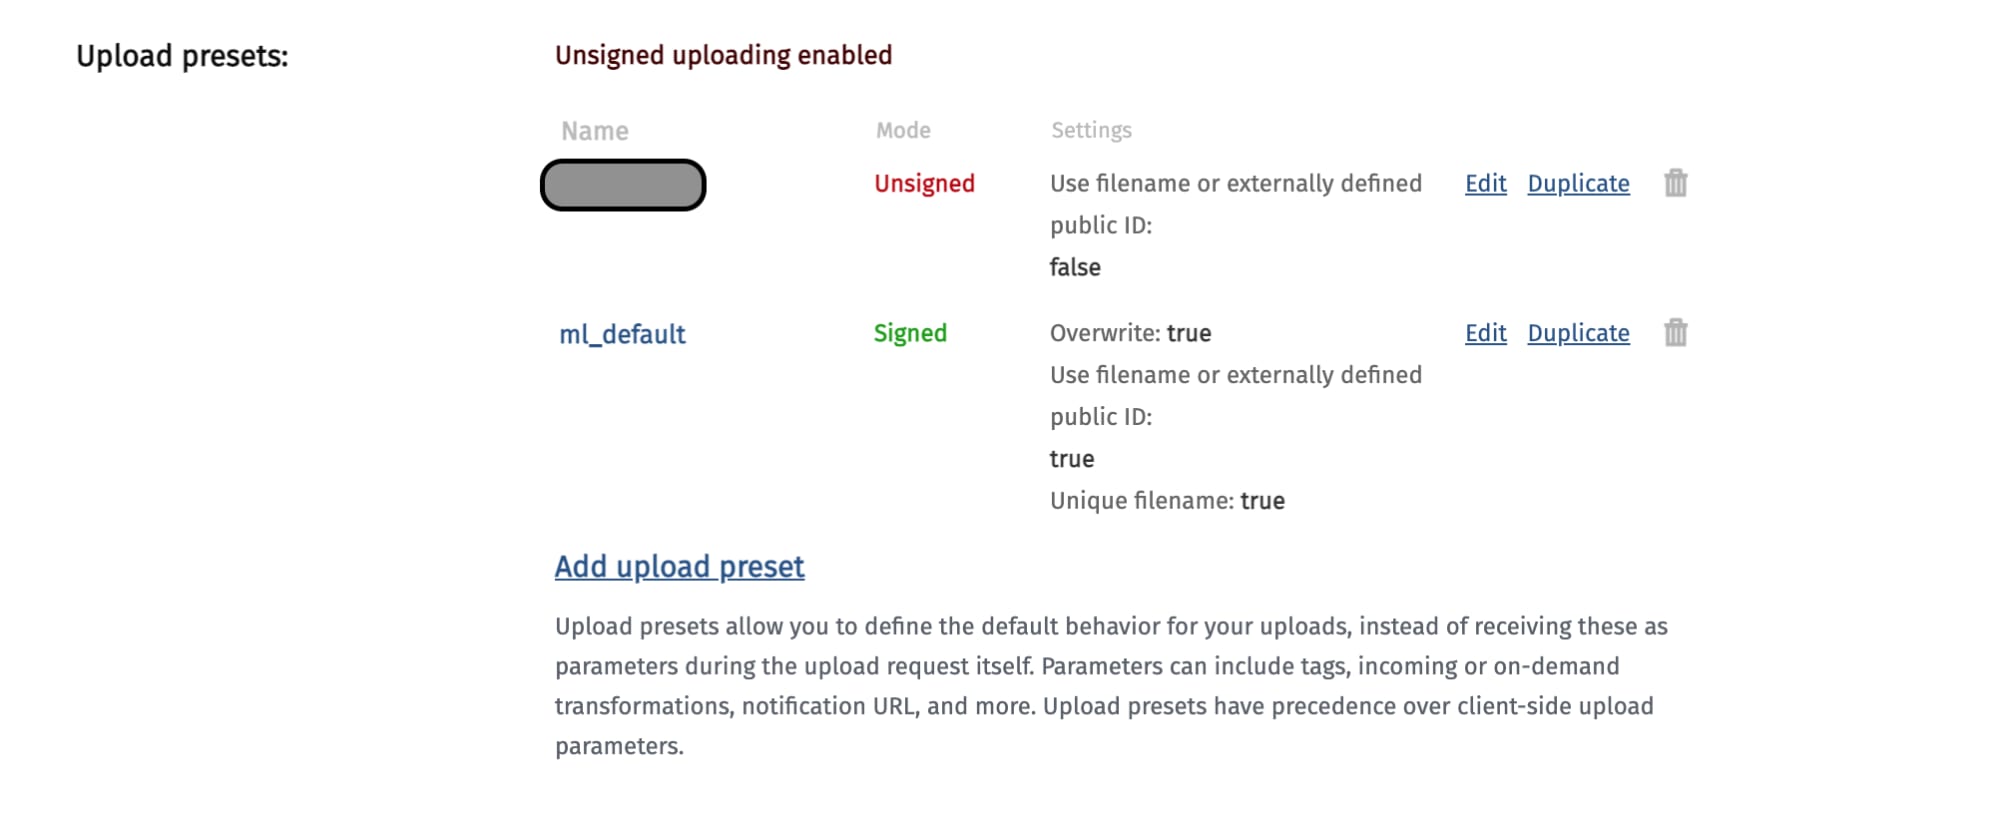
Settings > Upload > Upload presetsmenu and you’ll see the option “Enable unsigned uploading” enabled by default, as the next screenshot shows:
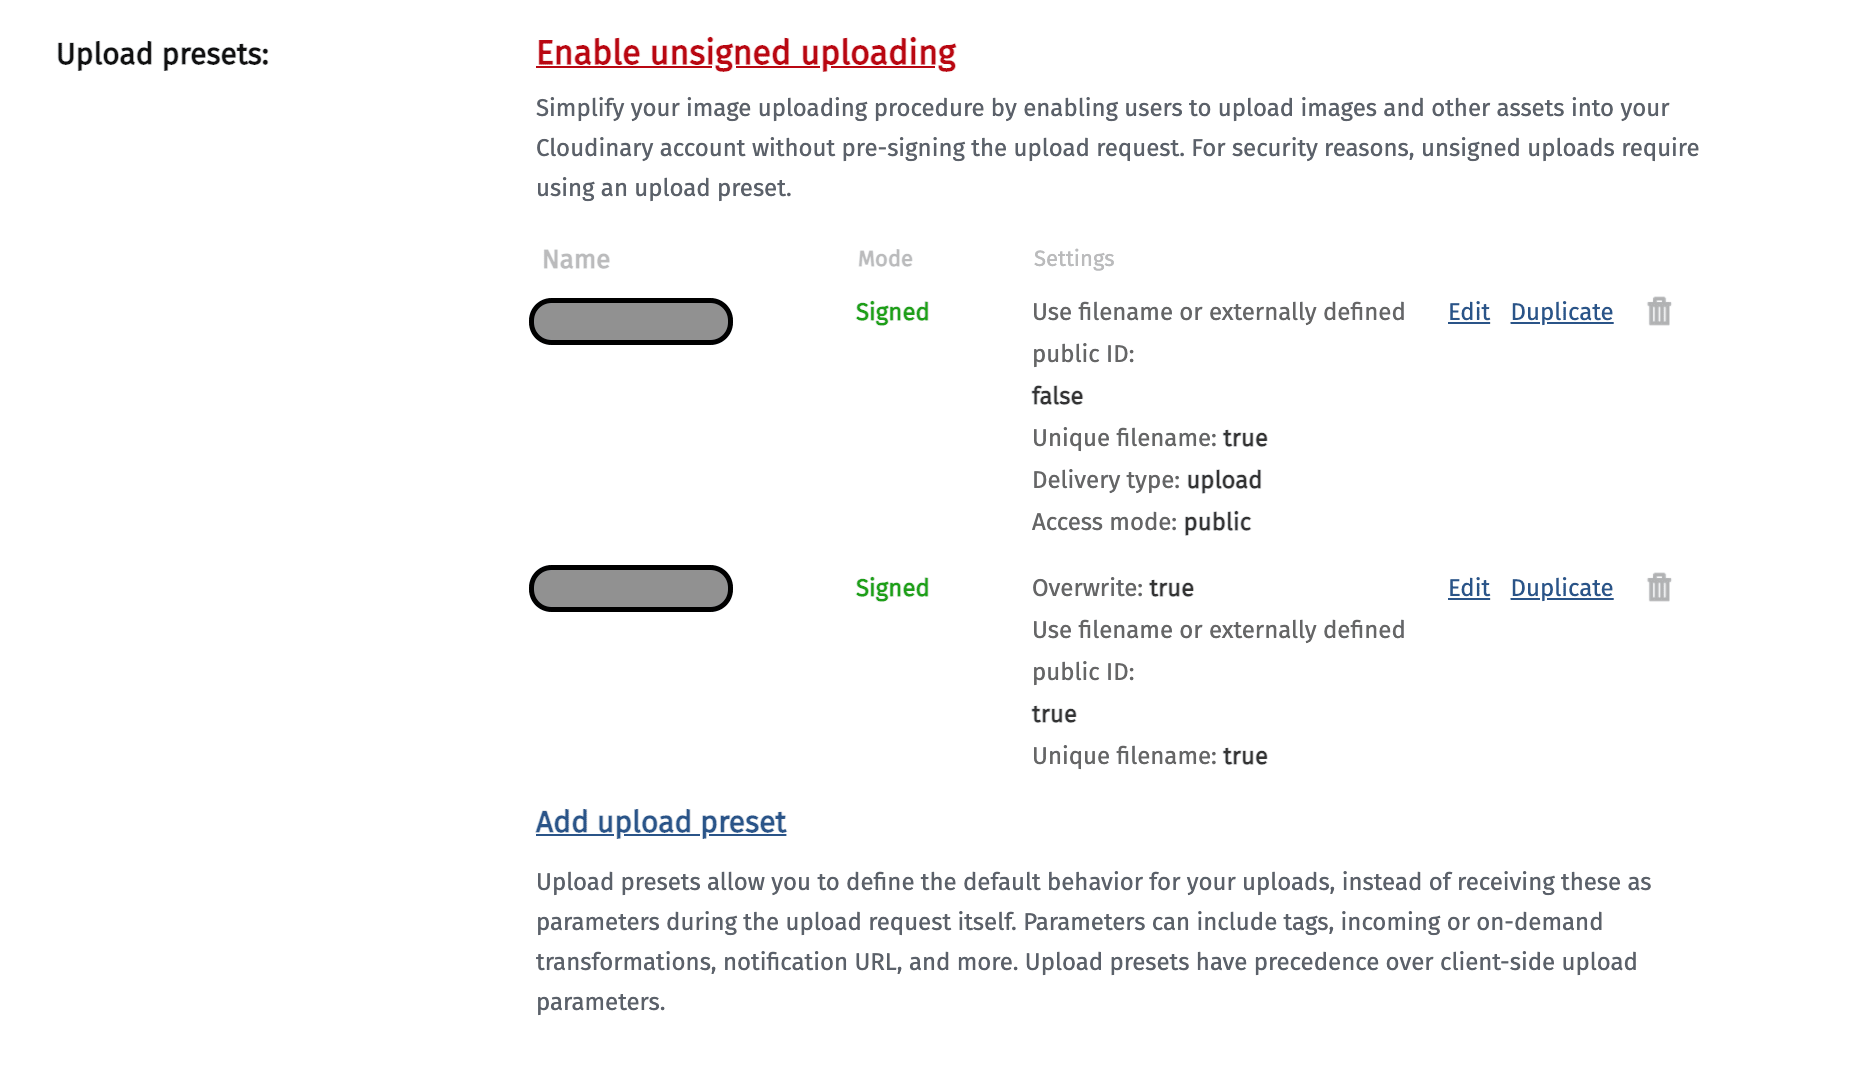
This means the platform expects parameters for authenticated requests by default. However, you can enable Unsigned Uploading requests after a click on “Enable unsigned uploading” link, and then you’ll have a new Upload Preset with the Mode set as Unsigned. Take note of the preset name since we’ll use that value later.
You’ll need to have the following tools installed in your local environment:
- I recommed having the latest LTS version of Node.js installed
- Either NPM or Yarn as a package manager
- The Angular CLI tool (Command-line interface for Angular)
Also, make sure you have your Cloudinary account ready to use. You must verify your email if it’s your first time using the platform.
Let’s create a clone, or download the project seed before adding any changes in the source code:
git clone https://github.com/luixaviles/angular-upload-images-demo.git
cd angular-upload-images-demo/
git checkout -b 01-drag-drop tags/01-drag-drop
npm install
Code language: PHP (php)
In the previous step, you will download a local copy of the project, and create a new branch 01-drag-drop in preparation for the following steps.
Pay attention to the current project structure since it comes with a set of files and default configurations for Angular and TypeScript. Open the angular-upload-images-demo folder in your favorite code editor.
|- angular-upload-images-demo/
    |- src/
        |- app/
            |- app.module.ts
            |- app.component.ts
            |- directives/
                |- image-uploader.directive.ts
            |- model/
                |- image-file.ts
Please take a look at these files and identify the purpose of them: Application Module, Angular Component, Angular Directive, and the Model.
Every time you upload an asset over the Cloudinary Platform through the REST API, the response comes as a JSON object with several details related to it. Find an example below:
{
  "asset_id": "7a6d4839fe25a041ac1a9cbe8e62097c",
  "public_id": "smvwr6wvuanpo0mhfhvb",
  "version": 1616802885,
  "version_id": "b171b2b766188643ea8d20fd1ecff304",
  "signature": "802a90cec7e5feb54473828f753f20ec2b4ca1b8",
  "width": 250,
  "height": 250,
  "format": "png",
  "resource_type": "image",
  "created_at": "2021-03-26T23:54:45Z",
  "tags": [],
  "bytes": 2385,
  "type": "upload",
  "etag": "9db278d630f5fabd8e7ba16c2e329a3a",
  "placeholder": false,
  "url": "http://res.cloudinary.com/luixaviles/image/upload/v1616802885/smvwr6wvuanpo0mhfhvb.png",
  "secure_url": "https://res.cloudinary.com/luixaviles/image/upload/v1616802885/smvwr6wvuanpo0mhfhvb.png",
  "original_filename": "angular (1)"
}
Code language: JSON / JSON with Comments (json)
Let’s focus on some relevant properties only to create a TypeScript interface and model this response:
ng generate interface model/cloudinary-asset
Code language: PHP (php)
This command will create the cloudinary-asset.ts file where we can add a couple of attributes and types as the below code snippet shows.
// cloudinary-asset.ts

export interface CloudinaryAsset {
    asset_id: string;
    url: string;
    width: number;
    height: number;
    format: string;
}
Code language: PHP (php)Since we have the Angular component already, we may think to send the request from there. However, as best practice, we should create an Angular Service instead to encapsulate all the business logic related to the client-server communication (HTTP request/response processing).
Let’s create it using the Angular CLI command ng generate service.
ng generate service services/image-uploader
This command will create the image-uploader.service.ts file under a new folder services. Next, let’s update the auto-generated content.
// image-uploader.service.ts

import { HttpClient } from '@angular/common/http';
import { Injectable } from '@angular/core';

const uploadUrl = 'https://api.cloudinary.com/v1_1/<cloud-name>/image/upload';
const uploadPreset = 's55foqri';

@Injectable({
  providedIn: 'root',
})
export class ImageUploaderService {
  constructor(private httpClient: HttpClient) {}
}
Code language: JavaScript (javascript)
Let’s understand what’s happening there.
- The
uploadUrlvalue is set using the Cloud Name which is assigned to your account. - The
uploadPresetvalue is set with the name of your Upload Preset set as “Unsigned”. - The
HttpClientgets injected into the Angular Service.
In general, the uploadUrl value can be configured as:
https://api.cloudinary.com/v1_1/<cloud_name>/<resource_type>/upload
Code language: HTML, XML (xml)
The cloud_name is the name of your Cloudinary account and the resource_type can be: image, raw, video or auto. You can find more details about these configurations here.
Since the HttpClient has been injected already, don’t forget to import the HttpClientModule in the app.module.ts file:
// app.module.ts

// ... other imports
import { HttpClientModule } from "@angular/common/http";

@NgModule({
  declarations: [
   // ... declarations
  ],
  imports: [
    BrowserModule,
    AppRoutingModule,
    HttpClientModule
  ],
  providers: [],
  bootstrap: [AppComponent]
})
export class AppModule { }
Code language: JavaScript (javascript)
Next, we’ll need to define a method to be able to process incoming files and send them to the cloud. But first, let’s create a method to process a single file.
// image-uploader.service.ts

// ... other imports
const uploadUrl = 'https://api.cloudinary.com/v1_1/luixaviles/image/upload';
const uploadPreset = 's44foqri';

@Injectable({
  providedIn: 'root',
})
export class ImageUploaderService {

  constructor(private httpClient: HttpClient) {}

  private getFormData(file: File): FormData {
    const formData = new FormData();
    formData.append('file', file);
    formData.append('upload_preset', uploadPreset);
    return formData;
  }
}
Code language: JavaScript (javascript)
The getFormData() method takes a File object as an input and returns a FormData object.
-
FormDatais an interface to construct an object using key/value pairs. This object can be easily sent using theXMLHttpRequest.send()or evenfetch(). - The required parameters for unauthenticated requests are
fileandupload_presetonly. Find more information about them here.
It’s time to implement the main function to process all the image files.
// image-uploader.service.ts

// ...

@Injectable({
  providedIn: 'root',
})
export class ImageUploaderService {

 // ...constructor

 uploadImages(imageFiles: ImageFile[]): Observable<CloudinaryAsset[]> {
    const files = imageFiles.map((imageFile) => imageFile.file);
    const files$ = from(files);
    return files$.pipe(
      map((file) => this.getFormData(file)),
      mergeMap((formData) =>
        this.httpClient.post<CloudinaryAsset>(uploadUrl, formData)
      ),
      toArray()
    );
  }

  // ... private method
}
Code language: JavaScript (javascript)
Let’s describe what’s happening in this code snippet.
- The
uploadImages()method will receive a set ofImageFileobjects and is expected to return a set ofCloudinaryAsset(model defined above) objects as an Observable. - The
imageFiles.map()operation makes sure to “extract” theFileobjects only. - The
files$ = from(files)instruction says we’ll take thefilesarray as an input to create an Observable. Next, we’ll use a couple of RxJS operators to process each file arriving in the data stream. - The
map((file) => this.getFormData(file))operation says we’ll “map” afileto aFormDataobject. - The
mergeMap()operator takes the previousFormDataobject to send the HTTP request:POSTusing the URL and theformDataas a payload. The result will be anObservable<CloudinaryAsset>. - Finally, the
toArray()operator “collects” all previous results to emit all of them as a single array. This happens when the stream has been finished (All files have been uploaded).
Since the Business Logic has been updated, and we have an Angular Service ready to be injected, we’ll need to update the Angular Component, which displays the dropbox, and also renders the uploaded images.
// app.component.ts

// ...
export class AppComponent {
  imageFiles$: Observable<CloudinaryAsset[]>;

  constructor(private imageUploaderService: ImageUploaderService) {

  }

  onDropFiles(imageFiles: ImageFile[]): void {
    this.imageFiles$ = this.imageUploaderService.uploadImages(imageFiles);
  }
}
Code language: JavaScript (javascript)
The logic around this component involves:
-
imageFile$replaces the previousArray. It’s now an Observable that will “emit” a set ofCloudinaryAssetobjects. - The
ImageUploaderServicegets injected using theconstructor. This means we’ll have an instance of the service ready to be used. - The
onDropFilesmethod invokes the Angular Service method and expects to get an Observable.
However, the template still expects an Array, and it’s not ready to process the Observable. Let’s fix that by opening the same app.component.ts file:
    <div class="container">
      <!--Previous code not changes at all-->
      <div class="row">
        <a
          *ngFor="let file of imageFiles$ | async"
          [href]="file.url"
          target="_blank"
        >
          <img [src]="file.url" />
        </a>
      </div>
    </div>
Code language: HTML, XML (xml)
The main change here is the use of the async pipe, which is required to subscribe to the imageFiles$ Observable.
The template will render the image after the upload process is complete. Also, you can click over any image to open it in a separate tab/window using the original URL provided by Cloudinary in the response.
Find the source code available in GitHub.
If you prefer, you can play around with the project in CodeSandbox – Uploading Images to Cloudinary with Angular too:
Cloudinary offers a practical way to upload our assets, using different methods and APIs.
The solution implemented here doesn’t involve any server-side code, and that’s the reason why we’re creating an Unsigned Upload Preset. In other words, if you need to manage authenticated requests, you’ll need to have at least one server endpoint to generate a signature, using your API secret (Dashboard > Account Details). Be sure to never expose your API secret in the client-side code!
Feel free to reach out on Twitter if you have any questions. Follow me on GitHub to see more about my work.