
Since the invention of the barcode some years back, its usage has grown in popularity from being used in mini-marts for small-scale inventory to large-scale commercial purposes at shipping companies.
A barcode is a strict square and rectangular box containing machine-readable vertical lines of different thicknesses. Numbers always come with Barcodes, and on scanning, they provide information about the products to which they are attached.
In this article, we will be learning how to generate downloadable shipping label barcodes in Nuxt.js using the CODE128 barcodes.
We can find the completed project on CodeSandbox. Fork it and run the code.
Check out the complete source code here.
Understanding this article requires the following:
- Installation of Node.js and its package manager, npm.
- Basic knowledge of JavaScript.
- Familiarity with Nuxt.js
We use the npx create-nuxt-app <project-name> to create a new Nuxt project.
The process of scaffolding the project should bring a list of options which should look like this:
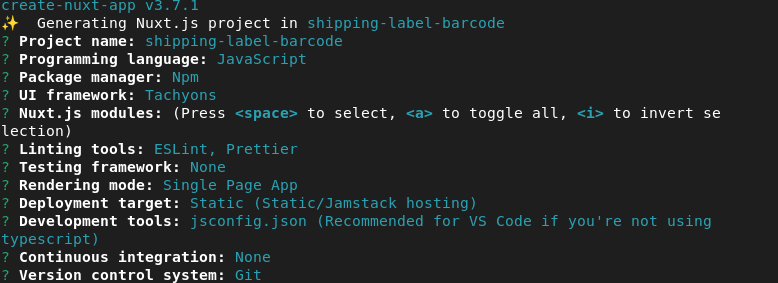
After successful project creation, we can start our application by running the following command.
    cd <project name>
    npm run dev
Code language: HTML, XML (xml)
Nuxt will, in turn, start a hot-reloading development environment which is accessible by default at http://localhost:3000.
As said earlier, barcodes come with numbers. The width of the bars depicts numbers ranging from 0 to 1, and the bars sequence connotes numbers from 0 to 9.
We will randomly generate numbers that we will be using to render our barcodes for the shipping labels.
To generate random numbers, navigate into the pages/index in our Nuxt application and add the code below:
    <template>
      <button class="bg-white br3 pa3 ba dib tc" @click="generateRandomNumber"> Generate number: <span class="bg-washed-red br3 pa2">{{number}}</span></button>
    </template>

    <script>
    export default {
      data() {
        return {
          number: '111111',
          max: 100000000,
          min: 1000,
        }
      },
      methods: {
        generateRandomNumber () {
          this.number = Math.floor(Math.random()*(this.max-this.min+1)+this.min);
        },
      }
    }
    </script>
Code language: HTML, XML (xml)
When we fire the generateRandomNumber() method in the above code block, the Math.random() function returns numbers lower than 1; on pairing the result with Math.floor() returns random integers.
The random number generated ranges between the values of the minimum and max variables assigned to the number variable.
After generating numbers, the next step is to attach the number to a barcode. We will employ the power of the Vue barcode package created by Fengyuan chen. The barcode package generates barcodes based on the options we define.
To use the package in any Nuxt application, we will install it like so:
    npm install @chenfengyuan/vue-barcode@1
Code language: CSS (css)
After installation, we will import the component into our project.
Update the pages/index.vue with the following:
    <template>
        <!-- code for generateRandomNumber() method -->
          <VueBarcode ref="barcode" :value="number" tag="img" format="CODE128" :options="options" class="db center tc mv3"></VueBarcode>
    </template>
    <script>
    import VueBarcode from '@chenfengyuan/vue-barcode';
    export default {
      components: {
        VueBarcode
      },
      data() {
        return {
          number: '111111',
          max: 100000000,
          min: 1000,
          tag: 'img',
          options: {
            width: 2.5,
            height: 150,
          },
        }
      },
      methods:{
        generateRandomNumber () {
          this.number = Math.floor(Math.random()*(this.max-this.min+1)+this.min);
        },
      }
    };
    </script>

Code language: HTML, XML (xml)
In the above code block, we imported our bar code package then initialized it as a component for usage. The barcode component has several attributes and options that enable it to function as expected. Some of these options are:
-
:value: av-bindthat takes in the value of the number variable. -
tag: the barcode’s element tag, which shows the downloadable barcode format. These formats include img, SVG, and canvas. -
:options: the options contain many options like height and width, which are both expressed in number, background, font e.t.c -
format: There are different barcode formats for which the CODE128 is one. The CODE128 is famous for its ability to encode a large amount of data. This helpful attribute is due to its acceptance of any of the 128 ASCII characters.
When we click on the generateRandomNumber() method, we get a random number that generates a barcode alongside.
At the successful generation of the barcodes, we should be able to download the generated barcodes for use. We will add the code below as a continuation in our pages/index.vue.
    <template>
      <a class="dib bg-green pa3 br3 white" :href="link" download="ship label barcode">Download Barcode</a>
    </template>
    <script>
    export default {
      data() {
        return {
          link: '',
        }
      },
      methods:{
        generateRandomNumber () {
          this.number = Math.floor(Math.random()*(this.max-this.min+1)+this.min);
          this.$nextTick(()=> {
            this.link = this.$refs.barcode.$el.src
          })
        },
      }
    };
    </script>
Code language: HTML, XML (xml)
In the code block above, we bind the link variable with the src value of the generated barcode. This link generates a downloadable image that we can use later on.
At this point, our code in the Nuxt application should look like this:
    <template>
      <div class="ph4 pv3 bg-washed-yellow vh-100">
        <nav class="pa3 pa4-ns">
          <a class="link dim black b f1-ns f3 tc db mb3 mb4-ns">Barcode Image Generator</a>
        </nav>
        <section class="center tc w-60-ns w-70">
          <button class="bg-white br3 pa3 ba dib tc" @click="generateRandomNumber"> Generate number: <span class=" bg-washed-red br3 pa2">{{number}}</span></button>
          <VueBarcode ref="barcode" :value="number" tag="img" format="CODE128" :options="options" class="db center tc mv3"></VueBarcode>
          <a class="dib bg-green pa3 br3 white" :href="link" download="ship label barcode">Download Barcode</a>
        </section>
      </div>
    </template>
    <script>
    import VueBarcode from '@chenfengyuan/vue-barcode';
    export default {
      components: {
        VueBarcode
      },
      data() {
        return {
          number: '111111',
          max: 100000000,
          min: 1000,
          tag: 'img',
          link: '',
          options: {
            width: 2.5,
            height: 150,
          },
        }
      },
      methods:{
        generateRandomNumber () {
          this.number = Math.floor(Math.random()*(this.max-this.min+1)+this.min);
          this.$nextTick(()=> {
            this.link = this.$refs.barcode.$el.src
          })
        },
      }
    };
    </script>
Code language: HTML, XML (xml)
While our application will look like the below in the browser:

This article goes through how to generate a shipping label barcode image in Nuxt.js. You can modify the interface to include other information included in shipping labels.