
With many essential features for powering users’ shopping experience, Magento became one of the leading modern e-commerce platforms. And the release of Magento 2 focusing on GraphQL continues its goal to provide a better developer experience for its developer community. As Magento’s long-time digital asset management partner, Cloudinary recently released an update to its Magento extension, providing support for retrieving your digital assets in a Magento-powered application effectively using GraphQL query.
First and foremost, make sure you install the Cloudinary extension through Magento marketplace to your Magento account.
After starting your local Magento dev server, let’s head to https://magento.test/admin to log in with your local admin credentials.
Once logged in, navigate to Stores>Configuration

Now select the Cloudinary section on the left sidebar within the Configuration page and click on the “Settings” option under the Cloudinary dropdown menu to load the configuration page for Cloudinary extension.

Then change the settings to the following:
- Enable Cloudinary – Yes
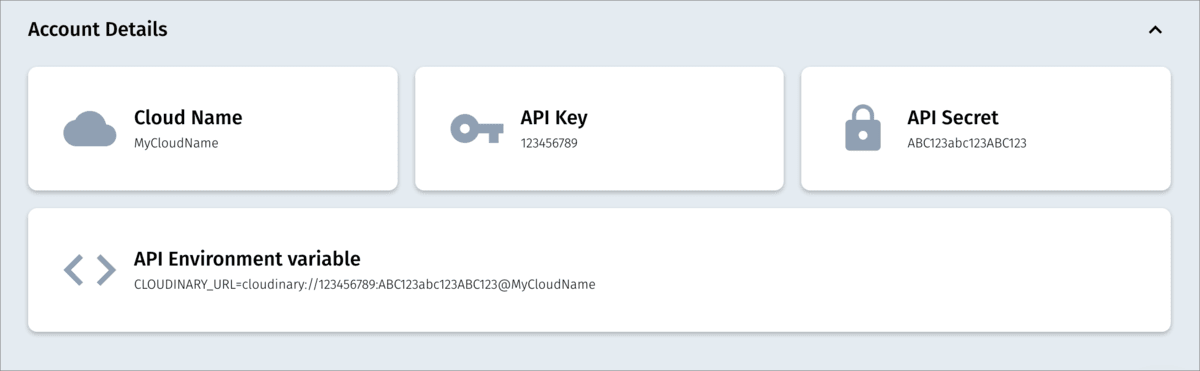
- Cloudinary Account Credentials: Copy and paste your API Environment Variable from your Cloudinary Account Details page to this section. This field is to let the extension know the exact Cloudinary account to map all the uploads and where to retrieve assets.
- Enable auto-uploading: Change to Yes if you want all the existing images in Magento to be uploaded to Cloudinary automatically whenever they are queried by users and map Magento asset management directory to your Cloudinary account.
Hit the Save Config button, and we are ready to use Cloudinary in Magento!
The next step is to add a new product and map it with Cloudinary assets. You can skip this step if you already have products in your Magento store using assets from your Cloudinary account.
Let’s head to the Catalog > Product page and create a new product by clicking the “Add Product” button.

After filling in all the product information, click on the button “Add from Cloudinary” to open the Cloudinary media library in the Images and Videos section.

Then you can select the existing assets and insert them into the newly created product.

Finally, let’s click the Save button, and we can start query our products using GraphQL.
To start testing our Magento GraphQL query locally, we will need a GraphQL Client to help us access the GraphQL server, and fortunately, there are quite a lot of Chrome extensions available for that purpose.
In this post, we will use Altair GraphQL Client extension for querying our products.
Once installed, we launch our GraphQL Client by clicking on the Altair extension icon on our browser toolbar. Upon the new window opened, we place our local Magento GraphQL API endpoint (https://magento.test/graphql) to the request URL bar as shown in the picture below:

Then we can retrieve our products list by pasting the following query into the Query section on the left side of the site:
{
  products(search: "", pageSize: 2 ) {
    total_count
    items {
      name
      sku
      cld_data {
        image
        thumbnail
      }
    }
    page_info {
      page_size
      current_page
    }
  }
}
Besides the built-in Magento product’s fields as name and SKU, this query also requests cld_data, which contains Cloudinary’s assets information. Similarly to the Cloudinary REST API response’s structure, cld_data includes two subfields:
-
image– the optimized URL of the asset stored in Cloudinary. -
thumbnail– the optimized thumbnail Cloudinary URL of the asset.
Note that if you didn’t store the asset in Cloudinary, both fields would return the default Magento image URL.
Once done, we click on the “Send request” button, and the results should be similar to the one below:

That’s it! Now we can use those URLs returned from GraphQL to display our product images with optimization in our front-end application, totally out of the box from Cloudinary.
At this point, our APIs are ready for consumption on the client-side. The next step is to build the front-end side that will take the data queried and display them beautifully to the end-users with the help of Cloudinary.