
When building sites, the file upload functionality tends to be more complex than anticipated. It’s no longer enough to have an input form that sends documents to some server. These days one has to consider asynchronous file uploads, progress bars, etc. Additionally, it must be abstracted and covered with a visually appealing form that users will find intuitive. This is where FilePond has found its relevance.
Filepond provides a visually appealing file upload interface that allows you to drag and drop files. It also automatically handles the upload process and progress updates. Additionally, it provides a feature to revert uploads — all of which we will be exploring in this article.
We will build a React application that uses Filepond to upload multiple images to a Cloudinary store and also (should the user decide to) delete the images.
Here is a link to the demo on CodeSandbox.
Create a new React application by running the following command:
npx create-react-app cloudinary_filepond
Next, add FilePond to the React application by running the following command:
npm install react-filepond filepond
We’ll also be using two FilePond plugins – the Image exif-orientation plugin, which is used by the Image preview plugin to ensure that the preview of the uploaded image is displayed correctly. Add both plugins using the following command:
npm install filepond-plugin-image-preview filepond-plugin-image-exif-orientation
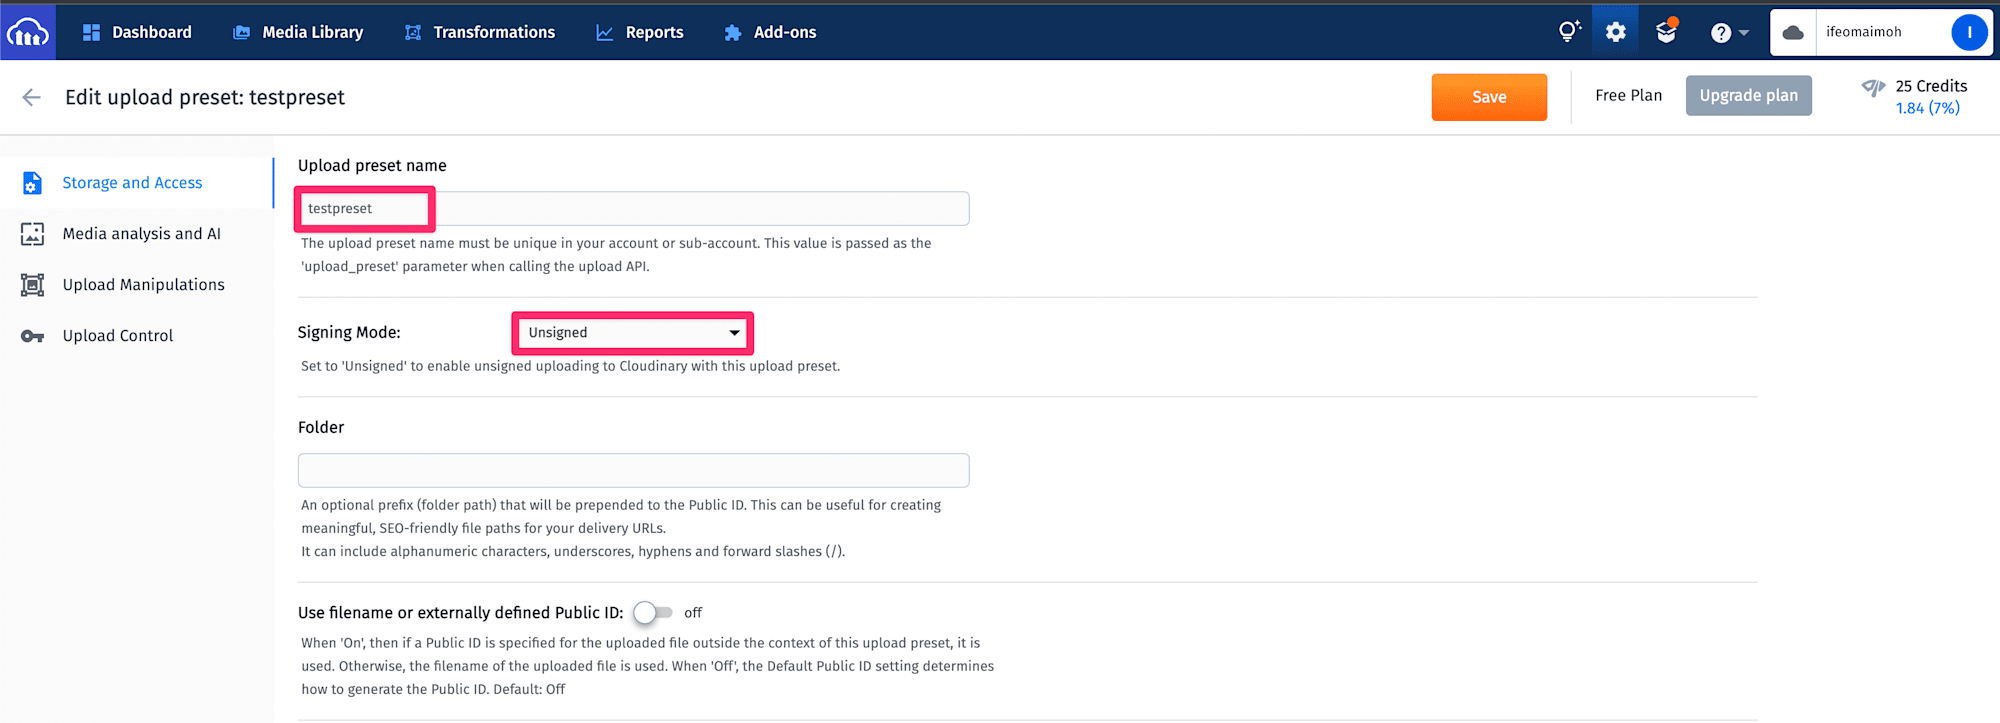
For this tutorial, we will be sending images to Cloudinary via unsigned POST requests, but you need to first sign up for a free Cloudinary account if you don’t have one already. Displayed on your account’s Management Console (aka Dashboard) are important details: your cloud name, API key, etc. We will need our account cloud name and an unsigned upload preset. To create one, log into the Management Console and select Settings > Upload and then scroll to the Upload presets section. Create a new upload preset by clicking Add upload preset at the bottom of the upload preset list. In the displayed form, make sure the Signing Mode is set to Unsigned as shown below.
Next, in the Upload Control section, ensure that the Return delete token option is turned on. This will allow us to delete uploaded images within 10 minutes of uploading to Cloudinary.

Click Save to complete the upload preset definition, then copy the upload preset name as displayed on the Upload Settings page.
Next, we need to create some environment variables in our React application to hold our Cloudinary details. Create a new file at the root of your project called .env and add the following to it:
REACT_APP_CLOUD_NAME = INSERT YOUR CLOUD NAME HERE
REACT_APP_UPLOAD_PRESET = INSERT YOUR UNSIGNED UPLOAD PRESET KEY HERE
This will be used as a default when the project is set up on another system. To update your local environment, create a copy of the .env file using the following command:
cp .env .env.local
Code language: CSS (css)
By default, this local file is added to .gitignore and mitigates the security risk of inadvertently exposing secret credentials to the public. You can update the file with your Cloudinary cloud name and generated upload preset.
In the src directory of the project, create a new folder named cloudinary. This folder will hold all the Cloudinary-related helper classes we will need in our components. In the cloudinary folder, create a new file called cloudinaryConfig.js. This file will give access to the environment variables and prevent repeated process.env. calls throughout the project. In cloudinaryConfig.js, add the following:
export const cloudName = process.env.REACT_APP_CLOUD_NAME;
export const uploadPreset = process.env.REACT_APP_UPLOAD_PRESET;
Code language: JavaScript (javascript)Let’s write a helper function that we will use to upload images to Cloudinary and another to delete images from Cloudinary. In the cloudinary folder, create a new file named cloudinaryHelper.js and add the following code to it:
import { cloudName, uploadPreset } from "./cloudinaryConfig";

const baseUrl = `https://api.cloudinary.com/v1_1/${cloudName}`;

export const makeUploadRequest = ({
  file,
  fieldName,
  progressCallback,
  successCallback,
  errorCallback,
}) => {

  const url = `${baseUrl}/image/upload`;

  const formData = new FormData();
  formData.append(fieldName, file);
  formData.append("upload_preset", uploadPreset);

  const request = new XMLHttpRequest();
  request.open("POST", url);

  request.upload.onprogress = (e) => {
    progressCallback(e.lengthComputable, e.loaded, e.total);
  };

  request.onload = () => {
    if (request.status >= 200 && request.status < 300) {
      const { delete_token: deleteToken } = JSON.parse(request.response);

      successCallback(deleteToken);
    } else {
      errorCallback(request.responseText);
    }
  };

  request.send(formData);

  return () => {
    request.abort();
  };
};

export const makeDeleteRequest = ({
  token,
  successCallback,
  errorCallback,
}) => {

  const url = `${baseUrl}/delete_by_token`;

  const request = new XMLHttpRequest();
  request.open("POST", url);

  request.setRequestHeader("Content-Type", "application/json");

  request.onload = () => {
    if (request.status >= 200 && request.status < 300) {
      successCallback();
    } else {
      errorCallback(request.responseText);
    }
  };
  request.send(JSON.stringify({ token }));
};
Code language: JavaScript (javascript)
Requests are sent to Cloudinary using XMLHttpRequest Objects. In the makeUploadRequest function, we provide a function named progressCallback, which is used to update the progress indicator of the Filepond UI. Additionally, a function is provided, which is executed when a successful response is received — successCallback. This function takes the delete token provided by Cloudinary in the response. The errorCallback function is executed if an error response is returned.
The makeUploadRequest function returns a function that can be called if the user chooses to cancel the upload before it is completed.
In a similar vein, the makeDeleteRequest takes a token, a successCallback function, and an errorCallback function which are executed upon receipt of successful and error responses, respectively.
Next, update your src/App.js file to match the following:
import React, { useState } from "react";

import { FilePond, registerPlugin } from "react-filepond";
import FilePondPluginImageExifOrientation from "filepond-plugin-image-exif-orientation";
import FilePondPluginImagePreview from "filepond-plugin-image-preview";

import "filepond-plugin-image-preview/dist/filepond-plugin-image-preview.css";
import "filepond/dist/filepond.min.css";

import {
  makeDeleteRequest,
  makeUploadRequest,
} from "./cloudinary/cloudinaryHelper";

registerPlugin(FilePondPluginImageExifOrientation, FilePondPluginImagePreview);

function App() {
  const [files, setFiles] = useState([]);

  const revert = (token, successCallback, errorCallback) => {
    makeDeleteRequest({
      token,
      successCallback,
      errorCallback,
    });
  };

  const process = (
  fieldName,
    file,
    metadata,
    load,
    error,
    progress,
    abort,
    transfer,
    options
  ) => {
    const abortRequest = makeUploadRequest({
      file,
      fieldName,
      successCallback: load,
      errorCallback: error,
      progressCallback: progress,
    });

    return {
      abort: () => {
        abortRequest();
        abort();
      },
    };
  };

  return (
    <div style={{ width: "80%", margin: "auto", padding: "1%" }}>
      <FilePond
        files={files}
        acceptedFileTypes="image/*"
        onupdatefiles={setFiles}
        allowMultiple={true}
        server={{ process, revert }}
        name="file"
        labelIdle='Drag & Drop your files or <span class="filepond--label-action">Browse</span>'
      />
    </div>
  );
}
export default App;
Code language: JavaScript (javascript)
The App component has one state variable — files, which is used to keep track of the images selected by the user. Next, we declared two functions: process and revert, which handle the upload and delete operations. These functions are passed as props to the Filepond component.
In the process function, Filepond makes nine parameters available – however, we only need six for our use case. The fieldName and file parameters are appended to the FormData request, sent to Cloudinary. The load function is called upon successful execution of the request, and it takes a string – in our case, the delete token for the uploaded image, which is used to identify each file uniquely. When the revert function is called, Filepond knows exactly which image to delete. The progress function is used to update the progress bar, while the error function takes a string that displays as an error message. Just as we did for the makeUploadRequest function, the process function returns a function that is used to abort the upload process.
With this in place, our application is ready to test. Start the application using the following command:
npm start
When you run your application, you may see an error message in the browser console similar to the one shown below:
Uncaught TypeError: Cannot read properties of null (reading 'insertBefore')
Code language: JavaScript (javascript)
Disable React strict mode in the src/Index.js to get rid of the error. To do this, open the src/Index.js and update it to match the following:
import React from 'react';
import ReactDOM from 'react-dom/client';
import './index.css';
import App from './App';
import reportWebVitals from './reportWebVitals';

const root = ReactDOM.createRoot(document.getElementById('root'));
root.render(<App />);

reportWebVitals();
Code language: JavaScript (javascript)
Find the complete project here on GitHub.
In this article, we looked at how we can combine Filepond and Cloudinary to simplify the process of uploading multiple files while providing an intuitive interface with the ability to revert uploads – even after completion. We achieved a balance between complex functionality and code maintainability by leveraging them.
Resources you may find helpful: