
Besides working as a senior front-end developer at Cloudinary, I’m also a content creator, a blogger, and an open-source developer. Follow me at @mayashavin and on mayashavin.com.
In the beginning, my website, mayashavin.com, was mainly for showcasing the status of my development projects and keeping me organized with my speaking schedule. Initially, I built it with Vue.js, later on switching to Nuxt.js (aka Nuxt) for a higher SEO score, and deployed it with Netlify. After some time, I added a blog section with Netlify CMS as the content management system (CMS). Everything was fine until I added more content and features, which led to a significant decline in the site’s performance. Also, the site design needed a modern look. So, I gave the site a makeover.
While redesigning and rebuilding my site, I decided to also post details of some of my other activities: side projects, interviews, podcasts, training courses. I also wanted to ascertain that, besides sporting a captivating look, the site is rich in content, significantly faster, more accessible, and requiring only a minimal effort for upkeep.
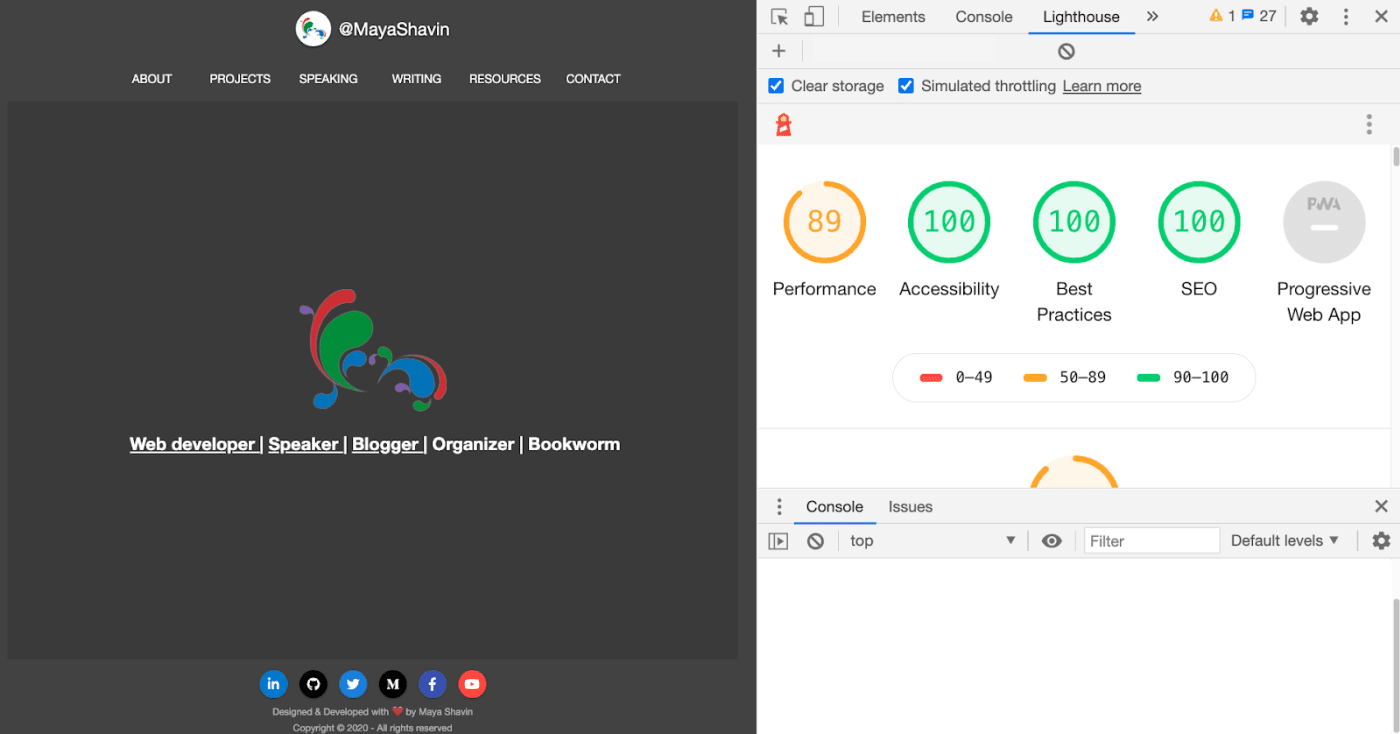
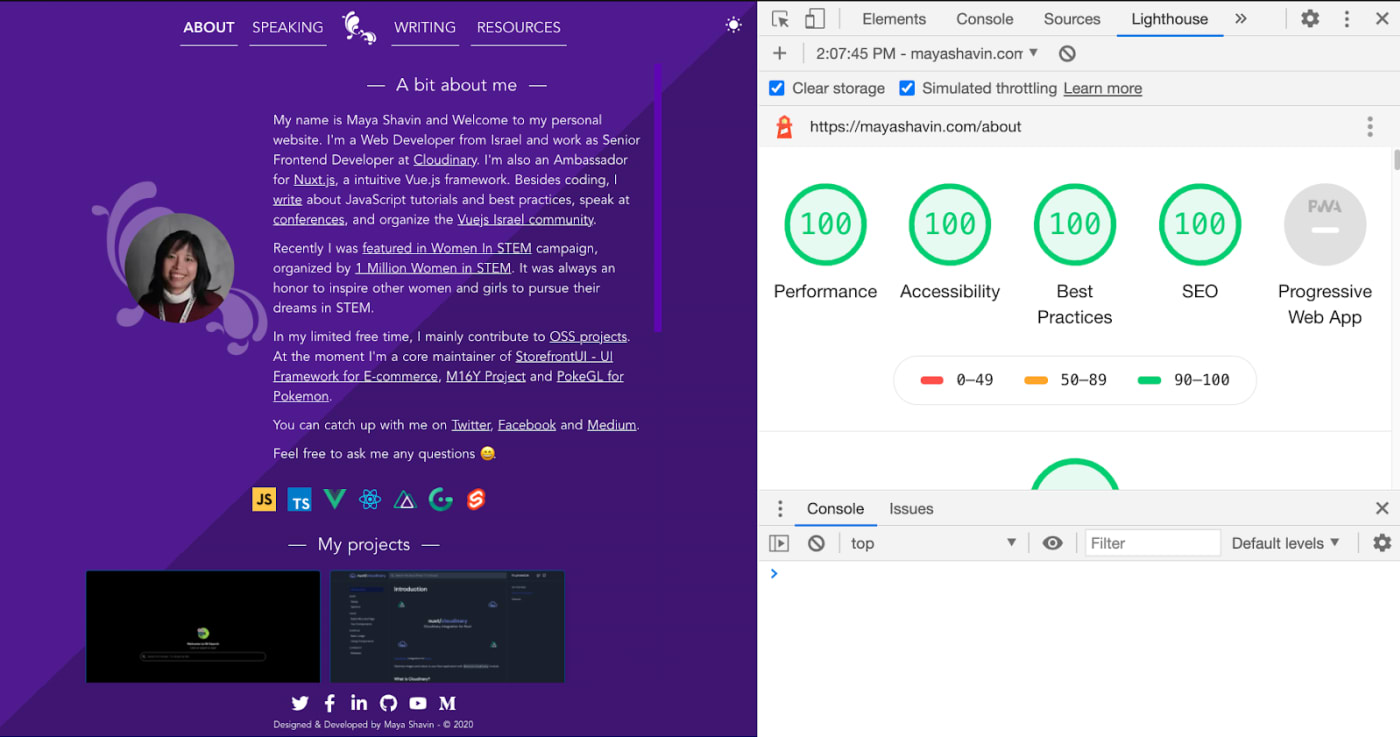 Gratifyingly, ideal tools abound for my goal, rendering the overhaul a smooth sail. Currently, under optimal conditions, the revamped site lands a perfect score on a Lighthouse audit.
So, what are the tools I used? How do I ensure that my codebase stays simple and straightforward in the long term? Read on.
I built my site with several architectural components.
Nuxt.js, whose version 2.14+ I installed before embarking on the revamp, continues as my primary framework. That version builds static apps much faster and works well with static site generators. With static configuration as its target and its auto-crawl mechanism, the Nuxt engine automatically prerenders all the dynamic content pages on my site during a build. Also, for content updates, which is the case for my site approximately 90 percent of the time, Nuxt’s new and smart build-caching mechanism redeploys much faster and more smoothly. What a perfect scenario! You probably guessed it already: my site’s core architecture model is Jamstack, which aims to be light and easy to distribute, capable of statically delivering dynamic content. Also, since Jamstack sites are served through a content delivery network (CDN), they are secure.
Content management was one of my biggest concerns. I wanted a simple tool that supports the Markdown markup language and that affords me full control over my content. Most of the headless CMSs I’d tried before were far too complex for my purpose. Finally, I found the ideal tool: the Nuxt Content module, which enables me to use Nuxt as a Git-based headless CMS with minimal setup and knowledge. The process can’t be simpler: Nuxt Content fetches content from the local directory’s files (Markdown, CSV, or YAML) and then auto-renders it with a Nuxt Content component. Everything is out of the box with no need for configurations. If you’re looking to build a blog, I strongly recommend checking out Nuxt and Nuxt Content. Less overhead, more productivity.
Privacy of my content, especially my drafts, is crucial. Though I plan to open-source my codebase, I prefer to keep my content private and separate from the main repository. To accomplish that, I implemented Nuxt Content with a Git submodule so that my content resides in a separate repository. And even though the rest of the codebase is public, my content folder remains private and reusable.
Whether to build your own CSS or adopt a UI library is no easy decision. For portfolio sites, I highly recommend not to opt for a massive UI-component library, which would be overkill because it’s slated for advanced use cases, such as complex applications. Developing your own CSS is a great option, but it takes a lot of hard work to maintain, organize, and ensure it’s reusable.
For my site, I picked Tailwind CSS, which offers not only all the utilities I needed, from CSS to class selectors, but also an innovative way in which to compose class-based styling, customize theme colors, and, most importantly, remove all unused CSS before deployment. Plus, everything is configurable.
Thanks to the flexibility of Tailwind CSS and the @nuxtjs/color-mode module, implementing dark mode for my site based on my theme was a cinch. Also, I was able to keep the site’s CSS to a minimum. Making my site look beautiful has never been easier.
The great thing about Nuxt is its module ecosystem, which aims to eliminate all the hassles in web development, such as SEO handling with robots, feeds, and sitemaps, which I automated with @nuxtjs/feed, @nuxtjs/sitemap, and @nuxtjs/robots.
Also, to leverage the benefits of progressive web apps (PWAs), I converted my site to a PWA with @nuxtjs/pwa.
Optimizing images is always a must-do, for which Cloudinary is the obvious choice. The implementation was straightforward with the components from Cloudinary’s Nuxt module, involving only two steps. Here’s what I did:
- Fetched the content through
$contentof the Nuxt Content module, uploading the local cover-images to Cloudinary, if necessary. - Transformed and displayed the images responsively with Cloudinary components.
To smoothly and efficiently deliver a Jamstack site like mine through a CDN, I had to pick a reliable hosting provider through which to build and auto-deploy my codebase. Netlify is an excellent choice, with lots of built-in capabilities like Netlify Forms and Analytics. Vercel also impressed me with its CLI-deployment feature and comprehensive geographic coverage. Nonetheless, Vercel is slightly faster and more reliable in delivery. Hence, I chose Vercel for my site.
Since I connected the content repository and the main codebase with a Git submodule, Vercel’s standard auto-deployment capability would not work with content updates. That’s because the main codebase repository is not aware of changes in the content repository, and vice versa. To enable communications between those two repositories, I added a Github Actions workflow and a GitHub event listener. Afterwards, pushed changes in the content repo would trigger a workflow that sends an event to the main codebase to start a rebuild, followed by a redeployment through the Vercel CLI. Finally, Github Actions triggers a tweet based on the message from the event instance. In summary, with a Git submodule, I was able to resolve the issue of lack of auto-deployment support from Vercel, automating the whole system. Vercel is exceptionally reliable, being hiccups free no matter how many times I redeploy.
Obviously, for best performance, useful tools require exemplary code. The right combination of excellent tools like Nuxt, Tailwind CSS, Cloudinary, and Vercel results in sheer magic, involving only minimal manual effort. Are you curious about how to combine them in code? Check out my open-source code.