
Have you ever used the Mac Finder Quick Actions? Quick Actions workflows are visible when you right-click on a file in Finder. There are built-in Quick Actions like “Create PDF”, and now, you can create your own Quick Actions to automate custom tasks.
Here, you’ll learn how to create your own Finder Quick Action that you can use to automatically upload selected images to Cloudinary. We’ll also copy the secure URL returned in the Cloudinary Upload API response into your clipboard so you can start working with your new image immediately.
The Mac Automator helps Mac users to automate tasks in many ways. It provides a user interface for creating Quick Actions. Custom Quick Actions are made up of action templates shared in the Automator library. One of the built-in action templates can Run Shell Scripts.
Cloudinary offers a command line interface (CLI) that enables you to make API calls in your terminal. You can create a shell script using Cloudinary CLI commands. The Cloudinary CLI runs on top of the Python SDK.
You’ll see how to create a shell script using the Cloudinary CLI, and then, add it to the Automator “Run Shell Script” action to create your own “Upload to Cloudinary” Quick Action.
Here are the steps you’ll perform to create your own custom Quick Action.

You need to install Python and the Cloudinary CLI before you can create and add your shell script to Automator. You’ll need a Cloudinary account, so you can access the credentials you need to perform a file upload. If you do not already have an account on Cloudinary, you can quickly set one up for free at https://www.cloudinary.com/console.
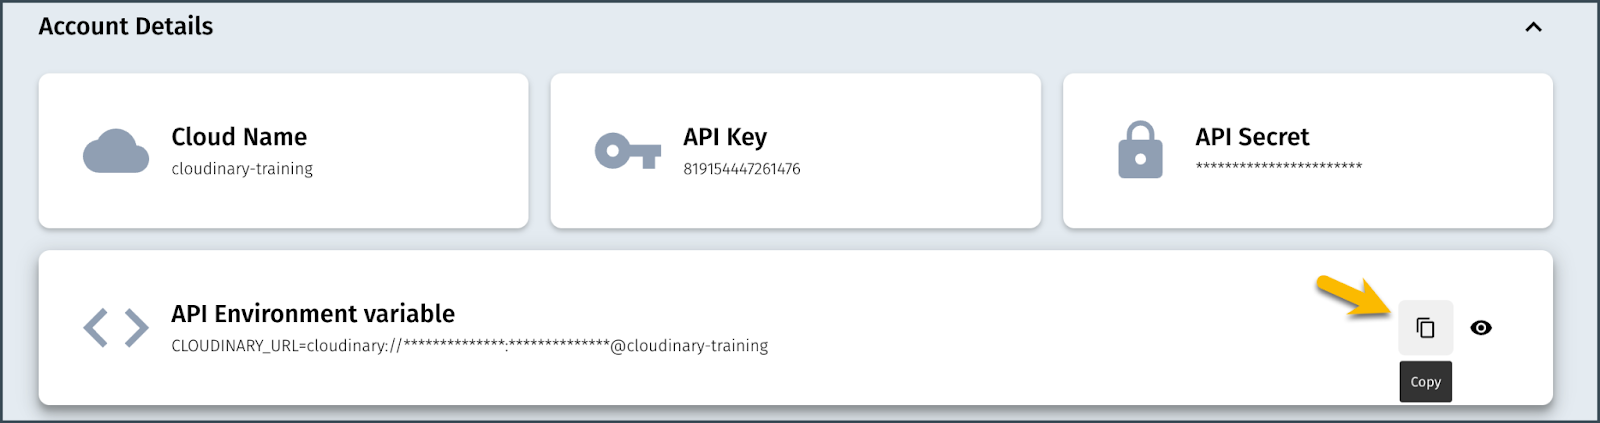
Once you have a Cloudinary account, you can access your CLOUDINARY_URL in the console, as shown below. You’ll find your account details by clicking on the Dashboard link. You’ll use the CLOUDINARY_URL to show shell script to authenticate and get authorization to upload. You can easily copy the CLOUDINARY_URL into your clipboard by clicking on the copy icon. You can save this in a text file until you are ready to write your shell script.

If you are new to Python, the Homebrew package manager can help you install the latest version quickly. If you haven’t installed Homebrew yet, you can do this by going to your Terminal and pasting the following command:
mkdir homebrew && curl -L https://github.com/Homebrew/brew/tarball/master | tar xz --strip 1 -C homebrew
Once Homebrew is installed, install the latest version of Python using this command:
brew install python
Test your Python installation by checking the version. If you see version >= 3.6, you can proceed.
python3 --version
With the Homebrew install, you’ll refer to version 3 of Python as python3. With your Python installation, you should get the Python package manager, pip. Starting in version 3.4, pip is automatically installed with Python.
pip3 --version
Now, you’re ready to install the Cloudinary Python SDK.
Note: There are many ways to install Python, so as long as you have a version >= 3.6 installed, you will be good to go!

Go to your Terminal and install the Cloudinary Python SDK using pip:
pip3 install cloudinary
Now you’re ready to install the Cloudinary CLI.
You can use pip to install the Cloudinary CLI.
pip3 install cloudinary-cli
Confirm that your CLI is installed by exporting your CLOUDINARY_URL and calling the CLI configuration command. You can now test your CLI with the cld config command.
export CLOUDINARY_URL=cloudinary://API_KEY:API_SECRET@cloud_name
cld config
Note: CLOUDINARY_URL details are not included in the example above. Yours will contain user-specific values for API_KEY, API_SECRET, and cloud_name. Paste the CLOUDINARY_URL you retrieved in an earlier step. The config command will never show your entire api_secret, which is like a password and should never be shared. The cloud_name and api_key are considered safe to show.
You should see the following response, with your cloud details:
cloud_name: cloudinary-training
api_key: 279567774524278
api_secret: ***************MMWA
private_cdn: False
signature_algorithm: sha1
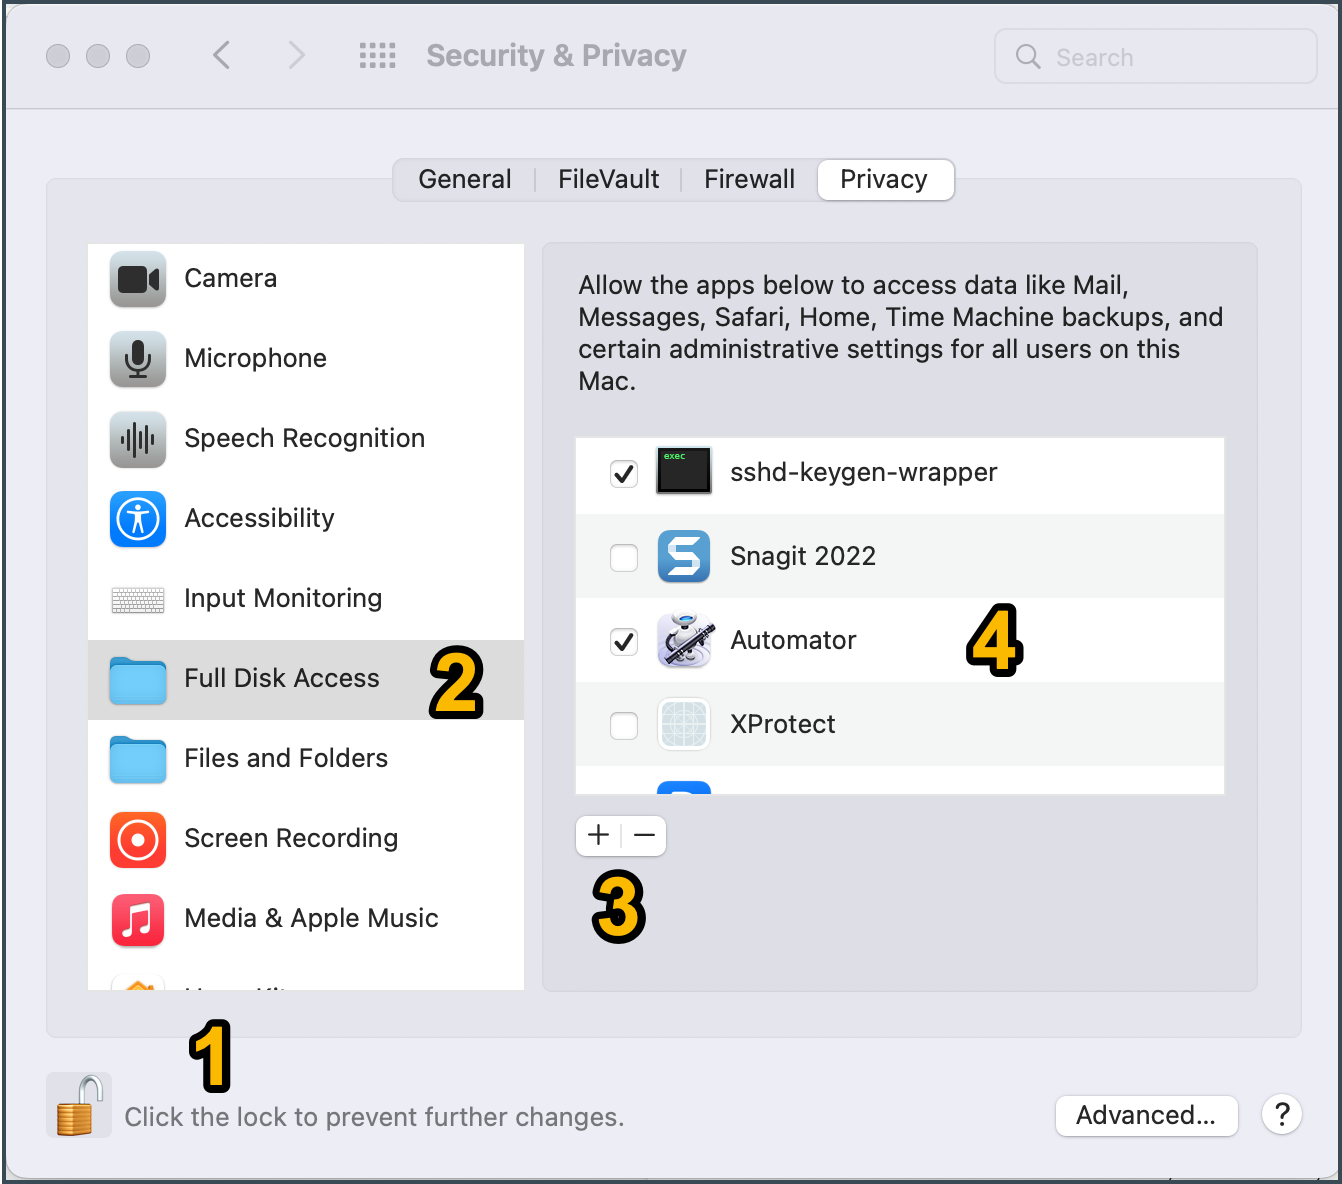
Before you start setting up your custom Quick Action in Automator, give Automator access to your file system. It will need to access the file system in order to hand files off to your shell script.
Follow these four steps to provide Automator appropriate access:
- Unlock the lock by clicking on it to enable changes to security.
- Select Full Disk Access.
- If Automator is not shown in your list of applications, click on the “+” to add Automator, which can be found in the Applications folder.
- Click on the checkbox next to Automator to indicate that it should have Full Disk Access.
Start by opening the Automator application on your Mac. You can do this by Spotlight searching (cmd – space) for Automator. You can also find Automator in your Applications folder.
With the Automator application open, click on “File”, and then select “Quick Action”, followed by the “Choose” button.
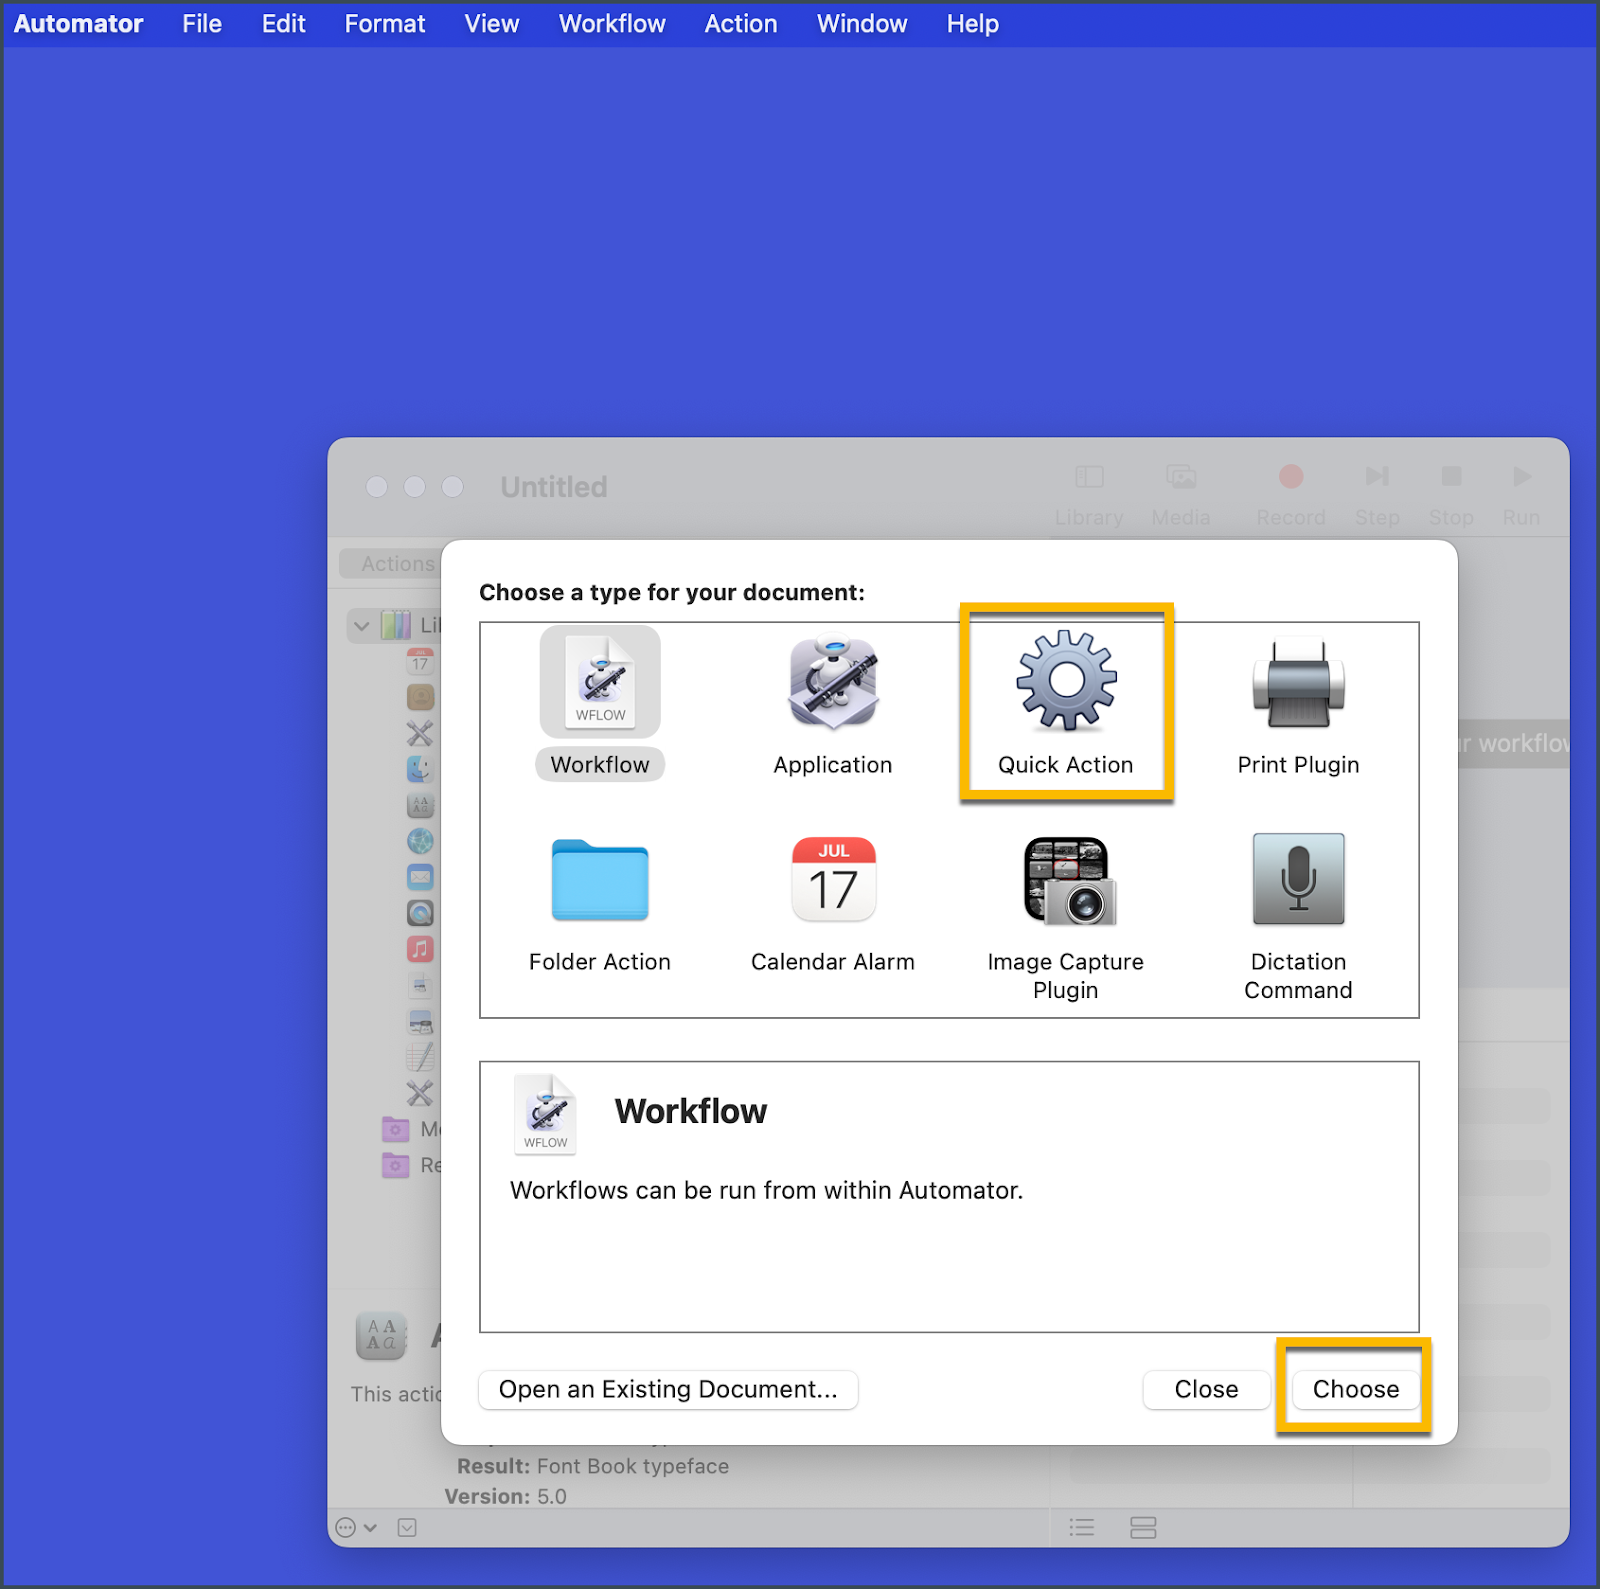
This will open up the Quick Action creation interface.
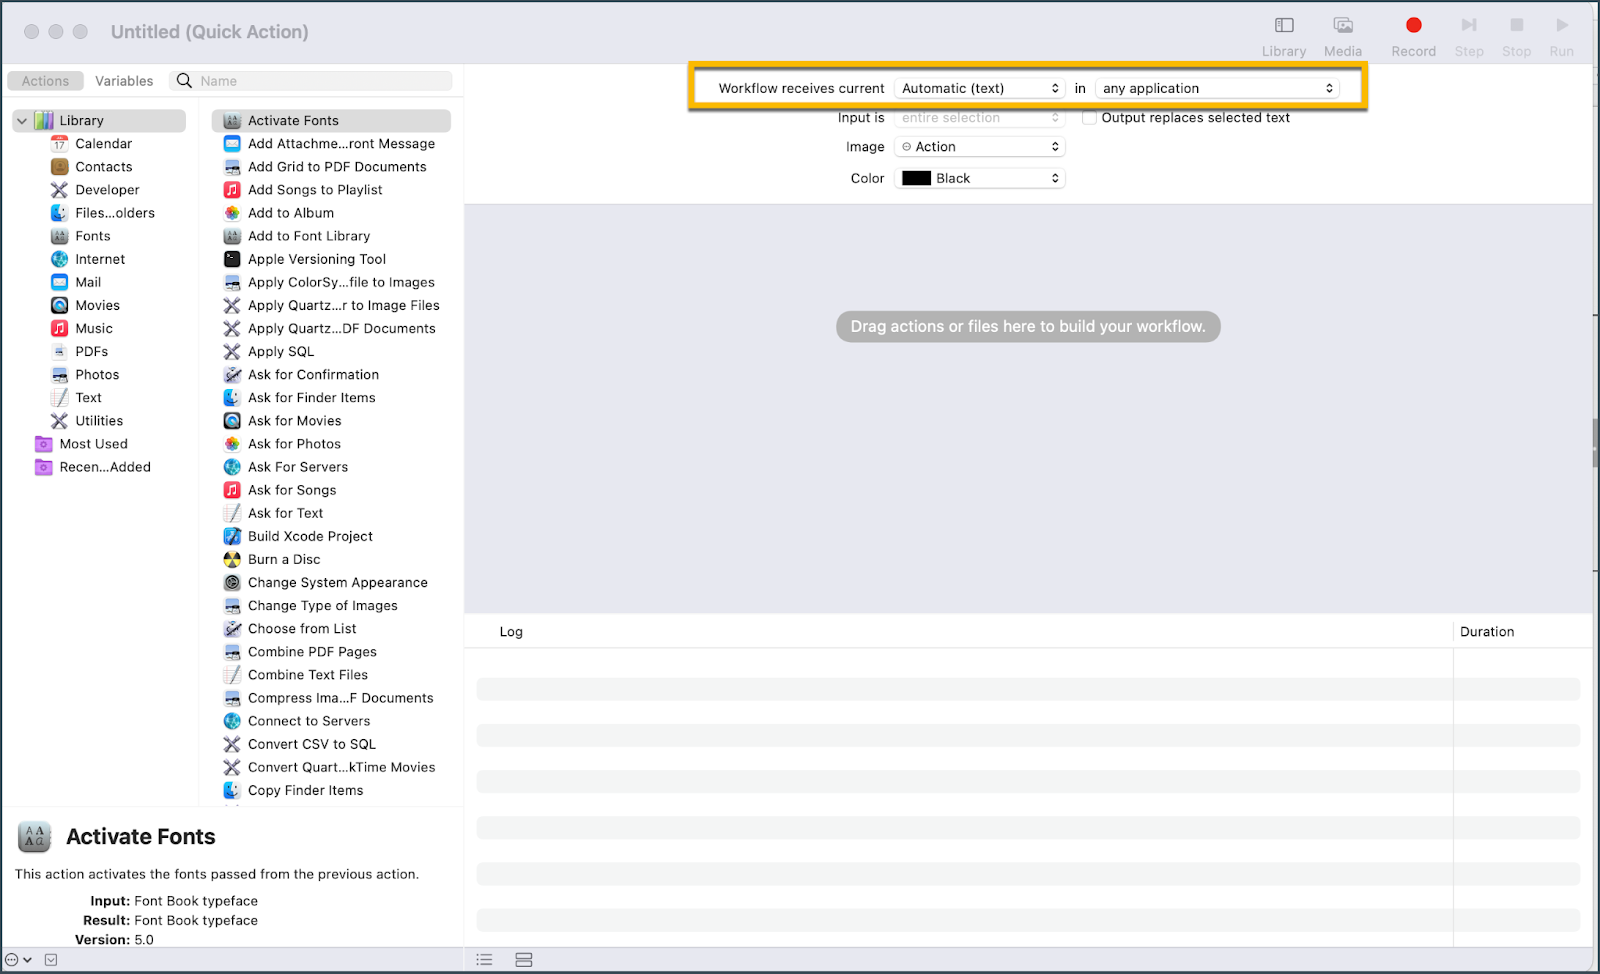
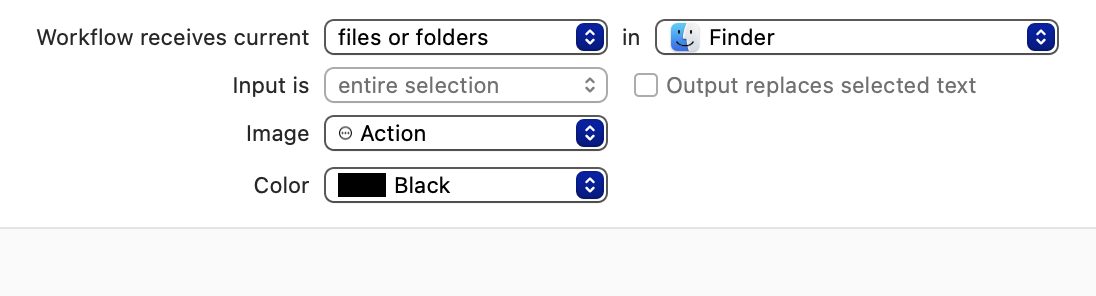
Above the Quick Action workflow canvas, select “files or folders” from “Workflow receives current” and “Finder” for “any application”. This allows you to pass in files that you have selected in Finder to the Quick Action workflow.
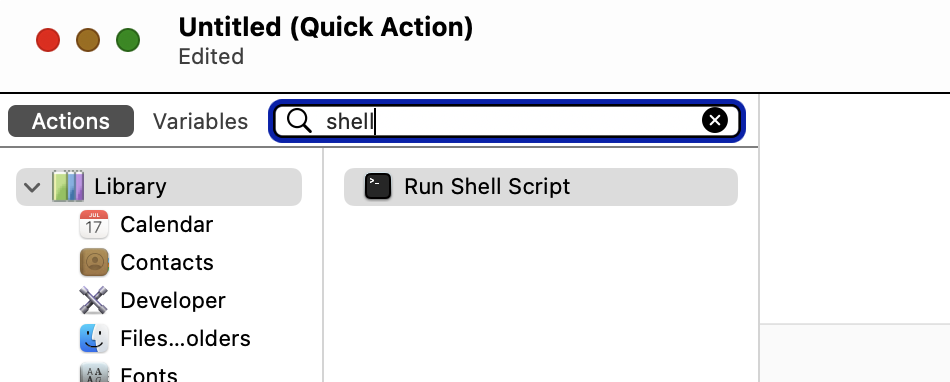
Type “shell” in the Actions search box. Drag the “Run Shell Script” action onto the Workflow canvas. Your canvas will now contain the Shell Script form. If you see the word “cat” in your shell script, you can delete it. This is provided by Automator for testing purposes.
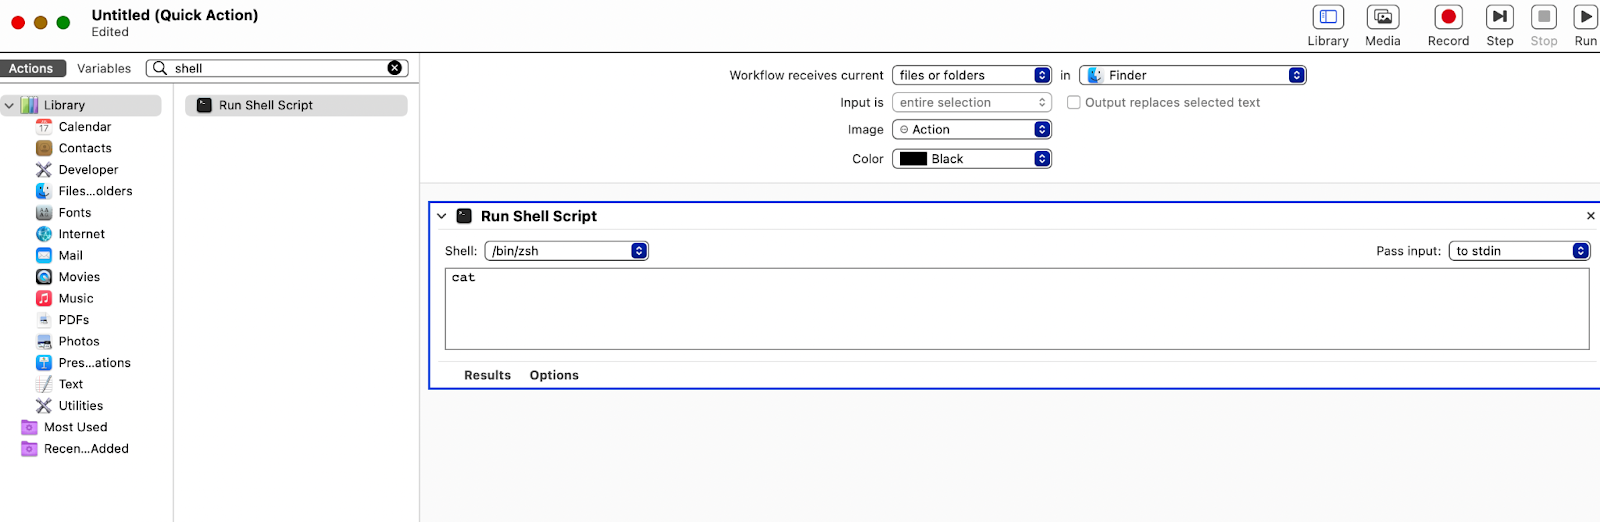
In 2019, Apple started using the zsh shell, instead of the bash shell for your terminal interface. You will likely see /bin/zsh selected as your shell, but if for some reason, you are using a different shell, select it in the Shell Script form.
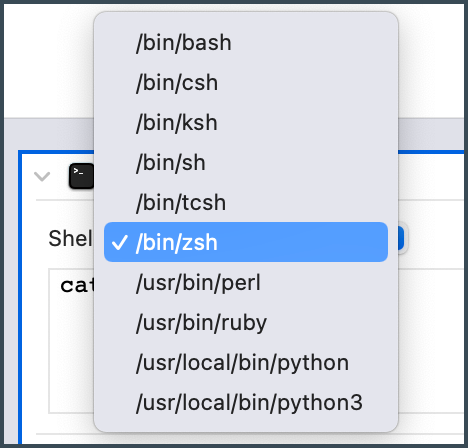
Your Shell script may contain the command ‘cat’. This is the shell command for listing file contents that is only there for testing. Since we’ll be replacing it with our own shell commands, you can delete it.
When we successfully upload an image to Cloudinary, the response will contain the secure URL that allows us to access our uploaded image. The response is in JSON format. The jq library will allow us to parse the response and extract the secure URL.
Use Homebrew to install the jq library in your Terminal.
brew install jq
The shell script that we are going to add to this action will look like the image below. Let’s break this down, so that you can enter the information specific to your Mac libraries. A copy/paste version is available below the image breakdown.

- Start by exporting your CLOUDINARY_URL. You can find this in your dashboard, as we described in the section, “Get Your Cloudinary Credentials”. Remember to type the word “export” before inserting your CLOUDINARY_URL.
- The for f in “$@” expression is how Automator will hand a set of file paths to the Quick Action shell script. Automator is taking into account the fact that a user may have selected multiple files in Finder before clicking on the Quick Action. You’ll see “$f” in the script, which refers to a single file. There could be more than one file selected for a Quick Action so Automator provides a way to share one file at a time.
- You can use the “which” command in your terminal shell to find the full path to your Cloudinary CLI and your jq library. You will need to supply the full path in the final step. This step uses pipes to execute multiple commands, starting with uploading the selected file to Cloudinary using the cld uploader command. When the response is returned, it is piped to the jq command, and the secure URL is extracted from the Cloudinary response. Finally, the secure URL is piped to the Mac pbcopy command, which copies the secure URL into the clipboard. In the example, cld and jq are located in /opt/homebrew/bin, because they were both installed using brew but can differ on your machine.
which cld
which jq
export CLOUDINARY_URL=cloudinary://<API_KEY>:<API_SECRET>@<CLOUD_NAME
for f in "$@"
do
<folder containing Cloudinary CLI>/cld uploader upload "$f" | <folder containing jq library>jq -r '.secure_url' | /usr/bin/pbcopy
done
Next, you’ll paste your script into the Shell Script form. You’ll also need to change the “Pass input:” selection to “as arguments” instead of “stdin”. Be sure that you have identified the full path to your cld and jq installations using the “which” command in your terminal.

To complete the creation of your Quick Action, click on File | Save and provide a name. The name you provide is what will show up in the list of Quick Actions in Finder.
Head over to Finder and select an image by right-clicking its file name. You should find your custom Quick Action in the list of actions. Click on your custom Quick Action.
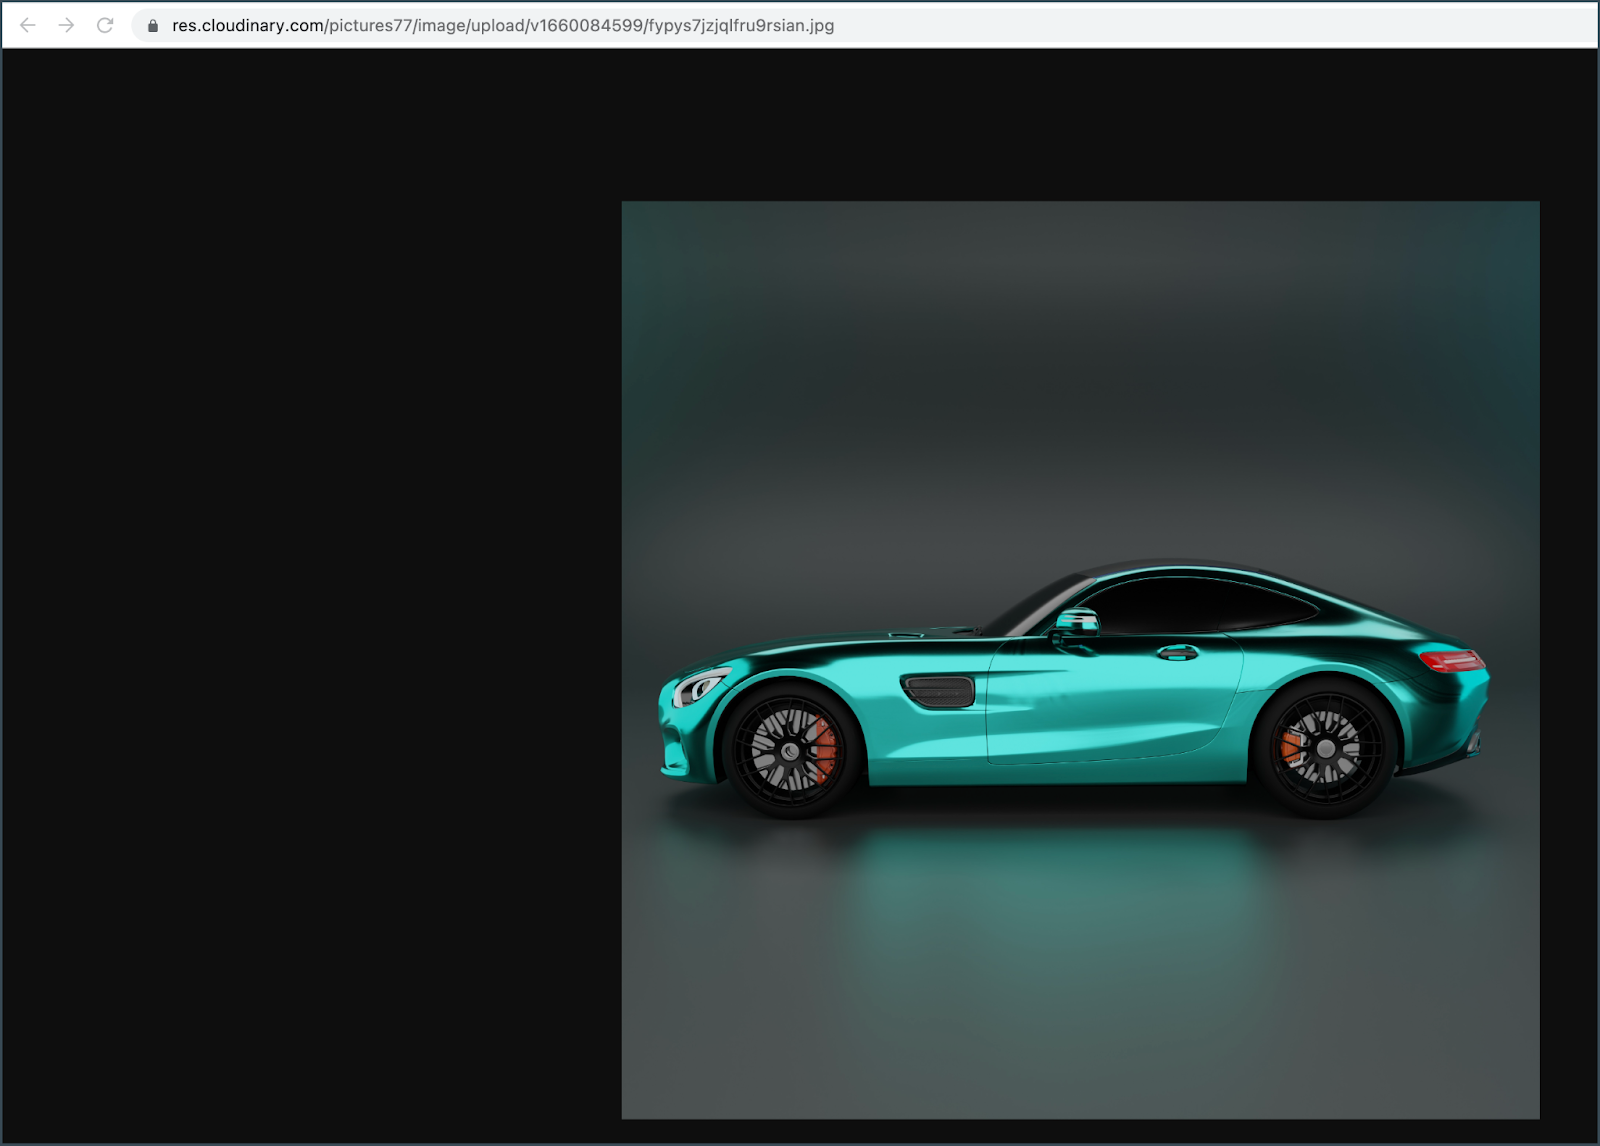
If everything was installed correctly, you should be able to go to your browser and paste the Cloudinary secure URL into the browser and pull up the image you uploaded. I have uploaded a local copy of the Cloudinary Sample image in the clip below.
If your Quick Action didn’t result in a successful upload or your clipboard didn’t contain the URL from the Cloudinary upload response, you can try running the commands in your shell script directly in the terminal. Paste these commands to see if the upload works. Be sure that you are using your specific CLOUDINARY_URL and not the general version shown in the examples.
export CLOUDINARY_URL=cloudinary://<API_KEY>:<API_SECRET>@<CLOUD_NAME
Next, run the Cloudinary CLI upload command with the path to your file. You should be able to do this by supplying the relative or absolute path to your file.
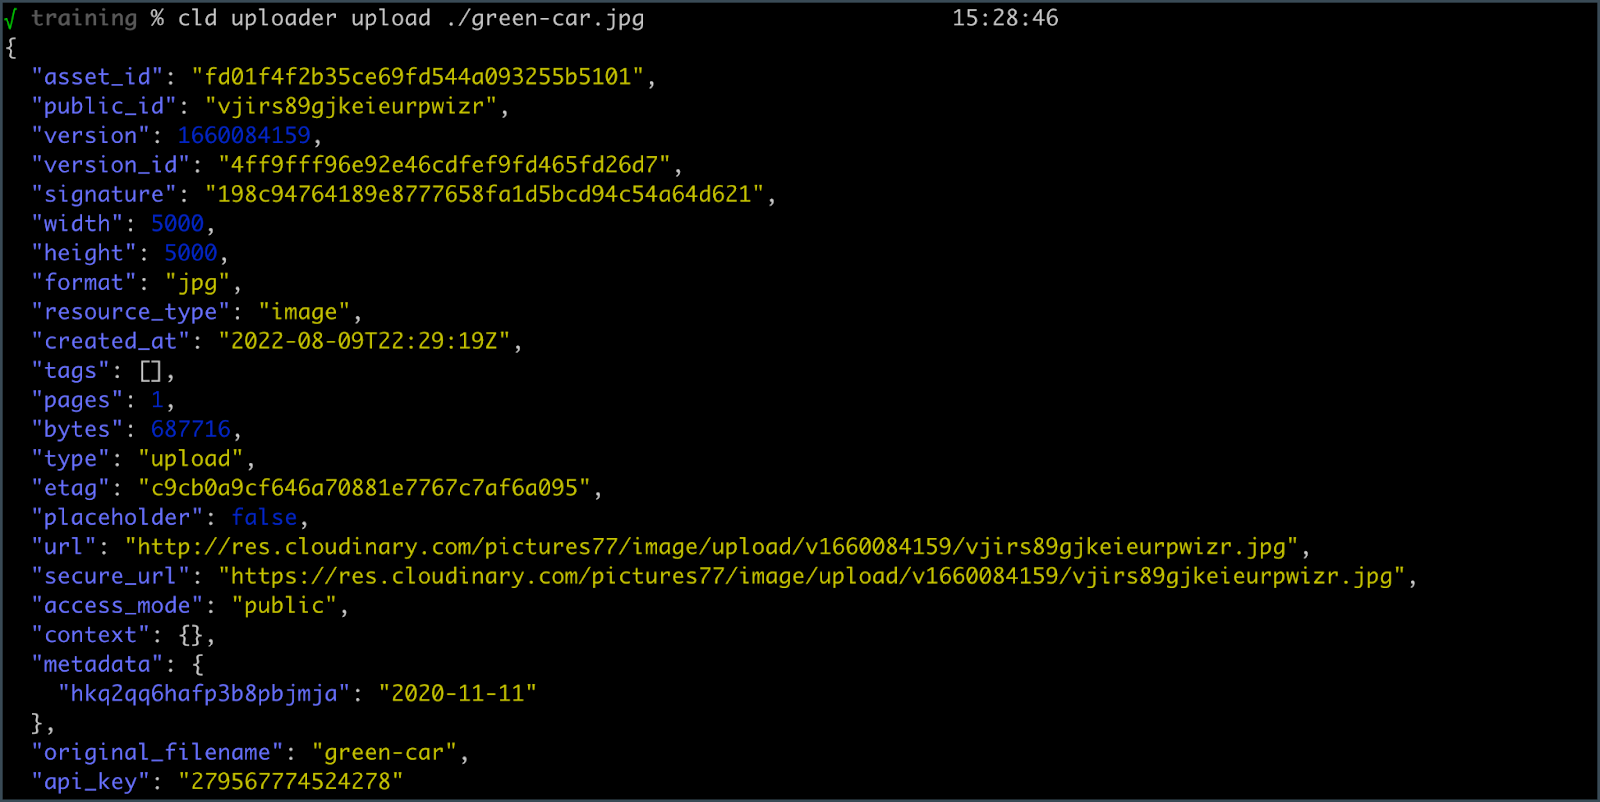
For example, if you are running the command inside the directory that contains your image “green-car.jpg”, your test command would look like this:
cld uploader upload ./green-car.jpg
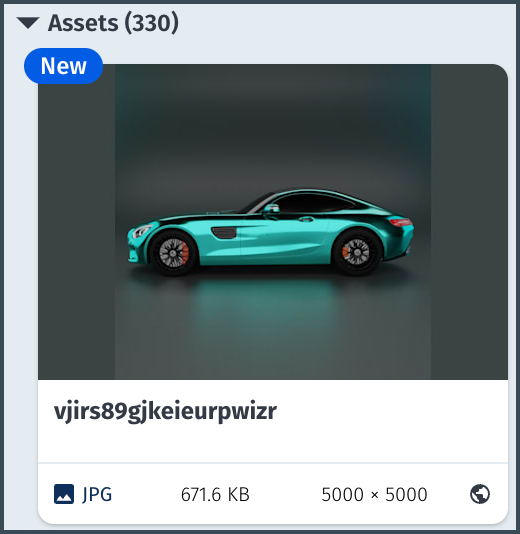
After running that command, look at the response and locate the Public ID.
Then, navigate to your Media Library to see whether your image was successfully uploaded.
If that worked, then try the set of three piped commands in your terminal, starting with exporting your CLOUDINARY_URL
export CLOUDINARY_URL=cloudinary://<API_KEY>:<API_SECRET>@<CLOUD_NAME
/usr/local/bin/cld uploader upload ./green-car.jpg | /usr/local/bin/jq -r '.secure_url' | /usr/bin/pbcopy
After running the piped command, go to your browser and paste what is in the clipboard into the browser address input. If this works, make sure your Quick Action script contains the same information, and try it again.
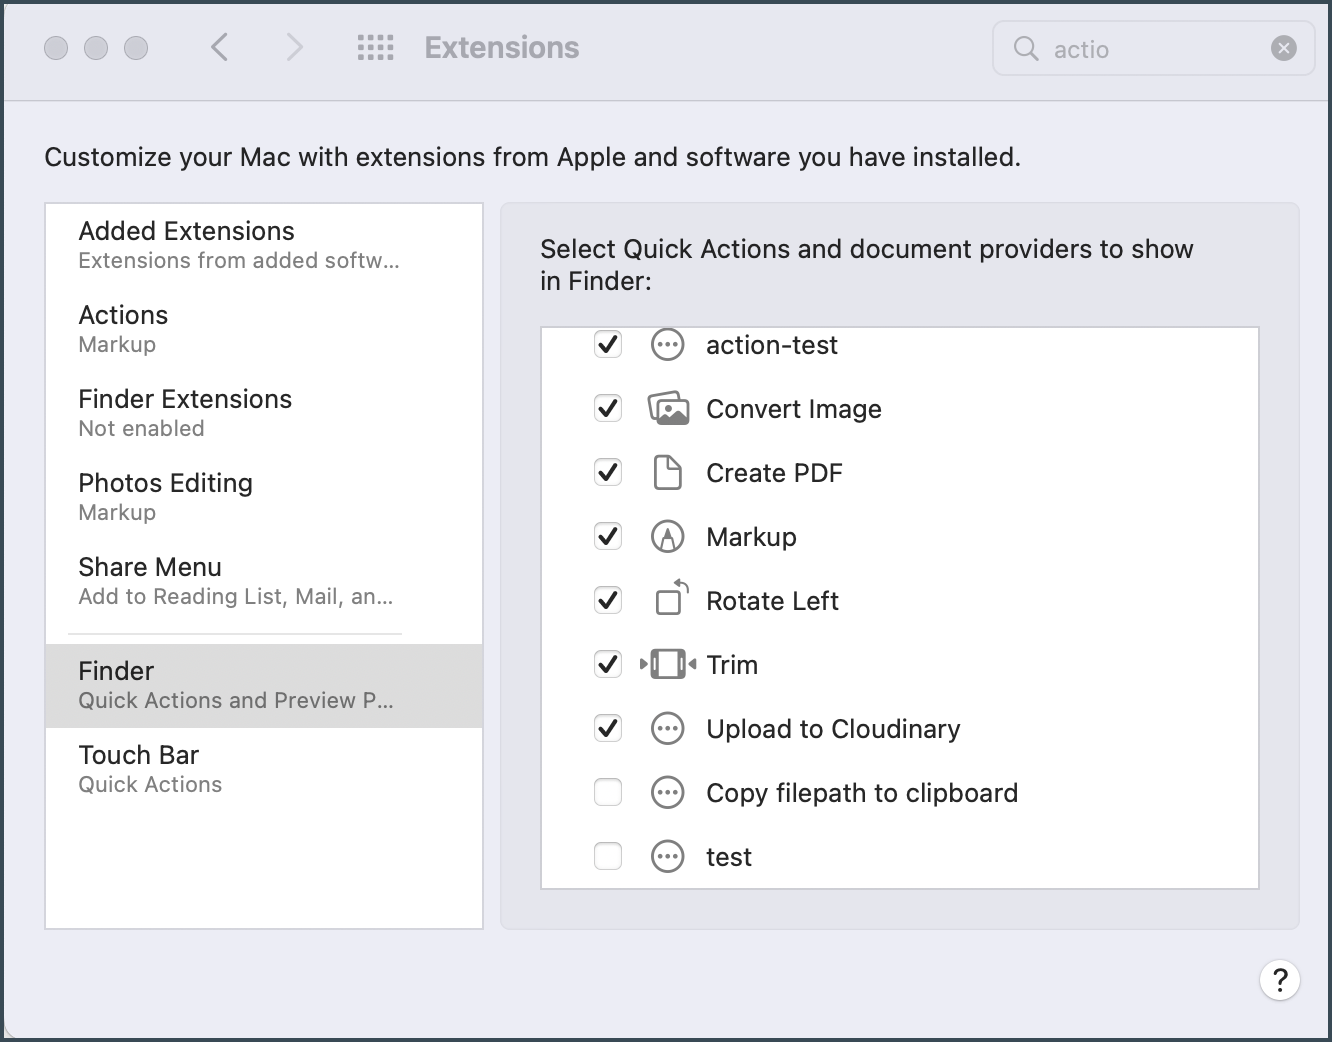
If you want to turn off access to any Quick Actions, whether they are provided by Apple or are custom, you’ll find them in Extensions within Apple Preferences. Click on Finder to see the Quick Actions and check or uncheck them to make them available.
Setting up a workflow with any tool involves breaking down the task into steps. You’ve combined five technologies here to be able to quickly upload your image to Cloudinary: Python, Cloudinary Python SDK, Cloudinary CLI, zsh command shell, and Automator Quick Actions.
You started by locating your Cloudinary credentials. Then, you installed Python and the Cloudinary Python SDK. On top of that, you installed the Cloudinary CLI. Next, you installed the jq library into your Shell, so that you could extract data out of the Cloudinary JSON upload response. Finally, you set up a Quick Action using the Mac Automator to call a short shell script that performed an upload. Now you can upload from your Finder and use the URL in your clipboard to work with your cloud-based image.
But this is just the beginning! Now that you know how to use the Cloudinary CLI, you can use the Automator to make other CLI calls.


