
Recently I’ve started experimenting with Google’s Flutter framework. For those who do not know, Flutter is a cross-platform framework (same as React Native) based on the Dart programing language.
After playing with the framework and understanding the best practices (thank you Effective Dart), I started to build our (Cloudinary’s) Flutter SDK.
In the following article, I’ll explain why we decided to implement this SDK, how you can use it, and what good it will do for your application.
One of the biggest pain points for a mobile developer is dealing with performance issues caused by handling many assets (images, videos, etc.) on multiple devices with different size screens.
In one of my previous jobs, I was responsible for an application that allowed users to download images into their phones and set them as backgrounds for the home screen, lock screen, or both. This application required pulling big JSON files with all the image information, including multiple fields such as title, URL, created date, etc… On the main screen, I had to present a thumbnail (a small image representation of a larger image) of each image.Tapping a thumbnail would direct the user to a screen where the image was shown full screen. These 2 screens already required multiple versions of the same image. You can’t present a full-screen image as a thumbnail image because you’ll get a pixelated result which yields a bad user experience. On the other hand, we didn’t want to present the full-screen image because that would cause a long load time for the screen, which is again a bad user experience.
Moreover, every image came in a different size, so we had to find a way to present them uniformly.
To add to the complexity, we wanted this app to work with different screen sizes (iPhones, iPads, different Android devices, and Android base tablets) which require different image sizes. The scenario in which we have a single image that needs to be displayed in many different sizes is very common. How can we best handle it? Let’s go through some possibilities.
One solution would be to get it in one size for the client and manipulate it for our needs. Unfortunately, this solution wouldn’t be efficient and could cause a long processing time. We could handle it on the server side (if we have one). We could create multiple URLs and send them to the client. But that would create big JSONS would be harder to handle and parse.
That’s where Cloudinary comes in.
Cloudinary is a platform that allows you to quickly and easily create, manage and deliver digital experiences across any browser, device, and bandwidth.
The first thing you need to do is go to the Cloudinary website and sign-up for a free account.
You can find the Git repository for the Cloudinary Flutter SDK here.
To integrate Cloudinary into your app you can use:
dependencies:
cloudinary_flutter: ^0.0.1
cloudinary_dart: ^0.0.7
Once the package is integrated, we’ll need to set up our Cloudinary object.
Your cloud name will appear in the dashboard where you created your account.
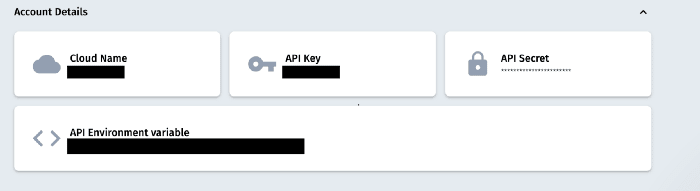
CloudinaryContext.cloudinary = Cloudinary.fromCloudName(cloudName: '<Cloud_name>');Code language: HTML, XML (xml)Now that you have your Cloudinary object set and ready to use, the MAGIC starts.
At the start of this article, I presented the problem where we have one asset, but we need it in many different sizes and aspect ratios. Let’s see how we can achieve that very easily by applying Cloudinary’s transformations.
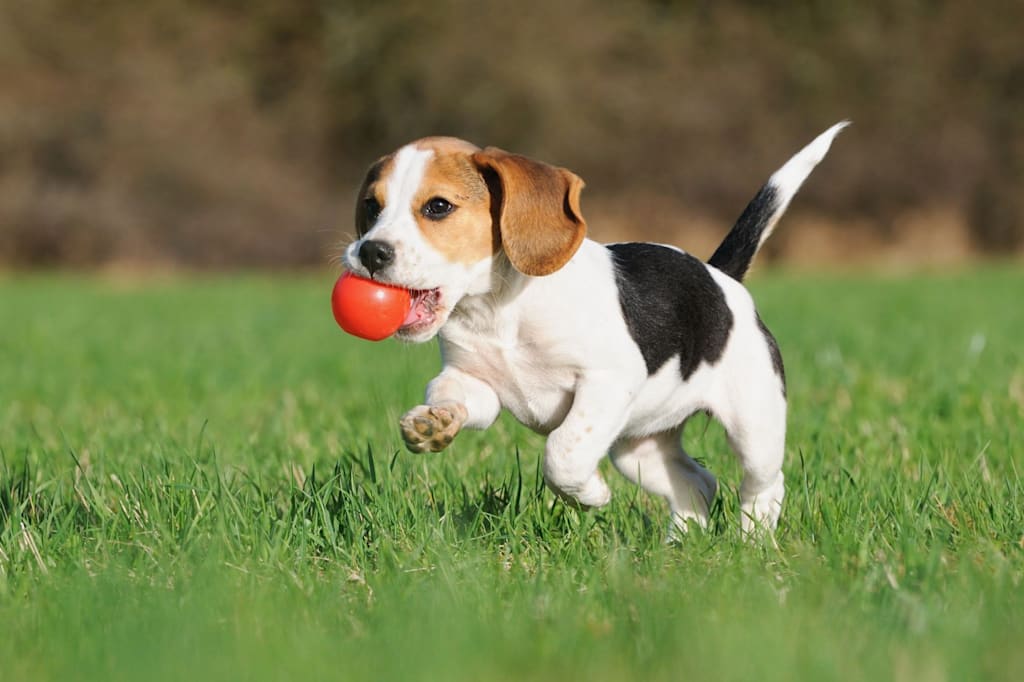
Here’s the original image called ‘dog’:
You can easily create a thumbnail(500×500) for your main screen:
String url = (CloudinaryContext.cloudinary.image('dog')
..transformation(Transformation()
..resize(Resize.crop()
..width(500)
..height(500))))
.toString();Code language: JavaScript (javascript)
This code creates a new string URL using the Cloudinary object that was initiated in the previous step. The image function builds the URL using the publicId of the specified image.
When calling transformation you can specify the action you want to perform. In this case, the resizeaction is applied with the Crop and the values for width and height , Finally, the toString()turns the object into a string.
This code will output a URL for the following image:

As we can see we got the 500×500 thumbnail we wanted, but the result could be improved. We lost the dog and we can only see white fur (not optimal at all).
What can we do? OH! Cloudinary has a few more tricks up its sleeve! Another COOL feature we can use is “gravity” where we can ask Cloudinary to focus on the most interesting object in the image.
String url = (CloudinaryContext.cloudinary.image('dog')
..transformation(Transformation()
..resize(Resize.crop()
..width(500)
..height(500)
..gravity(Gravity.autoGravity()))))
.toString();Code language: JavaScript (javascript)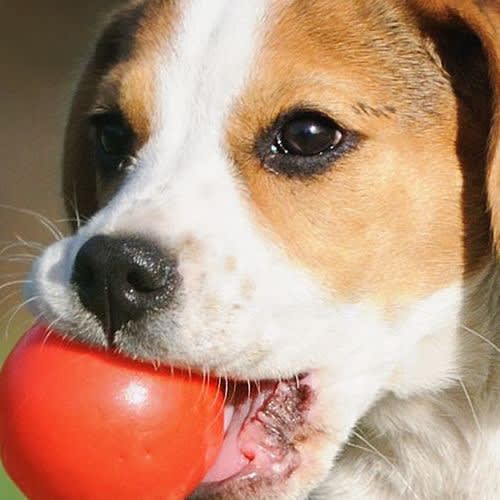
And as we can see the result is much better. The focus is on the dog’s face.
Let’s try another scenario. You want to deliver a 2k resolution image, which is quite a large file, and you don’t need to present it in its best form. Roaming can’t always handle big bandwidth. To make the image lighter we can use the Cloudinary “quality” feature.
Here’s the original image (5MB):
With Cloudinary we can do the following:
String url = (CloudinaryContext.cloudinary.image('dog')
..transformation(
Transformation()..delivery(Delivery.quality(Quality.auto))))
.toString();Code language: JavaScript (javascript)
This code will produce the following URL:
After this transformation, the size is reduced to 626.56 KB and it’ll be faster to load this image on a mobile device.
So far we’ve seen how to generate URLs and we can manually put them into an image widget, but Cloudinary gives us an extra zing, an image widget that can integrate with everything we’ve implemented so far.
CldImageWidget(
publicId: 'dog',
transformation: Transformation()
..resize(Resize.crop()
..width(500)
..height(500)
..gravity(Gravity.autoGravity()))
..delivery(Delivery.quality(Quality.auto)),
),Code language: JavaScript (javascript)
In the code snippet above we see that we create the image widget and we give the following attributes:
- Public Id
- Resize crop, with width=500 and height=500 and Gravity auto
- Delivery with quality auto
This code will generate the URLs we’ve seen before and will inject them into the image widget.
In this blog, you saw how Cloudinary can handle the same asset in many sizes and qualities. That’s just the tip of the iceberg. Cloudinary has many other features that you can use when managing the media in your apps.
I encourage you to visit Cloudinary’s documentation to get the most out of the platform.
The Cloudinary SDK can also be found on Android and iOS and 14 more languages you can find at Cloudinary’s git.


