
Social media is amongst the main sources of website traffic this day. We are always engaging our users to share content as much as possible. Let us learn how we can ensure our websites look elegant when shared by dynamically generating relevant social sharing images.
The final project can be viewed on Codesandbox.
You can find the full source code on my Github repository.
Before learning how to generate social share images, we need to set up our blog. Let us create our NuxtJs project.
We will set up our project using the create-nuxt-app utility. Ensure you have yarn or npm v5.2+ or v6.1+ installed.
yarn create nuxt-app automatic-social-share-nuxtjs

# OR

npx crete-nuxt-app automatic-social-share-nuxtjs

# OR

npm init nuxt-app automatic-social-share-nuxtjs

Code language: PHP (php)
This will prompt a series of setup questions. Here are our recommended defaults:
Project name: automatic-social-share-nuxtjs
Programming language: JavaScript
Package manager: Yarn
UI framework: Tailwind CSS
Nuxt.js modules: Content
Linting tools: N/A
Testing frameworks: None
Rendering mode: Universal (SSR/SSG)
Deployment target: Server (Node.js hosting)
Development tools: N/A
What is your Github username?
<your-github-username>
Version control system: Git
Once the setup is complete, you may now run the project. The project should now be available on http://localhost:3000
yarn dev

# OR

npm run dev

Code language: PHP (php)We need some content to display on our dummy blog. We have some prepared for you. Let us copy this content into the content/articles folder.
mkdir content/articles

cd content/articles

wget https://raw.githubusercontent.com/musebe/Social-sharing-images-nuxt/main/content/articles/curabitur.md

wget https://raw.githubusercontent.com/musebe/Social-sharing-images-nuxt/main/content/articles/donec.md

wget https://raw.githubusercontent.com/musebe/Social-sharing-images-nuxt/main/content/articles/duis.md

wget https://raw.githubusercontent.com/musebe/Social-sharing-images-nuxt/main/content/articles/nam.md

Code language: JavaScript (javascript)
In each of the files, you will notice that the image is a simple string instead of a URL to a remote image. This is because we are hosting our images on Cloudinary. Cloudinary is a powerful image management platform we will be using. If you do not have an account, feel free to create one here.
Create a folder called automatic-social-share-images-nuxtjs and add the following files:
Additionally, create a folder called template and add this file: og-template.png.
The resulting folder should look like this:

To be able to render the images from Cloudinary in our project, we need to set up the recommended Nuxt.Js plugin.
yarn add @nuxtjs/cloudinary

# OR

npm install @nuxtjs/cloudinary

Code language: CSS (css)
Configure the plugin by adding a cloudinary section to the nuxt.config.js file. This is the project’s configuration file.
// nuxt.config.js

export  default  {

...

cloudinary: {

cloudName:  process.env.NUXT_ENV_CLOUDINARY_CLOUD_NAME,

useComponent:  true,

secure:  true

}

}

Code language: JavaScript (javascript)
The above file references the NUXT_ENV_CLOUDINARY_CLOUD_NAME environmental variables. These are values we set outside of our codebase either for security or deployment flexibility. You can find your Cloudinary cloud name on your dashboard. Let us create the .env file.
touch .env

Code language: CSS (css)
You may now set the variable:
NUXT_ENV_CLOUDINARY_CLOUD_NAME=<cloudinary-cloud-name>

Code language: HTML, XML (xml)
The above setup will ensure that the $cloudinary instance is injected globally.
We are going to create two components, one to render the entire article and one to render the previews of other articles. Let us start with our single article renderer. Let us create a custom component to render the title, image, author details and content.
touch components/ArticleRender.vue
<!-- components/ArticleRender.vue -->

<template>

<div>

...

<div>

<div>

<h1>

<span>{{ article.title }}</span>

</h1>

<img :src="$cloudinary.image.url(article.image)"  />

</div>

<div>

<div>

<div>

<div>

<img

:src="$cloudinary.image.url(article.author_avatar)"

alt="article.author"

/>

</div>

<div>

<p>

{{ article.author }}

</p>

</div>

</div>

</div>

<nuxt-content :document="article"  />

</div>

</div>

</div>

</template>

Code language: HTML, XML (xml)
// components/ArticleRender.vue

<script>

export default {

props: {

article:  {

required:  true,

type:  Object,

},

},

};

</script>

Code language: HTML, XML (xml)
The above component will receive the article as a required property and render it. The nuxt-content component renders our markdown content in a friendly HTML format.
Let us now setup the MoreArticles component. Create the component in the MoreComponents folder:
touch components/MoreArticles.vue
This is the component we will use to display other articles available for reading.
<!-- components/MoreArticles.vue -->

<template>

<div>

...

<div>

<div>

<h2>More articles</h2>

</div>

<div>

<div v-for="(article, key) in articles"  :key="key">

<div>

<img :src="$cloudinary.image.url(article.image)"  />

</div>

<div>

<div>

<nuxt-link :to="article.path">

<p>{{ article.title }}</p>

<p>{{ article.description }}</p>

</nuxt-link>

</div>

<div>

<div>

<nuxt-link :to="article.path">

<span>{{ article.author }}</span>

<img :src="$cloudinary.image.url(article.author_avatar)"  />

</nuxt-link>

</div>

<div>

<p>

<nuxt-link :to="article.path">

{{ article.author }}

</nuxt-link>

</p>

<div>

<time :datetime="article.createdAt">

{{ article.createdAt }}

</time>

</div>

</div>

</div>

</div>

</div>

</div>

</div>

</div>

</template>

Code language: HTML, XML (xml)
Our component will an Array of articles.
// components/MoreArticles.vue

<script>

export default {

props: {

articles:  {

required:  true,

type:  Array,

},

},

};

</script>

Code language: HTML, XML (xml)The nuxt/content module globally injects the $context instance which means we can access it anywhere. We will use the asyncData hook to fetch the articles and merge them back into the Page state. Let’s do this in the pages/index.vue page.
// pages/index.vue

<script>

import ArticleRender from "../components/ArticleRender.vue";


import MoreArticles from "../components/MoreArticles.vue";


export default {

components: {

ArticleRender,

MoreArticles,

},


async  asyncData({  $content  })  {

const articles  =  await  $content("articles").fetch();


const article  =  articles.pop();


return {

article,

articles,

};

},

};

</script>

Code language: HTML, XML (xml)
In the above code, we render the last article and pass the rest to be displayed in the “More articles” section. As we created the rendering components already, let’s add them to the page template section.
<!-- pages/index.vue -->

<template>

<div>

<article-render :article="article"  />

<more-articles :articles="articles"  />

</div>

</template>

Code language: HTML, XML (xml)The pages/index.vue page is the index page, the page we receive when we open http://localhost:3000. Other articles will be rendered through the pages/articles/_slug.vue page. This page will receive the slug of the article we want to read. Let us first create the file.
touch pages/articles/_slug.vue
We will use the slug to query the article we want to read and to exclude it in “More articles”. To exclude the current article in the query, we use the $ne flag which denotes not equal.
// pages/articles/_slug.vue

<script>

import ArticleRender from "../../components/ArticleRender.vue";


import MoreArticles from "../../components/MoreArticles.vue";


export default {

components: {

ArticleRender,

MoreArticles,

},

async  asyncData({  $content,  params  })  {

const article  =  await  $content("articles",  params.slug).fetch();


const articles  =  await  $content("articles")

.where({

slug:  { $ne:  params.slug  },

})

.fetch();


return  {

article,

articles,

};

},

};

Code language: HTML, XML (xml)
Let us now render the content as we did on the pages/index.vue page.
<!-- pages/index.vue -->

<template>

<div>

<article-render :article="article"  />

<more-articles :articles="articles"  />

</div>

</template>

Code language: HTML, XML (xml)
When we open our landing page, we should now see something similar to this:

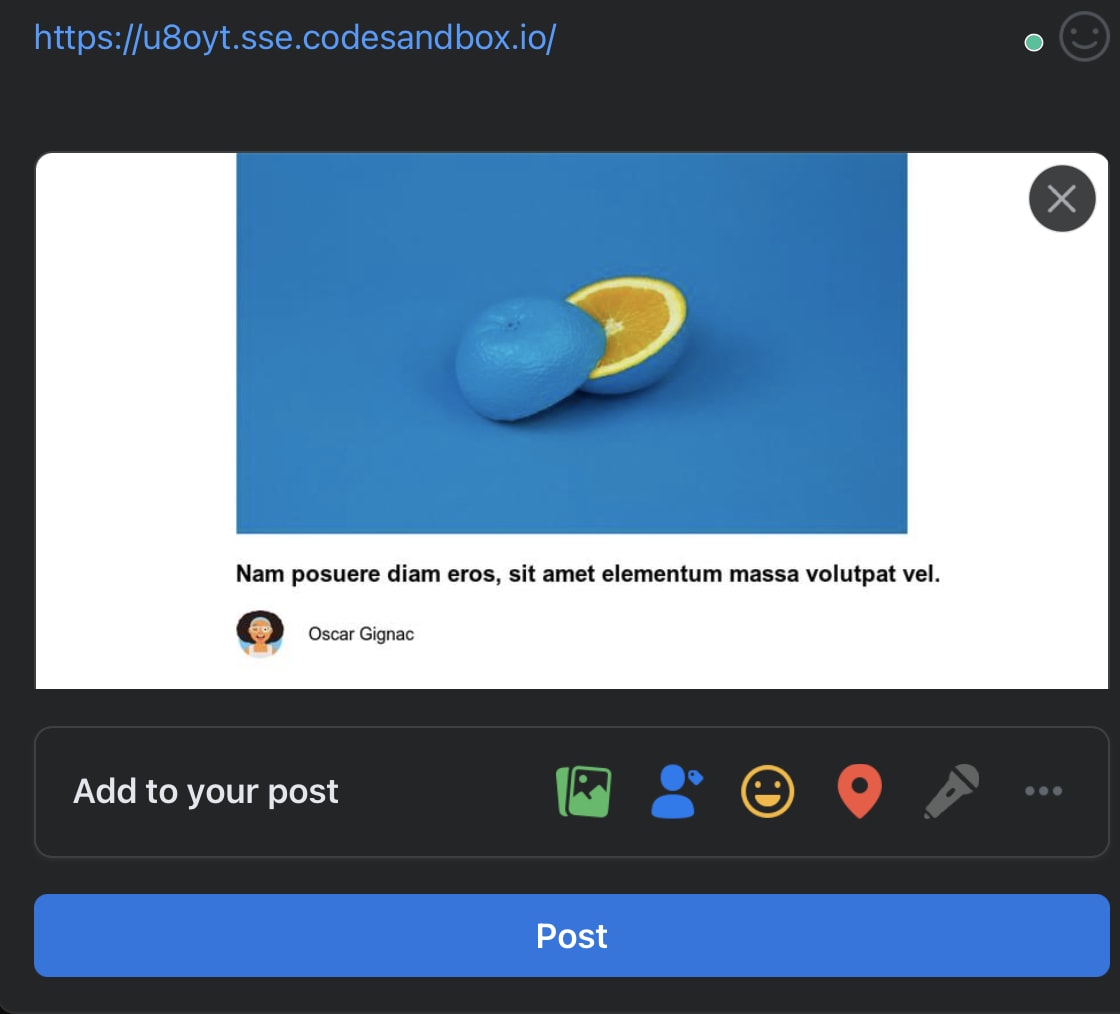
Social share images are the images displayed when the article is shared. Here is a preview of the social share image we will be generating.
To generate the image, we will be using a series of transformations applied on the template file. We will overlay the article’s image, the article title, author image and author title.
// pages/index.vue

<script>

...

export default {

...

computed: {

ogImageUrl()  {

return  this.$cloudinary.image.url(

"automatic-social-share-images-nuxtjs/template/og-template",  {

transformation:  [{

overlay:  "automatic-social-share-images-nuxtjs:photo-1494253109108-2e30c049369b",

gravity:  "north",

height:  "400",

width:  "700",

},

{

overlay:  "automatic-social-share-images-nuxtjs:avataaars",

gravity:  "south_west",

height:  "50",

width:  "50",

x:  "250",

y:  "100",

},

{

overlay:  {

font_family:  "Arial",

font_size:  24,

font_weight:  "bold",

text:  this.article.title,

},

gravity:  "south_west",

co_rgb:  "000000",

x:  "250",

y:  "175",

},

{

overlay:  {

font_family:  "Arial",

font_size:  18,

font_weight:  "normal",

text:  this.article.author,

},

gravity:  "south_west",

co_rgb:  "000000",

x:  "325",

y:  "115",

},

],

}

);

},

},

...

};

</script>

Code language: HTML, XML (xml)
To customise the content displayed when sharing the articles, we will use the open graph protocol. This is the protocol that enables any web page to become a rich object in a social graph. We do this by adding basic metadata to our header elements. Examples of these tags are og:site_name, og:type, og:url, og:title etc. Twitter also has special tags it uses for its social cards. You can read more about them here.
To append meta tags to our page’s head (e.g. meta tags), we add a head method in our page script and return the key meta with the correct values.
// pages/index.vue

<script>


export  default  {

...

head()  {

return {

meta:  [{

property:  "og:site_name",

content:  "NuxtJs Blog"

},


{

hid:  "og:type",

property:  "og:type",

content:  "article"

},


{

hid:  "og:url",

property:  "og:url",

content:  process.env.NUXT_ENV_URL,

},


{

hid:  "og:title",

property:  "og:title",

content:  this.article.title,

},


{

hid:  "og:description",

property:  "og:description",

content:  this.article.description,

},


{

hid:  "og:image",

property:  "og:image",

content:  this.ogImageUrl,

},


{

property:  "og:image:width",

content:  "1200"

},


{

property:  "og:image:height",

content:  "630"

},


{

name:  "twitter:site",

content:  "NuxtJs Blog"

},


{

name:  "twitter:card",

content:  "summary_large_image"

},


{

hid:  "twitter:url",

name:  "twitter:url",

content:  process.env.NUXT_ENV_URL,

},


{

hid:  "twitter:title",

name:  "twitter:title",

content:  this.article.title,

},


{

hid:  "twitter:description",

name:  "twitter:description",

content:  this.article.description,

},


{

hid:  "twitter:image",

name:  "twitter:image",

content:  this.ogImageUrl,

},

],

};

},

...

};

</script>
Code language: HTML, XML (xml)
Using the above configuration, we have a solid setup for social media sharing of our landing page. To enable the same for our pages/articles/_slug.vue page, we just need to copy over the head and computed methods.
This is just an introduction to what we can achieve. Feel free to read more on Open Graph protocol to see what is possible.