
You might have a blog or a site that specializes in giving users video and image content. You can make yourself a media library to manage all of your content and keep it relevant to your users. That way you can see the exact data you need and you can arrange your images and videos in ways that don’t affect users.
In this tutorial, we’ll make a small media library to handle videos and images for us. You’ll be able to upload the videos and images to Cloudinary and then show them in your own library. We’ll be storing references to that content in our own Postgres database that we could use to reference images in other places.
The first thing we’ll do is set up a Cloudinary account. You can sign up for a free account here.
Then you’ll have a single place to upload all of your users’ media content. That way you don’t have to worry about storing all of your content and you can just fetch and upload your videos.
Now you can go to a terminal and we’ll make our new Redwood app with the following command.
yarn create redwood-app media-library
When this finishes, you’ll have a full-stack app that just needs a little updating. In the api folder you’ll find all of the code to handle your database and GraphQL back-end. In the web folder you’ll find the code for the React front-end. We’ll start with the database schema because Redwood uses this to handle a lot of work for us.
Open schema.prisma in the api > db directory. Make sure to update your provider to postgresql instead of sqlite since we’ll using a Postgres database. Take a moment to update the .env file in the root of the project. You’ll need to uncomment the DATABASE_URL value and update it to your Postgres connection string. It might look like this.
DATABASE_URL=postgres://postgres:admin@localhost:5432/media_library
If you don’t have Postgres installed locally, you can download it here and get your connection string from pgAdmin once the installation is finished.
You can close .env now and go back to schema.prisma because we need to add our models. You can delete the example model in the file and add the following ones.
model Video {
  id       Int    @id @default(autoincrement())
  name     String
  duration Float
  url      String
}

model Image {
  id     Int    @id @default(autoincrement())
  name   String
  url    String
}
Code language: JavaScript (javascript)
We have the database schema ready so we can run a quick migration to set up the database.
yarn rw prisma migrate dev
This will create the tables with the columns and constraints we defined in the models. Just to have some data to look at, we’ll seed our database.
Inside of api > db, open seed.js and delete all of the commented out code in the main function. We’ll be adding our own seed calls with the following code.
await db.video.create({
  data: { name: 'Beth_vid', duration: 765.34, url: 'example.com' },
})
await db.image.create({
  data: { name: 'Beth_img', url: 'example.com/beth.jpg' },
})
Code language: CSS (css)
Now you can run this command to seed your database.
yarn rw prisma db seed
With your fresh data applied, we can move on to the best part of Redwood.
Now we’ll use my favorite Redwood command to generate the CRUD to work with videos for the front-end and back-end of this project.
yarn rw g scaffold video
This one command generates a React front-end to handle everything we need to add video records to the database. If you look in api > db > src > graphql, you’ll see a new sdl file that contains all of the types for our queries and mutations for handling videos. In api > db > src > services, you’ll see a new videos directory. This folder has all of the resolvers to handle the database updates. It also has a test that you can add on to.
On the front-end of the app, take a look at web > src > pages, you’ll see a lot of new directories for videos. These contain pages that show different aspects of the CRUD functionality.
Take a look in web > src > components and you’ll see even more directories for videos. These directories contain the files that handle the data on the front-end and the form we could use to handle adding videos to the database.
We’re going to run the scaffold command one more time to generate all of the files for images.
yarn rw g scaffold image
This is everything we need to start working with the Cloudinary upload widget.
We’re not actually going to use the form to add videos to the database. We’re going to do that automatically after we upload the videos to Cloudinary. To start with, we’ll add the Cloudinary widget to the NewVideo component. We can use a package to add this widget so we’ll install that in the web directory first.
yarn add react-cloudinary-upload-widget
Let’s go to web > src > components > NewVideo and edit the file there. This is where the edit form for the video gets pulled in. We’ll add the import for the upload widget components we need along with the other imports.
import { WidgetLoader, Widget } from 'react-cloudinary-upload-widget'
Code language: JavaScript (javascript)
Then we’ll add the uploader widget components. In the code right above the VideoForm, add this code.
<WidgetLoader />
<Widget
  sources={['local', 'camera']}
  cloudName={process.env.CLOUD_NAME}
  uploadPreset={process.env.UPLOAD_PRESET}
  buttonText={'Open'}
  style={{
    color: 'white',
    border: 'none',
    width: '120px',
    backgroundColor: 'green',
    borderRadius: '4px',
    height: '25px',
  }}
  folder={'test0'}
  onSuccess={successCallBack}
/>
Code language: PHP (php)
While you can check out what each of these props does for the widget in the README in the repo, there are a few we need to highlight. The CLOUD_NAME and UPLOAD_PRESET need to be defined in your .env.
You’ll need the values for these two fields and you’ll get those from your Cloudinary console. The cloud name is on the dashboard as soon as you log in.

You’ll need to go to the settings page for uploads and create a new unsigned upload preset. Your upload setting page will look something like this.
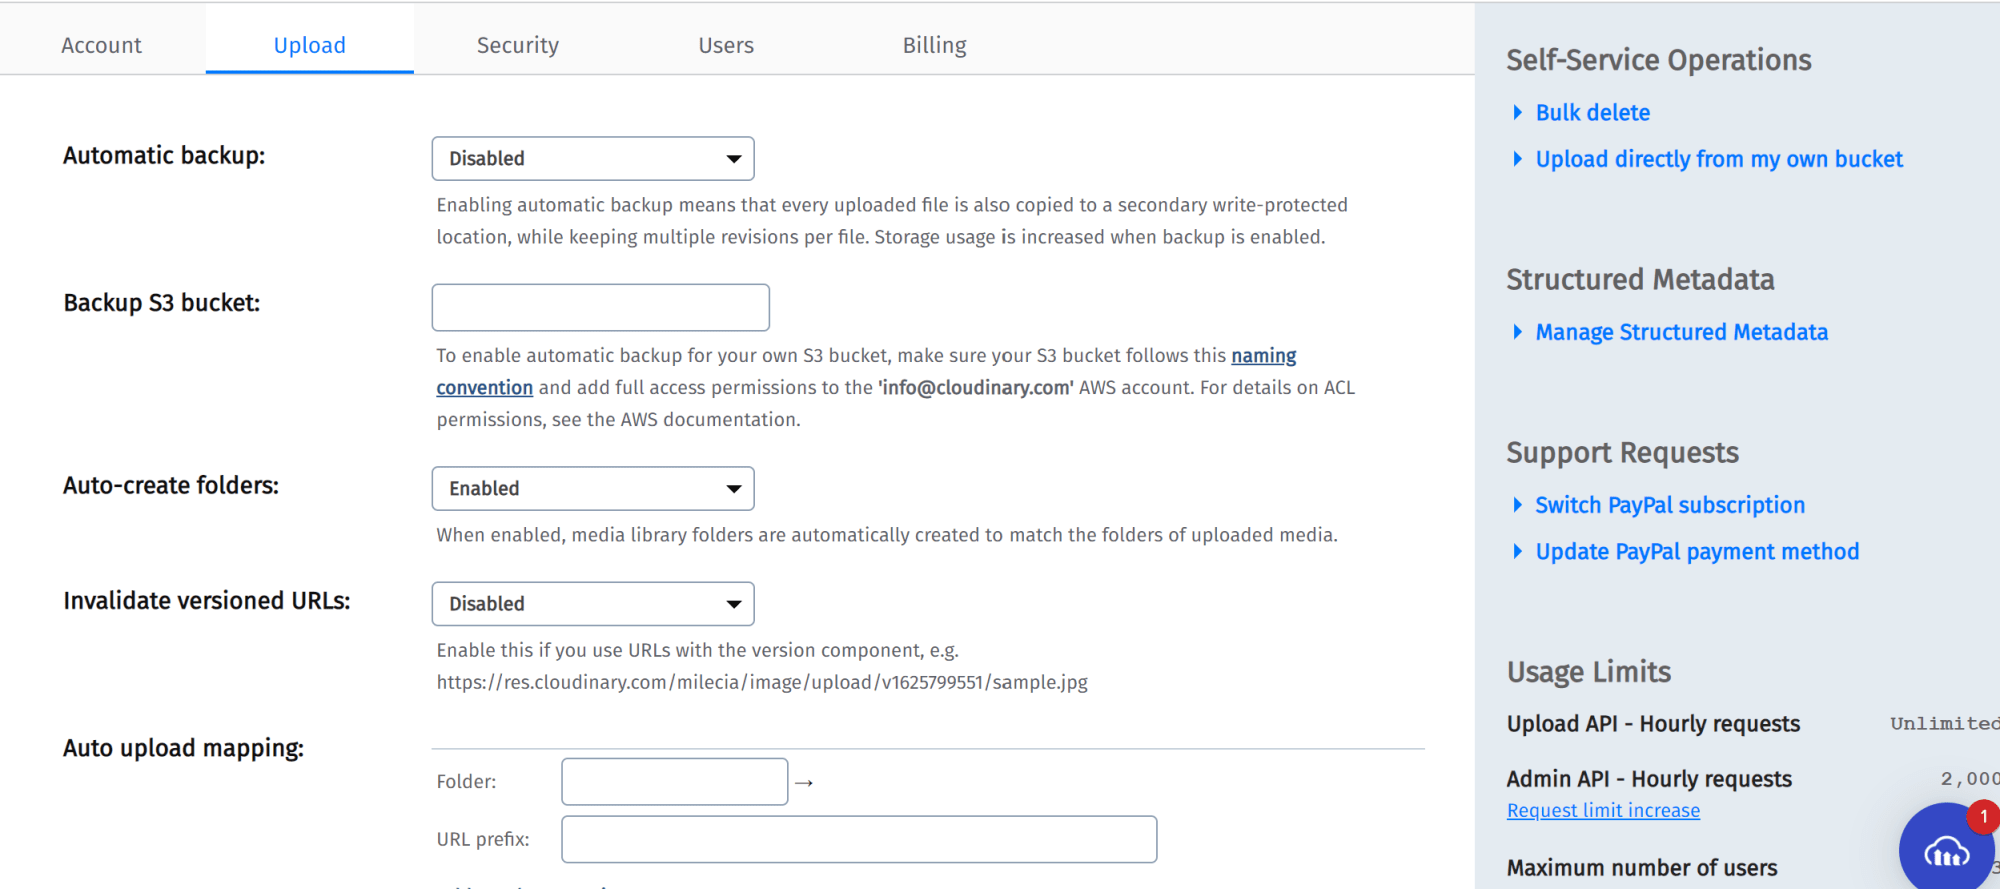
If you scroll down the page a bit, you’ll see the “Upload presets” section. Click on “Add upload preset” to create a new unsigned preset. You be taken to a page that looks like this and the only thing you need to do is change “Signed” to “Unsigned” and save that change.

The value you see for “Upload preset name” is what you will need to set for your UPLOAD_PRESET in the .env. With these two values, you’re .env should look similar to this.
CLOUD_NAME=test0
UPLOAD_PRESET=rftg435ebtre4
Now that we have those values in place, we need to define the callback for a successful video upload. This is where we’ll get the URL to store in the database and where we’ll make that GraphQL call now. You can delete the form now!
The success callback will look like this. It’ll go right above the return statement.
const successCallBack = (results) => {
  const videoInfo = results.info
  const input = {
    name: videoInfo.original_filename,
    duration: videoInfo.duration,
    url: videoInfo.url,
  }
  createVideo({ variables: { input } })
}
Code language: JavaScript (javascript)
When you run the app with yarn rw dev and go to http://localhost:8910/videos/new in your browser, you should see a new button above the form that says “Open”. This opens the Cloudinary upload widget.


Upload a few videos and you’ll see you get redirected to the main videos page that has a table with references to all your videos.

All that’s left now is to show the videos on this page in a library format!
Now you’ll need to go to web > src > components > Videos and open Video.js. This is the file that has the table we see with our video info listed. We’re going to keep the table and add the videos above it.
Since this component already has all of the video data fetched, we’re going to add another .map over the videos and create new elements. Add this code right above the table element.
<div
  style={{
    display: 'flex',
    flexWrap: 'wrap',
    justifyContent: 'space-evenly',
    marginBottom: '24px',
  }}
>
  {videos.map((video) => (
    <video width="320" height="240" controls>
      <source src={video.url} type="video/mp4" />
      Your browser does not support the video tag.
    </video>
  ))}
</div>
Code language: HTML, XML (xml)
If you reload your page, you should see something similar to this, but with your videos.

We’re done! Now you have a fully functional media library. You can customize how content is displayed and how users interact with it if you add a little more imagination to what we started. You could add this functionality to the Image components we didn’t cover. (It’s why I put them in this guide.)
You can check out the full code in this GitHub repo in the media-library directory. Or you can check out the front-end in this Code Sandbox.
Note: You won’t be able to see everything in the Code Sandbox because it doesn’t support monorepos like Redwood.
Storing media references to your own database can give you the flexibility to monitor changes over time. They can also act as a buffer against people trying to access your Cloudinary account. Some performance aspects might also make media references in your database useful.
Regardless of what your reasons are, now you know how to handle this use case quickly with the help of Redwood.