
Sometimes we want to focus on specific parts of an image to figure out what’s going on. This might involve looking at different quadrants of an image to see what the special features are. That can be done with machine learning or user input.
In this post, we’re going to look at different locations on multiple images to take a guess at where certain information or image details should be displayed. We’ll save snapshots of the heatmap and upload them to Cloudinary and save a reference to them in a Postgres database with a Redwood app.
A couple of things you’ll need to have in place are:
This covers all of the things we need outside of our Redwood app. Now we can open a terminal and create a new app.
In the terminal, run this command:
$ yarn create redwood-app --typescript image-heatmap
Note: If you don’t want to work with TypeScript, feel free to leave the --typescript flag out of the command.
This will generate a lot of code for you. The main two folders we’ll be working in are web and api. The web folder is where we’ll write all of the React code for the front-end. The api directory is where we’ll define our database schema and write a back-end using GraphQL.
Let’s start working in the back-end.
Redwood uses Prisma as the ORM to handle database operations. In the api > db folder, you’ll see a schema.prisma file. This is where we’ll define the database connection and the models that make up our tables and relations.
The first thing we can do is change the provider value to postgresql from sqlite.
Then you’ll notice that the url value is coming from the DATABASE_URL while is an environment variable. So you’ll need to open the .env file and uncomment this line and update it with your local connection string. That may look similar to this:
DATABASE_URL=postgres://postgres:admin@localhost:5432/heatmap
Code language: JavaScript (javascript)
Now you can delete the example model that’s in the schema.prisma and replace it with our real models below:
model Image {
  id      Int     @id @default(autoincrement())
  name    String
  heatmap Heatmap[]
}

model Heatmap {
  id            String @id @default(uuid())
  originalImage Image @relation(fields: [imageId], references: [id])
  imageId       Int
  heatmapImage  String
}
Code language: JavaScript (javascript)
This means that an image can have multiple heatmaps associated with it, but each heatmap can only be associated with one image. It’ll help us keep track of which images we’re working with when we look at reports using this data.
Now that we have the models ready, we can run a migration on our database with the following command:
$ yarn redwood prisma migrate dev
This creates a new database and a couple of tables in our local Postgres instance. Now there’s a really cool thing we can do to add images we want to work with.
Since we have our models in place, the Redwood CLI has a command that will generate all of the CRUD for us on both the front-end and back-end. In your terminal, run:
$ yarn redwood generate scaffold image
This will create a lot of new files in different locations for us, but we’ll have a fully functional front-end and back-end! This is a good time to start the app and take a look at what we have so far.
In your terminal, run this command:
$ yarn redwood dev
This will open your browser to a page like this.

If you go to the /images/new page, you’ll see where you can add the name of the image to our database.
Since we have everything set up for our images, let’s get things ready to handle the heatmaps.
The front-end for the heatmap input will be pretty different from how we’re handling the image data, so we’ll build the back-end separately. We can still take advantage of the Redwood CLI to generate the back-end CRUD. Run the following command in your terminal:
$ yarn redwood generate sdl --crud heatmap
Now if you take a look in api > src > graphql, you’ll find all of the types for the heatmap queries and mutations. Then if you go over to api > src > services, you’ll see the folder that has several files for the heatmap resolvers. There are a couple of test-related files and then the main file with the resolvers.
If you take a look inside heatmap.ts, you’ll see all of the resolvers to handle getting data and updating data. We don’t need to make any changes here. All of our work will be on the front-end now.
Before we write the code, let’s install a package we’ll need to take the heatmap image straight from the browser. In the terminal, go to the web directory and run the following command:
$ yarn add html-to-image
This is a really nice package that converts HTML elements into images. Now let’s make the page for our heatmaps.
In the terminal, go to the root of the project again and run this command:
$ yarn redwood generate page heatmap
This will create a new directory in web > src > pages called HeatmapPage. This also updates the Routes.tsx to include this new route in the app. Let’s take a look in web > src > pages > HeatmapPage.
There are three files: one containing a Storybook story, one with a Jest test ready to run, and the page component itself. Open HeatmapPage.tsx. This is where we’ll write all of the remaining code.
You can delete all of the existing imports in this file and replace them with the following:
import { useQuery, useMutation } from '@redwoodjs/web'
import { useRef, useState } from 'react'
import { toPng } from 'html-to-image'
Code language: JavaScript (javascript)
These are the hooks and methods we’ll work with. Now we have a couple of GraphQL queries to make.
Let’s add these queries below the imports. Add the following code:
const GET_IMAGES = gql`
  query {
    images {
      id
      name
      url
    }
  }
`

const CREATE_HEATMAP_MUTATION = gql`
  mutation CreateHeatmapMutation($input: CreateHeatmapInput!) {
    createHeatmap(input: $input) {
      id
    }
  }
`
Code language: JavaScript (javascript)
The first query will return the id, name, and URL of all the images we have saved in the database. That way we’ll be able to decide what to apply the heatmap to.
The second query is actually the mutation we need to call in order to make a new heatmap record in the database. It only returns the id because we don’t need to do anything after the record is created.
Now we can start building the inner workings of this HeatmapPage component. We’ll add some states and other things we need to make this component function like we want. Inside the HeatmapPage component, add the following code:
const [createHeatmap] = useMutation(CREATE_HEATMAP_MUTATION)
const { data, loading } = useQuery(GET_IMAGES)

const heatmapRef = useRef(null)
const [image, setImage] = useState({id: 1, url: `https://res.cloudinary.com/${cloudName}/image/upload/v1606580778/3dogs.jpg`})
const [bottom, setBottom] = useState<string>('0')
const [left, setLeft] = useState<string>('0')
Code language: JavaScript (javascript)
The first two lines give us the method for creating new heatmap images and all of the images from our database, including the loading state. Then we set a ref to get the HTML elements that will make up the heatmap.
Lastly, we set a few state variables. The cloudName value the url should be the cloud name you see in your Cloudinary console.
With the initial variables in place, let’s add a quick check to see if the data is still loading. Below the state variables, add the following code:
if (loading) {
  return <div>Loading...</div>
}
Code language: JavaScript (javascript)
If the data is still being loaded, we don’t execute any more code. We just return this little loading element. The reason we do this is to prevent the app from crashing when there isn’t data available when it expects.
Now that we have a good data check in place, let’s start writing the functions we’ll need to upload the heatmap images to Cloudinary and create new records in the local Postgres database. Below the loading check, add the following code:
const uploadHeatmap = async () => {
  if (heatmapRef.current === null) {
    return
  }

  const dataUrl = await toPng(heatmapRef.current, { cacheBust: true })

  const uploadApi = `https://api.cloudinary.com/v1_1/${cloudName}/image/upload`

  const formData = new FormData()
  formData.append('file', dataUrl)
  formData.append('upload_preset', 'lqe6bakr')

  const cloudinaryRes = await fetch(uploadApi, {
    method: 'POST',
    body: formData,
  })

  const input = {
    heatmapImage: cloudinaryRes.url,
    imageId: image.id,
  }

  createHeatmap({
    variables: { input },
  })
}
Code language: JavaScript (javascript)
There are a few things going on here. We do a quick check to make sure the heatmap ref isn’t null so that we know we can capture the image. Then we convert that ref to an image using the toPng method of that library we added earlier.
Next, we set the URL for the Cloudinary API we need to upload any heatmap image. Remember that you can get the cloudName value from your Cloudinary console. Then we create a FormData object to hold the heatmap image and our Cloudinary upload preset.
Then we make the call to the API, upload the image, and get the response back. That’s where we get the URL to the heatmap image that gets passed into the createHeatmap variables.
We’ll be manually placing a heatmap over the images we select through button clicks. That’s why we have the bottom and left states. These control the location of the heatmap on a given image. So we need a little switch statement to update those states correctly.
const setPosition = (position) => {
  switch(position) {
    case 'top-left':
      setBottom('0')
      setLeft('0')
      break
    case 'top-right':
      setBottom('0')
      setLeft('80%')
      break
    case 'bottom-left':
      setBottom('-150px')
      setLeft('0')
      break
    case 'bottom-right':
      setBottom('-150px')
      setLeft('80%')
      break
  }
}
Code language: JavaScript (javascript)
These values are going to be used in CSS, that’s why they might look a bit all over the place. All that’s left now is writing the HTML elements for this component.
There are going to be multiple buttons and a dropdown to help users target, along with an element to display the picture and update where the heatmap is shown.
Add the following code right below that helper function we made:
return (
<>
<h1>HeatmapPage</h1>
<select onChange={(e) => {
const {id, url} = JSON.parse(e.target.value)
setImage({id: id, url: url})}
}
>
{data.images.map(image => (
<option
key={image.id}
value={`{"id": ${image.id}, "url": "${image.url}"}`}
>
{image.name}
</option>
))
}
</select>
<button onClick={uploadHeatmap}>Upload Heatmap to Cloudinary</button>
<div style={{ display: 'flex', flexDirection: 'row'}}>
<button onClick={() => setPosition('top-left')}>Top-Left</button>
<button onClick={() => setPosition('top-right')}>Top-Right</button>
<button onClick={() => setPosition('bottom-left')}>Bottom-Left</button>
<button onClick={() => setPosition('bottom-right')}>Bottom-Right</button>
</div>
<div
ref={heatmapRef}
style={{
backgroundImage: `url(${image.url})`,
backgroundRepeat: 'no-repeat',
backgroundSize: 'cover',
height: 300,
position: 'absolute',
width: '100%'
}}
>
<div
style={{
background: 'radial-gradient(rgba(0, 255, 25, 0.5), rgba(255, 0, 25, 0.5))',
height: 150,
position: 'relative',
bottom: bottom,
left: left,
width: 250,
zIndex: 10
}}
></div>
</div>
</>
)
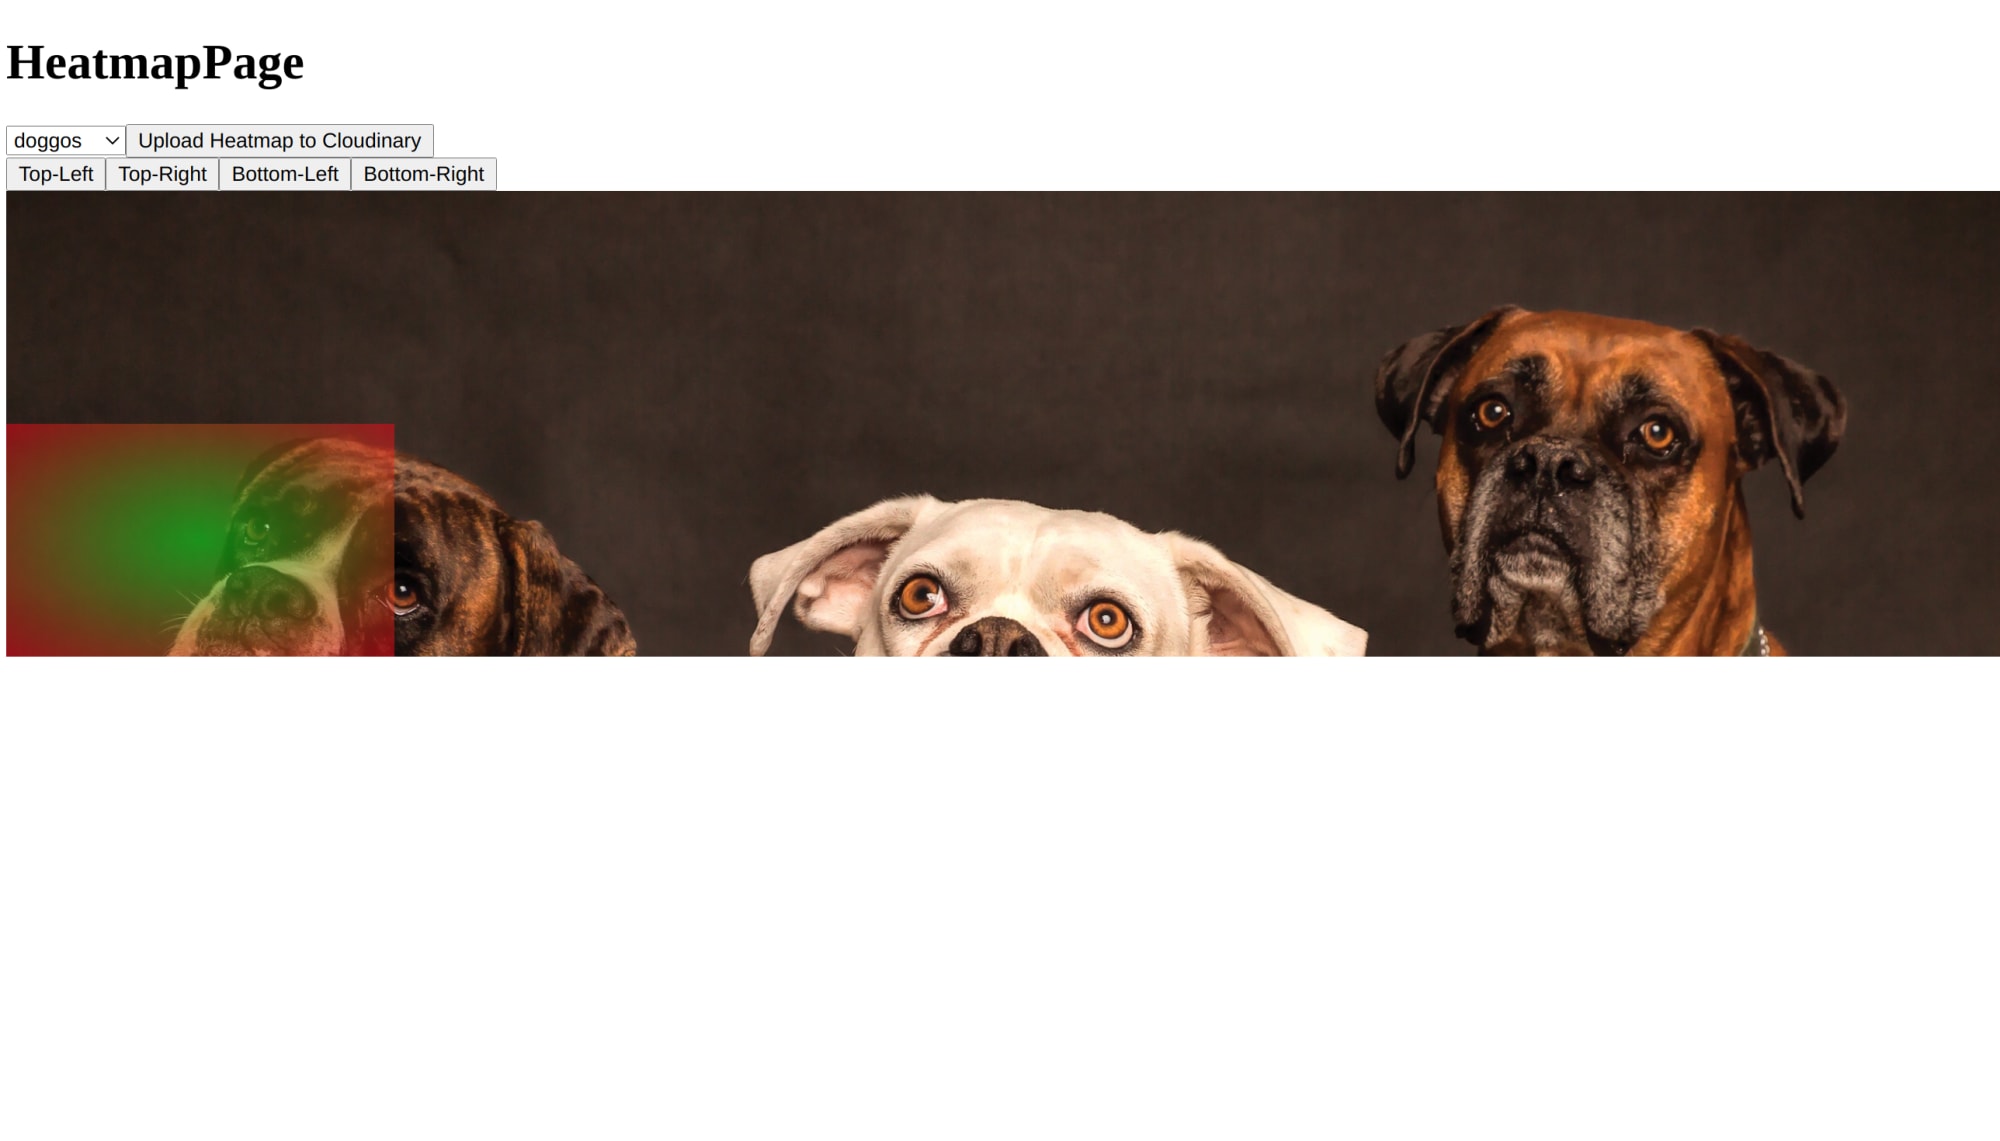
Code language: JavaScript (javascript)Let’s walk through what’s happening in this component. The first thing to note is the <select> element. This has an onChange function that gets the image id and URL from the selected element and updates the corresponding state.
Inside the <select> element, we’re using the image data fetched from GraphQL to create the options we can choose from in the dropdown. Right after that, we have a button that triggers the upload to Cloudinary and creates the database record for the heatmap.
Then we have a set of buttons that update the location of the heatmap by updating that state. Finally, we have the image with the heatmap overlayed.
You’ll see where the heatmapRef is being used so that we can capture the image. These two <div> elements just have some CSS properties that update based on the selected image option and heatmap location a user picks.
Your final code should look like this:
import { useQuery, useMutation } from '@redwoodjs/web'
import { useRef, useState } from 'react'
import { toPng } from 'html-to-image'

const GET_IMAGES = gql`
  query {
    images {
      id
      name
      url
    }
  }
`

const CREATE_HEATMAP_MUTATION = gql`
  mutation CreateHeatmapMutation($input: CreateHeatmapInput!) {
    createHeatmap(input: $input) {
      id
    }
  }
`

const HeatmapPage = () => {
  const [createHeatmap] = useMutation(CREATE_HEATMAP_MUTATION)
  const { data, loading } = useQuery(GET_IMAGES)

  const heatmapRef = useRef(null)
  const [image, setImage] = useState({id: 1, url: 'https://res.cloudinary.com/milecia/image/upload/v1606580778/3dogs.jpg'})
  const [bottom, setBottom] = useState<string>('0')
  const [left, setLeft] = useState<string>('0')

  if (loading) {
    return <div>Loading...</div>
  }

  const uploadHeatmap = async () => {
    if (heatmapRef.current === null) {
      return
    }

    const dataUrl = await toPng(heatmapRef.current, { cacheBust: true })

    const uploadApi = `https://api.cloudinary.com/v1_1/milecia/image/upload`

    const formData = new FormData()
    formData.append('file', dataUrl)
    formData.append('upload_preset', 'cwt1qiwn')

    const cloudinaryRes = await fetch(uploadApi, {
      method: 'POST',
      body: formData,
    })

    const input = {
      heatmapImage: cloudinaryRes.url,
      imageId: image.id,
    }

    createHeatmap({
      variables: { input },
    })
  }

  const setPosition = (position) => {
    switch(position) {
      case 'top-left':
        setBottom('0')
        setLeft('0')
        break
      case 'top-right':
        setBottom('0')
        setLeft('80%')
        break
      case 'bottom-left':
        setBottom('-150px')
        setLeft('0')
        break
      case 'bottom-right':
        setBottom('-150px')
        setLeft('80%')
        break
    }
  }

  return (
    <>
      <h1>HeatmapPage</h1>
      <select onChange={(e) => {
        const {id, url} = JSON.parse(e.target.value)
        setImage({id: id, url: url})}
        }
      >
        {data.images.map(image => (
          <option
            key={image.id}
            value={`{"id": ${image.id}, "url": "${image.url}"}`}
          >
            {image.name}
          </option>
          ))
        }
      </select>
      <button onClick={uploadHeatmap}>Upload Heatmap to Cloudinary</button>
      <div style={{ display: 'flex', flexDirection: 'row'}}>
        <button onClick={() => setPosition('top-left')}>Top-Left</button>
        <button onClick={() => setPosition('top-right')}>Top-Right</button>
        <button onClick={() => setPosition('bottom-left')}>Bottom-Left</button>
        <button onClick={() => setPosition('bottom-right')}>Bottom-Right</button>
      </div>
      <div
        ref={heatmapRef}
        style={{
          backgroundImage: `url(${image.url})`,
          backgroundRepeat: 'no-repeat',
          backgroundSize: 'cover',
          height: 300,
          position: 'absolute',
          width: '100%'
        }}
      >
        <div
          style={{
            background: 'radial-gradient(rgba(0, 255, 25, 0.5), rgba(255, 0, 25, 0.5))',
            height: 150,
            position: 'relative',
            bottom: bottom,
            left: left,
            width: 250,
            zIndex: 10
          }}
        ></div>
      </div>
    </>
  )
}

export default HeatmapPage
Code language: JavaScript (javascript)
That’s all of the code! Now open your terminal and run:
$ yarn redwood dev
You should see something similar to this.
There’s a chance you might want to add new images to select from. This is where you can go to the images/new page and add new URLs to other images.

If you want to check out the complete project, you can find all of the code in the image-heatmap directory of this repo.
Or you can check out the front-end in this Code Sandbox.
<CodeSandBox title=“zen-mcclintock-hgc7y” id=“zen-mcclintock-hgc7y” />
There are several ways you could take advantage of a dynamically moving heatmap. Maybe you’ll end up building some machine learning model to create heatmaps for you so you can take a look at where people interact with the page the most. Or maybe you’ll make something that lets users see where they have the most activity in apps.s