
Conference organizers often need to issue conference attendance tags to users who sign up to attend their conferences. This is often a daunting task requiring them to manually create and customize these tags for the hundreds and possibly thousands of attendees.
What if we can automate the process and generate a visually appealing conference tag upon registration for every attendee using Cloudinary and Next.js? That is what we’ll discuss in this post.
First, a brief about both technologies:
Cloudinary is a modern asset management tool that helps you create, manage and deliver high-quality digital experiences to users. If you’d like to follow along with this post, you’ll need to create a free Cloudinary account.
Next.js is a React-based frontend framework that supports server-side rendering and static site generation. We’ll be building the tag generation project with it.
If you’re eager to get a quick look at the finished product, it is available here on Codesanbox
and also hosted on Github.
Before we proceed, let’s make sure you’ve correctly set up and ready to build along. You will need the following:
- Some experience with JavaScript and Next.js.
- Node.js installed for local development.
- Some experience with Cloudinary.
- Some experience styling with Bootstrap
Run the following command in the terminal to create a new Next.js application named conference-tags:
npx create-next-app conference-tags
This will create a conference-tags application for you. Next, let’s change directory into the conference-tags project we just created:
cd conference-tags # to navigate into the project directory
Next, we’ll install the following npm packages:
- @cloudinary/react – so we can easily use Cloudinary in a React environment, and
- @cloudinary/url-gen to add different Cloudinary transformations and also generate a URL.
Run the command below to install the packages above:
npm install @cloudinary/react @cloudinary/url-gen
Since we want to have a base image hosted on Cloudinary that we can fetch and add transformations to, we’ll first need to upload it to Cloudinary. You can access the base image I uploaded here and reuse it for your own demo if you’re building along.
For every user that registers for our conference, we want to:
- Overlay their details on the base image we currently have on Cloudinary
- Upload the new image (now containing the user’s data) to Cloudinary
- Finally display the image with a link for the user to download their tags.
To do that, let’s first set up a Cloudinary upload preset. Log into your Cloudinary account and click on Settings > Upload.
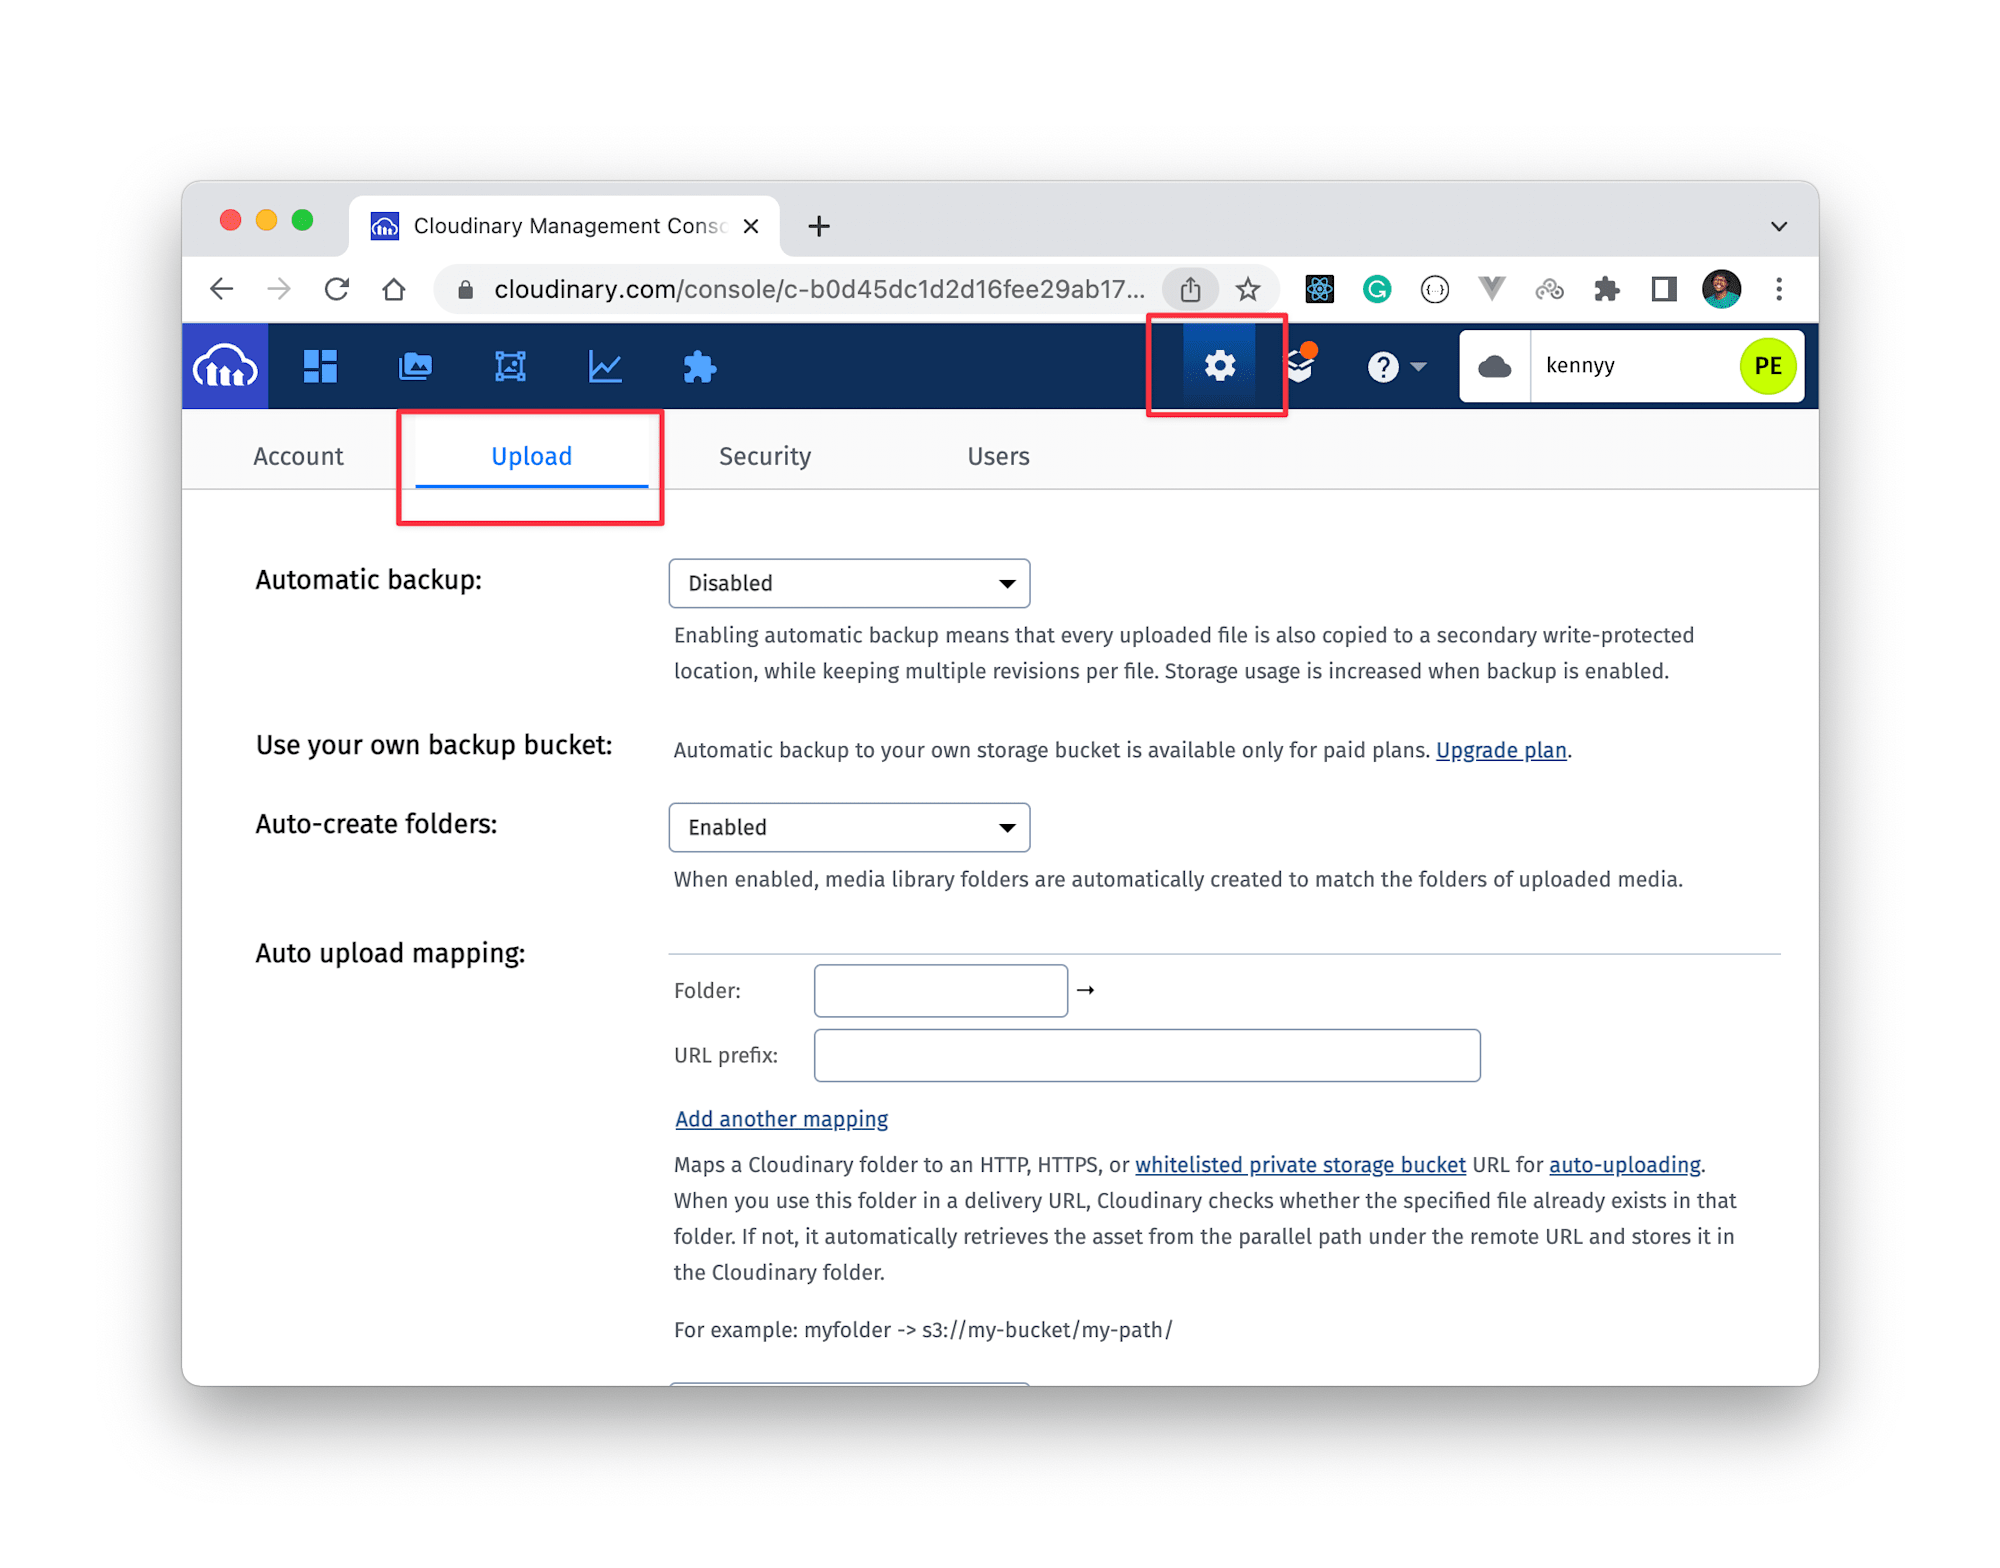
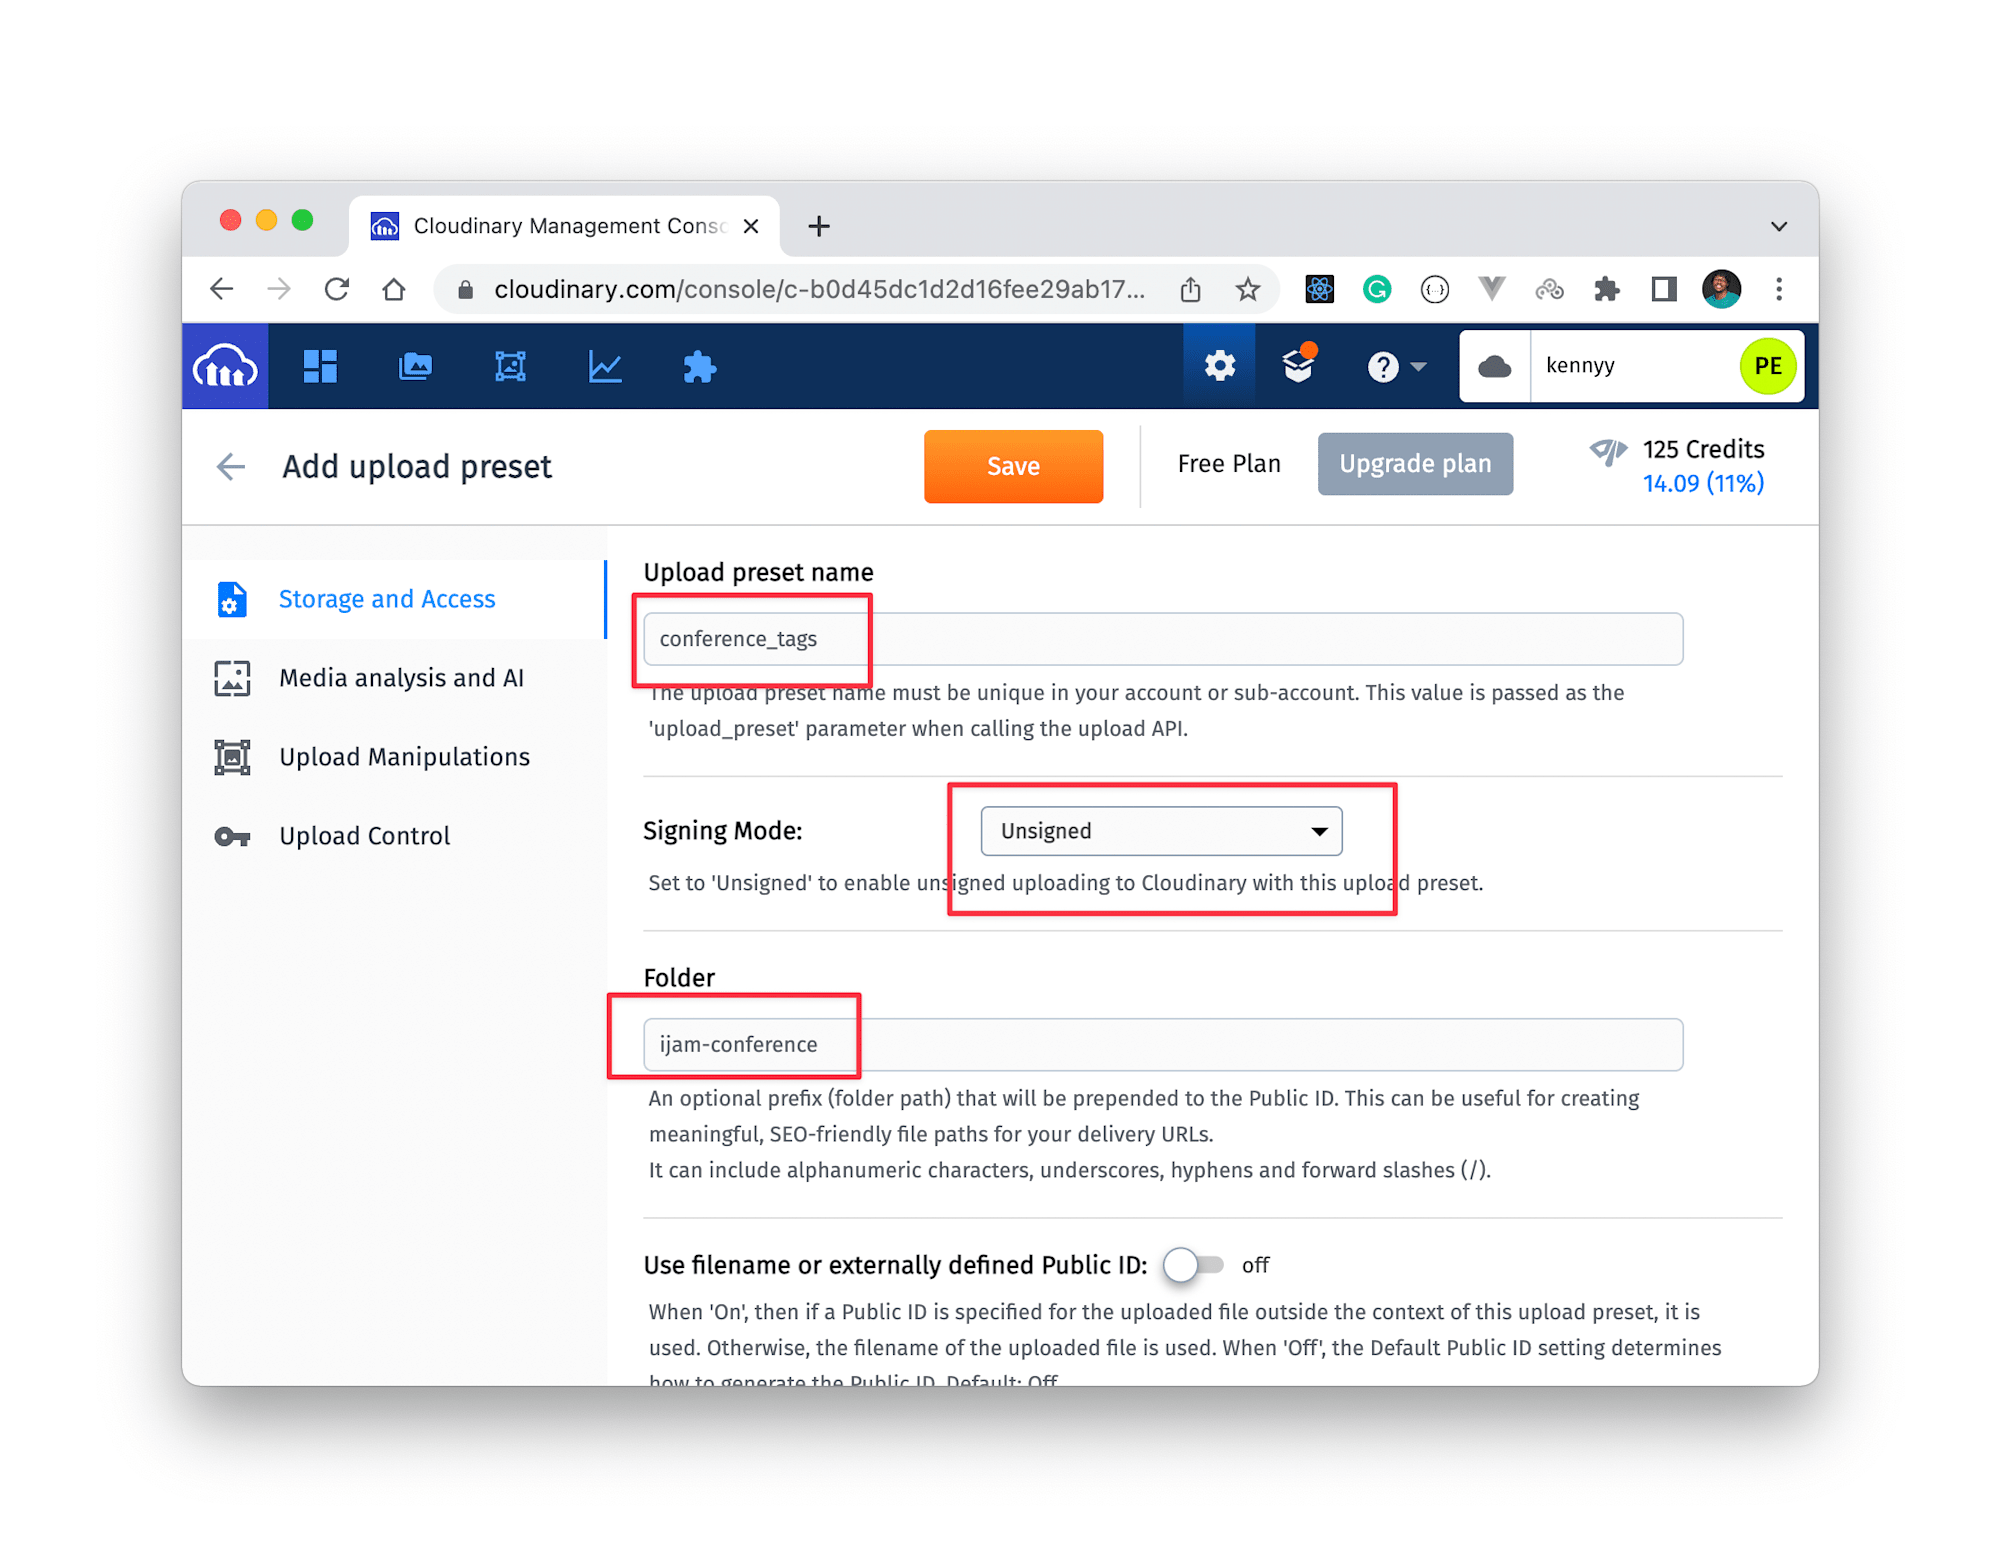
Now, scroll down to upload presets and click on Add upload presets. Then:
- Provide an upload preset name.
- Set signing mode to unsigned, and
- Set the desired folder to hold the image uploads.
Now that we have the initial Cloudinary settings out of the way, we can start building our tag generator application. First, run the development server with npm run dev to visualize the changes in the browser as we build the project.
Next, open the project folder in your preferred code editor and create a components folder in the root of the project. Inside it, create a new Tag.js file and update it with this snippet:
// components/Tag.js
import { Cloudinary, Transformation } from "@cloudinary/url-gen";
import { AdvancedImage } from "@cloudinary/react";
import { source } from "@cloudinary/url-gen/actions/overlay";
import { image, text } from "@cloudinary/url-gen/qualifiers/source";
import { scale } from "@cloudinary/url-gen/actions/resize";
import { Position } from "@cloudinary/url-gen/qualifiers";
import { compass } from "@cloudinary/url-gen/qualifiers/gravity";
import { TextStyle } from "@cloudinary/url-gen/qualifiers/textStyle";
import { byRadius } from "@cloudinary/url-gen/actions/roundCorners";
import { brightness } from "@cloudinary/url-gen/actions/adjust";

export default function Tag({ formData }) {
  // component code here
}
The Tag component above will represent every tag we generate for every user when they sign up to attend this conference. What we’ve done so far is import all the Cloudinary packages we’ll need to achieve the desired transformation.
Next, let’s create a new Cloudinary instance with our cloud_name to establish a connection between this project and our Cloudinary account:
// imports here
export default function Tag({ formData }) {
  const cld = new Cloudinary({
    cloud: {
      cloudName: process.env.NEXT_PUBLIC_CLOUD_NAME,
    },
  });
}
With that, we can now define a baseImage variable which can directly access our Cloudinary account to get the already existing base image:
// imports here
export default function Tag({ formData }) {
  // init cloudinary
  let baseImage = cld.image(`base-tag`);
}
With that, we can now apply transformations on the base image to overlay the user’s details on it. Before we proceed, here’s something to note:
The Tag component will be rendered in the index.js file where we’ll accept the user data via a registration form and then pass that data to the Tag component as props. The props will give us access to the name, role, and avatar of the users which we can then overlay the base image like so:
// src/components/Tag
export default function Tag({ formData }) {
  const { name, role, avatar } = formData;
  baseImage.overlay(
    source(
      image(`${avatar}`).transformation(
        new Transformation()
          .resize(scale().width(400).height(400))
          .roundCorners(byRadius(230))
          .adjust(brightness(5))
      )
    ).position(new Position().gravity(compass("center")).offsetY(-50))
  );
  baseImage.overlay(
    source(
      text(`${name}`, new TextStyle("Nunito", 65)).textColor("white")
    ).position(new Position().gravity(compass("center")).offsetY(210))
  );
  baseImage.overlay(
    source(
      text(`${role}`, new TextStyle("Nunito", 70)).textColor("purple")
    ).position(new Position().gravity(compass("center")).offsetY(350))
  );
  return();
}
Finally, we render the transformed base image for the user to see via the Cloudinary <AdvancedImage /> component:
// src/components/Tag
export default function Tag({ formData }) {
// other component code
return (
    <div>
      <AdvancedImage cldImg={baseImage} />
    </div>
  );
}
With that, we are done with the Tag component. You can find the complete Tag.js component code embeded in this Github gist.
Moving on, let’s update the index.js file to create the registration form and collect the user data when the form is submitted.
// src/pages/index
import Head from "next/head";
import Image from "next/image";
import styles from "../styles/Home.module.css";
import { useState } from "react";
import { Form, Button } from "react-bootstrap";

const initialState = { name: "", avatar: "", role: "" };
export default function Home() {
  const [formData, setFormData] = useState(initialState);
  const [disableInput, setDisableInput] = useState(false);
  const [imageLoaded, setImageLoaded] = useState(true);
    // more component code here
}
What we’ve done in the Home page above is import Next.js and Bootstrap components that we’ll be using shortly to build out the form. We also initialized some relevant variables using the useState hook for the same purpose. In the form, we want to have 3 fields for name, role, and avatar like so:
//src/pages/index
//import statements here

const initialState = { name: "", avatar: "", role: "" };
export default function Home() {
return (
    <div>
      <main>
        <h1>
          Register to attend iJam Conf'22!
        </h1>
        <div>
          <div>
            <Form >
              <Form.Group>
                <Form.Label>Name</Form.Label>
                <Form.Control
                  type="text"
                  name="name"
                  required
                  disabled={disableInput}
                  onChange={handleChange}
                  value={formData.name ?? ""}
                />
              </Form.Group>
              <Form.Group controlId="formFile">
                <Form.Label>Avatar</Form.Label>
                <Form.Control
                  type="file"
                  accept="image/*"
                  onChange={(e) => handleImage(e)}
                  disabled={disableInput}
                />
              </Form.Group>
              <h4>Choose Role</h4>
              <div>
                <Form.Check
                  type="radio"
                  label={`Speaker`}
                  value={`SPEAKER` ?? ""}
                  name="role"
                  onChange={handleChange}
                />
                <Form.Check
                  type="radio"
                  label={`Attendee`}
                  value={`ATTENDEE` ?? ""}
                  name="role"
                  onChange={handleChange}
                />
              </div>
              <div>
                <Button
                  onClick={(e) => {
                    e.preventDefault();
                    setShowTag(true);
                    setDisableInput(true);
                    setImageLoaded(true);
                  }}
                  type="submit"
                  variant="primary"
                  disabled={imageLoaded}
                >
                  Generate Tag
                </Button>
              </div>
            </Form>
          </div>
        </div>
      </main>
    </div>
  );
}
Here, we have a simple form with three fields to collect the users name, avatar and their roles respectively. At the moment, the code will error out since we are calling functions in it that we haven’t defined yet. The handleChange() and handleImage() functions — let’s define them below:
//src/pages/index
//import statements here

const initialState = { name: "", avatar: "", role: "" };
export default function Home() {
  const [formData, setFormData] = useState(initialState);
  const [disableInput, setDisableInput] = useState(false);
  const [imageLoaded, setImageLoaded] = useState(true);

  const handleChange = async (e) => {
    e.preventDefault();
    setFormData({ ...formData, [e.target.name]: e.target.value });
  };

  const handleImage = async (e) => {
    const reader = new FileReader();
    reader.onloadend = async () => {
      setImageLoaded(true);
    };
    const files = e.target.files[0];
    if (!files) return;
    const data = new FormData();
    data.append("file", files);
    data.append("upload_preset", "conference_tags");
    const res = await fetch(
      "https://api.cloudinary.com/v1_1/kennyy/image/upload",
      {
        method: "POST",
        body: data,
      }
    );
    const file = await res.json();
    setFormData({ ...formData, avatar: file.public_id });
    setImageLoaded(false);
  };
  // return() function here
}
The handleChange() function updates the value of our formData object in state with the value of the input fields as the user fills the form.
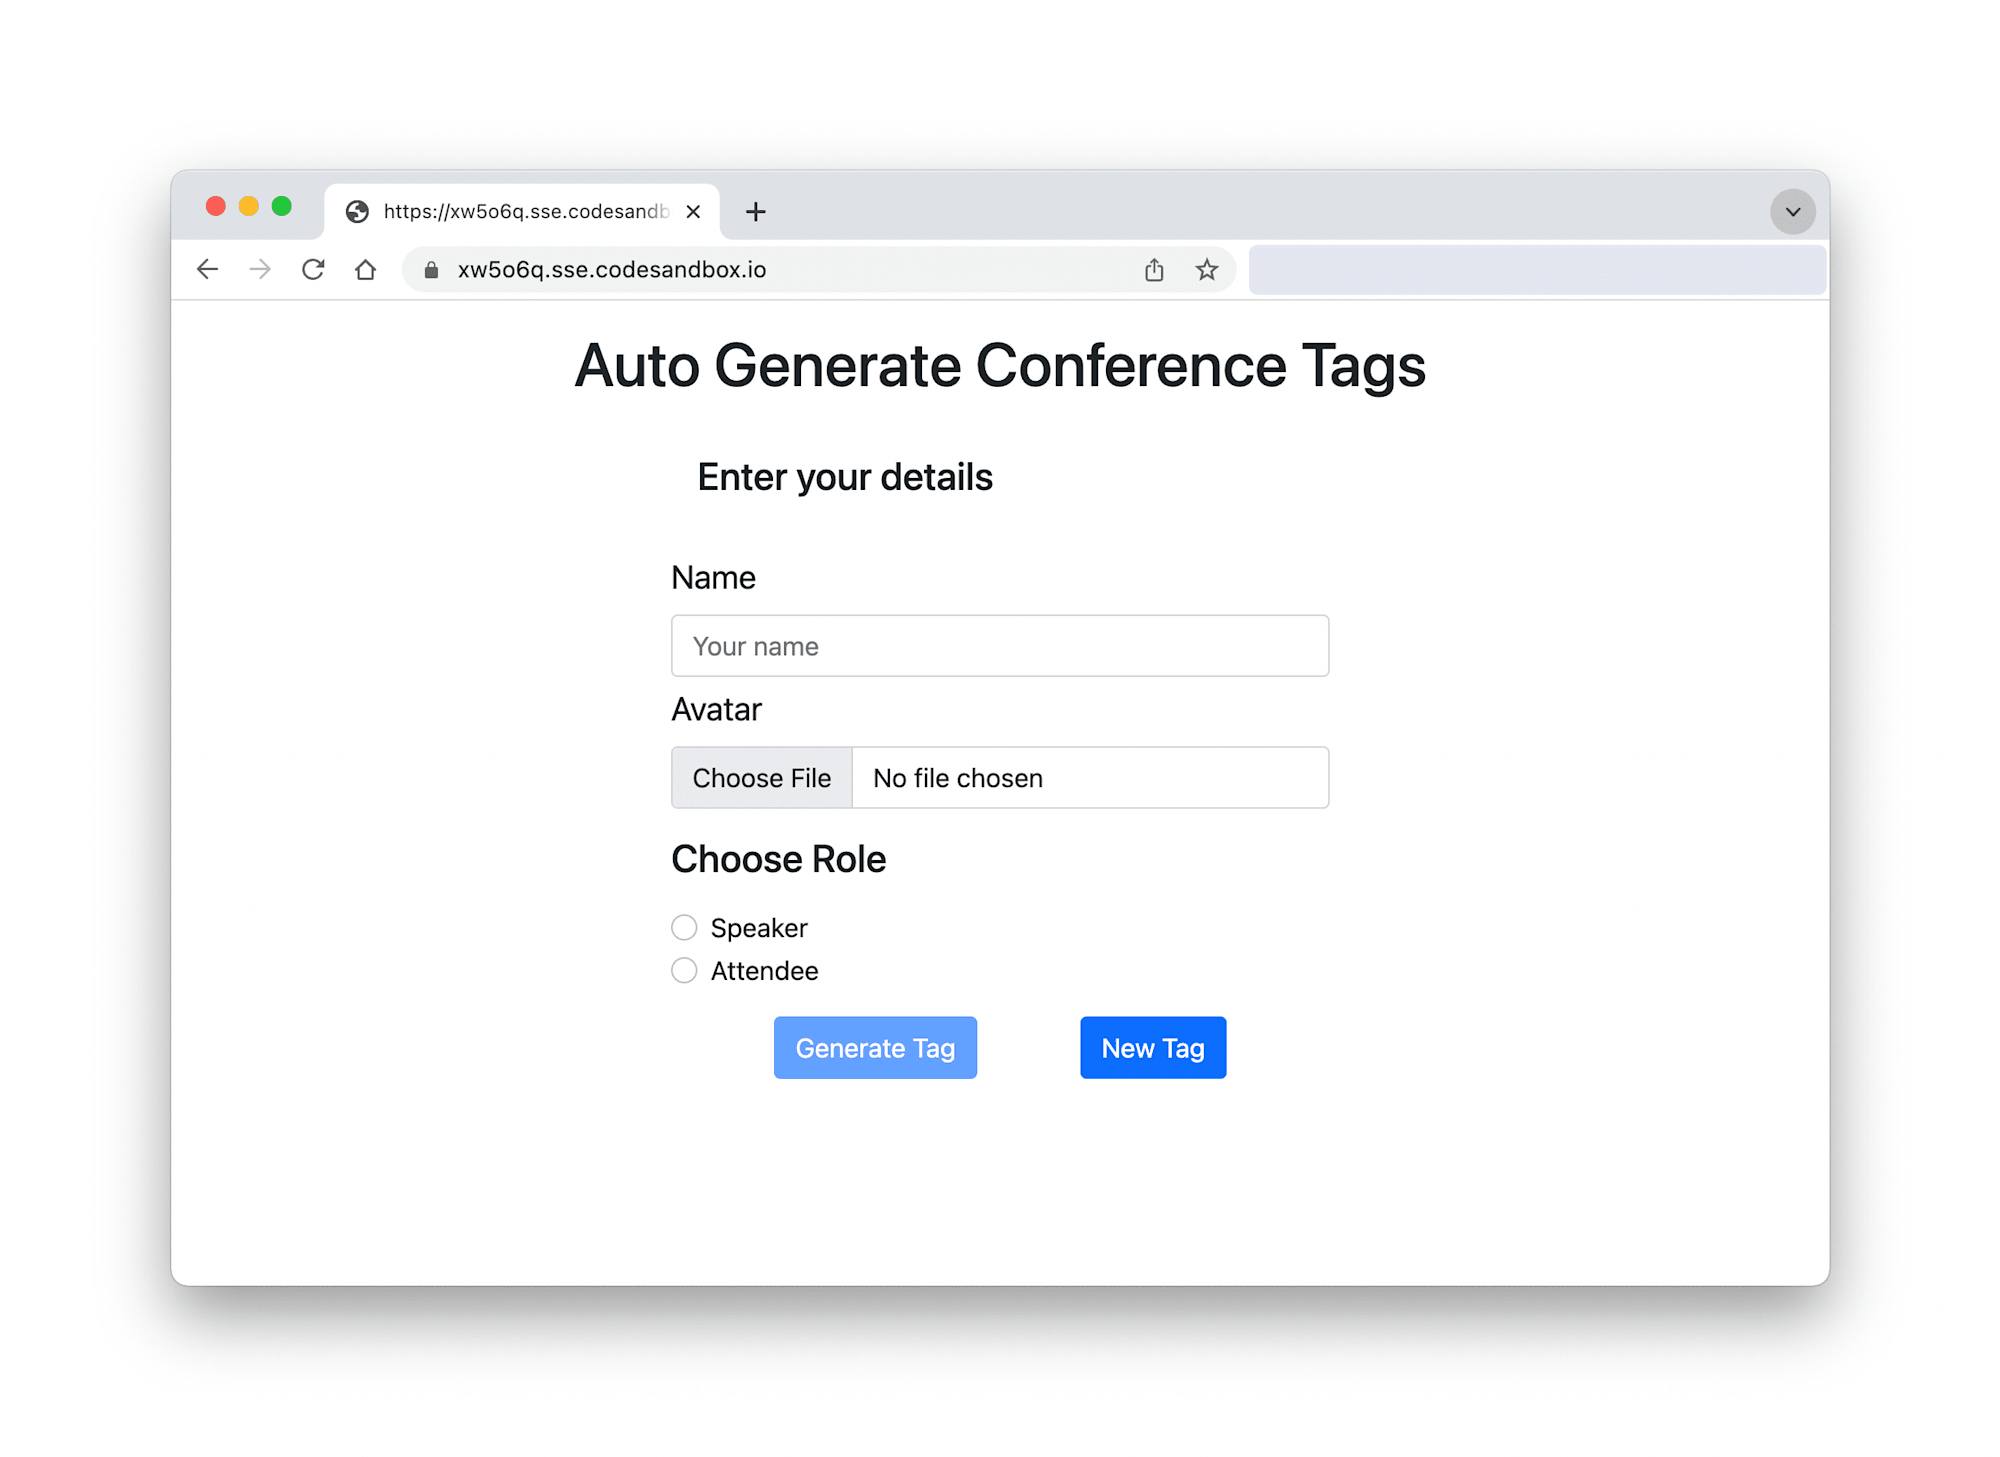
When the user clicks on the field to choose an image, we call the handleImage() function to access our filesystem, select an image, upload the selected image to Cloudinary and update our formData object with the publicID of the uploaded image. At this point, if we check back on the browser, we should see the registration form:
With this, we have now accounted for all the fields in our form. We have access to the name of the user, the role they’ve selected and their avatar. As a result, we can render our Tag component and pass the user data to it. The component will accept the details as a prop and then overlay it on our base image and finally generate the conference tag for the user:
{showTag && (
  <Tags
    formData={formData}
  />
)}
And with this, we are now successfully passing the user data to our Tag component. The complete index.js file is available in this gist for your consumption.
And now, the moment of truth. Let’s take this project for a spin!

In this post, we’ve leveraged Cloudinary’s image transformation capabilities to automatically generate conference tags on the fly for all users registering for our iJam conference. If you’d like to extend this project, you’re welcome to fork this repo and make changes as you see fit.