
When you’re building an online shopping platform, you want to make sure that everything loads quickly for your potential customers. One huge factor that slows down many e-commerce sites is loading images. When you have hundreds of product images loading on a page at the same time, it can create a frustrating user experience as people wait to see how things look.
In this article, we’re going to build a simple clothing store to demonstrate how you can make fast-loading pages. We’ll be working with Next.js for the front-end and back-end of the app and we’ll be using Cloudinary as the image host.
Let’s start by generating a Next.js app. Open your terminal and run this command. It’ll generate all of the files you need for a Typescript Next app.
$ yarn create next-app --typescript
At some point, you’ll be prompted to enter the name of the project. The one we’ll be working with is called tienda-de-ropa, but feel free to name it anything you like. After you set the name, the downloads will start and the project files will be created.
Most of our work will be in the pages folder because this is where we’ll add the pages that users will interact with on the online store.
Let’s install a few packages before we get too far ahead of ourselves.
$ yarn add typescript ts-node @types/node @prisma/client prisma styled-components
Before we get to that though, we’re going to be pulling items from a Postgres database and using Prisma to do so. If you don’t have Postgres installed locally, go ahead and download it here and get set up. You should create a new database called tienda-de-ropa so that we can connect to it immediately.
Now we need to get Prisma set up in our app. We’ll start by adding a new file to the root of the project called prisma.ts. This will handle the Prisma client we need to interact with and keep our app from having issues due to database connection limits. Inside of this file, add the following code:
import { PrismaClient } from "@prisma/client";

let prisma: PrismaClient

if (process.env.NODE_ENV === 'production') {
  prisma = new PrismaClient()
} else {
  if (!global.prisma) {
    global.prisma = new PrismaClient()
  }
  prisma = global.prisma
}
export default prisma
Code language: JavaScript (javascript)
That’s not the only new thing we’ll be adding to this project to get Prisma working. In the root directory, add a new folder called prisma. Inside the new sub-folder, add a file named schema.prisma. This will hold the database schema and the instructions that tell Prisma how to connect to Postgres. Open this file and add the following code:
generator client {
    provider = "prisma-client-js"
}

datasource db {
    provider = "postgresql"
    url      = "postgres://usernamer:password@localhost:5432/tienda-de-ropa"
}
Code language: JavaScript (javascript)
This code defines how Prisma connects to Postgres by defining the database provider type and the connection string. Make sure to update the username and password to your own values. Since we have the connection established, it’s time to create the model for our products. Below the code we just wrote, add this model definition:
model Product {
    id          String @id @default(uuid())
    name        String
    category    String
    price       Float
    image       String
    description String
}
Code language: JavaScript (javascript)
The model has a few fields that are commonly seen in online stores, but feel free to add any other fields you like! We’re going to take advantage of NextJS doing server-side rendering and not worry about building a back-end. You can extend this app and add some back-end functionality with NextJS API routes, but that’ll be out of the scope of this post.
To have some product data to work with, we’ll seed the database with a few different products.
Create a new file in the prisma directory called seed.ts. This is the standard file name you’ll see when working with Prisma seed data. In this file, we’ll add the following code and then discuss what’s happening:
import { PrismaClient, Prisma } from '@prisma/client'

const prisma = new PrismaClient()

const products: Prisma.ProductCreateInput[] = [
  {
      name: 'Blue Shirt',
      category: 'Tops',
      price: 29.99,
      image: 'https://res.cloudinary.com/milecia/image/upload/v1606580778/3dogs.jpg',
      description: 'Blue shirt with dog print'
  },
  {
      name: 'Taupe Pants',
      category: 'Bottoms',
      price: 59.99,
      image: 'https://res.cloudinary.com/milecia/image/upload/v1606580780/beach-boat.jpg',
      description: 'Ankle length pants'
  },
  {
      name: 'Black Patent Leather Oxfords',
      category: 'Shoes',
      price: 99.99,
      image: 'https://res.cloudinary.com/milecia/image/upload/v1606580772/dessert.jpg',
      description: 'Ankle high dress shoes'
  }
]

async function main() {
  console.log(`Start seeding ...`)
  for (const p of products) {
    const product = await prisma.product.create({
      data: p,
    })
    console.log(`Created product with id: ${product.id}`)
  }
  console.log(`Seeding finished.`)
}

main()
  .catch((e) => {
    console.error(e)
    process.exit(1)
  })
  .finally(async () => {
    await prisma.$disconnect()
  })
Code language: JavaScript (javascript)
We start off by importing a few objects from the Prisma client package and setting up an instance of the client. Then we create a typed array for the products we want to add to the database. If you have images in Cloudinary already, you should definitely replace these example images with your own.
Then we have a main function that will add all of these products to the Product table we defined in our schema file. Finally, we’ll call the main function to execute the seeding and then disconnect from the database if there are no errors. That’s all the code we need for seeding this data.
There’s one more tiny thing we need to do before we can run a migration to put the schema and seed data in the tienda-de-ropa database. Since this is a Typescript project, that means we need to be more explicit about how the app should handle seeding the data in the migration.
We need to add a small script to the package.json so everything runs smoothly. Open this file and add the following code below your devDependencies:
"prisma": {
    "seed": "ts-node --compiler-options {\"module\":\"CommonJS\"} prisma/seed.ts"
}
Code language: JavaScript (javascript)
This will help us avoid any errors due to Typescript interfacing with regular JavaScript packages. Now we can run the migration. Open your terminal and run the following command:
$ npx prisma migrate dev
You will be prompted for a name for this migration and then it will create the database schema in Postgres and add your seed data to it. Now that we have the data side of the app set up, we can jump over to the front-end and get a few pages up.
Like most online stores, we’re going to have a few pages. There will be a page that displays all of the products, individual product pages, and a cart that shows customers all of the items they’ve selected. Keep in mind that this is just a demo so there’s a lot of functionality, styles, and other considerations that could be added.
Let’s start by making a page that displays all of the products. Adding a new route in NextJS means adding a new file to the pages directory. So we’re going to add a file called products. Open this new file and add the following code.
import Image from 'next/image';
import Link from 'next/link'
import styled from 'styled-components'
import prisma from '../prisma'

interface Product {
    id: string
    name: string
    category: string
    price: number
    image: string
    description: string
}

function Products() {
    return <div>Products</div>
}

export default Products
Code language: JavaScript (javascript)
We’ve added all of the imports we need for this specific file and we’ve defined the type for the product data we’ll receive from the database. We’ve also added the Products component that will get rendered on the page. If you run the app now with yarn dev, you’ll just see the “Products” text on the page.
Next let’s add a few styled components so that the app has a bit of organization. Right below the product type definition, add this code:
const HoverCard = styled.div`
    margin: 12px;
    padding: 12px;
    width: 30%;

    &:hover {
        border: 1px solid #c4c4c4;
        cursor: pointer;
    }
`

const ToCart = styled.div`
    border: 1px solid #c4c4c4;
    background-color: #abacab;
    width: 150px;
`
Code language: PHP (php)
The HoverCard element will be used to display some overview info about each product and if you click on one of them, you’ll be redirected to the individual product page that has all of the details about that product. The ToCart element will wrap the link to the current user cart so that it looks more button-like instead of like a link. We do this because NextJS has a specific element to handle links.
NextJS does a great job at server-side rendering, so that means we don’t have to worry about sensitive info leaking even though we are going to fetch data directly from the database. Any code defined in the getStaticProps function is executed at build time on the server-side.
To get all of the products from the database, add the following code just above the export statement line:
export async function getStaticProps() {
    const products = await prisma.product.findMany()

    return {
        props: {
            products,
        },
    }
}
Code language: JavaScript (javascript)
This code lets us connect to the database directly through our Prisma client and we get all of the product records available. Then we return this product data as a prop to the Products component. So let’s start filling in the code for that component now that we have the data.
With our data readily available, let’s use it to display the shop’s products to potential customers. Update your Products component to match the following code:
function Products({ products }) {
return (
<div style={{ margin: '24px' }}>
<h1>Everything in the store</h1>
<div style={{ display: 'flex' }}>
{
products.map((product: Product) => (
<Link
passHref
key={product.name}
href={`/product/${encodeURIComponent(product.id)}`}
>
<HoverCard>
<Image src={product.image} alt={product.description} height={250} width={250} />
<h2>{product.name}</h2>
<p>{product.category}</p>
</HoverCard>
</Link>
))
}
</div>
<Link passHref href={`/cart`}>
<ToCart>Go to Cart</ToCart>
</Link>
</div>
)
}
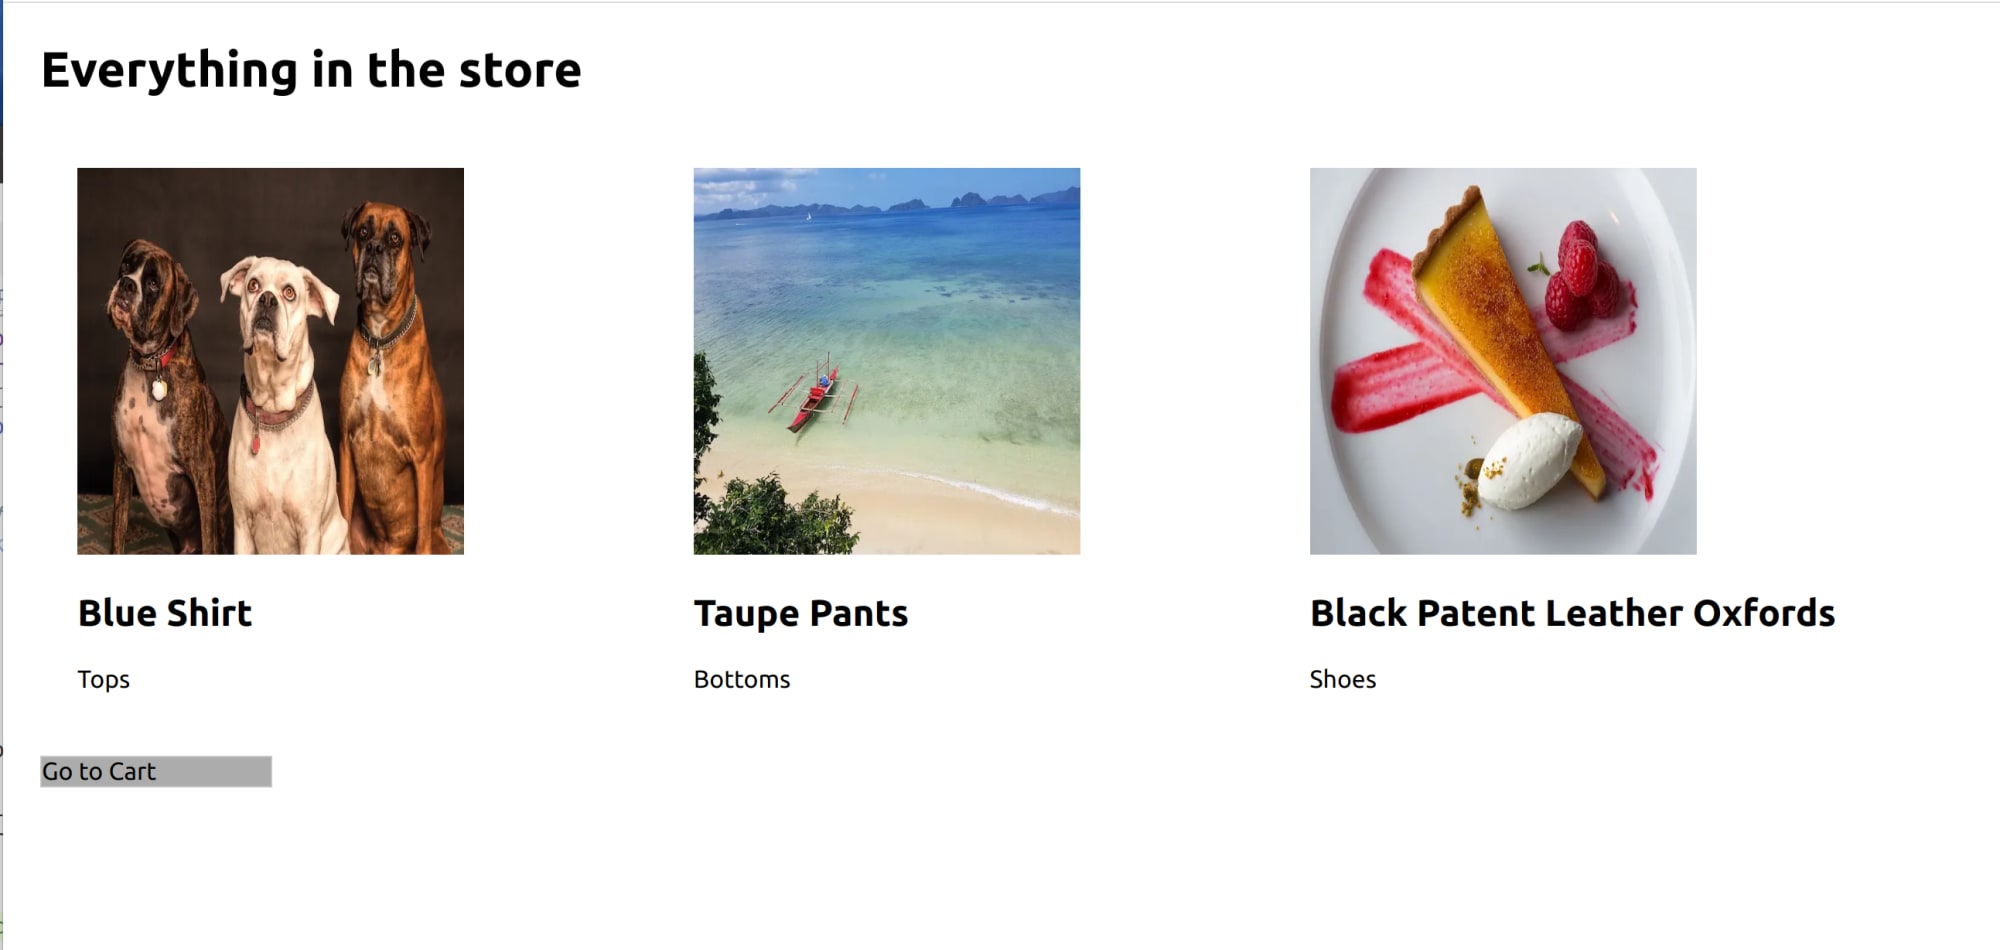
Code language: JavaScript (javascript)Thankfully, this component is relatively simple because it only has one set of data to work with and the elements are already defined for us. There’s a styled div that wraps everything and we have a small heading for the page. Then we get to the most important part of this component, where we actually display the data we pulled from the database.
In the div with the flex style, we take the products prop that was passed in from the getStaticProps function and map it to the different elements. First, we have a link that routes to the individual product pages based on the product id.
Within that Link, we display the product image, name, and category so that customers can quickly find what they need. The last element we have is a link to the cart so that customers can see what they’ve decided to purchase. Take a moment to run the app and navigate to the /products route. You should see something similar to this:
Now the customers can see all of the products, we need to work on the individual product pages.
NextJS uses the folder structure in the pages directory to determine how to handle nested routes. To make the individual product pages, we’ll use the product id as the differentiator. Let’s add a couple of new folders and a file to the pages directory.
Start by adding a folder named product. This will create a new route like /product. Inside of this folder, add another folder named [id]. This is how NextJS does dynamic routing. So this gives us routes like, /product/[id] where id is the product id getting passed from the products page.
Inside the [id] folder, create a new file called index.tsx. This is where we’ll make the component for a single product. Go ahead and open this file and add the following code:
import Image from 'next/image'
import Link from 'next/link'
import styled from 'styled-components'
import prisma from '../../../prisma'

const Back = styled.div`
    border: 1px solid #c4c4c4;
    background-color: #abacab;
    width: 150px;
`

function Product() {
    return ()
}

export default Product
Code language: JavaScript (javascript)
We’re bringing in the imports like normal and making another styled component to wrap the link back to the products page and we have the outline of the Product component we’ll display on the page.
Now we need to fetch the data for a particular product based on the id parameter that’s passed in the URL.
Since this data will need to be retrieved on each request because there will be different products being displayed, we’ll use the getServerSideProps function instead of the getStaticProps function.
All of the data fetching will still happen server-side, it will just happen each time this route is requested. So just above the export statement, add the following code:
export async function getServerSideProps(context) {
    const id = context.params.id

    const product = await prisma.product.findUnique({
        where: { id }
    })

    return {
        props: {
            product,
        },
    }
}
Code language: JavaScript (javascript)
Because this page uses dynamic routing, we are using the context parameter to get the params from the route parameters. So since our page is in the [id] folder, we’ll be able to get the product id from this context object. Then we make a call to the database using the Prisma client to get the specific product based on its id and we pass the product data to the component as a prop.
This component will render the image, name, price, and category for the specified product and there will be a button to add the item to a customer’s cart. There are a number of ways to manage cart items, but if you take a look in the developer tools on your favorite store’s website, you’ll likely see an array is stored in the local storage. We’ll take that approach here.
Let’s start by adding a function inside of the Product component that handles products being added to the cart. Update your existing Product component with the following code:
function Product({ product }) {
    function addToCart() {
        let arr = []

        const existingItems = window.localStorage.getItem('lineItems')

        if (existingItems != null) {
            arr = JSON.parse(existingItems)
        }

        const itemForCart = {
            name: product.name,
            price: product.price,
            imageUrl: product.image
        }

        arr.push(itemForCart)

        window.localStorage.setItem('lineItems', JSON.stringify(arr))
    }

    return ()
}
Code language: JavaScript (javascript)
You can see that we are using that product prop returned from the getServerSideProps call. Then we create the addToCart function that checks the local storage for any existing cart items and it will push this current product to the cart when a customer clicks the button we’ll add shortly. This is how we can preserve the cart items as customers navigate around the site.
Now we’re ready to add the customer-facing functionality. Update the existing return statement with the following code:
return (
    <>
        <div style={{ display: 'flex', justifyContent: 'space-evenly' }}>
            <Image src={product.image} alt={product.description} height={250} width={250} />
            <div style={{ width: '30%' }}>
                <h2>{product.name}</h2>
                <p>{product.category}</p>
                <p>$ {product.price}</p>
                <button onClick={addToCart}>Add to cart</button>
            </div>
        </div>
        <Link passHref href={`/products`}>
            <Back>Back to Products</Back>
        </Link>
    </>
)
Code language: JavaScript (javascript)
This will display all of the product info we discussed earlier along with a button to add the product to the cart and a link back to the products page. If you aren’t running the app, start it back up with yarn dev, click on one of the products from the page that has all of the products, and you should see something similar to this.
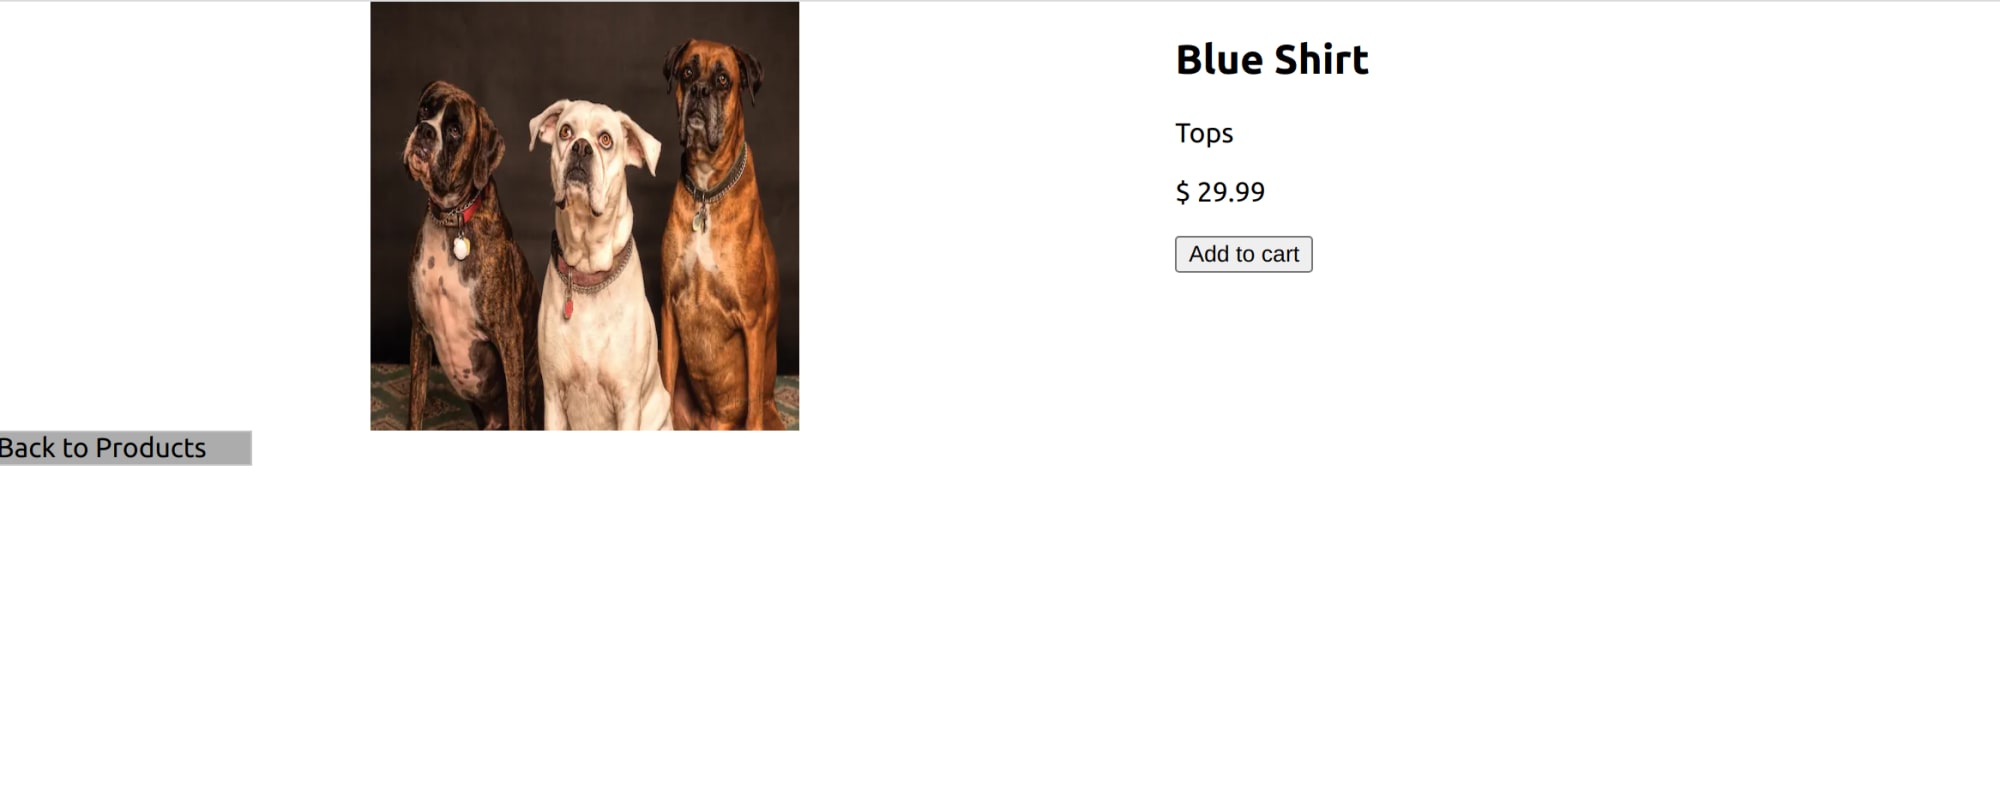
You’ll also see a URL similar to this: http://localhost:3000/product/62b6e542-33dd-4e88-98a0-c781c970e317 It has the product id we’re using in that data request.
Go ahead and add the current product to the cart because we’re about to make the page for it and having some data there will help.
This is the last page for this app so we’re almost there! Remember that we have the button to go to the cart on the products page. You could definitely add this button to the individual product pages if you like.
For now, let’s work on this cart page. Add a new file to the pages directory called cart.tsx and add the following:
import Image from 'next/image'
import Link from 'next/link'
import styled from 'styled-components'

const Back = styled.div`
    border: 1px solid #c4c4c4;
    background-color: #abacab;
    width: 150px;
`

const CartItem = styled.div`
    border: 1px solid #c4c4c4;
    display: flex;
    height: 100px;
    justify-content: space-between;
    margin: 12px;
    padding: 24px;
`

const Container = styled.div`
    margin: 24px;
    padding: 12px;
`

interface CartItem {
    name: string
    price: number
    imageUrl: string
}

function Cart() {
    return ()
}

export default Cart
Code language: JavaScript (javascript)
This brings in all the imports we need, some styled components to bring a bit of organization to the list of items in the cart, and the type definition for the data we’ll be handling. Since the cart items are stored in the browser’s local storage, we don’t need to request anything from the database on this page.
All that’s left is getting the items from local storage and using our styled components to display them to the customers. So update the component with this code to get those items and handle the render state accordingly:
function Cart() {
    let cartItems

    if (typeof window !== "undefined") {
        cartItems = window.localStorage.getItem('lineItems')
    }

    if (!cartItems) {
        return <div>No items in the cart</div>
    }

    const parsedCartItems = JSON.parse(cartItems)

    return()
}
Code language: JavaScript (javascript)
This code will check the local storage for any cart items and if there aren’t any, we’ll render a message to the customer that the cart is empty. Otherwise, we’ll parse the cart items so we can use the data. Now let’s update that empty return statement to render all of those cart items:
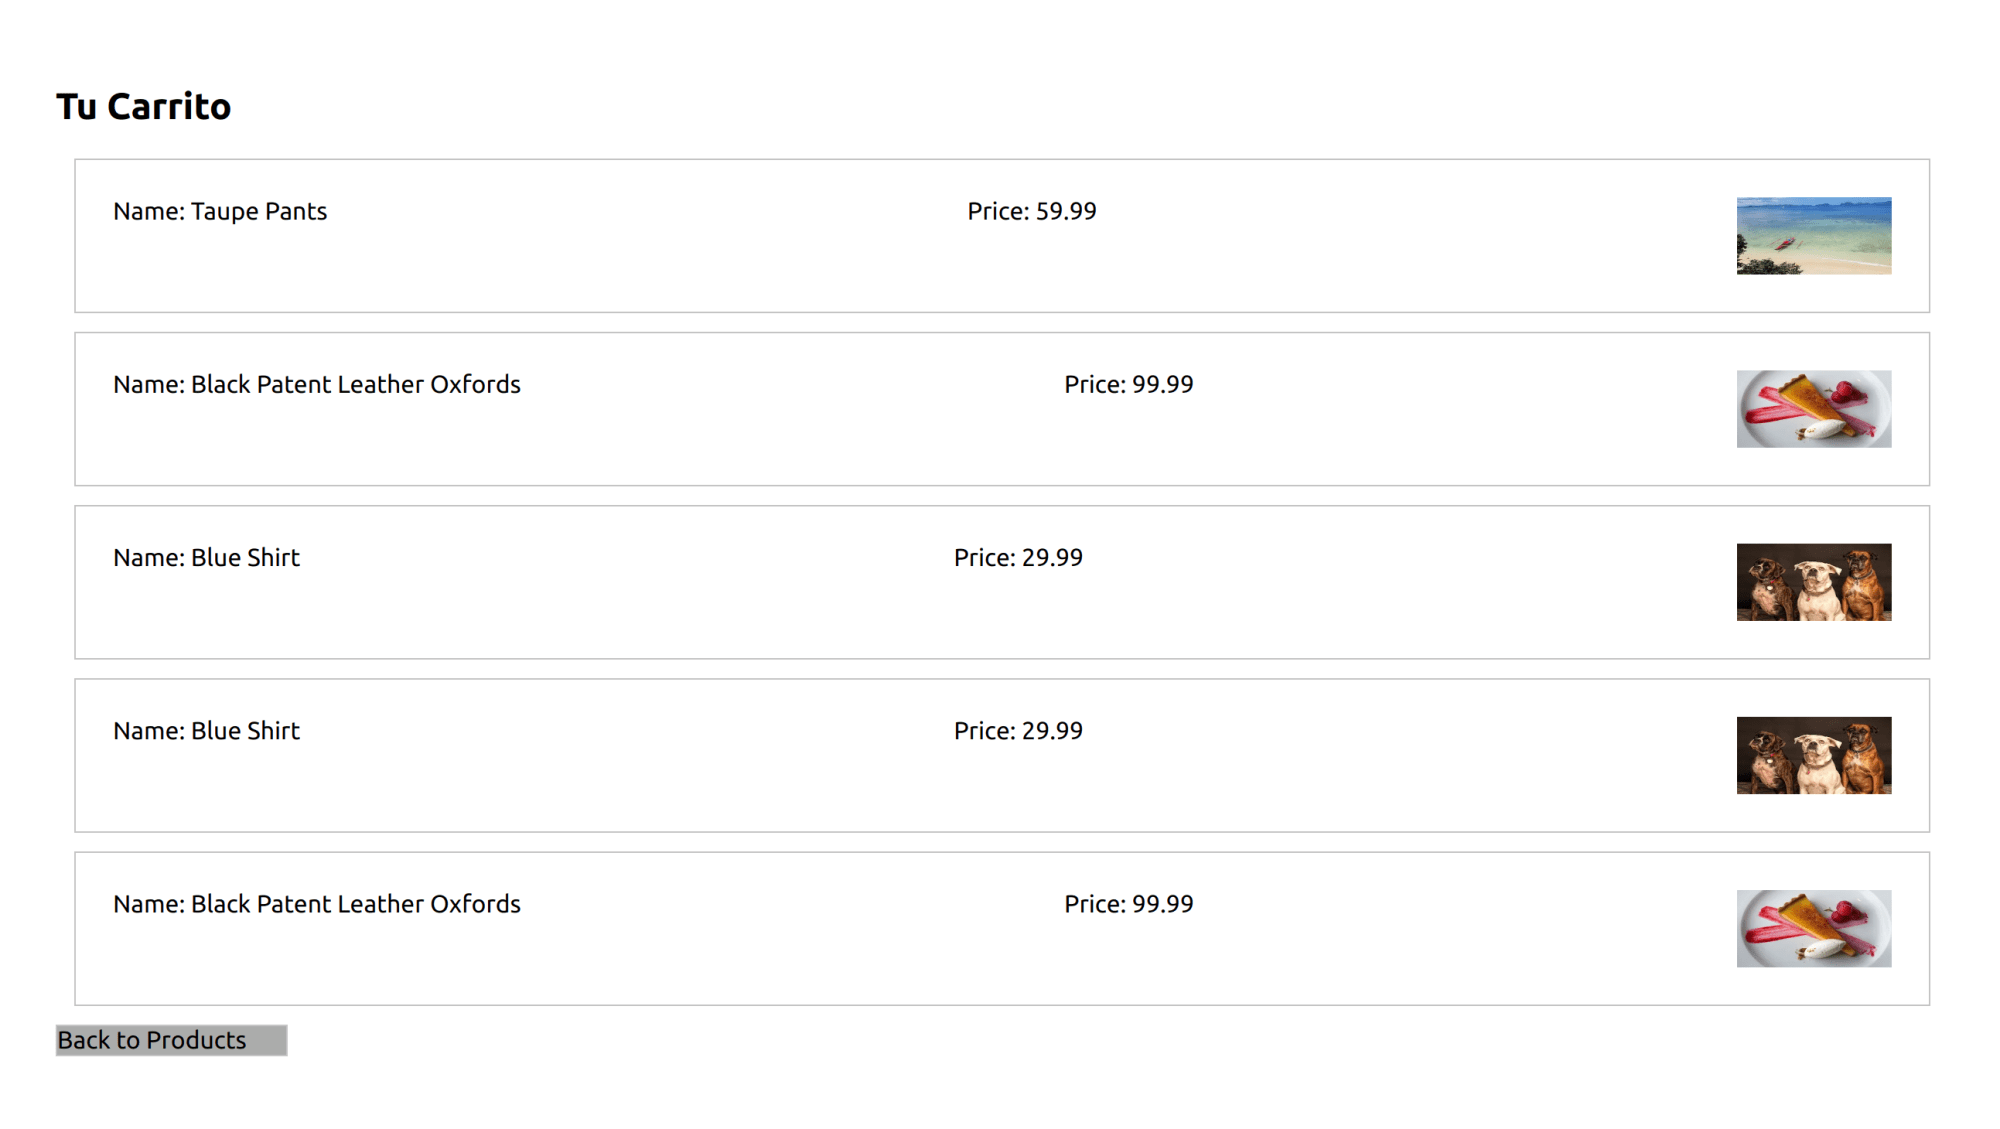
return (
    <Container>
        <h2>Tu Carrito</h2>
            {
                parsedCartItems.map((item: CartItem) => (
                    <CartItem key={item.name}>
                        <div>Name: {item.name}</div>
                        <div>Price: {item.price}</div>
                        <Image src={item.imageUrl} alt={item.name} height={100} width={100} />
                    </CartItem>
                ))
            }
        <Link passHref href={`/products`}>
            <Back>Back to Products</Back>
        </Link>
    </Container>
)
Code language: JavaScript (javascript)
We have a page header so that the customer knows they’re on the cart page. Then we take all of the cart items and map the data to our CartItem styled component. This will create a styled list view of all the items. After we show all of the items, then we have a button to go back to the products page. This is a good place to add a button to some check-out functionality and that will likely require some third-party service.
At this point, run the app again and add a few items to the cart from their respective product pages. Then navigate to the /cart route and you’ll see something like this.
Now the app has common pages that customers will go to in any online store! This can be cleaned up and turned into a full-fledged online store app that renders images quickly.
If you want to check out the full repo, you can find the complete code in here.
Or you can check out the non-database code in this Code Sandbox.
<CodeSandBox title=“sleepy-banach-y92t8y” id=“sleepy-banach-y92t8y” />
Making a fast-loading online store is essential to getting customers to stay on your site. Waiting on images or pages to load will deter people from sticking around and it can cause your existing customers to look for other options. Using server-side rendering can help improve your customer experience and make your app more secure, so make sure it’s a consideration before you build!