
A contact card, also known as a Virtual Contact File (VCF), is a standardized digital file format that stores contact information. Contact cards are versatile enough to store information like names, phone numbers, addresses, email e.t.c The most incredible flexibility of contact cards is their ability to be shared electronically via messages, emails, QR codes, or barcodes.
Barcodes contain machine-readable vertical lines that provide information about the items attached. This article will discuss how to encode a contact card in a barcode.
We will be using Nuxt.js and Cloudinary to build the contact card barcode generator. At the end of this article, we would have learned how to encode contact cards in a barcode, upload the generated barcode to Cloudinary and serve the Cloudinary link for easy sharing.
Nuxt.js is a Vue.js-based open-source JavaScript library that enhances building server-rendered Vue.js applications to produce more performant web applications.
Cloudinary, on the other hand, is a cloud-based asset management platform that offers services for managing and transforming uploaded videos and images for usage on the web.
We can find the completed project on CodeSandbox. Fork it and run the code.
Check out the complete source code here.
Understanding this article requires the following:
- Installation of Node.js.
- Basic knowledge of JavaScript.
- Familiarity with Nuxt.js
- Cloudinary account. Sign up for a free account.
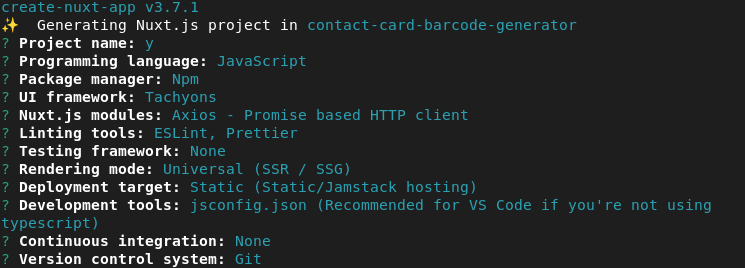
We use the npx create-nuxt-app <project-name> to create a new Nuxt project.
The process of scaffolding the project should bring a list of options which should look like this:
After successful project creation, we navigate into our directory and start our application by running the following commands.
cd <project name>
npm run dev
Code language: HTML, XML (xml)
Nuxt will, in turn, start a hot-reloading development environment which is accessible by default at http://localhost:3000.
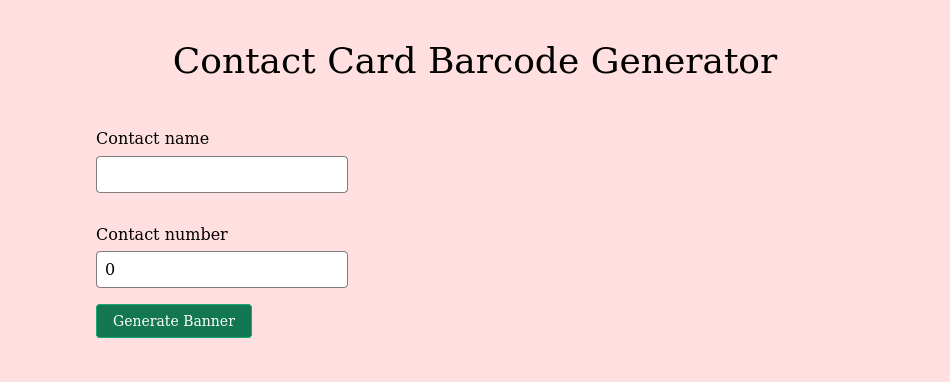
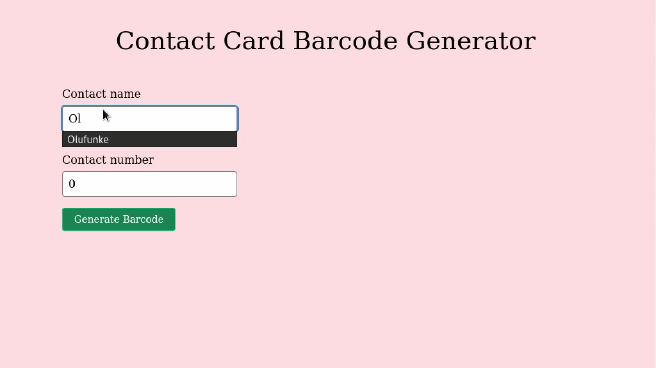
As mentioned earlier, contact cards have various information stored in them. In this article, we will be focusing on creating a simple contact card that has just the person’s name and the phone number attached.
We will do this by navigating into our pages/index.vue to add the code below:
https://gist.github.com/MoeRayo/69475376461afd9eab2ebabbd79dd2d3
We created a form with two input fields containing the contact’s name and the contact’s number in the code above. We also added a button that, when clicked, would run a method that would submit the value of the input fields, which will enable the encoding in the barcode.
We should have a UI that looks like the below in our browser.
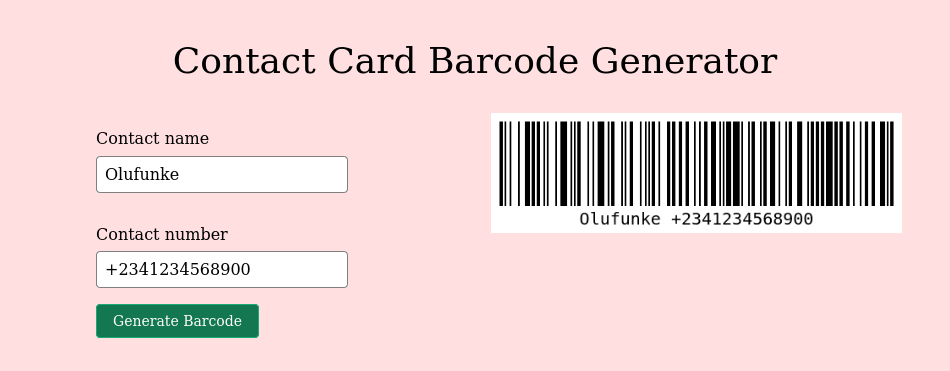
After creating the input fields that take in the contact’s information, our next action point will be to encode the data to a barcode. For the barcode encoding, we will employ the power of the Vue barcode package created by Fengyuan Chen. The barcode package generates barcodes based on the options we define.
To use the package in any Nuxt application, we will install it like so:
npm install @chenfengyuan/vue-barcode@1
Code language: CSS (css)
After installation, we will import the component into our project by updating the pages/index.vue with the code found below:
https://gist.github.com/MoeRayo/fbe84e5523781e65363de36d1bd383d9
We imported the barcode package in the code block above and then initialized it as a component for usage. The barcode component has several attributes and options that enable it to function as expected. Some of these options are:
-
:value: av-bindthat takes in the value of thecontactNameandcontactNumber, which are initialized in thedataproperty. -
tag: the barcode’s element tag, which shows the barcode format. These formats include img, SVG, and canvas.
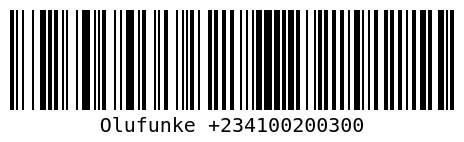
Filling the input fields will produce a UI that looks like the below in the browser:
Having successfully generated a barcode with a contact card encoded in it, we will proceed to upload the generated barcode image to Cloudinary and get the image back from Cloudinary for display in the browser.
We will need to have a Cloudinary cloud name and an upload preset credentials for performing the upload, thus making it imperative to create an account with Cloudinary. Free sign up can be done here.
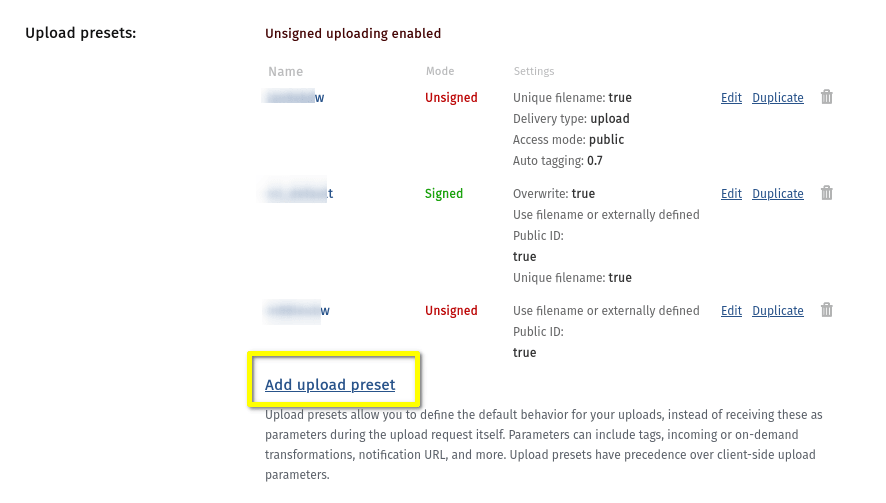
We will be registering for an unsigned upload preset, limiting access to people who can upload to our cloud. To do this, we will log in to the Cloudinary dashboard and navigate to the settings tab, like so:

From the settings tab, we will be presented with four tab options, from which we will pick the upload tab, like so:

From here, we can choose from any of the unsigned uploads presets or create a new unsigned one as we deem fit.
At this point, we should have our Cloudinary cloud name and upload presets ready and thus should be fully prepared to begin working on uploading our barcodes to Cloudinary.
At this stage, uploading our barcode image to Cloudinary exposes us to the storage capacities provided by Cloudinary. We can begin this process by adding the code below in the pages/index.vue.
https://gist.github.com/MoeRayo/b8f6a7e7e81f35e69ce5b3929866c717
We achieved the following from the code snippet above:
We added a method called upload to the form, executed when triggered by the generate barcode button.
- Leveraged Vue’s
$attrsobject to get the object that were not declared in theVueBarcodecomponentspropsoptions. - The upload function also runs the
prepareFormDatafunction that contains the form data. - Added a data property to manage the error, the
cloudname,preset,formdata, andtagsfor better organizing our assets, e.t.c. - Used Axios to post data to the Cloudinary endpoint using the request object options of the
url, POSTmethodand theformData. - Functionality to capture if the upload was successful or not. After a successful upload, we got access to some returned data like the
secured_urlused to render the uploaded image back in the browser.
Sharing the contact card barcode is as important as the barcode encoding process. To share our barcode, we will modify the pages/index.vue by adding functionality to create and display the generated image URL and a button that enables us to copy the URL.
We will add the following code in the pages/index.vue.
https://gist.github.com/MoeRayo/f1ee747c68d77f861d9f85b4c4cda886
In the code snippet above, we leveraged the Clipboard API to get the url of the image served from Cloudinary, which gets added as the copied input value.
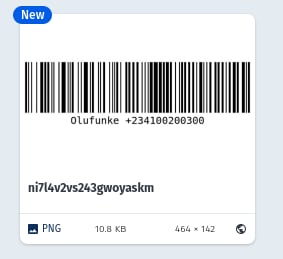
Our application, at this stage, should look like the below:
Here is the generated barcode as seen in our Cloudinary media library.
Click here to find the shareable link from the generated contact card.
This post explains encoding a contact card in a barcode with a shareable link provided using Cloudinary and Nuxt.js.