Building web applications involves displaying text, videos, and images to users. Sometimes, the sheer size of these assets could cause application lag; therefore, there is a need to display these assets in bits to users.
Developers have devised several means of compressing images; one that stands out is using pagination to enhance user experience. The use of an infinite scroll has proven to provide a better user experience. Building an infinite scroll into projects has gotten even easier with the introduction of the react-infinite-scroll-component.
This tutorial will walk us through implementing infinite scroll in an image gallery using the react-infinite-scroll-component with Remix.
The completed demo for this project is in a CodeSandbox. Fork it to run the code.
The source code is available here.
Infinite scroll is an interactive feature that automatically loads more content as the user scrolls through the page, creating a seemingly endless page.
The interactivity has successfully eliminated the friction of pagination and led to increasing engagement. There is little wonder we would see it on almost all social media platforms and E-commerce websites.
“Just a few more shoes to check….” But you never get to the end of the seemingly endless list of shoes before you doze right off!
This tutorial will focus on leveraging the react-infinite-scroll-component to achieve infinite scroll.
This tutorial assumes that we have the following:
- Installation of Node.js on our computer
- Basic knowledge of JavaScript
- Familiarity with Remix
- Pixabay account
First, we need to run the command below in the terminal to set up a new Remix application.
npx create-remix@latest remix-infinite-scroll
The command triggers a CLI where we can configure the application. The images below show the configuration options the CLI provides:

Next, we navigate into the project directory.
cd remix-infinite-scroll
Then, run the command below to start the application.
npm run dev
Remix will start a development environment accessible by default at http://localhost:3000.
TailwindCSS is a utility-first CSS framework with classes to help us style web pages.
We install tailwindcss and its peer dependencies via npm, which generates tailwind.config.js and postcss.config.js.
npm install -D tailwindcss postcss autoprefixer
npx tailwindcss init -p
We need to add the paths to our template files in the tailwind.config.js file.
//tailwind.config.js
    module.exports = {
      content: [
        "./pages/**/*.{js,ts,jsx,tsx}",
        "./components/**/*.{js,ts,jsx,tsx}",
      ],
      theme: {
        extend: {},
      },
      plugins: [],
    }
We should add the @tailwind directives for Tailwind’s layers to our ./styles/globals.css file.
//globals.css
    @tailwind base;
    @tailwind components;
    @tailwind utilities;
React-infinite-scroll-component is a component to make all the infinite scrolling woes go away with just 4.15 kB! An infinite scroll that works and is super simple to integrate! The Pull Down to Refresh feature was added to make it more awesome.
To install the react-infinite-scroll-component in our project, we run the following terminal command.
npm install --save react-infinite-scroll-component
Before wading through an endless list of images, we’ll build a skeleton interface to lay the foundation of our gallery.
Creating the Image Component
The grid of images across each row shows a photo gallery.
We create a component folder in the app directory, then create an ImageCard.jsx file and add the code block below:
const ImageCard = ({ image }) => {
  return (
      <div className="max-w-sm rounded overflow-hidden shadow-lg">
          <img src={image.webformatURL} alt="" className="w-full" />
          <div className="px-6-py-4">
              <div className="font-bold text-purple-500 text-xl mb-2">
                  Photo by Samson
              </div>
              <ul>
                  <li>
                      <strong>Views:</strong>
                      4000
                  </li>
                  <li>
                      <strong>Downloads:</strong>
                      5000
                  </li>
                  <li>
                      <strong>Likes:</strong>
                      50
                  </li>
              </ul>
          </div>
      </div>
  )
}
export default ImageCard;
Proceed to the app/routes/index.jsx file and import the ImageCard component.
At this point, the app/routes/index.jsx should look like this:
import ImageCard from "../component/ImageCard";

export default function Index() {

  return (
    <div className="container mx-auto">
        <div className="grid grid-cols-3 gap-4">
          <ImageCard/>
        </div>
      </InfiniteScroll>
    </div>
  );
}
Our webpage should then look like this:

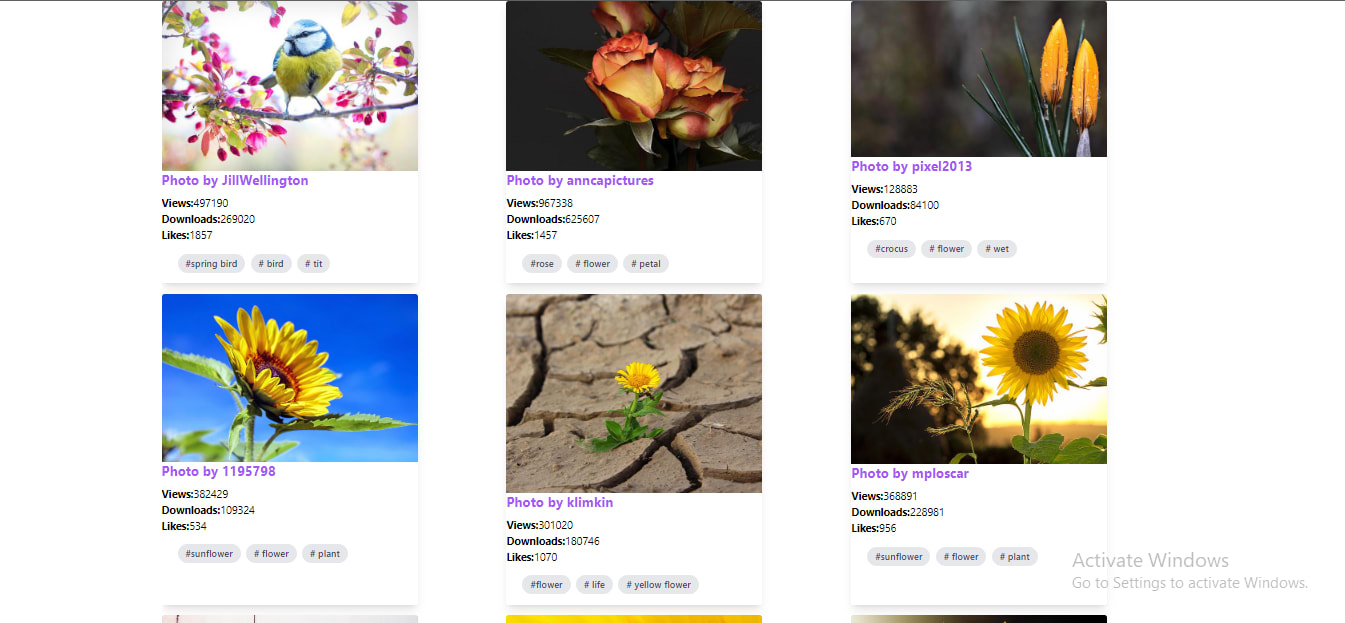
After setting up the basic UI skeleton for the page, the next thing to be done is to add dynamic images that populate automatically from an API. This article will be using the Pixabay API. To use the Pixabay API, we must sign up for an account to generate an API Key.
At the end of this setup, the app/routes/index.jsx should look like the below:
import { useState, useEffect } from "react";
import ImageCard from "../component/ImageCard";

export default function Index() {
  const [images, setImages] = useState([]);

  useEffect(() => {
    fetch(`https://pixabay.com/api/?key={PIXABAY_API_KEY}&q=yellow+flowers&image_type=photo&pretty=true?_limit=10`)
      .then(res => res.json())
      .then(data => {
        console.log(data)
        setImages(data.hits);
        setIsLoading(false);
      }).catch(err => console.log(err));
  }, [])
  return (
    <div className="container mx-auto">
        <div className="grid grid-cols-3 gap-4">
          {images.map(image => (
            <ImageCard key={image.id} image={image} />
          ))}
        </div>
    </div>
  );
}
In the app/routes/index.jsx, we did the following:
- Used the
useEffectHooks to fetch dynamic images from the Pixabay API in the code above - Set the limit of the image to 10 on the mounts of the app
- Loop through the imported image array to render each image
Instead of Pixabay, we could use data of images stored locally or retrieved from an API.
By now, our UI should look like this:

To create a seemingly endless page with the react-infinite-scroll-component, import the dependency into the app/routes/index.jsx file.
import InfiniteScroll from 'react-infinite-scroll-component';
We then need to render the InfiniteScroll component to our images like this:
<InfiniteScroll
    dataLength={images.length} //This is important field to render the next data
    next={getMoreImages}
    hasMore={true}
    loader={<h4>Loading...</h4>}
    endMessage={
      <p style={{ textAlign: 'center' }}>
        <b>Yay! You have seen it all</b>
      </p>
       }
 >
    <div className="grid grid-cols-3 gap-4">
      {images.map(image => (
        <ImageCard key={image.id} image={image} />
       ))}
    </div>
</InfiniteScroll>
The code snippet above passed the InfiniteScroll component with the dataLength, next, loader, and endMessage properties.
Next, we need to declare the getMoreImages() function that’ll get new images from the Pixabay API while scrolling through the web pages.
const getMoreImages = async () => {
    const response = await fetch(`https://pixabay.com/api/?key={PIXABAY_API_KEY}&q=yellow+flowers&image_type=photo&pretty=true?_start=${images.length}&_limit=10`);
    const newImages = await response.json();
    setImages([...images, ...newImages.hits]);
    setIsLoading(false);
}
At this point, more images should automatically load as we navigate through the application in our browser.

In this post, we learned how to build a photo gallery with infinite scroll implemented using the react-infinite-scroll component and Pixabay APIs in Remix.
We may find these resources helpful:
