
Popular video streaming platforms like Netflix, Hulu, Youtube, e.t.c; give users an option to watch previews of listed videos while hovering. This feature helps users save time by watching preliminaries and quickly determining if it is relevant to them before watching it.
This post will discuss creating video thumbnail previews on hover using Cloudinary and Nuxt.js. At the end of this tutorial, we will learn how to use Cloudinary’s AI-Based video preview feature to generate video previews that improve users’ experience while browsing through videos.
We completed this project in a CodeSandbox, and you can fork it to run the code.
Github link here.
The following steps in this post require JavaScript and Vue.js experience. Experience with Nuxt.js isn’t a requirement, but it’s nice to have.
We also need a Cloudinary account to store and transform media assets. Signup is completely free.
We need to create a Nuxt.js starter project by navigating to the desired directory and running the command below in our terminal.
npx create-nuxt-app video_thumbnail && cd video_thumbnail
This command will ask us some questions on how to configure our application. We can answer the questions as shown below:
    Ok to proceed? (y) < PRESS "y" and hit ENTER>
    project name: <PRESS ENTER>
    programming langauge: <JAVASCRIPT>
    package manager: <NPM>
    UI framework: <TAILWIND CSS>
    Nuxt.js modules: <AXIOS - PROMISE BASED HTTP CLIENT>
    Linting tools: <ESLINT, PRETTIER>
    Testing framework: <NONE>
    Rendering mode: <UNIVERSAL (SSR/STATIC)
    Deployment target: <STATIC/JAMSTACK HOSTING>
    Deployment tools: <JSCONFIG.JSON>
    Continous integration: <NONE>
    Version control system: <GIT>
Code language: PHP (php)
The command creates a Nuxt.js project with TailwindCSS called video_thumbnail, and navigates into the project directory.
TailwindCSS is a utility-first CSS framework packed with classes to help us style our web page.
First, we need to modify the nuxt.config.js file by adding Cloudinary CDNs to the link and script section as shown below:
    head: {
        ...
        htmlAttrs: {
         ...
        },
        meta: [
          ...
        ],
        link: [
          { rel: 'icon', type: 'image/x-icon', href: '/favicon.ico' },
          {
            rel: 'stylesheet',
            href: 'https://unpkg.com/cloudinary-video-player@1.5.9/dist/cld-video-player.min.css',
          },
        ],
        script: [
          {
            src: 'https://unpkg.com/cloudinary-core@latest/cloudinary-core-shrinkwrap.min.js',
          },
          {
            src: 'https://unpkg.com/cloudinary-video-player@1.5.9/dist/cld-video-player.min.js',
          },
        ],
      },
Code language: JavaScript (javascript)
Next, we need to include our Cloudinary’s cloud name as an environment variable. To do this, first, we need to create a .env file in the root directory, and in this file, add the snippet below:
NUXT_ENV_CLOUDINARY_CLOUD_NAME=<YOUR CLOUD NAME HERE>
PS: We can get Cloudinary’s cloud name by logging into the Cloudinary console.
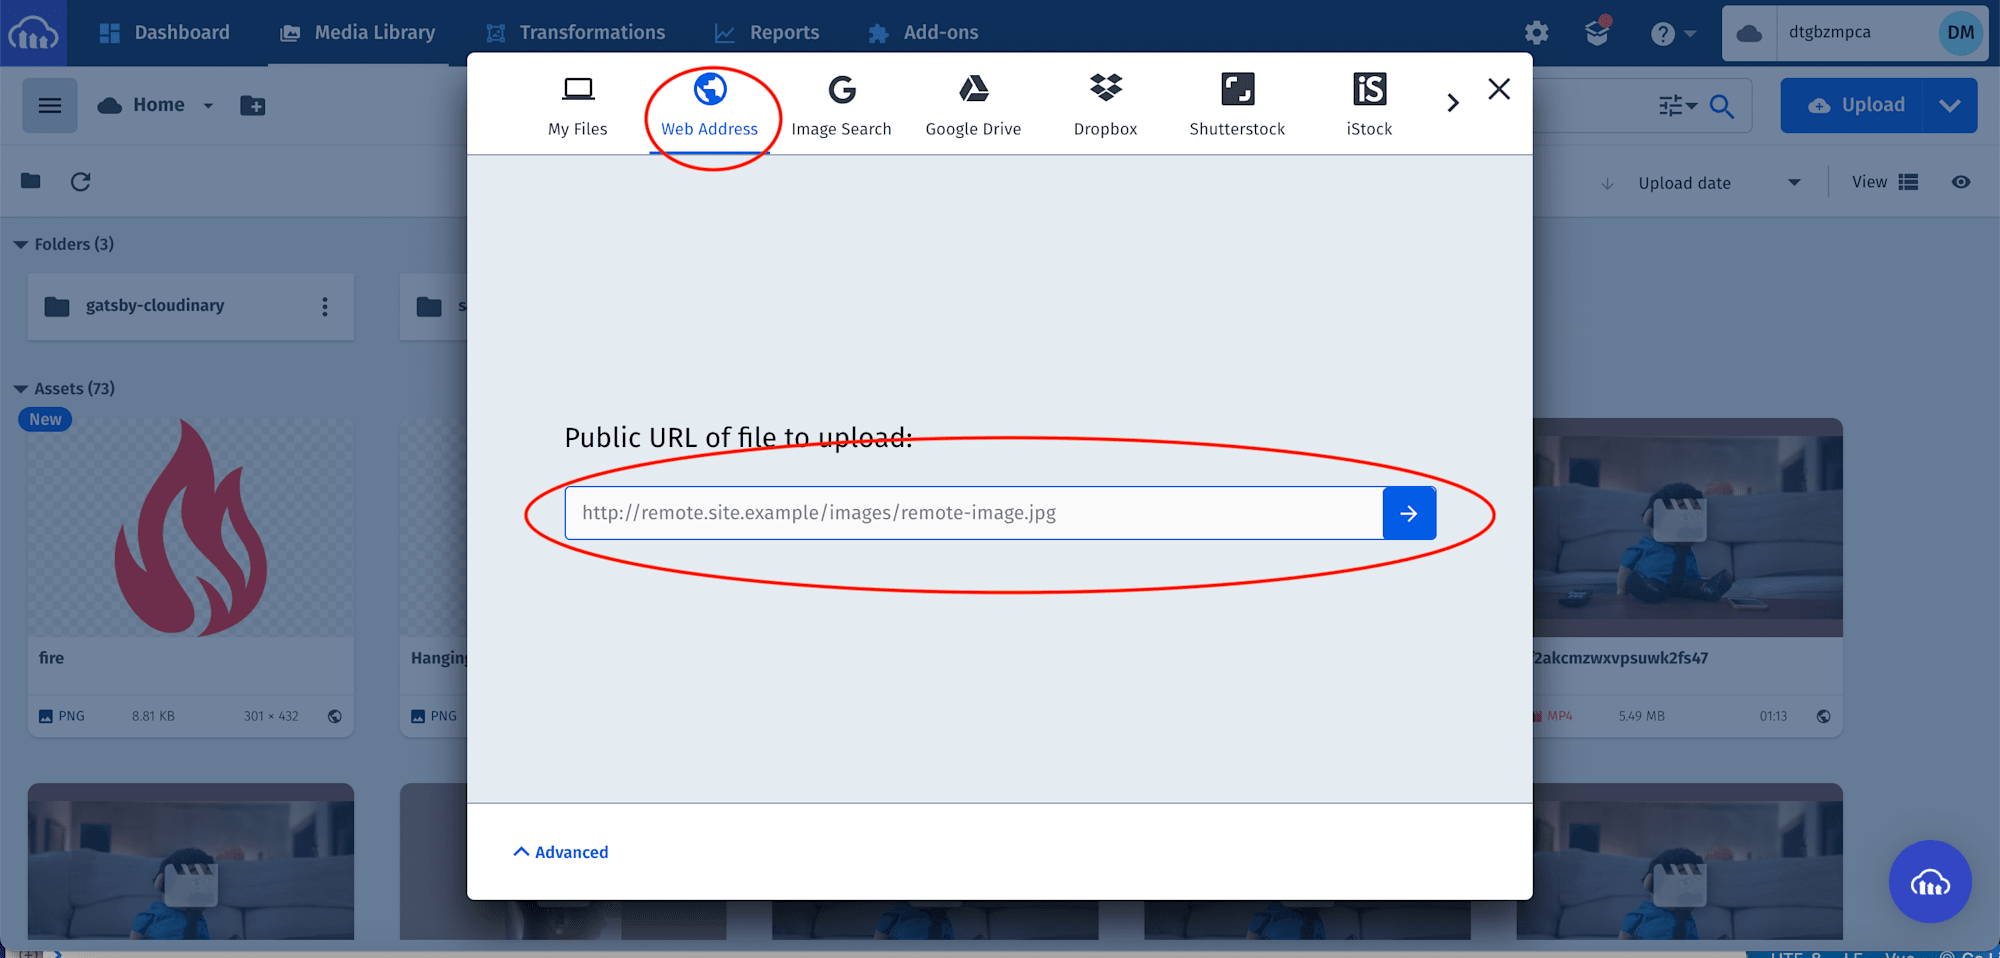
Next, we need to upload sample videos to generate thumbnails and previews. Video URLs
- https://res.cloudinary.com/dtgbzmpca/video/upload/v1635669808/jkffravgmvsumnnv8qs0.mp4
- https://res.cloudinary.com/dtgbzmpca/video/upload/v1635528649/h77edtixvdz0ddkvspsy.mp4
- https://res.cloudinary.com/dtgbzmpca/video/upload/v1645539487/dancing-catvideo.webm
- https://res.cloudinary.com/dtgbzmpca/video/upload/v1621302254/ouszrok1zgkeuqqsuzit.mkv
In our Cloudinary dashboard, we uploaded the videos by clicking on the Media Library tab, clicking on Upload, selecting Web Address option, input the url, and clicking on the Arrow Button to upload.

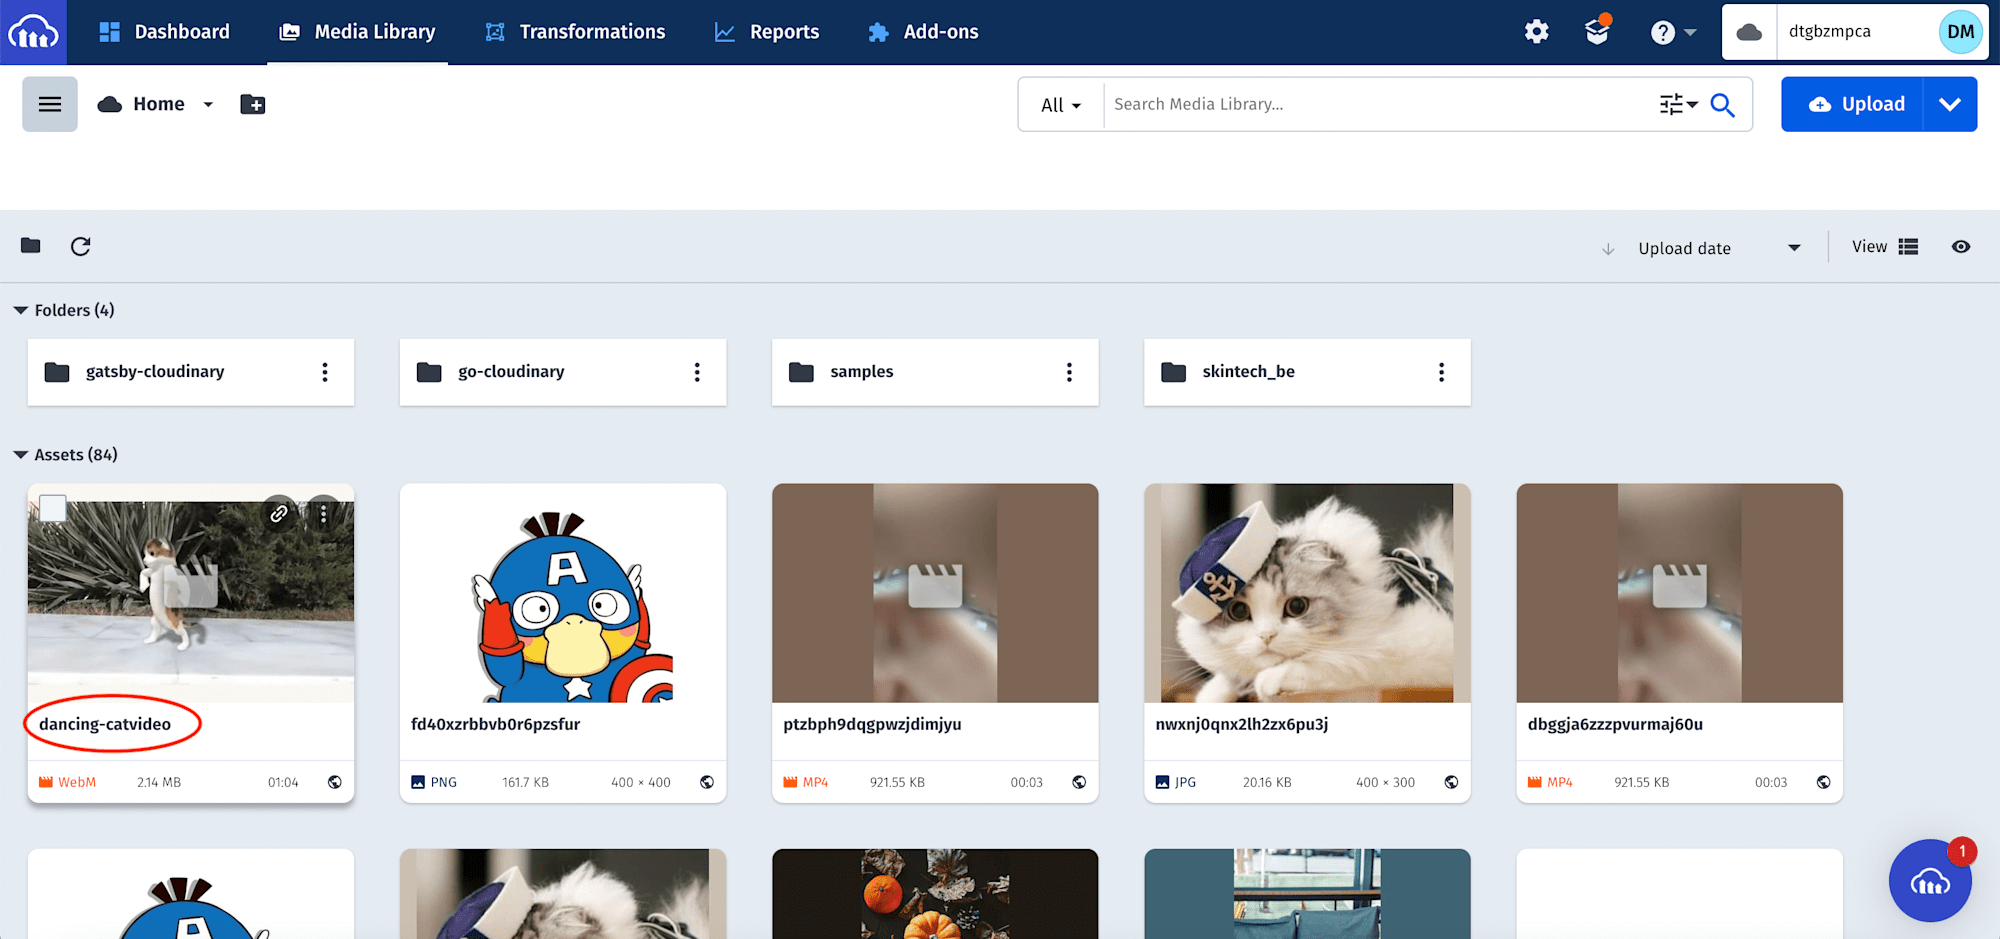
After uploading all the videos, we will see them displayed on the console with their publicId. The IDs will come in handy when creating video thumbnails and previews.
Next, we need to create a utils folder in the project root directory. In this folder, we create a videoList.json file to save data about the uploaded videos.
Here is the JSON data for the file.
[
    {
        "id": 1,
        "publicId": "<REPLACE THIS WITH YOUR IMAGE PUBLICID>"
    },
    {
        "id": 2,
        "publicId": "<REPLACE THIS WITH YOUR IMAGE PUBLICID>"
    },
    {
        "id": 3,
        "publicId": "<REPLACE THIS WITH YOUR IMAGE PUBLICID>"
    },
    {
        "id": 4,
        "publicId": "<REPLACE THIS WITH YOUR IMAGE PUBLICID>"
    }
]
Next, we modify the index.vue file in the pages folder to the following:
    <template>
      <div class="flex flex-col items-center p-8">
        <h1 class="text-xl font-medium text-blue-900 mb-8">Cloudinary Video Preview</h1>
        <div class="grid grid-cols-1 lg:grid-cols-3 gap-3">
          <div
            class
            v-for="(video, i) in videoList"
            :key="i"
            @mouseenter="onHoverEnter(i)"
            @mouseleave="onHoverLeave(i)"
          >
            <video class="w-96 h-96" :id="`video-player${video.id}`" muted controls></video>
          </div>
        </div>
      </div>
    </template>
    <script>
    import videoList from '@/utils/videoList.json'

    export default {
      name: 'IndexPage',
      data() {
        return {
          cld: null,
          player: null,
          videoList,
        }
      },

      mounted() {
        this.player = this.videoList;
        this.cld = cloudinary.Cloudinary.new({
          cloud_name: process.env.NUXT_ENV_CLOUDINARY_CLOUD_NAME,
          secure: true,
        })
        this.videoList.forEach((video, i) => {
          this.player[i] = this.cld.videoPlayer(`video-player${video.id}`, {
            transformation: { effect: "preview:duration_5" }
          })
          this.player[i].source(`${video.publicId}.jpg`)
        });
      },

      methods: {
        onHoverEnter(id) {
          this.player[id].source(this.videoList[id].publicId)
          this.player[id].play()
        },
        onHoverLeave(id) {
          this.player[id].source(this.videoList[id].publicId)
          this.player[id].stop()
        },
      },
    }
    </script>
Code language: HTML, XML (xml)
The snippet above does the following:
- Import the video collection.
- Create
dataproperties to manage imported video collection, Cloudinary instance, and video element. - Use the
mountedlifecycle method to assign the list of imported videos to theplayervariable, create a Cloudinary instance, loop through the list of videos to initialize the video player and assign a source to the video using thepublicId. We also leverage Cloudinary’s support for AI-Based transformation to apply thepreviewtransformation effect with a duration of 5 seconds. - Create an
onHoverEnterandonHoverLeavemethod to assign, play and stop a video while hovering. - Markup while hovering to show the list of videos with corresponding functions to play and pause a video.
With that done, we can start a development server using the command below:
npm run dev
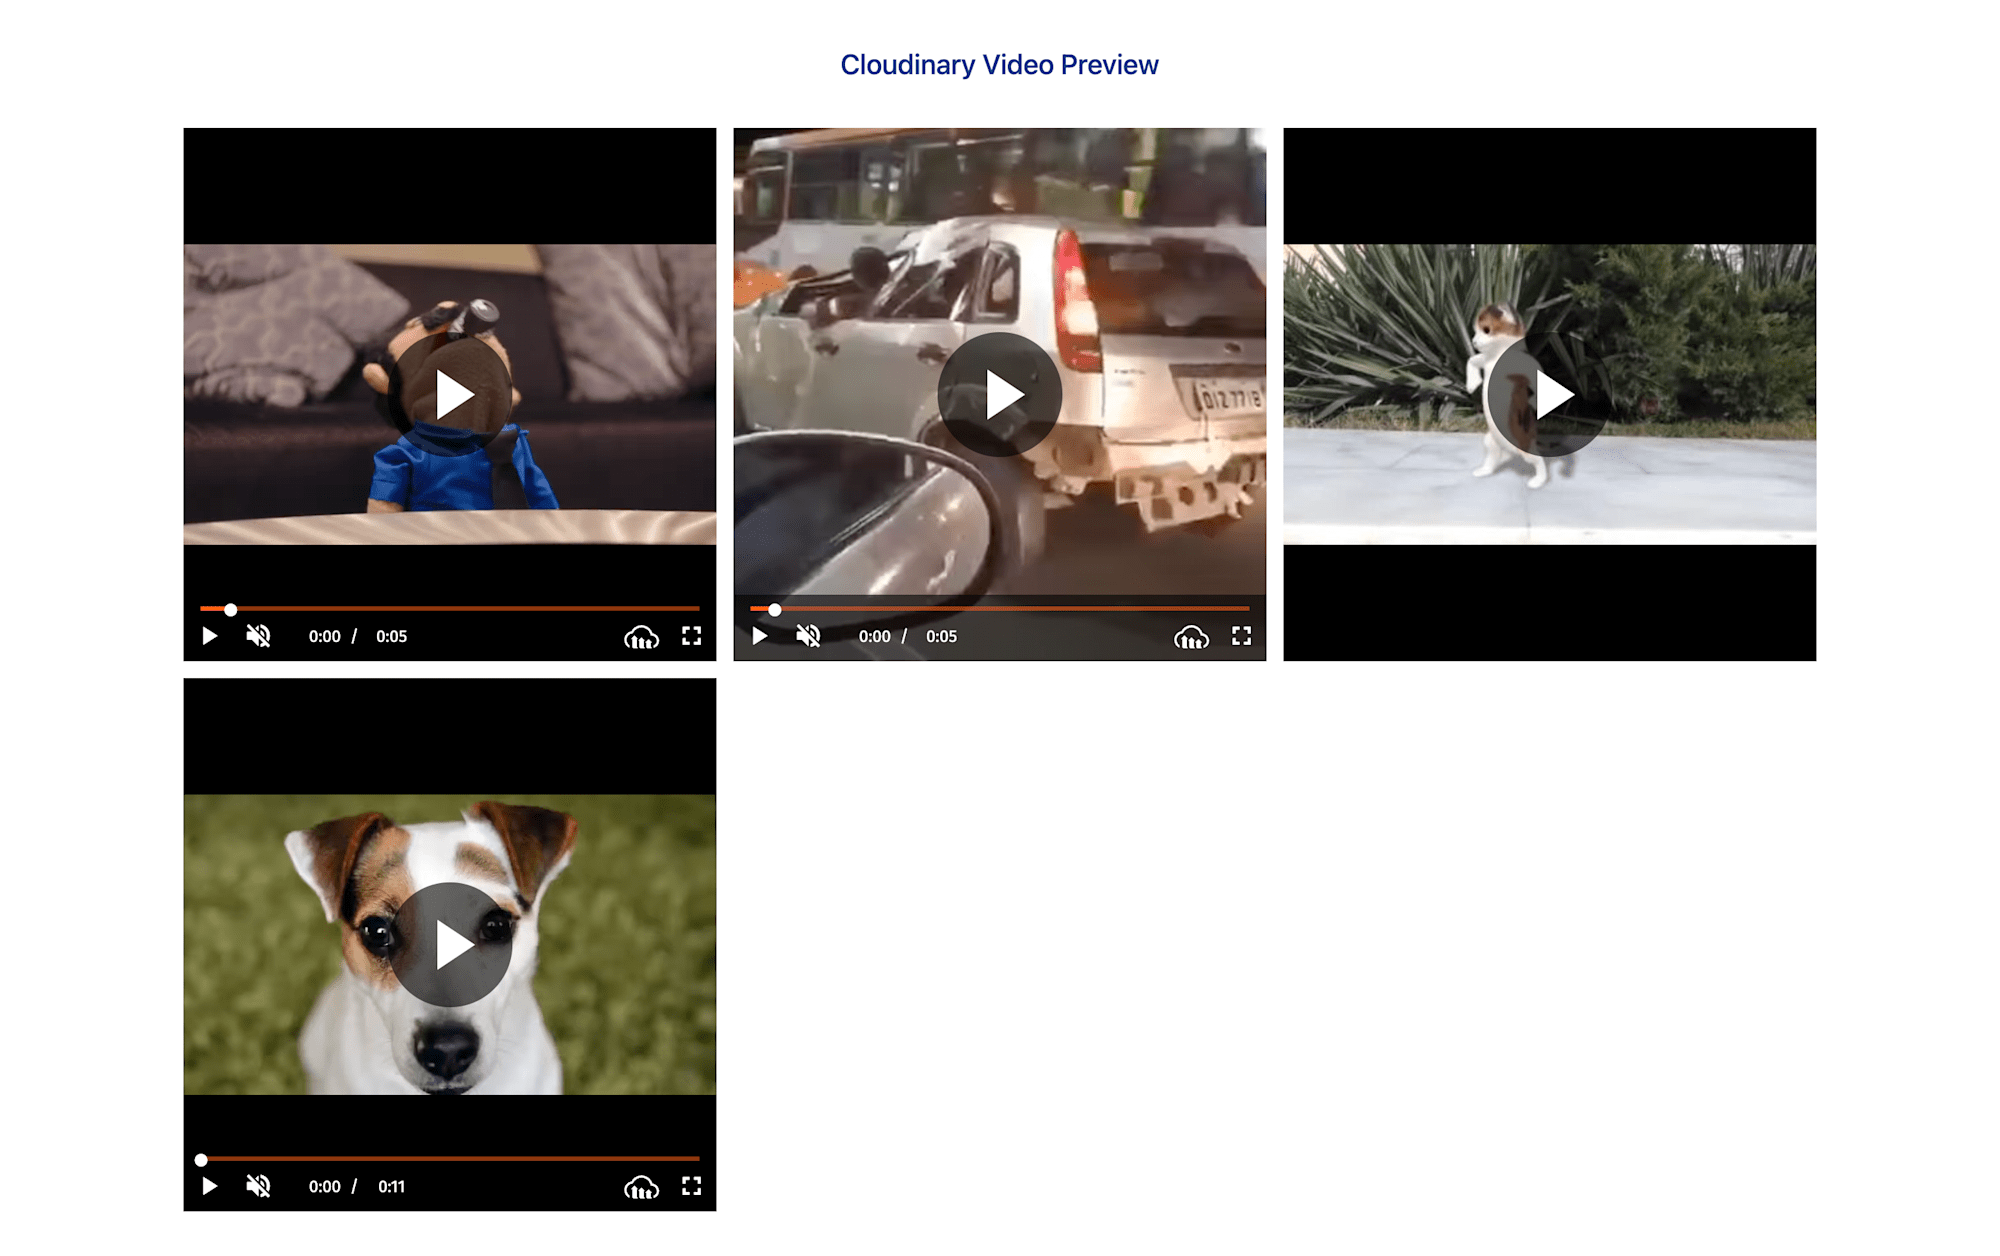
This post discussed creating a video thumbnail with a preview on hover using Cloudinary and Nuxt.js.
These resources might be helpful: