Physical events are often packed with several brand activation activities and photo booths are always a must. We can make our space exciting and engaging to our audience by creating a photo booth. The virtual photo booth will take user images apply cool effect transformations and display them in a gallery.
All the code is available on Github and PHPSandbox for a live demonstration of the Virtual Photo Booth Gallery.
To be able to follow this article, you need to have experience issuing commands through a terminal. You should also have some knowledge of Git version control and PHP specifically with the Laravel framework.
We will need Composer to initiate a Laravel project and install our dependencies. Follow the steps below diligently. In step 1 we will install PHP and Composer.
-
Install Composer and PHP on your machine. Be sure to follow the steps for your respective operating system.
-
There are two ways to install Laravel:
-
Via Composer:
composer create-project --prefer-dist laravel/laravel cloudinary-photobooth -
Via Laravel Installer (Recommended):
composer global require laravel/installerlaravel new cloudinary-photobooth
-
-
Following the Laravel installation steps above will create a new application in the folder
cloudinary-photobooth. Now we need to start the server and test our new application to ensure everything is okay. Change the directory to the project folder and run the local development server by typing the following commands:cd cloudinary-photoboothphp artisan serve
The Laravel server should be up and running and when you open http://localhost:8000 on your computer, you should see the application default page shown in the image below:

Cloudinary has made integration easy for different programming languages with their Programmable Media SDK libraries and with a vibrant community, there are community libraries available as well. In this article, we will use Cloudinary’s Laravel SDK.
-
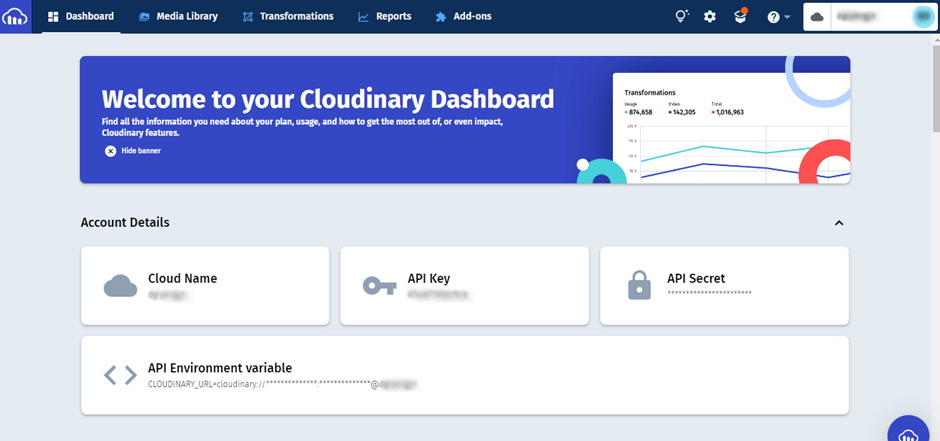
First things first, we will need a Cloudinary account. You can sign up for one here. Don’t worry it’s free. Log in with your details and you will be redirected to the Dashboard. Take note of your Account details, the Cloud Name, API Key, API Secret and the API Environment variable, we will need them later.

-
Back at our terminal, we need to install Cloudinary’s Laravel SDK. Run the following command:
composer require cloudinary-labs/cloudinary-laravelNote: Follow the link to the SDK and ensure you follow all the steps in the #Installation section.
-
To complete the setup we will need to add the Account details to our
.envfile as shown below:
CLOUDINARY_API_KEY=YOUR_CLOUDINARY_API_KEY
CLOUDINARY_API_SECRET=YOUR_CLOUDINARY_API_SECRET
CLOUDINARY_CLOUD_NAME=YOUR_CLOUDINARY_CLOUD_NAME
CLOUDINARY_URL=YOUR_CLOUDINARY_ENVIRONMENT_VARIABLE
Cloudinary is a great platform for media management and manipulation. It is perfect for our current use case since we will need to apply some transformations to the images our users will be uploading and return a URL that we will use to populate our gallery.
To return their desired photo booth effect we will manipulate the photos as follows:
- Change the aspect ratio 0.75 which is a 3×4.
- Adjust the height to 1600px
- Apply an overlay of the respective effect chosen by the user
Before we can start image manipulation, you’ll have to upload the overlay effects to your Cloudinary media library. You can find them below:
As you can see we will have four overlays in this project. You can download the above overlay effects and upload them to your Cloudinary Media library and name them as follows:
-
effect_one -
effect_two -
effect_three -
effect_four

With the overlay effects uploaded, we will need a user interface to allow the user to upload images, for this, we will use the Laravel package Livewire.
-
Install Livewire Package by running the following command in your Laravel project:
composer require livewire/livewire -
Include Livewire scripts and styles on every page that will be using Livewire. In our case
welcome.blade.php:
...
    @livewireStyles
</head>
<body>
    ...

    @livewireScripts
</body>
</html>
Code language: HTML, XML (xml)-
We will then create a Livewire Component to handle our image uploads:
php artisan make:livewire PhotoBoothThis will create two files, first
app/Http/Livewire/PhotoBooth.phpand the other one inresources/views/livewire/photo-booth.blade.php.We can then use this component anywhere in our code using the following snippet:
<livewire:photo-booth/>or
@livewire('photo-booth') -
Open
resources/views/welcome.blade.phpand add the following code within the<body></body>tags as shown below:
<body class="antialiased">
  <div>
    @livewire('photo-booth')
  </div>
</body>
Code language: HTML, XML (xml)
This includes the Livewire component we created earlier in our welcome.blade.php.
Note: Please ensure you go through the Livewire documentation, to learn how to install and set it up.
- Open the file
resources/views/livewire/photo-booth.blade.phpand populate it with the following code:
<form class="mb-5" wire:submit.prevent="photoBooth">
	<div class="form-group row mt-5 mb-3">
		<div class="input-group mb-5">
			<select id="effect" type="file" class="form-select @error('effect') is-invalid @enderror"
			        wire:model="effect">
				<option selected>Choose Photo Effect ...</option>
				<option selected value="effect_one">Cloudinary Rocks</option>
				<option value="effect_two">Rose Flower</option>
				<option value="effect_three">Abstract</option>
				<option value="effect_four">Flower Petals</option>
			</select>
			@error('effect')
			<div class="invalid-feedback">{{ $message }}</div>
			@enderror
		</div>
		<div class="input-group">
			<input id="photo" type="file" class="form-control @error('photo') is-invalid @enderror"
			       placeholder="Choose photo..." wire:model="photo">

			@error('photo')
			<div class="invalid-feedback">{{ $message }}</div>
			@enderror
		</div>
		<small class="text-muted text-center mt-2" wire:loading wire:target="photo">
			{{ __('Uploading') }}…
		</small>
	</div>
	<div class="text-center">
		<button type="submit" class="btn btn-sm btn-primary w-25">
			<i class="fas fa-check mr-1"></i> {{ __('Lights, Camera, Action') }}
			<i class="spinner-border spinner-border-sm ml-1 mt-1" wire:loading wire:target="photoBooth"></i>
		</button>
	</div>
</form>
Code language: JavaScript (javascript)
This is a form with a select field, file input field and a button. You can refer to the code on Github for the full implementation.
Open the file app/Http/Livewire/PhotoBooth.php and update it with the following code:
-
First, we use Livewire’s
WithFileUploadsto help us with file uploads, then create the variables$photo,$effect,effectTransformations,$tag,$folderand$galleryan array which will contain the transformed image URLs we get back from Cloudinary.use WithFileUploads; public $photo; public $effect; public $gallery = []; public $effectTransformations; public $folder = "photo-booth"; public $tag = "photo-booth";Code language: PHP (php) -
Next, create the
photoBoothfunction which will apply upload and apply transformations to create the respective effect.public function photoBooth() { ... }Code language: PHP (php) -
Let’s populate our method in step 2 above:
public function photoBooth() { $this->validate([ 'effect' => 'required|string', 'photo' => ['required', 'image', 'max:10240' ]); $photo = cloudinary()->upload($this->photo->getRealPath(), [ 'folder' => $this->folder, 'aspect_ratio' => 0.75, 'crop' => 'fill', 'height' => 1600, 'gravity' => 'faces' ])->getSecurePath(); $this->effectTransformations = [ 'overlay' => [ 'public_id' => "$this->folder/assets/$this->effect", 'flags' => 'layer_apply', 'width' => 1.0, 'height' => 1.0, ] ]; $transformed = cloudinary()->upload($photo, [ 'folder' => $this->folder, 'tags' => $this->tag, 'transformation' => $this->effectTransformations ])->getSecurePath(); $this->gallery = Arr::prepend($this->gallery, $transformed); }Code language: PHP (php)Let’s talk about the code.
-
First, we create the effect transformations based on user input and assign them to the variable
$effectTransformations.$this->effectTransformations = [ ['crop' => 'crop', 'aspect_ratio' => 0.75, 'gravity' => 'faces', 'height' => 1600], [ 'overlay' => [ 'public_id' => "$this->folder/assets/$this->effect", 'flags' => 'layer_apply', 'width' => 1.0, 'height' => 1.0, ] ] ];Code language: PHP (php)-
First, we upload the user image to Cloudinary, with an
aspect_ratioof0.75,cropoffill,gravityset tofacesand get thesecure_urlwhich we save in the variable$photo. The last line just prepends the transformed$phototo our$this->galleryarray which we use to display the gallery.
-
First, we upload the user image to Cloudinary, with an
$photo = cloudinary()->upload($this->photo->getRealPath(), [
	'folder'         => $this->folder,
	'tags'           => $this->tag,
	'transformation' => $this->effectTransformations
])->getSecurePath();

$this->gallery = Arr::prepend($this->gallery, $photo);
Code language: PHP (php)
Update our Livewire component view and add the following code beneath the form:
<div class="row mt-4">
	@foreach($this->gallery as $galleryItem)
		@if ($galleryItem)
			<div class="col-sm-3 col-md-3 mb-3">
				<img class="card-img-top img-thumbnail img-fluid" src="{{ $galleryItem }}" alt="Virtual Photo Booth"/>
			</div>
		@endif
	@endforeach
</div>
Code language: HTML, XML (xml)
This will display our gallery.
With our code implementation complete, you should be able to see the following when you navigate to http://localhost:8000:


Congratulations, we have built our own virtual photo booth powered by Cloudinary and Laravel. This is just the beginning, with Cloudinary you can create wonderful image management and manipulation products.
Keep discovering more with Cloudinary, all you have to do is create a free account.
