
Developers can customize image bundling using Webpack, which provides asset modules for using files (containing the fonts and icons). This is done without configuring additional loaders like url-loader and file-loader. Before Asset modules came in existence, a developer would have to install and configure different asset loaders.
In this article, you will learn about asset modules in webpack, and how you can customize image bundling. You will also learn to manage media content loaded in a React application and the transition from url/file loaders.
In addition to asset modules, a significant tool in image handling within webpack is the ‘image-webpack-loader’. This module provides advanced capabilities for processing images. Using image-webpack-loader offers several benefits, such as:
- Support for a wide range of image formats, including SVG and PNG.
- The ability to load images from style sheets using ‘@import’ and ‘url()’.
- The option to refer to images within your code by explicitly importing them.
- Direct importing of images in JavaScript files, enhancing the flexibility of code structure.
- Advanced image processing features, notably image compression, which optimizes your application’s performance.
- Enhanced compilation speed, especially beneficial when using ‘webpack-dev-server’ for development.
These features extend the capabilities of webpack beyond what asset modules offer, particularly in the realms of image optimization and project build efficiency.
To follow along with this tutorial, ensure you have the following:
- Npm installed (v8.x current release)
- A basic understanding of JavaScript and React.js
- CodeSandbox
- React (latest version v17.0.2)
- Terminal
Asset modules is a module that allows the usage of asset files (icons and fonts) with four (4) module types. During image bundle customization, asset modules achieve this by replacing the loaders (that is, url-loader or file-loader) with one of four (4) module types. These module types are are ‘asset/resource’, ‘asset/inline’, ‘asset/source’ and ‘asset’.
-
The asset/resource module for emitting a separate file, exporting the image URL. It replaces
file-loader. -
The asset/source module type for exporting the source code of the asset. It replaces
raw-loader. -
The asset/inline module type exports a data URI of the asset. It replaces
url-loader. -
The asset module automatically choose between inline and resource type following a default condition.
Here, you will learn how to bundle three images with three file formats, jpg, png, and gif, using Webpack’s Asset/resource rule in a React.js application.
Open your terminal and run the following command to initialize npm:
npm init -y
Afterwards, install webpack and some functional dependencies with the following commands using npm:
npm i -D wepback webpack-cli wepback-dev-server babel-loader @babel/core @babel/preset-env @babel/preset-react


- webpack-dev-server: This module provides a development environment with hot reloading
- webpack-cli: This dependency provides CLI commands that speed up a webpack project setup
- babel-loader: This dependency transpiles the JavaScript files using babel and webpack.
- @babel/core: Babel compiler core
- @babel/preset-env: Allows the usage of the latest JavaScript syntax without providing transforms or polyfills.
- @babel/preset-react: A React.js preset for Babel.
Next, create a source folder, src folder for our development file, including an index.js file.
Create a dist folder which will contain the built static files. In the dist folder, create a main.js file that will hold the bundled JavaScript and an index.html file.
Note that you will use webpack to bundle your index.js file into the main.js file, which would requires webpack’s configuration.
In your dist/``index.html file, enter the following:
<div id="root"></div>
  <script src="main.js"></script>
Next, configure your package.json file by setting private to true, which lets webpack know that your project isn’t a package. Include the following script commands:
- "start”: “webpack server”
- “build”: “webpack”
Start a local development server for the project using webpack-server and the following command:
npm run start
First, in src/index.js file, import react, react-dom and the images to be rendered with:
import React from "react"
import {render} from "react-dom"
import FirstImg from "../img1.jpg";
import SecondImg from "../img1.jpg"
import ThirdImg from "../img3.gif";
These images are imported as resource assets. Other import types include inline and source.
Next, add two new rules in webpack.config.js:
-
A rule to bundle image assets with certain file formats
-
A rule to bundle all JavaScript files (ending in .js), excluding node modules
“rules”: [ { “test”: /.(png|jpe?g|gif|svg)$/i, “type”: “asset/resource”, }, { “test”: /.js$/, “exclude”: /node_modules, “use”: { “loader”: “babel-loader”, }, } ]
Here’s the complete webpack-config.js file:
module.exports = {
    "mode": "development",
    "module": {
        "rules": [
            {
                "test": /\.(png|jpe?g|gif|svg)$/i,
                "type": "asset/resource",
            },
            {
                "test" : /\.js$/,
                "exclude": /node_modules/,
                "use": {
                    "loader": "babel-loader",
                },
            },
        ],
    },
    "devtool": false,
    devServer: {
        static: './'
    },
};
You can see all webpack configuration options here.
Finally, configure babel by creating a babel.config.js file in the project’s root directory with the following content:
module.exports = {
  "presets": ["babel/preset-env", ["@babel/preset-react", {"runtime": "automatic"}]],
}
We’ll build the project to create the static files in the dist directory, using the command:
npm run build
The dist folder contains static files that can be served over a http server or hosted on a Content Delivery Network (CDN).
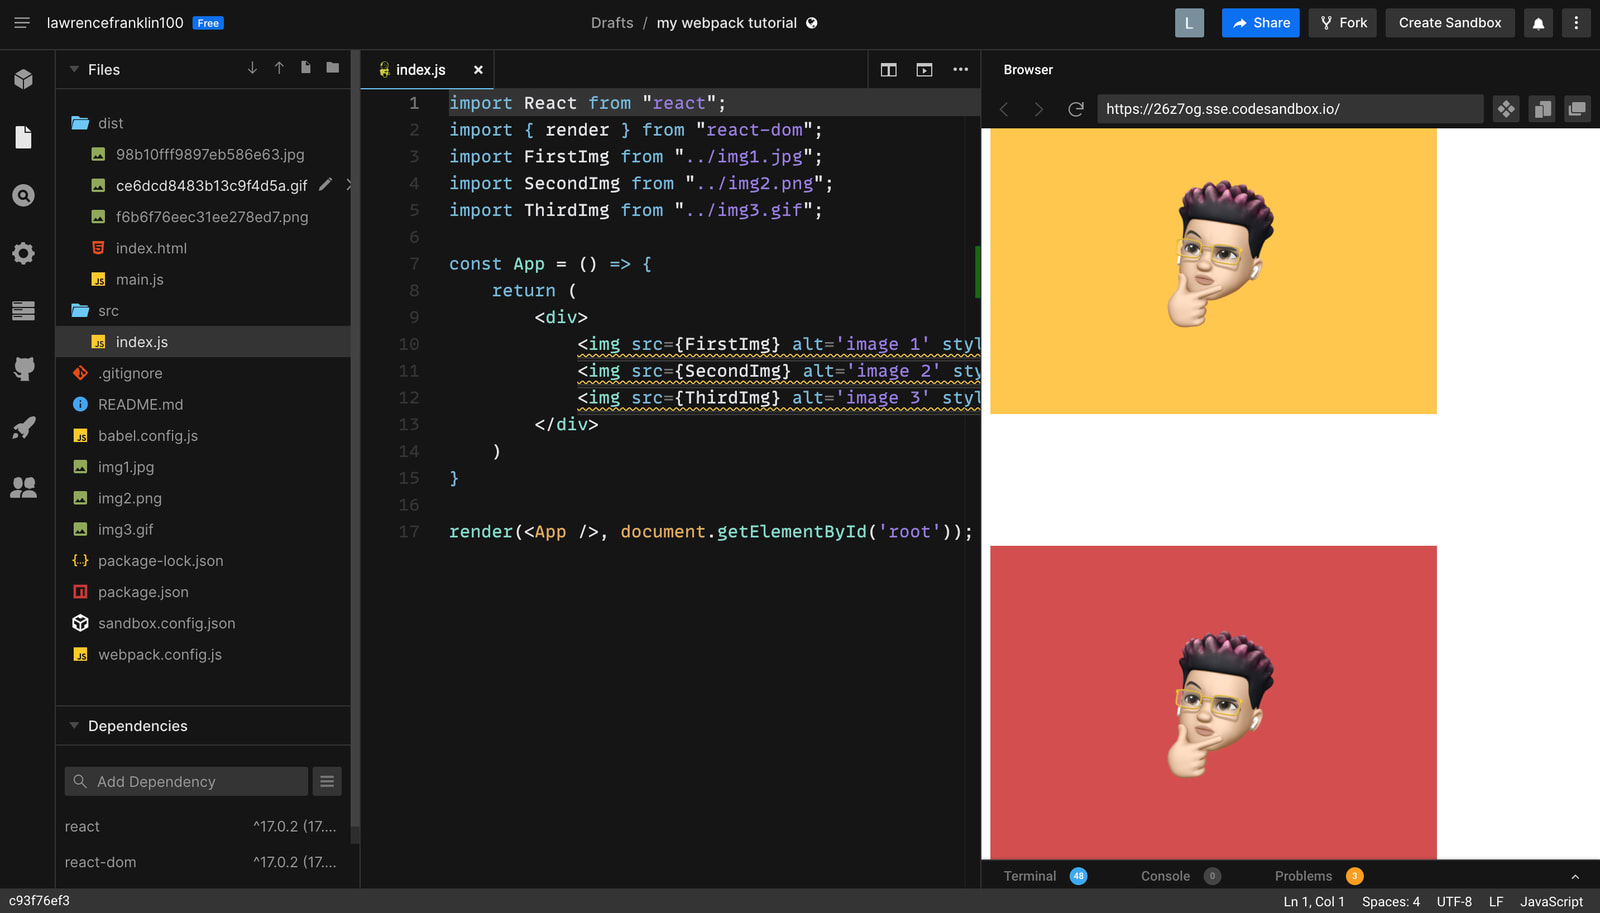
Here’s what the served page with three images looks like:
Tools like create-react-app exist to abstract this development experience with setting up webpack and managing asset bundling.
In this post, you learned how to setup a React.js project bundled with webpack. The project also includes image files bundled using webpack’s asset modules.
You may find the following resources useful.