If a picture is worth a thousand words, how about a video? Mixed content presentations currently have a higher conversion rate on desired outcomes when sharing information. Hence the combined use of video, image, and text content in blogs, tutorials, and even content marketing pages.
This post will explore adding interactive video content in a blog created with Gatsby.js and Markdown. We’ll utilize MDX, which helps us render React.js components in Markdown documents.
Markdown is a widely accepted choice for creating content, mainly blog posts, due to its simplicity in creating rich text and its closeness to writing plain text.
At the end of this tutorial, we’ll be able to display a video player playing a specific video for each of our blog posts in a Gatsby-powered blog, with text content written in Markdown.
We completed this project in CodeSandbox. You can fork it to run the code.
For this project, you require knowledge of JavaScript and React.js. The comprehension of Gatsby.js and Markdown content creation would be nice to have but isn’t needed.
As this is an enhancement to an existing Gatsby blog, you can utilize your current Gatsby blog or create a new one using the Gatsby blog starter. We bootstrapped this project using a blog starter built with Gatsby and styled with Chakra-ui components. You can find the starter CodeSandbox below to get started quickly.
https://codesandbox.io/s/goofy-lalande-m1sh0?file=/src/pages/index.js
In the above CodeSandbox, we have the following:
- Installed dependencies and plugins including Chakra-ui and gatsby-transformer-remark
- Plugin configuration in the gatsby-config.js file
- Gatsby blog setup with pages automatically created from Markdown documents
- Site layout and pages styled with Chakra-ui
- Blog posts fetched and listed on the homepage
- Single pages rendered and styled for each blog post
We’ll make several modifications to each of the above entities along the way and explain the reason for each change.
The current home page looks like this:

Each blog post page looks like this:

Our goal is to display a video at the top of each blog post content while maintaining the markdown content.
We require the MDX plugin for Gatsby and its dependencies. We’ll install those using yarn with:
    yarn add gatsby-plugin-mdx @mdx-js/mdx @mdx-js/react
Code language: CSS (css)
Alternatively, you can install them with NPM using:
    npm install --save gatsby-plugin-mdx @mdx-js/mdx @mdx-js/react
Code language: CSS (css)
Next, we need to configure the plugin in the gatsby-config.js file in the project’s root directory.
First, we updated the siteMetadata object to reflect the new site title and description.
    module.exports = {
      siteMetadata: {
        title: `Gatsby x MDX Video Blog`,
        description: `A Gatsby video blog using MDX`,
        author: `@gatsbyjs`,
      },
      plugins: [
        // plugins go in here
      ]
    }
Code language: JavaScript (javascript)
Next, we add the plugin configurations for gatsby-plugin-mdx.
    module.exports = {
      siteMetadata: {
        // site metadata goes in here
      },
      plugins: [
        {
          resolve: `gatsby-source-filesystem`,
          options: {
            name: `blogPosts`,
            path: `${__dirname}/src/blog-posts`
          }
        },
        {
          resolve: `gatsby-plugin-mdx`,
          options: {
            defaultLayouts: {
              blogPosts: require.resolve("./src/components/layout.js"),
              default: require.resolve("./src/components/layout.js"),
            },
            extensions: [`.mdx`, `.md`],
          }
        },
        // other plugins go in here
      ]
    }
Code language: JavaScript (javascript)
In the above snippet, we sourced all blog posts using gatsby-source-filesystem, which creates file nodes for all the documents in the blog-posts directory specified.
We then configured gatsby-plugin-mdx and added options for a layout and default layout.
This layout specified is a default exported React component applied to all MDX documents (we use the current page layout created in src/components).
We added default layouts for files sourced by gatsby-source-filesystem with the name of blogPosts. We set a global default layout as a fallback.
Lastly, we added both .mdx and .md extensions so that the MDX plugin will handle both markdown and MDX files.
With the .md and .mdx extension specified in the plugin configuration, you can discard the
gatsby-transformer-remarkplugin.
With the complete MDX plugin setup in gatsby-config.js, file nodes for the MDX data are created in Gatsby’s data layer and queried using GraphQL. We’ll update the logic that automatically makes pages for markdown files to use MDX files instead.
We update the automatic slug and page creation process in gatsby-node.js. First, in the onCreateNode function, we specify the slug field’s creation only for MDX node types.
    const { createFilePath } = require(`gatsby-source-filesystem`)
    const path = require("path")

    exports.onCreateNode = ({ node, getNode, actions }) => {
      const { createNodeField } = actions
      if (node.internal.type === "Mdx") {
        const slug = createFilePath({ node, getNode, basePath: `blog` })
        createNodeField({
          node,
          name: `slug`,
          value: slug
        })
      }
    }
Code language: JavaScript (javascript)
This snippet creates a new slug field for all MDX file nodes using the blog post’s file path.
Next, we’ll update the createPages function to create pages using each blog post’s newly generated slug.
You can create blog posts pages based on any existing field in the node. It doesn’t have to be from the slug. It could be a unique ID.
    const path = require("path")
    exports.createPages = async ({ graphql, actions }) => {
      const { createPage } = actions
      const result = await graphql(`
        query {
          allMdx {
            edges {
              node{
                fields {
                  slug
                }
                frontmatter {
                title
              }
              }
            }
          }
        }
      `)
Code language: JavaScript (javascript)
In the snippet above, we made a GraphQL query to fetch all MDX documents with their slug and title.
With these, we loop through the returned data and create pages using the createPage function. We use the slug as the path, added a template for the page in the component key, and added data sent to the page as context.
    result.data.allMdx.edges.forEach(({node}) => {
        createPage({
          path: node.fields.slug,
          component: path.resolve("./src/templates/blog-template-mdx.js"),
          context: {
            slug: node.fields.slug,
            title: node.frontmatter.title
          }
        })
      })
    }
Code language: JavaScript (javascript)
We added a template for the MDX blog posts so we need to create this template in src/templates. We make a new file called blog-template-mdx.js, similar to the blog-template.js file, in the same directory.
In blog-template-mdx.js, we import all required dependencies and make a GraphQL query for MDX data using its slug. This slug is already passed as context data on page creation.
    import React from "react"
    import { graphql } from "gatsby"
    import Layout from "../components/layout"
    import SEO from "../components/seo"
    import { Box, Center, HStack, Text } from "@chakra-ui/react"
    import { MDXRenderer } from "gatsby-plugin-mdx"
    import "./blog-template.css"

    export const query = graphql`
      query($slug: String!) {
        mdx(fields: {slug: {eq: $slug}}) {
          frontmatter {
            publishBy
            title
          }
          timeToRead
          wordCount {
            words
          }
          body
        }
      }
    `
Code language: JavaScript (javascript)
Here we imported the MDXRenderer component, which we’ll use to render the page’s MDX content. We also imported an existing CSS file to style the blog content. Also, we queried all relevant data required to display the blog content.
Next, we create the blog post component and render all relevant data.
    // Imports go here

    export const query = graphql`
      // graphql query goes in here
    `
    const BlogPostMdx = ({ data }) => {
      const post = data.mdx
      return (
        <Layout>
          <SEO title="Home" />
          <Text my={5} fontSize={"3xl"} fontWeight={"bold"}>
            {post.frontmatter.title}
          </Text>
          <Box mb={10}>
            <Center>
              <HStack spacing={5} mt={3}>
                <Text color={"gray.400"} fontSize={"xs"}>
                  {post.timeToRead} {post.timeToRead > 1 ? "mins read" : "min read"}
                </Text>
                <Text color={"gray.400"} fontSize={"xs"}>
                  {post.frontmatter.publishBy}
                </Text>
              </HStack>
            </Center>
          </Box>
          {/*handle MDX content*/}
          <Box className={'blog-content'}>
            <MDXRenderer>{post.body}</MDXRenderer>
          </Box>
        </Layout>
      )
    }
    export default BlogPostMdx
Code language: JavaScript (javascript)
We use Chakra-ui components and props to style the page template. Be sure to delete the old blog-template.js file as it will be compiled on app build and throw errors if kept.
At this point, the hot-reloaded app should throw multiple errors as we haven’t created MDX content or rebuilt the app. We update all markdown content in src/blog-posts to MDX files by changing their file extension to .mdx.
Next, we’ll update the home page component in src/pages/index.js to use a new GraphQL query with MDX data.
First, we update the imports and GraphQL query for MDX data to:
    import React from "react"
    import { graphql, Link } from "gatsby"
    import Layout from "../components/layout"
    import SEO from "../components/seo"
    import { Box, Text, SimpleGrid, HStack } from "@chakra-ui/react"

    export const query = graphql`
      query {
        allMdx(sort: { order: DESC, fields: frontmatter___publishBy }) {
          edges {
            node {
              fields {
                slug
              }
              frontmatter {
                title
                publishBy
              }
              timeToRead
            }
          }
        }
      }
    `
Code language: JavaScript (javascript)
Lastly, we update the IndexPage component to render the queried MDX data:
    const IndexPage = ({ data }) => {
      const blogPosts = data.allMdx.edges
      return (
        <Layout>
          <SEO title="Home" />
          <Text my={5} fontSize={"3xl"} fontWeight={"bold"}>
            Blog Posts
          </Text>
          <SimpleGrid columns={3} spacing={8}>
            {blogPosts &&
              blogPosts.map(({ node }, index) => (
                <Box as={Link} shadow="md" borderWidth="1px" rounded={"lg"} p={2}
                  key={index}
                  to={node.fields.slug}
                >
                  <Text fontSize={"sm"} mt={3} fontWeight={"500"}>
                    {node.frontmatter.title}
                  </Text>
                  <HStack spcacing={5} mt={1}>
                    <Text color={"gray.400"} fontSize={"xs"}>
                      {node.timeToRead} {node.timeToRead > 1 ? "mins" : "min"}
                    </Text>
                    <Text color={"gray.400"} fontSize={"xs"}>
                      {node.frontmatter.publishBy}
                    </Text>
                  </HStack>
                </Box>
              ))}
          </SimpleGrid>
        </Layout>
      )
    }
    export default IndexPage
Code language: JavaScript (javascript)
With these, we’ll restart the development server to see the blog with MDX content.
We’ll utilize the Cloudinary-React SDK to display a video player with a remote video on Cloudinary. To use media assets on Cloudinary for this project, you need to have a Cloudinary account with videos uploaded to Cloudinary. You create one here.
We proceed to install the cloudinary-react SDK using yarn with
yarn add cloudinary-react
The cloudinary-react package exports Image, Video, and Transformation React components required to present media assets and optimized transformations from Cloudinary.
While we use Cloudinary here, you can use any video library or even the native.
<video>element in HTML to render your choice video component.
We proceed to create a component in src/components called video-player.js.
    // src/components/video-player.js
    import React from "react"
    import { Box, Center } from "@chakra-ui/react"
    import { CloudinaryContext, Video } from "cloudinary-react"

    const VideoPlayer = ({ publicId }) => {
      return (
        <Box mb={"4%"}>
          <Center>
            <CloudinaryContext cloudName={"chuloo"}>
              <Video publicId={publicId} autoPlay controls />
            </CloudinaryContext>
          </Center>
        </Box>
      )
    }

    export { VideoPlayer }
Code language: JavaScript (javascript)
This functional component receives a prop of publicId of the Cloudinary video. It renders a video player with autoplay content and playback controls.
CloudinaryContext specifies data required and available to all child Cloudinary components, i.e., cloudName. Like all other components of this project, we use Chakra-ui for styling.
We can further enhance this video component to use video transformations and optimizations available on Cloudinary.
We can now import this component into any MDX document and render the video on runtime. To skip this VideoPlayer component’s importation into every MDX document, we will utilize shortcodes to import the component into each MDX document automatically.
We handle the shortcode in the MDX document template. First, we import the VideoPlayer and MDXProvider components.
    // src/components/layout.js
    import { VideoPlayer } from "./video-player"
    import { MDXProvider } from "@mdx-js/react"

    const shortcodeComponents = { VideoPlayer }
    const Layout = ({ children }) => {
      const data = useStaticQuery(graphql`
        // GraphQL query goes in here
      `)

      return (
        <>
          <Header siteTitle={data.site.siteMetadata?.title || `Title`} />
          <Box margin={"0 auto"} maxWidth={960} padding={`0 1.0875rem 1.45rem`}>
            <Box>
              {/*Furnish the provider with shortcode */}
              <MDXProvider components={shortcodeComponents}>{children}</MDXProvider>
            </Box>
          </Box>
        </>
      )
    }
Code language: JavaScript (javascript)
Any component specified in the shortcodeComponents object is available to all MDX documents with the above layout.
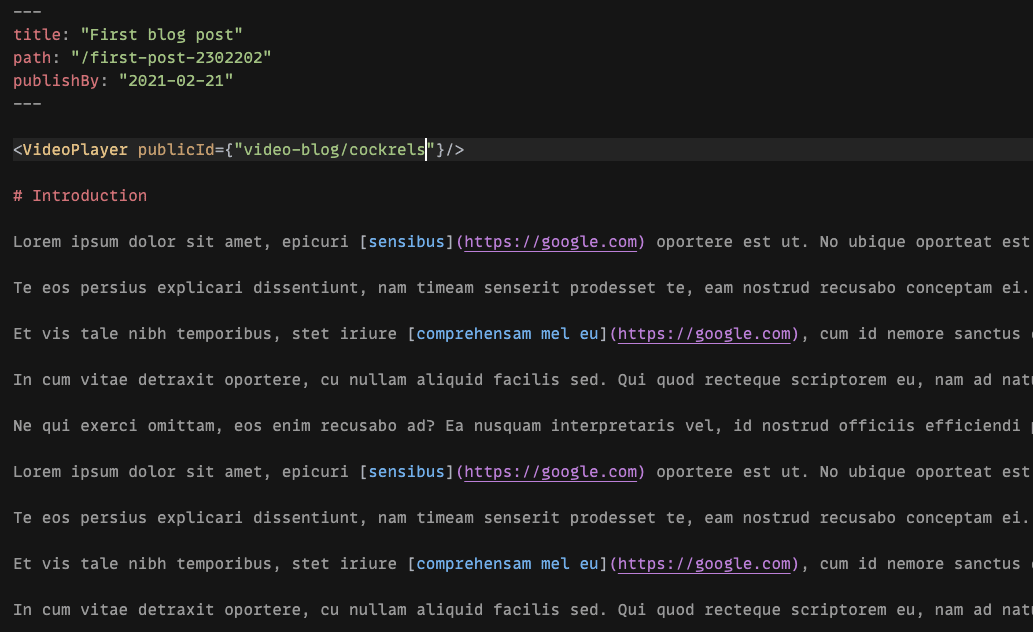
Finally, we’ll add the VideoPlayer component with a publicId of an existing video on Cloudinary to each MDX document.

We restart the development server to rebuild the site. Here’s an example blog post with a video of chickens clucking away:

In this post, we discussed how to create an interactive blog using MDX and Gatsby.js. We also introduced a video player with which we added remote videos from Cloudinary. You can add other interactive components to the blog using MDX. Also, add video transformations to each video or customize the video player even further to have subtitles and a caption.
You may find the following resources useful:
