
QR (quick response) codes are a popular type of two-dimensional or matrix barcode that allows you to easily encode information in the form of machine-readable images. These images can be used anywhere, from websites and mobile apps to banners, brochures, flyers, and business cards. Its popularity and effectiveness can be attributed to several factors, including the ease with which it can be scanned from any angle with a simple camera the high level of data integrity it provides even when parts of the QR Code are damaged or dirty.
The widespread use of QR codes has resulted in the development of several free and paid platforms for generating and scanning them. In this article, we will build a QR code generator that will encode alphanumeric data representing social media links. After that, we will add two additional features. The first is the ability to download the image locally. The second is to upload the resulting image to Cloudinary and receive a shareable URL that can be copied to the clipboard. This should be fun!
Here is a link to the demo on CodeSandbox.
Run this command in your terminal to create a simple React application:
npx create-react-app qr-code-generator
Next, run the following command in your terminal to install the dependencies we’ll need for this project:
    npm i qrcode.react react-dropzone axios
Code language: CSS (css)
The qrcode.react module will generate the QR code. The react-dropzone module will be used to add Drag and drop functionality for the images embedded on the QR code, while the **axios** module will be the HTTP client.
We’ll also need to create a separate component (file picker) to handle the drag-and-drop for the images that will be embedded in our QR code. Run the following command at the root of your project to create a folder named components and a file inside called ImagePicker.js:
    mkdir components
    cd components
    touch ImagePicker.js
Code language: CSS (css)Add the following to your App.js file:
    import './styles.css';
    import { useState } from 'react';
    import QrCode from 'qrcode.react';
    export default function App() {
      const [input, setInput] = useState('');
      const uploadToCloudinary = async () => {};
      const downloadImage = async () => {};
      return (
        <main className="App">
          <div className="form_group norm container">
            <label>Add link to social media profile</label>
            <input
              type="url"
              value={input}
              onChange={(e) => setInput(e.target.value)}
            />
          </div>
          {input && (
            <>
              <div>
                <QrCode value={input} size={400} level="M" includeMargin />
              </div>
            </>
          )}
        </main>
      );
    }
Code language: HTML, XML (xml)
In this component, we begin with some CSS, then some React hooks, and finally the QrCode component. We define a state variable called input in our App component, which will hold the URL of a random social media profile; this is followed by two other functions, downloadImage and uploadToCloudinary, which we will discuss later. Our App component renders several things; the first is an input field that updates the state variable with data provided by the user. We also conditionally render the QrCode component based on the availability of the user input, and it accepts the following props:
-
value: the data that would be encoded in the QR code; this is fed the string stored in our input state variable. -
size: this number would represent the dimensions of the rendered image holding the QR code. -
level: the level prop represents the error correction level used. The value can be either low(“L”), medium(“M”), Quartile(“Q”), or high (“H”). Each value represents the error correction level used when generating the QR code. Higher values indicate better error correction. This would mean more data can be recovered even if the QR code gets damaged. -
includeMargin: it accepts a boolean value, which we set totrue. This would allow some extra space to surround the generated symbol. This area is known as the silent zone in QR Code terminology because it helps the scanner identify where the barcode begins and ends.
With this in place, you can run the application using the following command:
npm start
In the running application, You should be able to add some text to the input field and see the resulting QR code generated.
While plain QR code symbols are sufficient to decode any encoded information contained in them, for business and marketing needs which constitute one of the primary use for these symbols, adding a logo on your QR code provides you with several advantages. It demonstrates, aids in promoting your brand’s identity and awareness, and so on.
To embed images in our QR code, we will first create an image picker component that will be used to get our images. We will then use this component in our App.js file to select files and add them to the QR code.
Add the following to your ImagePicker.js file:
    import { useDropzone } from 'react-dropzone';
    const fileToB64 = (file) =>
      new Promise((res, rej) => {
        const fileReader = new FileReader();
        fileReader.onload = () => res(fileReader.result);
        fileReader.onerror = () => rej(fileReader.error);
        fileReader.readAsDataURL(file);
      });
    export default function ImagePicker({ handleImageSelect, children }) {
      const { getInputProps, getRootProps } = useDropzone({
        maxFiles: 1,
        accept: 'image/*',
        onDrop: async (arrayOfFiles) => {
          const b64URL = await fileToB64(arrayOfFiles[0]);
          handleImageSelect(b64URL);
        },
      });
      return (
        <>
          <div {...getRootProps({ className: 'form_group' })}>
            <input {...getInputProps()} />
            <label className={`bl`}>Drag files to add image to QR code</label>
            {children}
          </div>
        </>
      );
    }
Code language: JavaScript (javascript)
In this file, we start by bringing in the useDropzone hook provided by the react-dropzone module. Next, we define a helper function called fileToB64, which uses the FileReader API to return the Data URI of a Blob that gets passed as input.
Next, we define the ImagePicker component, which accepts two props; the first is a function called handleImageSelect which would be used to feed the selected files to the parent component. Because we will use the ImagePicker component as a wrapper for other components, it also accepts the children prop. In the component body, we configure the options we want for the Dropzone by calling useDropzone and passing it an object representing the preferences we want. Here, we choose only to accept a single file which must be an image. We also define a handling function for the onDrop event that would fire whenever our Dropzone receives a file. It gets the file, converts it to a data URI and feeds it to the parent component using the handleImageSelect prop.
The call to useDropzone returns an object containing the Dropzone state, and we extracted these three things from it:
-
getRootProps: When called, this function would return an object representing the props for the Dropzone container, which can be any HTML element. -
getInputProps: this function holds the props for the input field, acting as the Decoy file picker for situations where the user decides to click on the Dropzone to pick files from their computer instead.
Based on the information above, this component renders some JSX, including the children prop it receives and an input element. They are nested within the Dropzone with the required props passed to the Dropzone and input element, respectively.
Next, let’s use this component in our App.js file:
    import ImagePicker from './components/ImagePicker';
Code language: JavaScript (javascript)
Next, let’s create a variable that’ll hold the content of our image.
    //...
    export default function App() {
      const [input, setInput] = useState('');
      const [image, setImage] = useState('');
    //...
Code language: JavaScript (javascript)
Finally, we update the return statement of our App component like so.
    return (
        <main className="App">
          <div className="form_group norm container">
            <label>link to social media profile</label>
            <input
              type="url"
              value={input}
              onChange={(e) => setInput(e.target.value)}
            />
          </div>
          {input && (
            <>
              <section className="dnd_con">
                <ImagePicker
                  handleImageSelect={(file) => {
                    setImage(file);
                  }}
                >
                  <QrCode
                    value={input}
                    size={400}
                    imageSettings={
                      image
                        ? {
                            src: image,
                            excavate: true,
                            width: 82,
                            height: 82,
                          }
                        : {}
                    }
                    level="M"
                    includeMargin
                  />
                </ImagePicker>
              </section>
            </>
          )}
        </main>
      );
Code language: HTML, XML (xml)
In the return statement above, we used the ImagePicker component to wrap the QrCode component. ImagePicker accepts a function it uses to store the selected file in state. The QrCode component accepts an ImageSettings prop that holds an object defining the settings we want for the image that will be embedded. By default, the rendered image will be placed in the center, but you can also specify the coordinates if you want. In our case, we will go with the default coordinates.
If you run your application now, you should be able to drag and drop images, as seen below.
Update the downloadImage function in the App component like so:
    const downloadImage = async (e) => {
      const canvas = document.querySelector('canvas');
      const imageDataURI = canvas.toDataURL('png', 1.0);
      const blob = await (await fetch(imageDataURI)).blob();
      const URL = window.URL.createObjectURL(blob);
      const el = document.createElement('a');
      el.href = URL;
      el.download = 'mydummyfile.png';
      el.click();
      window.URL.revokeObjectURL(URL);
    };
Code language: JavaScript (javascript)
This function starts by getting the canvas element in the DOM that renders the QR code and converts its contents to an image in the form of a Data URI. To make the Data URI downloadable, first, we transform it into a blob. Next, using the createObjectURL function, we create a string that references that blob in memory. This string is then passed as the href attribute to the anchor tag we created programmatically.
To download the blob, we specified the download attribute on the anchor tag. Next, we click the anchor tag programmatically to download the image. The call to window.URL.revokeObjectURL(URL) clears the blobs reference string to avoid memory leaks. Now, let’s update the return statement of our App component with a button that triggers the dowloadImage function.
      return (
        <main className="App">
          <div className="form_group norm container">
            <label>Add link to social media profile</label>
            <input
              type="url"
              value={input}
              onChange={(e) => setInput(e.target.value)}
            />
          </div>
          {input && (
            <>
            //...
              <section className="btn_con">
                <button onClick={downloadImage}> download image</button>
              </section>
            </>
          )}
        </main>
      );
Code language: HTML, XML (xml)In this section, we will make use of the Cloudinary to store and manage media assets. We need to create an account to store and manage media using Cloudinary. In the account details section on your dashboard, you should see your Credentials, as shown below.
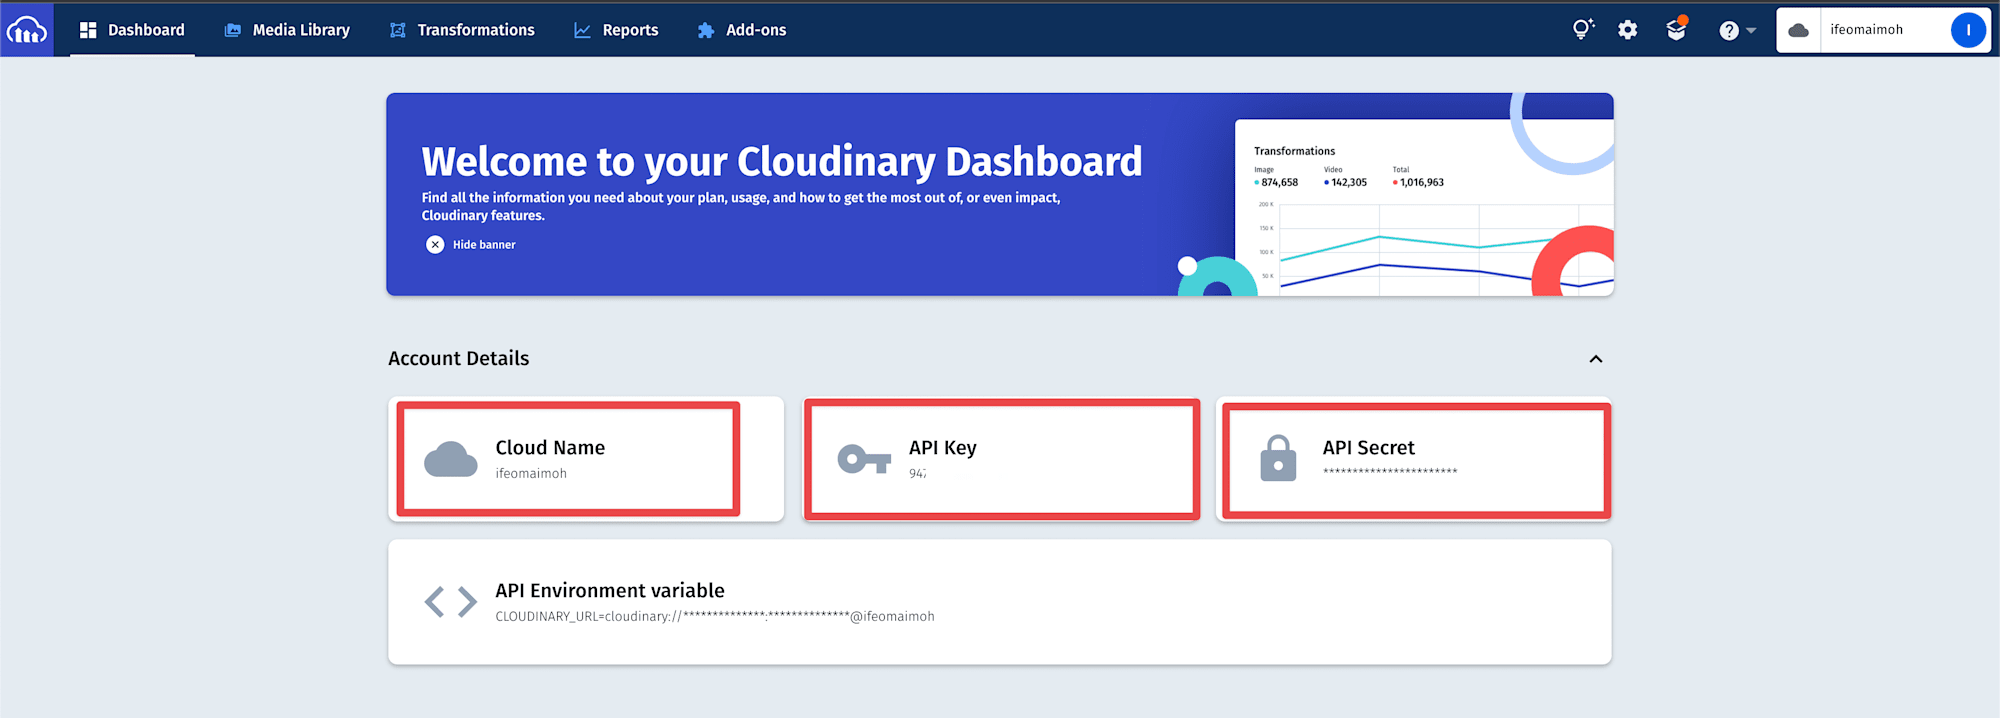
We will be sending images to Cloudinary via unsigned POST requests for this tutorial. To do this, we need our account cloud name and an unsigned upload preset. Specify a name for the upload preset and set the signing mode to unsigned; this will be sufficient for our app.
Before updating the uploadToCloudinary function in the App.js file, we need to create a state to keep track of the loading state for uploading.
    export default function App() {
      //... other state variables
      const [loading, setLoading] = useState(false);
Code language: JavaScript (javascript)
Now update the contents of the uploadToCloudinary function to match the following:
    const uploadAndGenSharableURL = async () => {
      const canvas = document.querySelector('canvas');
      const imageDataURI = await canvas.toDataURL('png', 1.0);
      const cloudname = 'INSERT-CLOUDNAME-HERE';
      const upload_preset = 'INSERT-NAME-OF-UPLOAD-PRESET-HERE';
      try {
        setLoading(true);
        let res = await axios.post(
          `https://api.cloudinary.com/v1_1/${cloudname}/image/upload`,
          {
            file: imageDataURI,
            upload_preset,
          }
        );
        const { url } = res.data;
        await navigator.clipboard.writeText(url);
        alert('COPIED TO CLIPBOARD');
      } catch (error) {
        console.log(error.message);
      } finally {
        setLoading(false);
      }
    };
Code language: JavaScript (javascript)
In this function, we start by getting the Data URI from the canvas element that renders the QR code. Next, we define variables to store our cloud name and upload preset. After that, we attempt to upload the file by hitting the image upload Cloudinary endpoint and passing the request body, which holds the two compulsory fields when doing unsigned uploads. The file key contains the Data URI of our QR code, and the upload_preset key holds the string representing the upload preset we created earlier.
If the API call is successful, we get a lot of things from the returned data, but what we are interested in is the url key that holds the URL pointing to the image on our Cloudinary account. Using the clipboard.writeText method, we copy the URL to the clipboard and notify the user. If the API call fails, we simply display an error message.
Now, let’s update our UI to include a button to trigger the uploadToCloudinary.
    return (
      <main className="App">
        //...

        {input && (

          //...
            <section className="btn_con">
              <button onClick={downloadImage}> download image</button>
              <button onClick={uploadToCloudinary}>
                {loading ? 'processing...' : 'copy QR code link'}
              </button>
            </section>
          </>
        )}
      </main>
    );
    }
Code language: HTML, XML (xml)
If we run our app now, we should be able to generate the QR codes with images embedded in them, download the resulting symbol, and get a sharable URL. You can also head over to the media gallery section of your Cloudinary dashboard to see the QR code image, as seen below.

Find the complete project here on GitHub.
In this article, we looked at how to build a QR code generator that encodes alphanumeric data representing social media links. This knowledge gives us a decent head start to explore the potential of this technology in future applications.
Resources you may find helpful: