
Accessibility is one of the most prominent concerns in modern web development. The need to optimize websites for screen readers and cater to the needs of the visually impaired cannot be overemphasized. In this post, we’ll look at how we can improve the accessibility of our media assets using Cloudinary and Next.js. We’ll build a demo with Next.js to implement accessibility enhancements like – auto-generating alt text for images, color-blind friendly images, dark/light modes, and more.
To follow along with this tutorial, you will need to have:
- A free Cloudinary account.
- Working experience with React and Next.js.
Create a new Next.js application using the following command:
npx create-next-app media-assets
The above command creates a starter next.js application in the project folder.
Now, run these commands to navigate into the project directory and install the required dependencies:
cd media-assets
npm i @cloudinary/url-gen isomorphic-dompurify
Code language: CSS (css)
After the installation is complete, run:
npm run dev
Next.js will start a live development server at http://localhost:3000
We will implement dark mode using the Next.js custom [_document](https://nextjs.org/docs/advanced-features/custom-document#caveats) configuration.
First, override the default Document by creating a _document.js file in the /pages folder, then add the following code snippet:
//pages/_document.js
import Document, { Html, Head, Main, NextScript } from "next/document";
import DOMPurify from "isomorphic-dompurify";
class MyDocument extends Document {
  render() {
    return (
      <Html lang="en">
        <Head></Head>
        <body>
          <script
            dangerouslySetInnerHTML={{
              __html: DOMPurify.sanitize(themeInitializerScript)
            }}
          ></script>
          <Main />
          <NextScript />
        </body>
      </Html>
    );
  }
}
// This function needs to be a String
const themeInitializerScript = `(function() {
  ${setInitialColorMode.toString()}
  setInitialColorMode();
})()
`;
Code language: JavaScript (javascript)
In the snippet above, we import Document, { Html, Head, Main, NextScript } from the next/document package. We also Import DOMPurify from our isomorphic-dompurify package and use it to sanitize our dangerouslySetHtml data.
Next, we define a themeInitializerScript to set our initial color mode, this is the data we sanitize using the DOMPurify package. Notice that we called a setInitialColorMode() function our themeInitializerScript ? let’s define that function below:
//pages/_document.js
function setInitialColorMode() {
  // Check initial color preference
  function getInitialColorMode() {
    const persistedPreferenceMode = window.localStorage.getItem("theme");
    const hasPersistedPreference = typeof persistedPreferenceMode === "string";
    if (hasPersistedPreference) {
      return persistedPreferenceMode;
    }
    // Check the current preference
    const preference = window.matchMedia("(prefers-color-scheme: dark)");
    const hasMediaQueryPreference = typeof preference.matches === "boolean";
    if (hasMediaQueryPreference) {
      return preference.matches ? "dark" : "light";
    }
    return "light";
 }
Code language: JavaScript (javascript)
In the snippet above, we:
- Create the
getInitialColorMode()function to fetch thepersistedPreferenceModefrom theLocalStorageusing thethemekey. - Create a
hasPersistancePreferencevariable that stores a boolean result after checking to ensure that thetypeofof thepersistedPreferenceModeis astring. - Declare a conditional statement that returns the
persistedPreferenceModeifhasPersistedPreferenceis true. - Set
preferencevariable that equals the value ofwindow.matchMedia("(prefers-color-scheme: dark)"). - Set a check to confirm the
typeofofpreference.matchesis equal to abooleanand stores its value in thehasMediaQueryPreference. - Lastly, we create a conditional statement to check if
hasMediaQueryPreferenceis true, and perform different actions when the conditions match and fail respectively.
Next, let’s link these settings to our next app by adding the following snippet:
//pages/_document.js
const currentColorMode = getInitialColorMode();
  const element = document.documentElement;
  element.style.setProperty("--initial-color-mode", currentColorMode);
  // If darkmode, apply darkmode
  if (currentColorMode === "dark")
    document.documentElement.setAttribute("data-theme", "dark");
}
Code language: JavaScript (javascript)
In the snippet above, we store the value of our getInitialColorMode() function into a new variable currentColorMode. We do the same to document.documentElement as we store its value into a new element variable to make it easier to reference.
With that, we can easily assign a CSS property to that element using the setProperty() function, which sets the value of our --initial-color-mode property to the currentColorMode(). Lastly, we check if the currentcColorMode is dark and, if so, set the data-theme attribute to dark. Next, let’s configure the index page with the necessary markup and logic for our demo.
First, we’ll set up state management in our application using React hooks. This will allow us to track and modify the state of our applications theme such that we can toggle it from light to dark and vice versa:
//pages/index.js
import { useEffect, useState } from "react"
const HomePage = () => {
const [ darkTheme, setDarkTheme ] = useState(undefined)
useEffect(() => {
    const root = window.document.documentElement;
    const initialColorValue = root.style.getPropertyValue(
      "--initial-color-mode"
    );
    // Set initial darkmode to light
    setDarkTheme(initialColorValue === "dark");
  }, []);
}
Code language: JavaScript (javascript)
Here, we:
- Import the
useState, anduseEffecthooks from react for state management. - Initialize a
darkThemestate and assign it an undefined value for a start. - Create a
useEffecthook without a dependency that sets the initial theme to light mode.
Next, we create another useEffect hook that depends on the darkTheme state to conditionally toggle our application from light mode to dark mode. It does this by setting the data-theme attribute on the DOM and storing the value in localStorage:
// pages/index.js
useEffect(() => {
    if (darkTheme !== undefined) {
      if (darkTheme) {
        // Set value of  darkmode to dark
        document.documentElement.setAttribute("data-theme", "dark");
        window.localStorage.setItem("theme", "dark");
      } else {
        // Set value of  darkmode to light
        document.documentElement.removeAttribute("data-theme");
        window.localStorage.setItem("theme", "light");
      }
    }
  }, [darkTheme]);
Code language: JavaScript (javascript)
In the above snippet, we will do a check to ensure that the darkTheme value is not undefined, then we set the data-theme attribute and the localstorage’s theme key to dark. Else, we remove the data-theme attribute and set the theme key to light.
Next, we create a checkbox input with a checked attribute and set its value to the darkTheme state. Then, we add an onChange event to listen and execute our handleToggle() function when the darkTheme state changes:
//pages/index.js
<div>
  {darkTheme !== undefined && (
    <form action="#">
      <label className="switch">
        <input
          type="checkbox"
          checked={darkTheme}
          onChange={handleToggle}
        />
        <span className="slider"></span>
      </label>
    </form>
  )}
</div>
Code language: HTML, XML (xml)
Next, let’s define the handleToggle``() function to toggle the theme by adding the following snippet:
  const handleToggle = (event) => {
    setDarkTheme(event.target.checked);
  };
Code language: JavaScript (javascript)
With this, we have successfully configured dark mode theming in this project. Next, let’s implement the color blind effects on assets uploaded to our Cloudinary application.
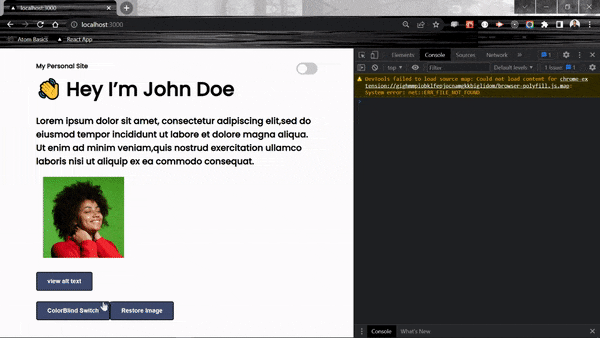
For this part of the article, we will integrate our application with Cloudinary using the Cloudinary React SDK. Here, we will work to cater for a commonly observed condition, deuteranopia (difficulty seeing different shades of red, green, and yellow).
Open the index.js file and update it with the snippet below:
// pages/index.js
import { Cloudinary } from "@cloudinary/url-gen";
import { simulateColorBlind } from "@cloudinary/url-gen/actions/effect";

const HomePage = () => {
  const [colorBlindEffect, setColorBlindEffect] = useState("");
  const handleClick = () => {
    setColorBlindEffect("");
    const cld = new Cloudinary({
      cloud: {
        cloudName: “YOUR_CLOUDNAME”
      }
    });
    const myImage = cld.image("color-effect/afro");
    myImage.effect(simulateColorBlind().condition("deuteranopia"));
    const imageUrl = myImage.toURL();
    setColorBlindEffect(imageUrl);
  };
  const reset = () => {
    setColorBlindEffect("/afro.jpg");
  };

  return (
    <>
      <div className="container">
        <section id="image">
          <div className="image-wrapper">
            <img
              src={colorBlindEffect ? colorBlindEffect : "/afro.jpg"}
              className="afro"
              alt="woman on afro"
            />
          </div>
          <div>
            <button
              onClick={handleClick}
              className="btn"
            >
              ColorBlind Switch
            </button>
            <button className="btn" onClick={reset}>
              Restore Image
            </button>
          </div>
        </section>
      </div>
    </>
  );
};
export default HomePage;
Code language: JavaScript (javascript)
In the snippet above, we:
- Import
Cloudinaryand thesimulateColorBlindmethod to help achieve the desired functionalities. - We then define a
colorBlindEffectstate to hold the initial value of the effect. - Next, we create an HTML image element to display the image, along with two buttons to initiate the Cloudinary conversion of the image, and restore the original image respectively.
- In the
handleClickfunction, we implement the logic to reset ourcolorBlindEffectstate and fetch a sample image from Cloudinary. With the image saved in a variablemyImage, we then apply the color blind effect on it by calling thesimulateColorBlind().condition()method. In our case, we want to simulate thedeuteranopiacondition, so we specify it in the method ascondition("deuteranopia"). To convert the value ofmyImageto a URL, we call thetoURL()method on it and save the value to a new variableimageUrl. Finally, we update our colorBlindEffect state with the imageURL.
With this, we have successfully implemented a colour-blind effect for the deuteranopia condition using Cloudinary. You can access this project here for a more hands-on experience with the source code.
For this part of the article, we’ll show you how you can generate descriptive text for web images using Cloudinary’s Google Auto Tagging add-on. To achieve this, we’ll leverage the next.js API routes feature to create a Node environment that communicates with the Cloudinary API.
In your pages folder, create an API route called update.js and add the following code:
// pages/update.js
import { v2 as Cloudinary } from "cloudinary";
export default function handler(req, res) {
  try {
    Cloudinary.config({
      cloud_name: process.env.CLOUD_NAME,
      api_key: process.env.API_KEY,
      api_secret: process.env.API_SECRET,
      secure: true
    });
    const imageUpdate = Cloudinary.api.update(
      "color-effect/afro",
      { categorization: "google_tagging", auto_tagging: 0.9 },
      function (error, result) {
        console.log(result, error);
        return result;
      }
    );
    imageUpdate.then((data) => {
      res.status(200).json(data.tags[0]);
    });
  } catch (error) {
    console.log(error.message);
    res.status(500).json();
  }
}
Code language: JavaScript (javascript)
Here, we:
- Import the Cloudinary Node SDK and export a handler function with
reqandresparameters. - Create a conditional statement to handle the Cloudinary configurations and execute an update call.
- Update the image using the
updateAPI and set thecategorizationproperty togoogle_tagging.
With the above configurations, we will be able to receive a URL from Cloudinary that contains an array of automatically generated texts that defines the image displayed.
Next, let’s display the returned result on the client by adding the following snippet to our index.js file:
//pages/index.js
const [altText, setAltText] = useState("");
const [altTextToggle, setAltTextToggle] = useState(false);

const toggleAlt = async () => {
  const altT = await fetch("/api/update");
  const alt = await altT.json();
  setAltText(alt);
  setAltTextToggle(!altTextToggle);
}
Code language: JavaScript (javascript)
Here, we make a fetch request to our /api/update route. As earlier mentioned, this endpoint will return a URL from Cloudinary that contains an array of generated texts that describes the image displayed. When we get this response, we update the altText in state with the first item in the array that we returned from the server.
Now that we have the descriptive text in state, let’s apply it to our HTML image element and also just display it on screen for visibility:
<section id="image">
  <div className="image-wrapper">
    <img
      src={colorBlindEffect ? colorBlindEffect : "/afro.jpg"}
      className="afro"
      alt={altText}
    />
    {altTextToggle ? <i>{altText}</i> : ""}
  </div>
  <button className="btn" onClick={toggleAlt}>
    view alt text
  </button>
</section>

Code language: HTML, XML (xml)
Bringing it all together, we’ve just built a small Next.js app with light and dark modes. We implement an accessibility-friendly image display that caters for the deuteranopia condition and lastly showed you how to auto-generate alt texts for your images using Cloudinary. Here’s a working demo for your convenience.
Feel free to use the source code via this sandbox and extend it as you see fit.