
Accessibility is one of the most important parts of the modern web. That is why we are using transcriptions to enhance the usability of video files online. Transcriptions are one of the most accessible ways to deliver video content as it caters to the challenges of a wide variety of web users. In this post, we’ll look at how to add transcriptions to videos rendered in a Nextjs application with Cloudinary.
In the end, we’ll create a web application that uses the Cloudinary API to transcribe a user-uploaded video and returns a downloadable URL of the transcribed video.
The Cloudinary API uses a Google-Speech-AI add-on to generate a subtitle file for the uploaded video, and then we will add a transformation that overlays this subtitle on the given video.
To follow along with this tutorial, you will need to have, — A free Cloudinary account. — Experience with JavaScript and React.js — Next.js is not a requirement, but it’s good to have.
If you’d like to get a headstart by looking at the finished demo, I’ve got it set up here on Codesandbox for you!
We completed this project in this sandbox.
To test successfully with this demo, ensure that you upload a video size <1MB
Fork and run it to quickly get started.
https://codesandbox.io/embed/dawn-fast-qt9enh?fontsize=14&hidenavigation=1&theme=dark
First, we will create a Next.js boilerplate with the following command:
npx create-next-app video-transcription
Let’s navigate to the root folder and install Netlify-CLI with the following command:
cd video-transcription
Next, install the following packages:
-
Cloudinary — a NodeJS SDK to interact with the Cloudinary APIs
-
File saver — to help us save our transcribed video
-
Axios — to carry out HTTP requests.
-
Dotenv — to store our API keys safely.
The following command will install all the above packages
npm i cloudinary file-saver axios dotenv
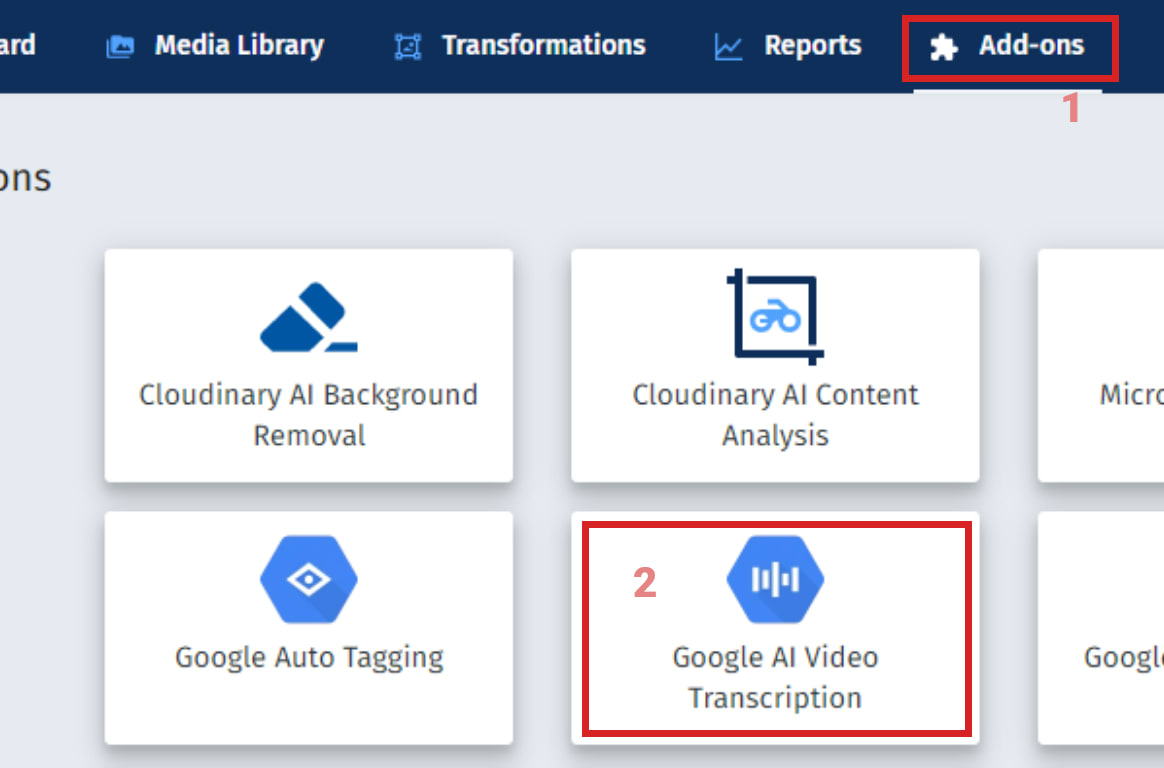
To enable the transcription feature on Cloudinary, we need to follow the process shown below:
Navigate to the Add-ons tab on your Cloudinary account and select the Google AI Video Transcription add-on.
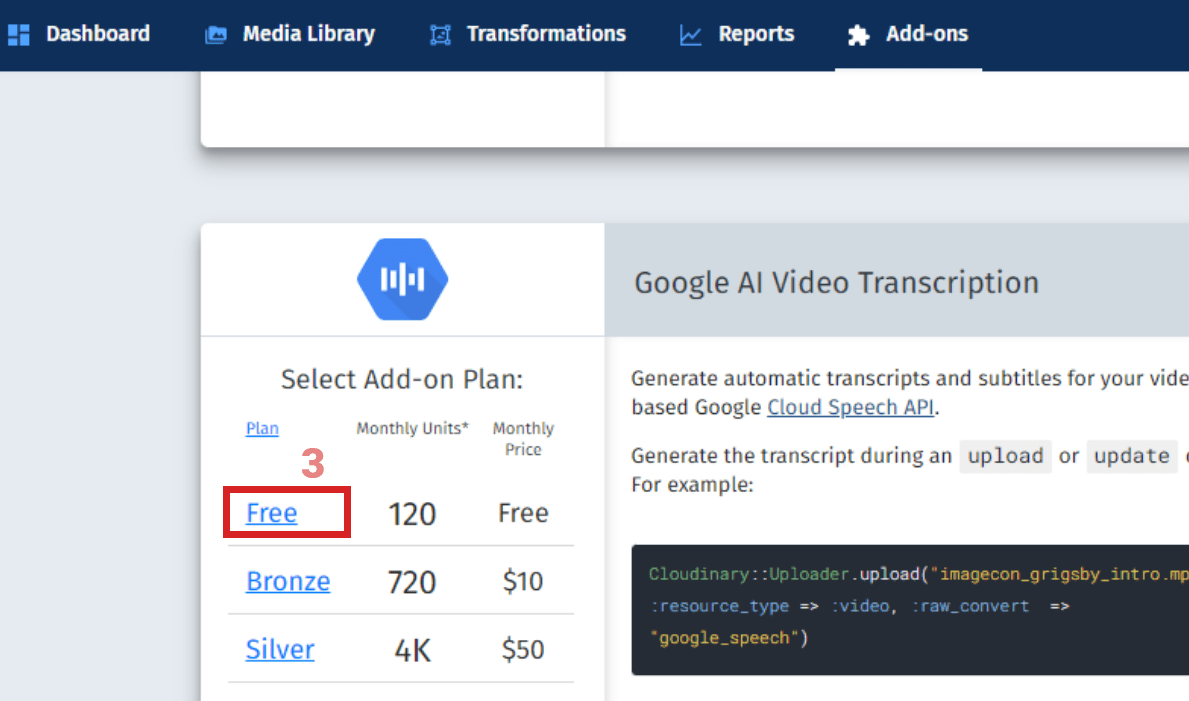
Next, select the free plan that offers 120 monthly units. For a more broad project, you should probably select a paid plan with more units, but this will be sufficient for our demo.
Navigate back into the project folder and start the development server with the command below:
npm run dev
The above command starts a development server at http://localost:3000. You can check that port on the browser to see our demo app running. Next, create a transacribe.js file in our pages/api folder. Then we add the following snippet to it:
const multiparty = require("multiparty");
const Cloudinary = require("cloudinary").v2;
const pth = require("path");
require("dotenv").config();

const uploadVideo = async (req, res) => {
  const form = new multiparty.Form();
  const data = await new Promise((resolve, reject) => {
    form.parse(req, async function (err, fields, files) {
      if (err) reject({ err });
      const path = files.video[0].path;
      const filename = pth.parse(files.video[0].originalFilename).name;

     // config Cloudinary

     // rest of the code here
      } catch (error) {
        console.log(error);
      }
    });
  });

  res.status(200).json({ success: true, data });
};

export default uploadVideo;

Code language: JavaScript (javascript)
Here, we define a uploadVideo() function that first accepts the video file coming from the client. Next, we parse the video
In the snippet above, we:
- Import
Cloudinaryand other necessary packages. - Create an
uploadVideo()function to receive the video file from the client - Parse the request data with multiparty to retrieve the video’s
pathandfilename.
Next, we need to upload the retrieved video file to Cloudinary and transcribe using the Cloudinary Video Transcription Add-on we added.
//src/pages/api/transcribe.js
try {
Cloudinary.config({
  cloud_name: process.env.CLOUD_NAME,
  api_key: process.env.API_KEY,
  api_secret: process.env.API_SECRET,
  secure: true
});

const VideoTranscribe = Cloudinary.uploader.upload(
  path,
  {
    resource_type: "video",
    public_id: `videos/${filename}`,
    raw_convert: "google_speech:srt"
  },
  function (error, result) {
    if (result) {
      return result;
    }
    return error;
  }
);

let { public_id } = await VideoTranscribe;

const transcribedVideo = Cloudinary.url(`${public_id}`, {
  resource_type: "video",
  fallback_content: "Your browser does not support HTML5 video tags",
  transformation: [
    {
      overlay: {
        resource_type: "subtitles",
        public_id: `${public_id}.srt`
      }
    }
  ]
});
resolve({ transcribedVideo });
} catch (error) {
console.log(error);
}

In the snippet above, we set up a Cloudinary instance to enable communications between our Next.js project and our Cloudinary account. Next, we upload the video to Cloudinary, transcribe it and return the result (the transcribed video). Lastly, we destructure the `public_id` of the transcribed video and use it to fetch the transcribed video. Afterwards, we simply add a Cloudinary transformation that overlays the subtitle on the video thereby achieving a complete video transcription functionality for the originally uploaded video.

> **Note**: The Cloudinary Video Transcription feature can only be triggered during an `upload` or `update` call.
> Also, each 15s video you transcribe takes 1 unit from your allocated 120 units in the free plan.

With this, we are finished with our transcription logic.

Next, let's implement the frontend aspect of this application. For this part, we will be creating a JSX form with an input field of type *file*, and a submit button.
Navigate to the `index.js` file in the `pages` folder and add the following code:

```js
// pages/index.js
import Head from 'next/head'
import axios from 'axios'
import { useState } from 'react'
import {saveAs} from 'file-saver'
export default function Home() {
  const [selected, setSelected] = useState(null)
  const [videoUrl, setVideoUrl] = useState('')
  const [downloaded, setDownloaded] = useState(false)

  const handleChange = (e) => {
    if (e.target.files && e.target.files[0]) {
      const i = e.target.files[0];
      let reader = new FileReader()
      reader.onload = () => {
        let base64String = reader.result
        setSelected(base64String)
      }
      reader.readAsDataURL(i)
    }
  }

  const handleSubmit = async(e) => {
    e.preventDefault()
    try {
      const body = JSON.stringify(selected)
      const config = {
        headers: {
          "Content-Type": "application/json"
        }
      };
      const response = await axios.post('/transcribe', body, config)
      const { data } = await response.data
      setVideoUrl(data)
    } catch (error) {
      console.error(error);
    }
  }
  // return statement return ()
}
Code language: JavaScript (javascript)
In the snippet above, we’ve set up the handleChange() and handleSubmit() functions to handle the interaction and submission of our form. Ideally, you can click on the Choose file button to select a video from your local filesystem, and the Upload video button to submit the selected video to our Next.js /transcribe API route for transcription.
Next, let’s set up the return statement of our index.js file to render the JSX form for choosing and uploading videos for transcription:
return (
<div>
  <Head>
    <title>Create Next App</title>
    <meta name="description" content="Generated by create next app" />
    <link rel="icon" href="/favicon.ico" />
  </Head>
  <header>
    <h1>
    Video transcription with Cloudinary
    </h1>
  </header>
  <main>
    <section>
      <form onSubmit={handleSubmit}>
        <label>
            <span>Choose your video file</span>
            <input type="file" onChange={handleChange} required />
        </label>
        <button type='submit'>Upload</button>
      </form>
    </section>
    <section id="video-output">
      {
        videoUrl?
        <div >
          <div>
            <video controls width={480}>
              <source src={`${videoUrl}.webm`} type='video/webm'/>
              <source src={`${videoUrl}.mp4`} type='video/mp4'/>
              <source src={`${videoUrl}.ogv`} type='video/ogg'/>
            </video>
          </div>
          <button
          onClick={() => {
          saveAs(videoUrl, "transcribed-video");
          setDownloaded(true)}}
          disabled={downloaded? true: false}>
            {downloaded? 'Downloaded': 'Download'}
          </button>
        </div> :
        <p>Please Upload a Video file to be Transcribed</p>
      }
    </section>
  </main>
</div>
)
Code language: JavaScript (javascript)
And with that, we should be able to upload and transcribe videos. As a bonus, I’ve added a couple more functionalities to allow you to download the transcribed video for local use. If you enjoyed this, be sure to come back for more as I look forward to all the things you’ll do with this feature.