
When we first started developing web apps with Ruby on Rails, some six years ago, we struggled with finding a good IDE. We settled for Eclipse with RadRails (still developing on PCs at that time…), but kept our eyes open for new and promising IDEs. At late 2007, a very surprising contender caught our eyes, it was called ‘Heroku’ and it offered an amazing concept – a fully featured IDE for Ruby-on-Rails that was completely online, available through your favorite browser.
In addition to collaborative online code editing, Heroku sought to revolutionize the way you deploy your Rails applications. Instead of messing around with a lengthy deployment process, heroku offered to deploy your Rails applications to the cloud in just a few clicks.
The huge benefits for the Rails community has drove Heroku to focus its whole attention at Cloud-based deployments, offering one of the most effective PaaS (Platform as a service) solutions at that time. Heroku soon extended their support to Node.js, Clojure, Java, Python, and Scala.
Two years later, Heroku added yet another disruptive feature to their platform – add-ons. With add-ons, any cloud service provider could integrate with Heroku, offering its service through the Heroku platform. New add-ons get listed on Heroku’s portal, and Heroku users can extend their existing applications with new cloud services in virtually one click.
When we started working on Cloudinary, we knew that we must develop a Cloudinary add-on for Heroku. Allowing web developers to integrate with our Cloud-based image management solution with just a single click was simply a too important opportunity to miss.
After a lengthy testing phase, we’re happy to report that the Cloudinary’s Heroku add-on is finally available to the general public!
To setup a Cloudinary account, simply select the plan that matches your needs from the list of plans. You can upgrade to plans with higher usage limits at any time.
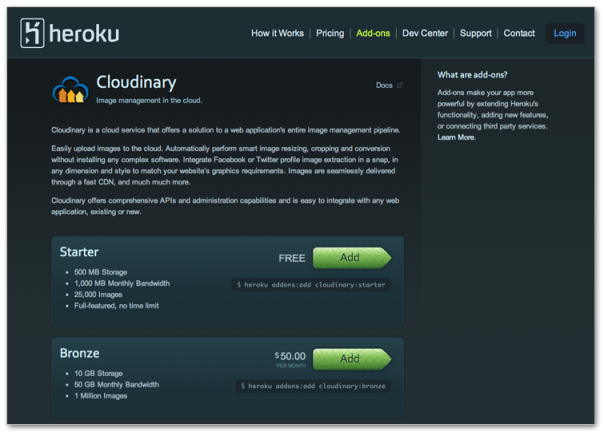
You can also do it from the command line. For example, the following line signs up to the Bronze plan:
heroku addons:add cloudinary:bronze
With Cloudinary’s client libraries for Ruby on Rails, Node.js and Python, integrating with Heroku is quite seamless. Heroku automatically defines the CLOUDINARY_URL environment variable in your deployed applications. This variable is processed by our client libraries for configuring your cloud name and access identifiers. Here is a sample CLOUDINARY_URL for example:
cloudinary://123456789012345:abcdeghijklmnopqrstuvwxyz12@n07t21i7
In addition, Cloudinary also offers straightforward URL-based APIs for simple integration with any web development platform out there.
Check out our Heroku documentation page for detailed usage instructions.
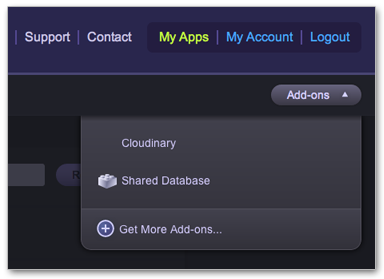
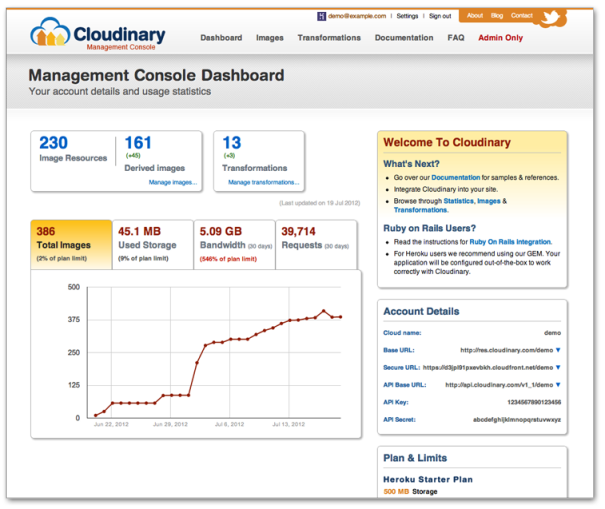
After you setup your Cloudinary add-on, make sure you check out our Management Console. Through the console you can browse all uploaded images and transformations, view usage statistics and charts, grab your access identifiers and modify your account settings. To reach your management console, just head to the Heroku portal, select your app, and select Cloudinary from the Add-ons drop-down menu on the top right corner.
Heroku users – why don’t you try out our new add-on? We would love to hear your feedback.