
I’m an instructional designer on Cloudinary’s Solutions and Training team. As the COVID-19 pandemic emerged in March, like other global organizations, we pivoted to set up virtual courses. As much as we looked forward to resuming in-person classes in the future, we switched gear to focus on the virtual way of learning.
At the beginning, we taught online through Zoom webinar, which quickly proved to be inadequate because students as a rule enjoy an active classroom in which they can not only hone their technical skills but also network with one another. Plus, the instructors desire to know the students and their background so as to fine-tune the in-class examples. What was direly missing from virtual training was a virtual ID badge.
So, we immediately embarked on building an app, dubbed the Student-ID App, leveraging the techniques and code from the Fundamentals for Developers course. This post describes the app’s components, configurations, and the like; also its benefits for the Customer Success team and a roadmap.
Read on for the details:
- Developing a Sample App
- Branching Out for Customer Success
- Transcribing to Vue.js
- Evaluating the App
- Moving On
- Scoping Out the Resources
The main purpose of the app is to show how upload presets and named transformations help deliver a webpage that contains the assets stored in a Cloudinary account.
An Upload preset is a named set of instructions, configured as signed or unsigned, that execute during an asset upload. You can call an unsigned preset from the browser without exposing secret credentials.
A named transformation, a set of abbreviated instructions for asset delivery, acts as a template you can apply to multiple assets to optimize delivery and raise aesthetic appeal.
A key goal is to keep this front-end app simple with no reliance on external servers for rendering, database, or authentication. It’s simply HTML, CSS, and Vanilla JavaScript in the browser communicating with Cloudinary’s APIs.
The picture below shows the app’s badge gallery: a group of students who have enrolled in a class along with their photos, names, organizations, titles, favorite background colors. All the data resides in Cloudinary with the photo’s public ID being the key and the other details stored as metadata.
 All photos are from pexels and associated data is fabricated.
The data (names, titles, organizations) is stored with the image and delivered through a named transformation that accesses the context metadata.
For ease of use, configuration is in the form of query strings, i.e.:
- Cloud name (
cn) - Course title (
title) - Course date (
date)
The demo page’s URL reads like this:
https://studentid.cloudinary.training/index.html?cn=<CLOUD_NAME>&title=<TITLE STRING>&date=<DATE STRING>
Before using the URL above, run two Node.js scripts in the code repo:
- Create an unsigned upload preset, which adds the metadata to the page, placing the data in a folder called
student-idand tagging itstudent-id. That folder enables the owner (instructor) to quickly locate the uploaded information in the Media Library. Cloudinary’slistAPI collects the images with the tag for display in the gallery. - Create a named transformation, which accepts the metadata saved with the image and which creates the badge.
Afterwards, create a student ID gallery with the URL.
As announced in the top banner, this configuration allows only one course per Cloudinary account. To ensure privacy, the app creates the account for the virtual class only and deletes it when the class is over—with no data collection whatsoever.
The top banner affirms to the participants that the data will not be saved. Also, an interface there enables them to delete the information or uploaded images through Cloudinary Support.

The form facilitates data entry. Once you’ve filled in all the fields, the Upload Image button is enabled. Clicking it opens the upload widget.
![]()
In the Fundamentals for Developers course, students learn the techniques for uploading assets by working through code. In particular, they instantiate and manage with JavaScript the upload widget, a highly configurable, responsive component. Optionally, students can add an upload preset to accept JPEG and PNG assets from various sources: the local file system, the web, Facebook profiles, and the device camera.

Faces are crucial for this app. Adding Cloudinary’s face-detection capability as an upload-preset instruction generates a report in the upload response on whether the image has a face. Also, you can delete any that’s not a face along with a reminder for the user to upload again.
In the upload request, you can ask Cloudinary for a delete token that’s valid for 10 minutes and store it locally. However, for such a short duration, it’s just as well to leave the token in memory. This is a front-end app so no cookies are involved.
Entering unique data is the only other requirement. If you enter a duplicate first name, last name, title, or organization name, the app displays a Toast warning.
A recent demo of the Student-ID App at Cloudinary’s weekly company caught the eye of a customer success manager (CSM), who asked to use it at an upcoming meetup with new customers. Because the CSM scenario required the gathering of names and titles for a large team at the beginning of a relationship, a couple of tweaks were necessary:
-
We removed the data-deletion step toward the end because the app was to be reused for new customers. That change involved a simple refactoring, whereby we replaced the hard-coded
student-idfor the folder and tag with abadgekey in the set of query strings. Thebadgevalue then became the folder and tag name for data storage and queries.Afterwards, a single account can hold many folders, one for each customer or customer meeting.
-
We removed the banner because the CSMs could manage the data themselves.
I like teaching in Vue.js. Once students have mastered coding in HTML, CSS, and JavaScript in separate files, it’s fun to show them how to write scoped code for all three languages in Vue.js— in a single file.
Right before the COVID pivot, I attended an in-person Vue.js conference with Cloudinary’s Evangelism team, after which Doron Sherman, our VP of evangelism, asked me, “Would you want to showcase the Student-ID App at a Vue.js conference?” I was intrigued but offered to calibrate the app first.
Fact is, the single JavaScript file for creating the app looked rather naive—just a bunch of listeners and functions that either passed around local data or accessed global data, resulting in confusing scoping. To be sure, the app’s simplicity was ideal for training, but it lacked organization and did not address a few issues that modern JavaScript frameworks might encounter.
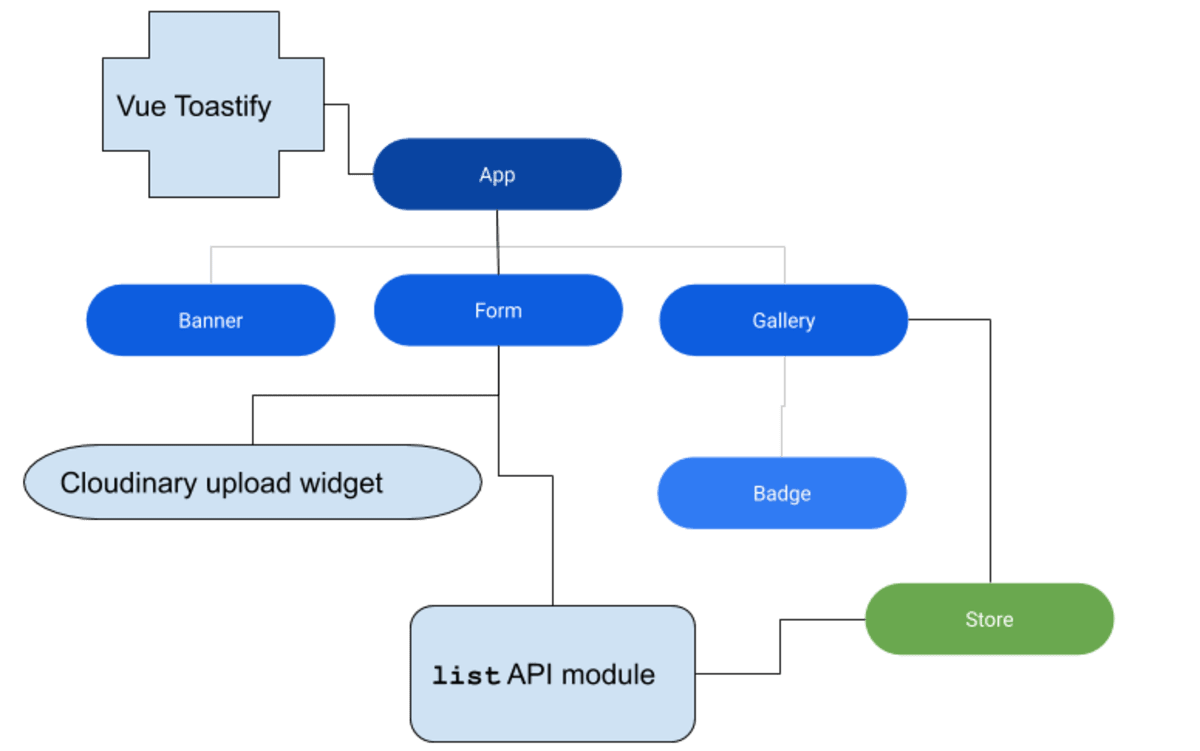
The tree diagram below shows four components:
- The Banner, which is self-explanatory.
- The Form, which pushes and splices data into the data store.
- The Gallery, which reads the reactive data store and updates the badges with information that reflects the state of the store.
- The App, which registers a Toastify plugin for generating toasts on the status and changes.
With the design as background, I’ll explain a few Cloudinary-specific coding requirements in the subsections below.
Cloudinary’s upload widget is styled in jQuery. To incorporate the code library for the widget, add a script tag to the project’s index.html file:
script
     src="https://widget.cloudinary.com/v2.0/global/all.js"
     type="text/javascript"
   ></script>
A callback function in the widget, which generates error and result objects, such as events that show the upload progress in percentages, is called repeatedly during upload. However, callback functions can be problematic in an otherwise modular function because they can block access to the this variable, which references the component within which the widget is rendered. That component defines the functions for processing the callback result, but the callback function cannot access the functions in the parent component by default.
Here’s the solution: the standard function() syntax makes the this reference to the widget; the arrow (=>) function syntax makes the this reference the global window object. The easiest way to implement component functionality inside the callback is to bind this to it. Here, you’re binding to the callback function a reference to the component itself:
 function(error, result) {
 	….
 }.bind(this)
Assigning the component reference with the bind function enables you access to all component and imported module functions, as well as the data.
The store defines an action that is called on a page load, fetching the student data with the list API, which gathers up all the assets with a tag named in the JSON file it returns. A list API call looks like this:
const dataURL = `https://res.cloudinary.com/${cloudname}/image/list/v${Date.now()}/student-id.json`
Certain processing must occur before this data can function as variables in the named transformation.
On a successful upload, the upload widget returns similar data, after which we push the data from the list API and splice the data from the form upload. All that is to maintain the default order (most recent first) of list and to place newly uploaded badges first in the gallery to minimize scrolling.
The list API module under src/util contains code that the URL encodes with the variable data that is supplied to the named transformation.
The list API also creates a JSON file on the content delivery network (CDN). Caching is useful if the data remains largely unchanged. To add new members to a list of students, however, you must refresh the JSON file by supplying a version with the epoch date. Hence this code in the URL for the page-load fetch call above:
v${Date.now()}
The Student-ID App is device responsive to accommodate that large segment of audience who prefers to interact with apps on their phones.
The input form appears inline on a desktop and renders a single line per input on a smaller device.

The form is in the CSS Flexbox layout, which adopts the mobile-first approach, assuming that only devices with a viewport greater than 800 pixels are served the desktop layout.
.form-inline {
 display: flex;
 flex-flow: row wrap;
 align-items: center;
}
.form-inline label {
 margin: 0;
 font-size: 0.8rem;

.form-inline input {
 vertical-align: middle;
 margin: 0;
 padding: .6rem;
 background-color: #fff;
 border: .3rem solid #ddd;
}
.form-inline button {
 padding: .6rem 1.2rem;
 background-color: #0e2f5a;
 border: 1px solid #ddd;
 color: white;
 cursor: pointer;
}
.form-inline button:disabled {
 background-color: gray;
 cursor: none;
}
.form-inline button:hover {
 background-color: royalblue;
}
@media only screen and (min-width: 800px) {
 .form-inline label {
   margin: .3rem;
 }
 .form-inline button {
   margin: 0 0 0 .3rem;
 }
 .form-inline button:disabled {
   background-color: gray;
   cursor:none;
 }
 .form-inline input {
   margin: .3rem 0;
 }
}
@media (max-width: 800px) {

 .form-inline {
   flex-direction: column;
   align-items: stretch;
 }
 .form-inline button {
   margin-top: .3rem;
 }
The gallery is a container in the CSS grid layout, allowing for separation and wrapping of the badges.
![]()
With the Min/Max option for grid-template-columns, you can specify the size of the images in the grid with a small phone’s width. The uploaded images are eagerly transformed to that size according to the instructions in the upload preset.
By way of explanation, eager transformations create derived images (or videos) during upload. Even though you can transform media, such as cropping them, on the fly, transforming them eagerly eliminates the wait time for the first derived transformation. Eager transformations are especially desirable for complex modifications or those of large assets like video—in effect, a best practice as part of any upload workflow.
.grid-container {
 display: grid;
 grid-template-columns: repeat(auto-fill, minmax(300px, 1fr));
 grid-gap: 1rem;
}
Instructional designers and educators like to refer to students in the same class or curriculum as cohorts, i.e., the community. The Student-ID App readily identifies community members, serving both as a badge for each individual and as an image of the community. We’ve just started to use the app in our courses. So far, participation has been excellent.
In essence, such an app defines use cases and answers many how questions, e.g.:
- How is the data input, uploaded, stored, and retrieved?
- How is the data displayed on a webpage?
- How do users interact with the app?
Since numerous students, many of whom are professionals, are interested in use cases for what they’ve learned, the app is intended as a project that students could fork and build on. Courses like ours often come with an expectation that the students will return to work armed with new technical skills. This app can be a starting point for students to build their own app with Cloudinary’s tools, techniques, and coding practices.
Following are a few ways you can capitalize on the Student-ID App.
This app was developed in three major steps:
- Vanilla JavaScript with one app per cloud
- Vanilla JavaScript with multiple apps per cloud
- Vue.js with one app per cloud
To learn the ins and outs, create a new project that builds on it. Next, consolidate the code or rewrite it in React, Angular, Ruby, PHP, Dotnet, Node.js, Java, Android, iOS, whatever you prefer. In fact, if you leave the browser, you can learn from and take advantage of the many capabilities offered by the Cloudinary SDKs.
Someone raised a feature request for an easier step to delete a badge, e.g., an OOP button that’s more forgiving than one that leads to an email to tech support. Well, the upload requests contain a delete token in the front end token that’s valid for 10 minutes, which you could use to delete a just-uploaded asset. Currently, the token deletes nonfacial images only, but you could make a button available after an upload that would delete the uploaded image on a click.
Students and professionals of media development alike who’re keen on implementing a front end for Cloudinary’s assets would find the code shared here useful. For further reference, have a look at the self-service and virtual training courses in the Cloudinary Academy. Our documentation and Support team can also answer questions that might arise.
Above all, check out Cloudinary’s robust APIs. You’ll be happily surprised at how many nifty features you can build with them with only minimal code.